Table of Contents
Advertisement
RECUMBENT MAGNETIC BIKE
Owner's Manual
CP-375R
UPC: 62248859703-4
IMPORTANT !
Please read all instructions in this manual carefully before using this product.
Retain this manual for future reference.
The specifications of this product may vary slightly from the illustrations and are subject to change without
notice.
Advertisement
Table of Contents

Subscribe to Our Youtube Channel
Related Manuals for Healthware Fit CP-375R


Summary of Contents for Healthware Fit CP-375R
- Page 1 RECUMBENT MAGNETIC BIKE Owner’s Manual CP-375R UPC: 62248859703-4 IMPORTANT ! Please read all instructions in this manual carefully before using this product. Retain this manual for future reference. The specifications of this product may vary slightly from the illustrations and are subject to change without...
- Page 2 1 YEAR WARRANTY This product is warranted for one year on parts from the date of original purchase at retail. This warranty: a) is conditional on the product being set-up, installed and used as directed in the instruction manual; b) does NOT cover damage, malfunction or failure which, in Club Piscine’s sole opinion, is the result of normal wear and tear, accident, misuse, abuse, neglect, negligence, abnormal •...
-
Page 3: Important Safety Information
Important Safety Information This Healthware exercise equipment is built for optimum safety. However, certain precautions apply whenever you operate a piece of exercise equipment. Be sure to read the entire manual before you assemble or operate your machine. In particular, note the following safety precautions: 1. -
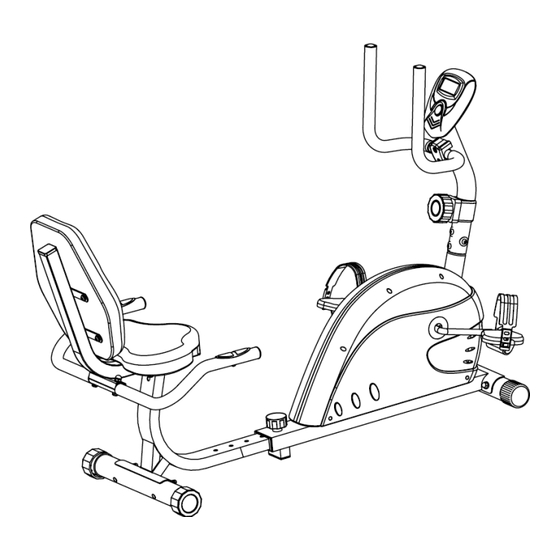
Page 4: Exploded Diagram
Exploded Diagram... -
Page 5: Parts List
Parts List Part Part Description Description Front main frame Pulse wire Rear main frame Bushing Front bottom tube Pulse wire Back bottom tube Handlebar wire handlebar Handlebar foam Seat frame End cap Handlebar post Bolt Tension control end Flat washer Screw Screw Backrest... -
Page 6: Assembly Instructions
have been preinstalled in the identified assembly parts. In these instances, simply remove and reinstall the hardware as assembly is required. Please reference the individual assembly steps and make note of all preinstalled hardware. Assembly Instructions Prior to assembly of this product, remove all components from the package and verify all the listed parts are supplied. -
Page 7: Handlebar Wire
Step 3: Attach the Seat (11) and the Backrest (10) to the Seat Frame (6) using the Screw (30) and Flat Washer (29) as shown. Step 4: Attach the Seat Frame (6) to the Rear Main Frame (2) using the Screw (30) and Flat Washer (29) as shown. Step 5: Connect the Handlebar Wire (25) and Pulse Wire (24). -
Page 8: Screw
Step 6: Attach the Left and Right Pedals (13L/13R) to Crank (14). Note: Tighten the Left Pedal (13L) counterclockwise, and tighten Right Pedal (13R) clockwise. Step 7: First, insert the Tension Wire (33) into the Handlebar Post (7). Attach the Tension Control (37) to the Handlebar Post (7) using the Tension Control End Cap (8), Flat Washer (32) and the Screw (9). -
Page 9: Spring Washer
Step 8: Using the Screw (41) and Spring Washer (40), attach the Handlebar (38) to the Handlebar Post (7), and place the Handle Clamp (42) to the Handlebar (5) as shown. Step 9: Connect the Pulse Wires (35) (43) to the Computer (12), then attach the Computer (12) to the plate in the Handlebar Post (7) using the Flat Washer (29) and Screws (36) as shown. -
Page 10: Maintenance And Treatment
BUTTON: 1. MODE: Press to select all functions in sequence. Hold the button for 2 seconds to total reset all function values. 2. SET: Press to set function value. 3. RESET: Press to reset function value and back to last setting stage. Hold the button for 2 seconds to reset all function values and clear all functions. -
Page 11: Warm Up Exercises
1. Floor is not flat or there is 1. Remove the object. small object under the front Base is unstable or rear stabilizer. 2. The rear stabilizer end caps 2. Adjust the rear stabilizer end have not been leveled when caps. - Page 12 Hamstring Stretch Sit with your right leg extended. Rest the sole of your left foot against your right inner thigh. Stretch toward your toe as far as possible. Hold for 15 counts. Relax and then repeat with left leg extended. Head Roll Rotate your head to the right for one count, feeling the stretch up the left side of your neck.
- Page 13 Side Stretch Open your arms to the side and continue lifting them until they are over your head. Reach your right arm as far upward toward the ceiling as you can for one count. Feel the stretch up your right side. Repeat this action with your left arm.
Need help?
Do you have a question about the CP-375R and is the answer not in the manual?
Questions and answers