Table of Contents
Advertisement
Quick Links
17 - REMOTE CONTROL OPERATION INSTRUCTIONS
A. REMOTE ICON IDENTIFICATION
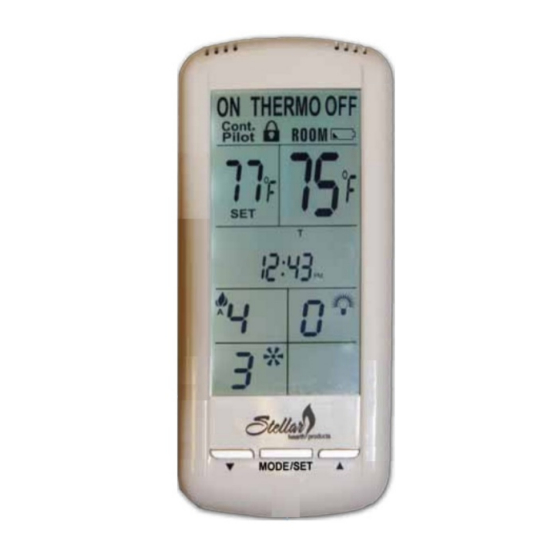
Remote:
Skytech Premium Transmitter Model AF-4000TSS02 comes standard with the fireplace.
Touch Screen LCD
Takes four (4) AAA batteries (included)
SET TEMP Zone
DOWN Button
Figure 17A
B. REMOTE CONTROL INFORMATION
IMPORTANT ELECTRICAL WARNING AND INFORMATION
Electrical wiring must be installed by a licensed electrician.
•
Do NOT wire 110V to wall switch.
•
Uninterrupted or continuous power is required at all times in IPI systems EXCEPT when using battery back-up.
•
Incorrect wiring will override IPI safety lockout and may cause an explosion.
•
Disconnect 110V before servicing
A double receptacle box cover and (3) wire nuts are supplied in fireplace components packet to be used when hardwiring to electrical box
located under firebox on right side of fireplace.
IMPORTANT ELECTRICAL WARNING AND INFORMATION
THIS SYSTEM GOES THROUGH A CALIBRATION MODE WHEN SWITCHING FROM 'ON' TO 'THERMO' TO 'OFF' MODES, CREATING A
HUMMING SOUND WHICH IS A NORMAL PART OF OPERATION.
FLAME Zone
FAN Zone
MODE/SET Button
MODE Zone
ROOM TEMP Zone
TIME/PROG Zone
LIGHT Zone
AUX Zone (not used)
UP Button
Page 1
Advertisement
Table of Contents

Related Manuals for Skytech AF-4000TSS02


Summary of Contents for Skytech AF-4000TSS02
- Page 1 17 - REMOTE CONTROL OPERATION INSTRUCTIONS A. REMOTE ICON IDENTIFICATION Remote: Skytech Premium Transmitter Model AF-4000TSS02 comes standard with the fireplace. Touch Screen LCD Takes four (4) AAA batteries (included) MODE Zone SET TEMP Zone ROOM TEMP Zone TIME/PROG Zone...
- Page 2 17 - REMOTE CONTROL OPERATION C. CONTINOUS PILOT - FOR VERY COLD CONDITIONS The IPI gas control system has the option of a continuous (standing) pilot feature. This allows you to change from a spark-to-pilot system to a stand- ing pilot system during cold weather conditions. By having the pilot on continuously, the firebox will remain warm and a draft is established in the vent, allowing the main burner to turn on with less air-flow disruption.
- Page 3 17 - REMOTE CONTROL OPERATION F. INTITAL SET-UP Plug Extension Module and AC Adaptor into receptacles. Install (4) AA batteries into battery compartment of Backup Battery Pack , making sure batteries are installed in proper direction. Position between valve and front of stove. A Velcro strip has been attached to help secure in place. The Hand Held Remote operates on (4) AAA batteries. We recommend always using ALKALINE batteries to extend battery life and improve operational performance. G. GAS TYPE CONVERSION Press and hold Learn Button on Main Control Module for 20 seconds. A beep will be heard letting you know the procedure has been completed. If converting from NAT to LP gas: (1) one second long beep •...
- Page 4 17 - REMOTE RECEIVER INFORMATION L. MANUAL MODE This remote can be manually or thermostatically operated. Press MODE/SET button for manual ON. The flame icon will appear on the LCD screen. Press MODE/SET button again to put the control into THERMO mode. Pressing MODE/SET again will turn fireplace OFF. IMPORTANT NOTE The MODE/SET button operates in a series that will cycle from ON to THERMO to OFF. Figure 17L M.
- Page 5 17 - REMOTE RECEIVER INFORMATION O. FLAME MODE This remote will operate the flame, allowing for (6) different flame height levels. Press the MODE/SET button. The FLAME icon will appear on the LCD screen. Press the FLAME icon on then screen, then ress UP or DOWN buttons to select desired flame level. Press the MODE/SET button to set or wait 15 seconds and the control will automatically accept the new setting, exit function setting mode and LCD display will return to normal view. Figure 17O IMPORTANT NOTE The fireplace will initially light at the highest level. After 5 seconds the flame will adjust to last chosen level before fireplace was turned OFF.
- Page 6 17 - REMOTE RECEIVER INFORMATION Q. SET THE DAY AND TIME DISPLAY The current day of the week and time of day will be continuously displayed in the TIME/PROG Zone (except during SET UP operations). The day of the week will be displayed as one of the following: S, M, T, W, T, F, S. The Time of day will be in 12-hour AM, 12-hour PM format with midnight being displayed as 12:00am. DAY - Press and hold the MODE Zone or the MODE/SET button for 5 seconds. Press the UP or DOWN buttons to adjust to the desired day of the week. Press the MODE/SET button to set or wait 15 seconds and the control will automatically accept the day, then enter the hour of day adjustment. HOUR: Press the UP or DOWN buttons to adjust the hour of the day. The time will advance in 1-hour increments; AM and PM will change when the hour Figure 17Q advances to 12:00 midnight and 12:00 noon respectively. Once the desired time of day is displayed, press the MODE/SET button to set or wait for 15 seconds and the control will automatically accept the hour, then enter minute of hour adjustment.
Need help?
Do you have a question about the AF-4000TSS02 and is the answer not in the manual?
Questions and answers