Table of Contents
Advertisement
Quick Links
Advertisement
Table of Contents

Related Manuals for InFocus IN810


Summary of Contents for InFocus IN810
- Page 1 User Guide IN810...
-
Page 2: Table Of Contents
Table of Contents Chapter 1: Getting Started..............1 1.1 Your Device....................1 Front ........................1 Back ........................1 1.2 Accessories ....................2 1.3 Installing SIM Card, Memory Card, and Battery ........2 Remove the back cover ..................2 Install the SIM card ....................2 Install the memory card .................. - Page 3 Chapter 4: People................27 4.1 Adding Contacts..................27 4.2 Importing Contacts ................... 28 4.3 Backing up Contacts................. 28 4.4 Communicating with Contacts..............29 Call Contacts ....................... 29 Text Contacts....................... 29 Email Contacts..................... 29 4.5 Managing Contacts ................... 30 Edit Contacts ....................... 30 Delete Contacts ....................
- Page 4 Read and Reply to Emails ................... 50 Manage Emails ....................51 Configure Gmail Settings ..................51 Chapter 7: Using Internet ..............53 7.1 Connecting to Internet ................53 Wi-Fi ........................53 Cellular Data Network ..................56 7.2 Browsing a Web Page................57 Manage Web Page ....................
- Page 5 Chapter 12: Programs................. 90 12.1 Browser ....................90 12.2 Calculator....................90 12.3 CamCard ....................90 12.4 CamDictionary ..................90 12.5 Camera ..................... 91 12.6 Clock......................91 12.7 DeviceFinder.................... 91 12.8 Downloads ....................91 12.9 Date and Time Settings................92 12.10 Email....................... 92 12.11 Facebook....................
- Page 6 13.4 Accounts Settings................. 111 Dropbox ......................111 Email........................111 ™ Google ......................111 Add Account ...................... 111 13.5 System Settings ..................112 Motion ........................ 112 Date & Time ....................... 112 Accessibility ....................... 113 About Phone ...................... 114 Chapter 14: Specifications ............... 115 Chapter 15: Troubleshooting ............
-
Page 7: Chapter 1: Getting Started
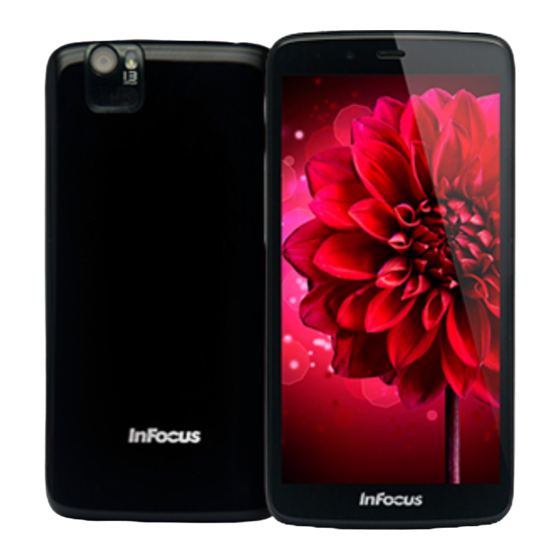
Chapter 1: Getting Started Chapter 1: Getting Started 1.1 Your Device Front Microphone Headset jack Status LED Earpiece Front camera Touch screen Back Flash Rear camera Speaker Power button Volume (+/-) button USB port Microphone... -
Page 8: Accessories
Your package comes with the following items. If any of them is missing, please contact your retailer. Smartphone AC adapter USB cable User Guide IN810 User Guide Headset Battery NOTE: The included AC adapter varies depending on region. 1.3 Installing SIM Card, Memory Card,... -
Page 9: Install The Memory Card
Chapter 1: Getting Started Install the memory card Insert the memory card with the gold contacts facing down. Install the battery 1. Insert the battery. 2. Make sure the contacts of the battery are aligned with the connectors on the battery slot. To remove the battery Use your fingertip to lift the battery and remove it from the slot. -
Page 10: Charging The Battery
Chapter 1: Getting Started 1.4 Charging the Battery Before using your device for the first time, fully charge the battery. Charge the battery 1. Connect the USB cable to the USB port of the device. 2. Connect the other end of the USB cable to the AC adapter. -
Page 11: Turning The Device On Or Off
Chapter 1: Getting Started 1.5 Turning the Device On or Off After installing the SIM card and charging the battery, the device is ready to be turned Turn Device On or Off Turn on the device Press and hold the Power button until the device turns on. Turn off the device 1. -
Page 12: Locking And Unlocking The Screen
Chapter 1: Getting Started 1.6 Locking and Unlocking the Screen Lock the screen to prevent it from accidentally being touched. By default, the screen locks after being idle for a period of time (see “Sleep” on page 105). Lock the screen To manually lock the screen and turn off the display, press the Power button. - Page 13 Chapter 1: Getting Started NOTE: To use the Email ( ), Phone ( ), or Messaging ( ) function directly, drag the lock icon ( ) upwards, then drag it to the respective icon.
-
Page 14: Creating A Google Account
Chapter 1: Getting Started 1.7 Creating a Google Account 1. Tap > Settings. 2. In ACCOUNTS, tap Add account. 3. Tap Google to create a Google account. 4. Tap New to create a new account. 5. Enter your name and tap... - Page 15 Chapter 1: Getting Started 6. Enter the account name and tap The system will automatically check the availability of the account name. 7. Create your password and tap...
- Page 16 Chapter 1: Getting Started 8. Set the recovery information (i.e. alternative email account and security question) and tap 9. Tap Join Google+ if you want to join Google+ or Not now if you want to skip this step. 10. Read the agreement and tap to complete the account setup.
- Page 17 Chapter 1: Getting Started 11. Enter the authentication text as shown on the screen. 12. Tap Set up credit card and enter your credit card information to enable purchases on Google Play Store, and then tap Save. Or, tap Not Now to skip this step.
-
Page 18: Using The Headset
Chapter 1: Getting Started 13. To use your Google account to back up your applications, setting, and other data, check Keep this phone backed with my Google Account and 1.8 Using the Headset For hands-free conversation or listening to music, plug a headset to the headset jack. NOTE: •... -
Page 19: Adjusting The Volume
Chapter 1: Getting Started 1.9 Adjusting the Volume There are two ways to adjust the volume: • Press the volume (+/-) button repeatedly to adjust the volume. • Press the volume button once. Drag the volume slider to adjust the volume. -
Page 20: Chapter 2: The Basics
Chapter 2: The Basics Chapter 2: The Basics 2.1 Home Screen From the Home screen, you can quickly access common features and view notifications of missed calls, received messages, check battery, and connection status. Status bar • Displays status and notification icons and clock. -
Page 21: Status Bar
Chapter 2: The Basics Status Bar Status bar icons indicate different types of information. The icons on the status bar indicate the following information: Network icon Missed call icon Battery icon Current time Battery power Wi-Fi icon level Icon Description Icon Description Battery is full. -
Page 22: Notifications Panel
Chapter 2: The Basics Notifications Panel The notifications panel displays the device activities, details of status or other notifications. Open the notifications panel Tap and slide the status bar downwards. To open related applications, touch a notification. Close the notifications panel •... -
Page 23: View Recently-Used Applications
Chapter 2: The Basics View Recently-Used Applications . The recently-used applications are displayed. Shortcut Icons Add a shortcut icon 1. From the Home screen, tap 2. Tap APPS tab to display the applications. 3. To add an item, drag the application icon to the specific Home screen. -
Page 24: Widgets
Chapter 2: The Basics Remove a shortcut icon 1. Tap and hold a shortcut icon. 2. Drag the shortcut icon to X Remove to delete. The application icon is removed from the Home screen. Widgets Live updates right on the Home screen and get all your personalized updates in one place. -
Page 25: Change Wallpaper
Chapter 2: The Basics Change Wallpaper You can customize the wallpaper of your Home screen with a default wallpaper or with pictures taken with the device. Set wallpaper from Gallery You can use pictures taken by the phone camera or pictures stored on the internal memory as the wallpaper. - Page 26 Chapter 2: The Basics Set wallpaper from Live Wallpaper gallery 1. From the Home screen, tap and hold the screen. 2. Tap 3. Tap Wallpaper > Live Wallpapers. 4. Tap to browse the desired live wallpaper. 5. Tap Set wallpaper to set the desired live wallpaper as the Home screen wallpaper.
-
Page 27: Chapter 3: Using On-Screen Keyboard
Chapter 3: Using On-screen Keyboard Chapter 3: Using On-screen Keyboard 3.1 On-Screen Keyboard On-screen keyboard appears when an application requires text input, such as messaging, and writing emails. The keyboard input method is activated by default. Tap to configure the keyboard settings. -
Page 28: Use The On-Screen Keyboard
Chapter 3: Using On-screen Keyboard 3.1.1 Use the On-Screen Keyboard Tap the screen to display the on-screen keyboard. Lower case keyboard Upper case keyboard Numbers and symbols • Use the on-screen keyboard as you would a computer keyboard. • Tap the keys to enter characters. •... -
Page 29: Switch Input Method
Chapter 3: Using On-screen Keyboard 3.1.4 Switch Input Method 1. Tap and hold the language button (i.e. [En]), an input method dialog box appears on the screen. 2. Select the desired input method that you want to use. 3.1.5 English Input •... - Page 30 Chapter 3: Using On-screen Keyboard • Upper case Input To toggle between upper and lower case letter display, tap In this mode, only the first letter is in upper case format. Then the keyboard will automatically switch to lower case display. To lock the upper case input mode, tap •...
- Page 31 Chapter 3: Using On-screen Keyboard • Advanced Prediction With this function, the system learns from input context (the words you have typed) to improve prediction quality. For example, if you have inputted “hi”, then input “me”. The next time you input "hi", "me”...
-
Page 32: Voice Input Method
Chapter 3: Using On-screen Keyboard 3.1.6 Voice Input Method You can input words without clicking the character key by using the voice input function. TouchPal supports voice input in Android 2.2 platform devices and above. To use the voice input function, tap on the main keyboard. -
Page 33: Chapter 4: People
Chapter 4: People Chapter 4: People People is your phonebook that lets you store names, phone numbers, email addresses and other information. You can also add the frequently used contacts to the favorites list. See “Favorite Contacts” on page 31. 4.1 Adding Contacts 1. -
Page 34: Importing Contacts
Chapter 4: People 4.2 Importing Contacts You can copy contacts from the SIM card or internal storage. 1. Tap > People. 2. Tap > Import/export and do one of the following: • To import contacts from the SIM card: Tap Import from SIM card > specify location to store data >... -
Page 35: Communicating With Contacts
Chapter 4: People 4.4 Communicating with Contacts Call Contacts NOTE: The available call options vary depending on the phone number(s) saved for a specific contact. 1. Tap > People. 2. Tap a contact. 3. Tap the phone number to call the contact. See “Making a Call”... -
Page 36: Managing Contacts
Chapter 4: People 4.5 Managing Contacts Edit Contacts 1. Tap > People. 2. Tap the contact that you want to modify. 3. Tap > Edit. 4. Modify the necessary information. 5. Tap to save changes. Delete Contacts 1. Tap > People. 2. -
Page 37: Assign Notification Ringtone
Chapter 4: People Assign Notification Ringtone 1. Tap > People. 2. Tap a contact that you want to assign a ringtone to. 3. Tap > Set message alert. 4. Tap desired ringtone for the new notification. 5. Tap OK. Block Contact Telephone Number 1. -
Page 38: Remove From Favorites
Chapter 4: People Remove from Favorites 1. Tap > People. 2. Tap the contact that you want to remove. 3. Tap The contact is removed from the FAVORITES list. 4.7 Searching for Contacts On the Contacts screen, do any of the following to easily search for contacts: •... -
Page 39: Chapter 5: Using The Phone
Chapter 5: Using the Phone Chapter 5: Using the Phone To open the Phone screen, tap > Phone. Phone tab Tap to erase a wrong number. Tap to hide the on-screen Tap to set up a keypad. conference call. Tap to configure the Phone settings. - Page 40 Chapter 5: Using the Phone Make a call from Contacts 1. Tap > Phone, then tap the People tab. 2. Tap the desired contact phone number to make a call. 3. To end the call, tap Make a call using Voice Dialer 1.
-
Page 41: Answering A Call
Chapter 5: Using the Phone 5.2 Answering a call When an incoming call is received, the device may ring or vibrate and the screen displays an incoming call message. If the caller is listed in your Contacts, the contact’s name appears. You may also see the caller’s phone number, if available. -
Page 42: In-Call Options
Chapter 5: Using the Phone 5.4 In-Call Options • To display the on-screen keypad, tap • To activate or deactivate the Speakerphone, tap • To put the call on hold, tap • To set up a conference call, tap and enter the second phone number. -
Page 43: Chapter 6: Email & Messaging
Chapter 6: Email & Messaging Chapter 6: Email & Messaging Use Messaging to send and receive text and multimedia messages. Use Email to send and receive email messages using your internet email accounts. 6.1 Text Message A text message can only contain letters, numbers, and symbols. 6.1.1 Create and Send Text Messages 1. - Page 44 Chapter 6: Email & Messaging • Delete a message thread 1. Tap > Messaging. 2. Tap a message thread to open it. 3. Tap > Delete messages > select the message that you want to delete > Delete. 4. Tap Delete to confirm. •...
-
Page 45: Multimedia Message
Chapter 6: Email & Messaging 6.2 Multimedia Message A multimedia message or MMS can contain letters, images, an audio or video file. 6.2.1 Create and Send MMS Messages 1. Tap > Messaging. 2. Tap 3. In the To field, enter the recipient’s phone number or email address. TIP: To add recipients from Contacts, tap and select the contact(s). -
Page 46: Voice Message
Chapter 6: Email & Messaging 6.3 Voice Message The device supports sending of voice messages. Create a voice message 1. Tap > Messaging. 2. Tap 3. Tap > Record audio. 4. Tap to record your message. 5. Tap to stop recording. 6. -
Page 47: Customizing Message Settings
Chapter 6: Email & Messaging 6.4 Customizing Message Settings 1. Tap > Messaging. 2. Tap > Settings. The following message settings are available: • STORAGE: Use this setting to enable Delete old messages, set Text message limit, and Multimedia message limit. •... -
Page 48: Email Accounts
Chapter 6: Email & Messaging 6.5 Email Accounts The device can send and receive emails just as you do with a computer. It supports Internet emails, email accounts that are provided by an Internet Service Provider (ISP) or web-based emails, such as Gmail, Hotmail, Yahoo! Mail, etc. 6.5.1 Set Up Email Account 1. -
Page 49: Add More Email Accounts
Chapter 6: Email & Messaging 6. Set the Inbox checking frequency settings and tap Next. 7. Enter Name and Account display name. NOTE: The Account display name is the name shown on the Home screen and the Email screen. 8. Tap Next. Once the account setup is complete, the device will automatically retrieve your emails. -
Page 50: Delete Email Accounts
Chapter 6: Email & Messaging 6.5.4 Delete Email Accounts 1. Tap > Email. 2. Tap > Settings. 3. Tap the account to delete. 4. Scroll to the bottom of the page, and tap Remove account. 5. Tap OK to confirm. -
Page 51: Using Email
Chapter 6: Email & Messaging 6.6 Using Email 6.6.1 Compose and Send Emails 1. Tap > Email. 2. Tap 3. In the To field, enter the recipient’s email address. 4. Tap Subject then type a subject. 5. Compose your email. 6. -
Page 52: Read And Reply To Emails
Chapter 6: Email & Messaging 6.6.3 Read and Reply to Emails The Inbox displays the email headers. Open the email to view the complete content. • Download attachments 1. Tap > Email. 2. On the Inbox screen, tap an email to open it. 3. -
Page 53: Manage Email Folders
Chapter 6: Email & Messaging 6.6.4 Manage Email Folders • Delete emails 1. Tap > Email, then tap an email account. 2. On the Inbox screen, open the message that you want to delete. 3. Tap to delete the message. •... -
Page 54: Customize Email Settings
Chapter 6: Email & Messaging 6.6.5 Customize Email Settings You can configure the settings of your email account such as account name, email checking frequency, default account, notifications, and server settings. • Set up your account name 1. Tap > Email > >... -
Page 55: Gmail
Chapter 6: Email & Messaging 6.7 Gmail ™ Gmail is the email service provided by Google. 6.7.1 Sign in to Gmail 1. Tap > Gmail. 2. Follow the on-screen instructions to login or create your Gmail account. 3. Once logged in, you can begin reading and sending emails from your Gmail account. -
Page 56: Create And Send Emails
Chapter 6: Email & Messaging 6.7.3 Create and Send Emails 1. Tap > Gmail. 2. Tap 3. In the To field, enter the recipient’s email address. 4. Enter a Subject. 5. Compose your email. 6. If necessary, do any of the following: •... -
Page 57: Manage Emails
Chapter 6: Email & Messaging 6.7.5 Manage Emails • Delete emails 1. Tap > Gmail. 2. Select the email that you want to delete, then tap • Mark emails as unread 1. Tap > Gmail. 2. Select the email, then tap •... - Page 58 Chapter 6: Email & Messaging • Inbox type: Select to specify the Inbox type for this account. • Notifications: Displays a notification icon on the status bar when an email is received. • Inbox sound & vibrate: Select email notification ringtone, enable the device to vibrate when an email is received, and change sync preferences for Inbox.
-
Page 59: Chapter 7: Using Internet
Chapter 7: Using Internet Chapter 7: Using Internet 7.1 Connecting to Internet The device connects to Internet via: • Wi-Fi • Cellular Data Networks Wi-Fi Turn Wi-Fi on 1. Tap > Settings. 2. In WIRELESS & NETWORKS, tap Wi-Fi and set it to Connect to a Wi-Fi network 1. - Page 60 Chapter 7: Using Internet Add Wi-Fi network 1. Tap > Settings. 2. Tap Wi-Fi and set it to ON. 3. In Wi-Fi networks, tap . A new window is displayed. 4. Follow the on-screen instructions and enter the necessary information, then tap Save to save the settings.
- Page 61 Chapter 7: Using Internet Connect to Wi-Fi by WPS Pin Your device supports W-Fi connection by entering the PIN displayed on your phone to a WLAN router to establish Wi-Fi connection. 1. Tap > Settings. 2. Tap Wi-Fi and set it to ON. 3.
-
Page 62: Cellular Data Network
Chapter 7: Using Internet Advanced Wi-Fi settings 1. Tap > Settings. 2. Tap Wi-Fi and set it to ON. 3. In Wi-Fi networks, tap > Advanced to access and set up more advanced options. NOTE: If both Wi-Fi and data connection (3G) are enabled, the device uses Wi-Fi connection to retrieve your emails, browse web pages, and synchronize other information. -
Page 63: Browsing A Web Page
Chapter 7: Using Internet 7.2 Browsing a Web Page 1. Tap > Browser. 2. Tap the address bar. 3. Type the URL then tap Go. Tap to display active web pages in Address bar windows. Viewing the page • To scroll the page, swipe your finger up or down. •... - Page 64 Chapter 7: Using Internet Menu Description Save to bookmarks Save favorite web pages. Share page Send this web page via one of the sharing applications. Find on page Find the text on the web page. Request desktop Open the current web page in desktop viewing mode. site Save for offline Save the current web page to be available even when the data...
-
Page 65: Using Google Search
Chapter 7: Using Internet 7.3 Using Google Search ™ Use Google Search to search for items on the Internet right on your home screen. 1. To use Google Search, drag the bottom panel up and release when the Google Search icon appears on your home screen. -
Page 66: Search By Voice
Chapter 7: Using Internet Search by Voice 1. On the Google Search bar, tap TIP: An alternative way to launch Voice Search from your home screen, tap Voice Search. 2. Say what you want to search. 3. When you are finished speaking, Google Voice Search analyzes your speech and displays the results of your search. -
Page 67: Dropbox
Chapter 7: Using Internet 7.4 Dropbox Dropbox lets you to store files in the Dropbox cloud server and synchronize your account with your phone. You can then access and share files and folders across multiple computer and mobile devices. 7.4.1 Create an Account 1. - Page 68 Chapter 7: Using Internet 4. Enter your name, e-mail address, and password. Then tap Register for Dropbox to continue. 5. Tap View Terms to read the agreement, and then tap I Agree to complete the account setup.
- Page 69 Chapter 7: Using Internet 6. Tap Next to continue with camera uploading settings. 7. Select the upload method. 8. Check Upload existing photos and videos to upload the photos and videos on your phone to Dropbox. 9. Tap Turn on to start uploading your existing photos and videos to Dropbox.
-
Page 70: Manage Files And Folders
Chapter 7: Using Internet 7.4.2 Manage Files and Folders Tap to view synced Tap to view your favorite photos and videos. photos, videos, and other files. Tap to view your Dropbox account directory. Tap to search for a file or folder. •... -
Page 71: Upload Files To Dropbox
Chapter 7: Using Internet • Export Files You can export files to the memory card of your phone or send it to another device via Bluetooth, Email or Gmail. 1. Tap > More > Export. 2. Then tap where you want to export the file. •... -
Page 72: Google Maps
Chapter 7: Using Internet 7.5 Google Maps ™ Use Google Maps to find places, view traffic and direction information, and find your friends’ location. NOTE: The Google Maps application is not available in every country or city. Before starting Maps, do the following: 1. -
Page 73: Using Turn-By-Turn Navigation
Chapter 7: Using Internet 7.6 Using Turn-By-Turn Navigation NOTE: • This application is not available in all countries. • Before using this application, the GPS satellites option in Settings > Location access needs to be enabled. 1. Tap > Navigation. 2. - Page 74 Chapter 7: Using Internet 1. Tap > YouTube. 2. Scroll through the list of videos, and then tap a video to start playback. 3. Scroll through the results and tap a video to start playback. TIP: You also have the option to view results of recently posted videos. Tap All time, and then select one of the available options.
-
Page 75: Chapter 8: Using Bluetooth
NOTE: When the Bluetooth is turned on, your device detects other Bluetooth devices, but your device is not visible to others. 3. To make your phone visible to others, tap IN810 to make this device visible to other devices. 8.1 Connecting to Bluetooth Devices A connection to a Bluetooth device is called a partnership. -
Page 76: Transferring Files To Bluetooth Devices
Chapter 8: Using Bluetooth 8.2 Transferring Files to Bluetooth Devices This device supports Bluetooth File Transfer. With this function, it allows your phone and the other Bluetooth-enabled device to exchange files. To send an image or a video between two smartphones, do the following: 1. -
Page 77: Receiving Files To Bluetooth Devices
Chapter 8: Using Bluetooth 8.3 Receiving Files to Bluetooth Devices When a new file is received from another device, an “Bluetooth share: Incoming file” message is displayed on the Notification panel. To accept the file, tap the notification bar and then tap Accept. -
Page 78: Chapter 9: Connectivity
If the connection is successful, the computer will recognize your phone and show that it is available to be accessed. In the PC file manager, there will be a folder named IN810 where you can access the data stored in your phone memory or the internal storage in your phone. Then you can manage or transfer the files to your computer. -
Page 79: List Of Software
Chapter 9: Connectivity List of Software Mobile PC OS version Software to be installed to PC Mobile phone OS phone USB version driver 4.0.4 Windows 7 32bit/64 bit No need Supported Windows Vista 32bit/64 No need Supported 4.0.4 4.0.4 Windows XP 32bit SP3 Install Windows Media Player 11 Supported Windows XP 32bit... -
Page 80: Driver Installation
Chapter 9: Connectivity Driver Installation 1. Turn on your device, and connect it to your computer using the USB cable. 2. From the Windows desktop, double click on My Computer and locate the CD drive. 3. Browse and double click setup.exe. 4. -
Page 81: Factory Data Reset
Chapter 9: Connectivity 9.2 Factory Data Reset You can reset your phone to its factory defaults. 1. Tap > Settings. 2. In PERSONAL, tap Backup & reset. 3. Tap Factory data reset. 4. Tap Reset phone to reset. The factory data reset may take about 3 minutes. All data stored in the phone memory will be erased. -
Page 82: Ota Software Update
Chapter 9: Connectivity 9.3 OTA Software Update NOTE: OTA requires Wi-Fi or 3G connection, however Wi-Fi connection is strongly recommended due to the file size. 1. Tap > Settings. 2. In SYSTEM, tap About phone > Software update. 3. Tap Wi-Fi only to only download updates when Wi-Fi is connected. - Page 83 Chapter 9: Connectivity 7. If a new software version is detected, the system will start updating your phone. NOTE: The time needed for an OTA varies depending on the file size. For example, if the software is 18.5MB, it will take 4 minutes 15 seconds. Please follow the on-screen instructions to complete the procedures.
-
Page 84: Chapter 10: Multimedia Applications
Chapter 10: Multimedia Applications Chapter 10: Multimedia Applications 10.1 Capturing Photos and Videos This device is equipped with rear and front cameras to take photos and videos. By default, your device uses the rear camera to take photos or record videos. Take Photos Tap to turn flash on or off. -
Page 85: Record Videos
Chapter 10: Multimedia Applications Record Videos Tap to turn flash on or off. Tap to switch between front and rear cameras. Tap to preview the latest Tap to record video. recorded file. 1. Tap > Camera. 2. Tap to enter video mode. NOTE: To switch between front and rear cameras, tap 3. -
Page 86: Take Panorama Shots
Chapter 10: Multimedia Applications Take Panorama Shots Tap to take the shot. 1. Tap > Camera. 2. Tap > and then select Panorama to enter panorama mode. 3. Aim the device at the subject. 4. Tap to take the shot. 5. -
Page 87: Configure Camera Settings
Chapter 10: Multimedia Applications Configure Camera Settings to access the camera/camcorder settings menu. Tap the menu item icon to open the respective menu and select the desired setting. Camera menu options Video menu options Mode Setting Available options Normal, Panorama, Smile shot, Beauty Shooting mode shot Off, Night, Sunset, Party, Portrait,... - Page 88 Chapter 10: Multimedia Applications Mode Setting Available options Object Tracking Off, On Blink Detect Off, On Face Tracking Off, On None, Mono, Sepia, Negative, Aqua, Effect Sketch, LOMO, Miniature, Mosaic, Fisheye, Cartoon, Mirror, Kaleidoscope 13M pixel, 10M Wide Screen, 8M pixels, Resolution 6M Wide Screen, 3.2M pixels, 2.4M Wide Screen, 0.8M pixels...
-
Page 89: Capture Screenshots
Chapter 10: Multimedia Applications Capture Screenshots To capture screenshots, press and hold the Volume down button and the Power button for a second. You will see the flash screen where the screenshot is captured and a message “Saving screenshot” appears on the status bar. NOTE: •... -
Page 90: Viewing Photos & Videos
Chapter 10: Multimedia Applications 10.2 Viewing Photos & Videos 1. Tap > Gallery. 2. Tap a folder to view the recorded files in thumbnails. 3. Tap an image or a video to view in full screen. 4. Swipe your finger to the left/right to view the previous/next file. -
Page 91: Mediashare
Chapter 10: Multimedia Applications 10.3 MediaShare ® Your phone is a Digital Living Network Alliance (DLNA) Certified device. This means that your phone can directly network with other DLNA certified devices in a wired or wireless home network. You can stream videos, photos, and music from your phone directly to a DLNA compatible media player like TVs. -
Page 92: Digital Media Server (Dms)
Chapter 10: Multimedia Applications 3. Tap Play on..Your phone searches for compatible DLNA devices. 4. Tap a device to start media streaming. Digital Media Server (DMS) 1. Tap > MediaShare. 2. Tap > Start DMS. Other DLNA certified devices can now browse for media files stored in your phone memory. -
Page 93: Chapter 11: Music
Chapter 11: Music Chapter 11: Music 11.1 Using Music Player With Music, you can listen to your favorite songs on your phone. Play Songs 1. Tap > Music. 2. Scroll to the SONGS tab to display all songs. 3. Tap a song to play. Playback Screen Tap to search a song, album or artist. -
Page 94: Create Playlists
Chapter 11: Music Create Playlists 1. Tap > Music. 2. Select the song you want to add. Then, tap 3. Tap Add to playlist. 4. Select a playlist or tap New to create a new playlist. NOTE: If you create a new playlist, enter the playlist name, then tap Save. -
Page 95: Delete Songs
Chapter 11: Music Delete Songs 1. Tap > Music. 2. Select the song you want to delete. Then, tap 3. Tap Delete. 4. Tap OK to confirm deletion. Customize the Sound Effects 1. Tap > Music. 2. Tap a song to play. 3. -
Page 96: Chapter 12: Programs
Chapter 12: Programs Chapter 12: Programs This device comes with the following pre-installed programs. 12.1 Browser Open the Browser to view web pages. See “Connecting to Internet” on page 53. 12.2 Calculator With Calculator, you can perform basic arithmetic functions on this device. >... -
Page 97: Camera
Chapter 12: Programs 12.5 Camera Capture images with this device. See “Capturing Photos and Videos” on page 78. 12.6 Clock Set alarm clock with this device. 1. Tap > Clock. 2. Tap 3. To add an alarm, tap 4. Set the alarm time, and tap OK. 5. -
Page 98: Date And Time Settings
Chapter 12: Programs 12.9 Date and Time Settings Automatically set the date and time 1. Tap > Settings. 2. In SYSTEM, tap Date & time. 3. Tap Automatic date & time to automatically set the date and time according to the network. Manually set the date and time 1. -
Page 99: Gallery
Chapter 12: Programs 12.12 Gallery You can view your captured images, recorded video clips, and downloaded images in Gallery. See “Viewing Photos & Videos” on page 84. 12.13 Kingsoft Office Kingsoft Office includes a word processor, spreadsheet program, and presentation maker. -
Page 100: People
Chapter 12: Programs 12.18 People View or manage your contact list. See “People” on page 27. 12.19 Phone Use Phone to make phone calls or manage contact list. See “Making a Call” on page 33. 12.20 Profile Manager Use Profile Manager to create and customize settings, such as sound, network, data, wireless, and location of profiles that you can use. -
Page 101: Voice Note
Chapter 12: Programs 12.22 Voice Note Use Voice Note to record a voice memo. Record a voice note 1. Tap > Voice Note. The recording screen is displayed. 2. Tap to record your message. 3. Tap to stop recording. 4. Tap OK to save the file. -
Page 102: Chapter 13: Managing Your Phone
Chapter 13: Managing Your Phone Chapter 13: Managing Your Phone 13.1 Wireless and Networks Settings Wi-Fi Manage Wi-Fi connections, scan and connect to available Wi-Fi networks. See “Wi-Fi” on page 53. Bluetooth Manage Bluetooth connections, set device name, and discoverability of the device. See “Connecting to Bluetooth Devices”... - Page 103 Chapter 13: Managing Your Phone 4. A warning message appears on the screen. Tap OK to continue. 5. To set up the limit for warning, tap the yellow line. Scroll up or down to set the limit, and tap Set.
-
Page 104: Airplane Mode
Chapter 13: Managing Your Phone 6. To set up the limit for stopping data usage, tap the red line. Scroll up or down to set the limit, and tap Set. 7. Scroll down to view data usage used the applications. Airplane Mode Disable all wireless connections. -
Page 105: Vpn
Chapter 13: Managing Your Phone Set up and manage Virtual Private Networks (VPNs). Using VPN, you can connect and access information inside a secured local network, such as your company network. Add a VPN connection You must set a lock screen pattern, PIN, or password before you can use credential storage. -
Page 106: Tethering & Portable Hotspot
Chapter 13: Managing Your Phone Tethering & Portable Hotspot Share your phone’s mobile data connection via USB/ Bluetooth or as a portable Wi-Fi hotspot. To set up your device mobile data network sharing settings, do the following: 1. Tap > Settings. 2. -
Page 107: Mobile Networks
Chapter 13: Managing Your Phone Mobile Networks Set option for data enabled, data roaming, Access Point Names, network operators, and other mobile network settings. See “Customize the mobile network settings” on page 56. Cell Broadcasts Select the types of emergency alerts to be displayed on the screen and set the alert notification. - Page 108 Chapter 13: Managing Your Phone Increase volume in pocket Ringtone volume increases when the device is in the pocket or bag. Call status tones Configure the call connect tone, minute minder, and call end tone settings. Voicemail Set up Voicemail settings. Dial pad touch tones Enable/disable sound when touching keys on the dial pad.
-
Page 109: Sound
Chapter 13: Managing Your Phone Sound To set the device sound settings, tap > Settings > Sound. Volumes Adjust the volume for media, ringtone, notification, alarms, and system. 1. Tap > Settings > Sound > Volumes. 2. Drag the respective volume slider to adjust the volume. -
Page 110: Display
Chapter 13: Managing Your Phone Display To set the device display settings, tap > Settings > Display. Screen Mode Set the screen mode type. Brightness Adjust the brightness of the screen. 1. Tap > Settings. 2. In DEVICE, tap Display. 3. - Page 111 Chapter 13: Managing Your Phone Sleep Adjust delay before the screen automatically goes off. 1. Tap > Settings. 2. In DEVICE, tap Display. 3. Tap Sleep. 4. Select the desired length of time. Your setting is automatically saved. Daydream Configure the screensaver function. Font size Set the font size.
-
Page 112: Notification
Chapter 13: Managing Your Phone Notification To customize status bar notification, tap > Settings > Notification. Hide notification To hide the notification of all applications not to be shown on the status bar, set the settings to ON. Show notification status bar Specify the applications that you want to display their notifications on the status bar. -
Page 113: Power Saver
Chapter 13: Managing Your Phone Power Saver Automatically enter the power saver mode when the battery level is low. To enable and configure the power saver settings: 1. Tap > Settings > Power Saver > ON. 2. Tap and select the desired settings. 3. -
Page 114: Personal Settings
Chapter 13: Managing Your Phone 13.3 Personal Settings Location Access Set your location and allow interactive options with your phone applications. To configure the settings, tap > Settings > Location access. Access to my location Allow applications that have asked permission to use your location information. GPS satellites Enable GPS satellites to pinpoint your location. - Page 115 Chapter 13: Managing Your Phone Set up SIM card lock Set up SIM card to lock or change the SIM pin codes. Make passwords visible Show passwords as you type. Device administrators View or deactivate device administrators. Unknown sources Allow installation of apps from unknown sources. Verify apps Disallow or warn before the installation of applications that may cause harm.
-
Page 116: Language & Input
Chapter 13: Managing Your Phone Language & Input Choose the system display language and input method. To configure the settings, tap > Settings > Language & input. Language Set the on-screen display language for your device. Spell checker Enable/disable spell check function. Personal dictionary Add or edit user preset words to the dictionary. -
Page 117: Backup & Reset
Chapter 13: Managing Your Phone Backup & Reset Configure the data backup method or reset all settings to factory default settings. To configure the settings, tap > Settings > Backup & reset. Back up my data Back up the current settings and other application data to Google servers. Backup account Set a backup account. -
Page 118: System Settings
Chapter 13: Managing Your Phone 13.5 System Settings Motion Tap the respective checkbox to enable Turn over to reject all, Volume quite on pickup, Direct call & answer, Smart alert, or Shake to next song function. For guideline on using motions on the device, tap How to use motions. To configure the settings, tap >... -
Page 119: Accessibility
Chapter 13: Managing Your Phone Accessibility Set several options to make it easier for people with impaired vision to use the device. To configure the settings, tap > Settings > Accessibility. TalkBack Configure TalkBack application settings. Magnification gestures Enable/Disable the magnification gestures function. Large text Check to change to a larger font size. -
Page 120: About Phone
Chapter 13: Managing Your Phone About Phone Configure the system update settings, view the phone status, and firmware related information. To configure the settings, tap > Settings > About phone. Software update Configure the software update settings and view the last check status. Diagnostics Configure the diagnostics report settings. -
Page 121: Chapter 14: Specifications
Chapter 14: Specifications Chapter 14: Specifications Item Descriptions Operating System Android 4.2, Jelly Bean HW Platform Snapdragon 600 Modem GSM / GPRS / EDGE / UMTS / HSPA / LTE Band GSM 850/900/1800/1900 MHz UMTS 2100/850/900/1900 MHz TD-SCDMA (Band 34, 39, 40) FDD-LTE (Band 1, 3, 7) TD-LTE (Band 38, 39, 40) Display... -
Page 122: Chapter 15: Troubleshooting
Chapter 15: Troubleshooting Chapter 15: Troubleshooting This section contains common troubleshooting tips that you may encounter while using the device. If you need additional assistance, please contact our customer service. Problem Solutions My device hangs or gives When the system hangs, press the Power button for no response. - Page 123 Chapter 15: Troubleshooting Problem Solutions My phone cannot pair with • You have entered the wrong PIN number. Bluetooth device. • Check if another Bluetooth-enabled device has accepted your device bluetooth pairing request.
-
Page 124: Important Safety Information
Important Safety Information Please read before proceeding • DO NOT place objects on top of the device, as objects may scratch the screen. • DO NOT drop your device or subject it to severe impacts. Bending the body and pushing the display or keys with extreme force could damage the device. •... -
Page 125: Safety In Aircraft
Safety Precautions For Battery Use • Keep the battery dry and away from any liquid since this may cause a short circuit. • Keep the battery away from metal objects since this may cause a short circuit. • Do not use damaged or deformed batteries. •... -
Page 126: Copyright Information
Copyright Information © ® Copyright InFocus 2013. All rights reserved. This product has an Android™ platform based on Linux, which can be expanded by a variety of JME-based application SW. Android, Google,YouTube and other marks are trademarks of Google Inc. - Page 127 all your electronic or electrical waste equipment by relocating over to the specified collection point for recycling of such hazardous waste. Isolated collection and proper recovery of your electronic and electrical waste equipment at the time of disposal will allow us to help conserve natural resources. Moreover, proper recycling of the electronic and electrical waste equipment will ensure safety of human health and environment.
-
Page 128: Warranty Statement
DFS controls related to radar detection shall not be accessible to the user. Warranty Statement Limited Warranty InFocus provides “Product Warranty Statement”, at the time of its original purchase, from the InFocus or its authorized distributor, describing the product warranty service. Notes: InFocus does not provide global cross border warranty.
Need help?
Do you have a question about the IN810 and is the answer not in the manual?
Questions and answers