
Related Manuals for FHF FernTel 3


Summary of Contents for FHF FernTel 3
-
Page 1: Operating Manual
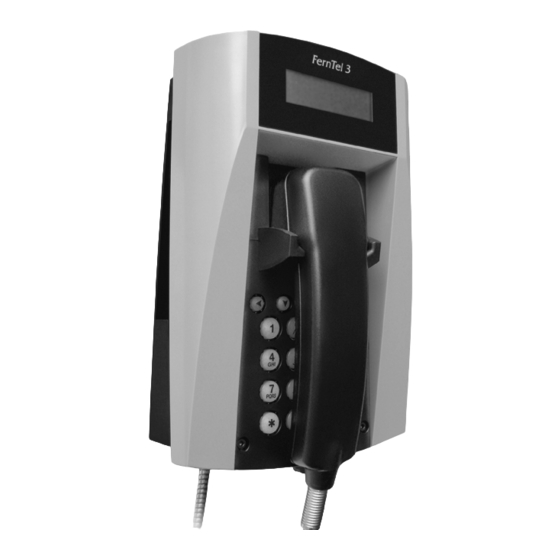
Weatherproof telephone ernTel 3 Version 21 keys with display Version without keys, Version 16 keys without display without display Tabletop unit Operating manual FHF B 9620-62 07/14... -
Page 2: Table Of Contents
Note Please read the operating manual carefully before installing the device. Please check the contents of the box for completeness. Table of Contents General operating notes ..................4 Device overview / Dimensions ................ 5 Device versions ....................5 Controls and indicators .................. - Page 3 Total lock ..................16 Telephone book ................16 Programming..................16 Direct call number .................. 16 PIN ......................16 Version with keypad (16 keys), without display ......17 Operation....................17 Seize (Make / answer a call)..............17 Amplified listening in receiver ..............17 Make a call ....................
-
Page 4: General Operating Notes
Programming sessions that have been started, but have not been completed, must be repeated. 8. If you get a call, the FernTel 3 rings with the volume and melody you have chosen. The display version also signals the incoming call in the display. -
Page 5: Device Overview / Dimensions
Device overview / Dimensions (mm / inch) Device versions The telephone FernTel 3 is available in three versions. - with keypad (21 keys) and display - with keypad (16 keys), without display - without keypad, without display (with a device-internal programming keypad) -
Page 6: Controls And Indicators
Controls and indicators Version with keypad (21 keys) and display Keypad Menu operations keys Short / Speed code dialling Disconnect Last number redial Enquiry key ________________________ Number keys Display The two uppermost lines display numbers or the menu settings. The lower line displays pictograms that correspond to the functions. -
Page 7: Version With Keypad (16 Keys), Without Display
Version with keypad (16 keys), without display Keypad Amplified listening in receiver Disconnect Last number redial Enquiry key ________________________ Number keys Version without keypad, without display Device-internal programming keypad (12 keys) -
Page 8: As-Delivered Condition
As-delivered condition Box contents The scope of the delivery includes: 1 telephone 1 telephone mount 1 handset accommodation for the table version with 2 screws 4 washers Ø 18 mm this operating manual Telephone presetting Valid for version Dialling mode Dual-tone multifrequency (DTMF), signal duration 90 ms Enquiry key function (R key) -
Page 9: Mounting And Installing
Mounting and installing Wall version Fasten the telephone mount with 4 screws (2). Place the provided washers Ø 18 mm under the screw head. Bore illustration (not to scale) Place the telephone in the upper latches (A), swing it downwards until the lower latches audibly engage (B). -
Page 10: Table Version
Plug the ribbon cable onto the pin contact strip (7) of the keypad plate. Tighten the keypad plate (6) using four screws (8). Table version Place the telephone in the lower latches (A), swing it backwards until the upper latches audibly engage (B). -
Page 11: Mounting The Sling Holder
Mounting the sling holder (optional) Remove the keypad plate (6) by loosening the screws (8). Lever out the duct cover (13). Fasten the sling holder (14) by using the two included screws (15). Insert the duct cover (16) with groove. Screw the keypad plate (6) back on again. -
Page 12: Operation And Programming
Operation and programming Version with keypad (21 keys) and display Operation Seize (Make / answer a call) When you pick up the handset, you may answer a call or make a call to a conversation partner. Receiver volume During a call you can adjust the volume in the receiver for the duration of the call, using the keys . -
Page 13: Programming
Programming In order to program the telephone, you have to allow modifications of the settings. General Use the Programming menu to modify the operating settings of the telephone. After lifting the handset or pressing the disconnect key, a welcome message appears in the display. Begin the programming procedure by pressing the key. -
Page 14: Telephone Book
Restrictions Programming SW version Press the key to select a menu item. Telephone book In the telephone book, you press the keys to display the entered names (and numbers). Press the key to choose between the following sub-menus: dial modify delete delete all In case of an empty telephone book, only the sub-menu „add“... -
Page 15: Settings
Settings Under Settings, use the keys to display the following sub-menus: Ringing signal Volume Dialling mode Menu As-delivered condition Ringing signal The volume and melody of the ringing signal are set. Volume The receiver volume is set permanently. Dialling mode Here, one of four dialling modes is selected. -
Page 16: Restrictions
Restrictions Under Restrictions, use the keys to display the following sub-menus: Activate Direct call number Activate Choose from none The telephone is not restricted. Telephone book Numbers can be dialled from the telephone book only. Direct call When pressed, all keys except the Disconnect key and the key dial the direct call number. -
Page 17: Version With Keypad (16 Keys), Without Display
Version with keypad (16 keys), without display Operation Seize (Make / answer a call) When you pick up the handset, you may answer a call or make a call to a conversation partner. Amplified listening in receiver Press the key to increase the receiver volume during a call. Depending on the presetting, the volume is increased in one or two steps. -
Page 18: Restrict Settings Modifications
Restrict settings modifications Lift the handset. Press the * and # keys simultaneously. Press the # and 1 keys consecutively. Enter the PIN Press the key to disable settings modifications. Replace the handset. (PIN) Adjust ringing volume Lift the handset. Press the * and # keys simultaneously. -
Page 19: Set Dialling Mode
Set dialling mode Lift the handset. Press the * and # keys simultaneously. Press key 9. Enter the code for the desired dialling mode. Press the key to store the selected dialling mode. Replace the handset. Code / Key Dialling mode Comment The DTMF tone is being generated as Dual-tone multifrequency (DTMF),... -
Page 20: Program Pause Following The Exchange Code
Program the pause following the exchange code Lift the handset. Press the * and # keys simultaneously. Press key 1. Press a key from 1 to 5 (the key number corresponds to the duration in seconds) Press the key to store the entered duration of the pause. Replace the handset. -
Page 21: Change Personal Identification Number (Pin)
Change Personal Identification Number (PIN) Lift the handset. Press the * and # keys simultaneously. Press the # and 2 keys consecutively. Enter the old PIN. Enter new PIN. Repeat new PIN. Press the key to store the new PIN. Replace the handset. -
Page 22: Version Without Keypad And Without Display
Version without keypad and without display Operation Seize (Make / answer a call) and dialling Receive a call by lifting the handset. If you want to make a call, lift the handset. The private branch exchange then automatically establishes a connection. The telephone is equipped with an internal keypad on the inside of the front plate. -
Page 23: Adjust The Ringing Melody
Adjust the ringing melody Lift the handset. Press the * key. Press key 6 (the set melody is played back) Set the desired melody using the keys 1 to 9. Press the # key to store the selected melody. Replace the handset. (1…9) Set dialling mode Lift the handset. -
Page 24: General Information
General information Service You have bought a modern FHF product subject to meticulous quality control. If any questions regarding the telephone, or malfunctions should occur – even after the guarantee has expired – please contact FHF. Please have the type denomination and product number (to be found on the nameplate) ready. -
Page 25: Technical Data
Technical Data Connection data Supply voltage 24….66 Vdc Supply current 19…100 mA Ringing alternating current 30….90 Vac Ringing frequency 16….68 Hz Ringer input impedance ≥ 6.0 kΩ at 25 Hz ≥ 3.5 kΩ at 50 Hz Enquiry key (flash) only for DTMF 80 ms, 120 ms, 600 ms Dialling mode DTMF Frequencies according to ITU-T Q.23... -
Page 26: Ec Declaration Of Conformity
2006/95/EC and the R&TTE directive 1999/5/EC. The conformity with the above directives is confirmed by the CE sign. If you experience problems during operation, please contact the FHF’s technical support service. Electric and electronic devices carrying this symbol may contain substances harmful to people and the environment. - Page 28 Subject to alterations or errors FHF Funke + Huster Fernsig GmbH Gewerbeallee 15-19 · D-45478 Mülheim an der Ruhr Phone +49 / 208 / 82 68-0 · Fax +49 / 208 / 82 68-286 http://www.fhf.de · e-mail: info@fhf.de...
Need help?
Do you have a question about the FernTel 3 and is the answer not in the manual?
Questions and answers