
Related Manuals for Irradio VR-600M

Summary of Contents for Irradio VR-600M
- Page 1 VR-600M Voice Recorder Digitale MP3/WMA Digital MP3/WMA Voice Recorder Grabador de voce MP3/WMA digital Manuale istruzioni User’s manual Manual de uso...
- Page 2 Note: H Se si prevede di non utilizzare l'apparecchio per un lungo periodo di tempo, portare l'interruttore di alimentazione in posizione di spegnimento. H Non utilizzare l'apparecchio in luoghi estremamente caldi, freddi, polverosi o umidi. H Evitare di far cadere l'apparecchio. H La durata della batteria può...
-
Page 3: Caratteristiche Principali
CARATTERISTICHE PRINCIPALI • Funzione di registrazione one-button, attivabile azionando un unico pulsante. • Possibilità di impostazione dell'ora di inizio e della durata della registrazione. • Funzione di registrazione con controllo vocale. • Possibilità di registrazione di telefonate. • Doppio microfono incorporato. Registrazione vocale di qualità elevata. •... -
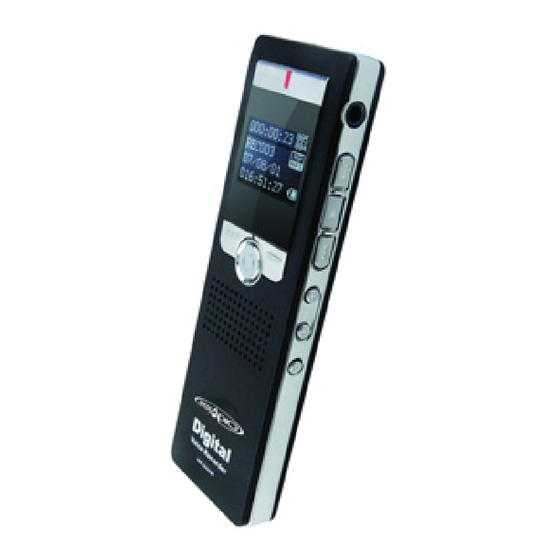
Page 4: Descrizione Dell'apparecchio
DESCRIZIONE DELL’APPARECCHIO 1. Microfono incorporato (canale di sinistra) 2. Microfono incorporato (canale di destra) 3. Indicatore luminoso di registrazione in corso 4. Uscita auricolari 5. Display LCD 6. Selettore “One-Touch-Recording” 7. Pulsante di visualizzazione dei menu 8. Pulsante di registrazione/pausa 9. - Page 5 INDICAZIONI NEL DISPLAY LCD Durata della registrazione Autonomia residua di 10. Formato della riproduzione Numero del file registrazione 11. Equalizzazione Nome del file Livello di carica della batteria 12. Modalità di ripetizione della Data della registrazione Modalità di riproduzione lettura Formato della registrazione Durata della riproduzione 13.
-
Page 6: Istruzioni Per L'uso
ISTRUZIONI PER L’USO Funzioni operative di base 1. Alimentazione L'apparecchio è alimentato tramite la batteria ricaricabile incorporata. Quando nel display viene visualizzata l'indicazione “ ”, la batteria deve essere ricaricata. Ricarica della batteria La batteria dell’apparecchio si può ricaricare in due modi: 1) Collegando l’adattatore caricabatteria ad una presa di corrente e alla porta USB dell’apparecchio. - Page 7 Note (1) Se l’orario di spegnimento viene raggiunto mentre l’apparecchio si trova in pausa o in stop, l’apparecchio si spegne automaticamente. (2) Se si spegne l’apparecchio utilizzando il selettore laterale, alla successiva riaccensione si dovranno reimpostare le impostazioni, come ad esempio quella dell’ora. 3.
- Page 8 II. Registrazione 1. Avvio della registrazione 1. Scegliere il formato della registrazione, come indicato nel relativo paragrafo “Scelta del formato della registrazione” alle pagine seguenti. 2. Portare il selettore “One-Button-Recording” dalla posizione “Music” alla posizione “Record”; l’apparecchio inizia immediatamente a registrare. Se l’apparecchio non si trovava in stop, la registrazione avrà inizio non appena verrà conclusa la funzione in corso.
- Page 9 5. Cancellazione dei file 1. Premere il pulsante “Delete” mentre l’apparecchio si trova in pausa o in stop, per entrare nel menu di cancellazione. Nel display vengono visualizzate le opzioni “Delete File” e “Delete All”. 2. Selezionare, per mezzo dei pulsanti “ y”...
- Page 10 3. Selezionare, per mezzo dei pulsanti “ y” o “y ”, l’opzione “ON” oppure “OFF”, a seconda che si voglia attivare o disattivare il controllo vocale delle registrazioni. Note (1) Il controllo vocale può essere attivato solo quando si seleziona il formato “Standard REC” o “Long REC”, e non è invece disponibile quando si seleziona il formato “Stereo REC”, mentre si registrano telefonate o quando si registrano file in formato MP3.
- Page 11 5. Riproduzione di una registrazione vocale 1. Mentre l’apparecchio si trova in stop ed è stata selezionata la modalità di funzionamento “Voice Mode”, premere il pulsante “Menu” per accedere al menu principale. 2. Selezionare per mezzo dei pulsanti “ y” o “y ”...
- Page 12 Nota (1) Se dopo aver regolato l’ora si spegne l’apparecchio, la memorizzazione verrà cancellata e dovrà essere reimpostata. b. Opzione “Record Timer” (programmazione della data e dell’ora di inizio della registrazione) 1. Premere il pulsante “Menu” in modo da accedere alla schermata “Record Timer”: 2.
- Page 13 b. Opzione “Timer Length” (programmazione della durata della registrazione) 1. Premere il pulsante “Menu” in modo da accedere alla schermata “Timer Length”: 2. La durata preimpostata è di 1 minuto. Per impostare la durata desiderata, utilizzare i pulsanti “ y” o “y ”, e al termine premere il pulsante “Menu”...
- Page 14 Linea telefonica Cavetto Ingresso audio LINE IN Cavetto Adattatore telefonico telefonico 8. Trasferimento su un dispositivo esterno dei file registrati Collegare il cavetto di collegamento audio all’uscita PHONES dell’apparecchio e al connettore di ingresso del dispositivo esterno, quindi premere contemporaneamente il pulsante “Stop” dell’apparecchio e il pulsante di registrazione del dispositivo esterno (si consiglia di effettuare un trasferimento di prova, in modo da verificare l’esecuzione della procedura).
- Page 15 1) Lanciare l’applicazione "Sound Converter", quindi cliccare il pulsante “Open”. 2) Selezionare i file REC che si desidera convertire. 3) Cliccare il pulsante “Convert”, selezionare il percorso di destinazione e immettere i nomi dei file convertiti. III. Modalità operativa “Music” Controllare che il selettore “One-Button-Recording”...
- Page 16 2. Selezione dei file e ricerca veloce Per accedere all’inizio del file precedente o successivo, premere brevemente il pulsante “y ” o “ y”. Per effettuare la ricerca veloce all’indietro o in avanti, mentre è in corso la riproduzione di un file, tenere premuto il pulsante “y ”...
- Page 17 6. Ripetizione della lettura di una sezione A-B 1) Impostazione del punto di inizio. Mentre è in corso la riproduzione dei file, premere il pulsante “Menu” per accedere al menu secondario della lettura. Selezionare per mezzo dei pulsanti “ y” o “y ”...
- Page 18 8. Impostazione della durata della pausa tra le ripetizioni Mentre è in corso la riproduzione dei file, premere il pulsante “Menu” per accedere al menu secondario della lettura. Selezionare per mezzo dei pulsanti “ y” o “y ” l’opzione “Replay Gap”, e premere il pulsante “Menu” per confermare.
- Page 19 IV. Impostazione dei parametri di funzionamento Questa modalità può essere utilizzata per impostare i parametri di funzionamento e per visualizzare lo stato del sistema. Comprende le opzioni “Backlight”, “Language”, “Power off”, “Contrast”, “Memory info”, “Firmware version” e “Exit” (Retroilluminazione, Lingua dei menu, Spegnimento automatico, Contrasto, Memoria disponibile, Versione del firmware e Uscita).
- Page 20 1) Programmazione dello spegnimento automatico in caso di inattività (la durata preimpostata è di 180 secondi). Nella schermata “Off Time”, premere il pulsante “Menu” per accedere alla schermata di impostazione. Selezionare per mezzo dei pulsanti “ y” o “y ” la durata desiderata, da un minimo di 0 ad un massimo di 180 secondi, quindi premere il pulsante “Menu”...
- Page 21 4. Regolazione del contrasto del display Impostare per mezzo dei pulsanti “ y” o “y ” la regolazione desiderata, in una scala da 0 a 16, quindi premere il pulsante “Menu” per confermare e uscire. 5. Indicazione della memoria disponibile Premere il pulsante “Menu”...
-
Page 22: Connessione Al Computer
VI. Connessione al computer 1. Installazione del driver Se il computer utilizza il sistema operativo Windows 98 si deve installare un driver, che non è invece necessario nel caso in cui utilizzi Windows 2000, XP o ME. Evitare di collegare l’apparecchio al personal computer prima di aver installato il driver, o nel corso della sua installazione. - Page 23 2. Utilizzo come disco USB Questo apparecchio può essere utilizzato come disco USB standard e supporta i sistemi operativi Windows 98 (per il quale richiede l'installazione di un driver), Windows 2000 (non richiede l'installazione di driver), Mac OS X 10.3 e versioni successive, Linux 2.4.2 e versioni successive.
-
Page 24: In Caso Di Problemi
IN CASO DI PROBLEMI 1. Perché non è possibile riprodurre alcuni file MP3? I file supportati da questo lettore sono: brani audio in formato MPEG 1 layer 3, MPEG 2 layer 3 e MPEG 2.5 layer 3. Gli altri formati non possono essere riprodotti, a meno che non vengano convertiti in un formato compatibile. 2. -
Page 25: Caratteristiche Tecniche
CARATTERISTICHE TECNICHE Durata max di registrazione*: Long REC: circa 270 ore; Standard REC: circa 70 ore Autonomia max di registrazione*: Long REC: circa 18 ore; Standard REC: circa 20 ore; Stereo: circa 9 ore Dimensioni: 107,6 x 34,5 x 11,7 mm Peso: 46,6 g (batteria compresa) Alimentazione: Batteria integrata ricaricabile al litio Memoria: Flash integrata 1GB... - Page 26 • Questo apparecchio è conforme alla Direttiva CEE/89/336 e successive modifiche CEE/92/31 - CEE/93/68, relativa al rispetto dei requisiti essenziali di compatibilità elettromagnetica (E.M.C.). • A causa della continua evoluzione dei prodotti, le caratteristiche ed il disegno di questo modello possono variare senza preavviso.
- Page 27 GARANZIA CONVENZIONALE La Società MELCHIONI S.p.A., distributrice sul originariamente progettato e fabbricato. territorio italiano del marchio IRRADIO, vi ringrazia per Questo apparecchio è stato progettato e costruito per un la scelta e vi garantisce che i propri apparecchi sono impiego esclusivamente domestico: qualunque altro frutto delle ultime tecnologie e ricerche.
- Page 28 Sig......................................Via..................................n° ....CAP ....Città ..........................Prov....Modello VR-600M ......Matricola........................Rivenditore ....................Data acquisto........... Per eventuali informazioni sui Centri di Assistenza autorizzati sul territorio italiano potete contattare il numero telefonico: 02-57941, oppure consultate il nostro sito: www.melchioni.it...
- Page 29 Note: If the unit is left unused for a long period, please push the Power Switch to “OFF”. Do not use the unit in places that are extremely hot, cold, dusty, or humid. A void the unit being dropped. The battery service life may differ under different usage conditions and different models If the unit work abnormally, such as the backlight of the LCD dose not work, the loudspeaker dose not work or no voice while recording by HP REC, please push the Power Switch to “OFF”...
- Page 30 FEATURES One-button-recording function Timing recording Voice Control recording Record the phone call contents Two built-in microphones. High-quality voice recording. Support real time function, to record the time when recorded. Built-in lithium rechargeable battery Support several of audio formats: MP3, WMA, WMV etc. A-B repeat function Support Windows 98/ME/2000/XP , Mac OS 10.X and Linux Kernel 1.2.4.2 and above (Windows 98 needs driver)
- Page 31 INTRODUCTION OF COVER 1. Built-in microphone (Left) Built-in microphone (Right) 3. Recording indicator 4. Earphone socket 5. LCD display 6. “One-button-Recording” 7. MENU button 8. Record/pause button 9. Stop button 10. Power switch 11. Line-in socket 12. Previous/REW 13. Play/Pause 14.
-
Page 32: Introduction Of Lcd
INTRODUCTION OF LCD 1. The current recording time 2. Number of file 3. Name of file 4. Date of recording 5. Recording format 6. Remaining recording time 7. Battery indicator 8. Playback mode 9. Time of playback 10. Type of playback 11. -
Page 33: Basic Operation
BASIC OPERATION I. Basic Operation 1. Power supply It is powered by built-in lithium battery. When the remaining capacity of battery indication shows , please charge the battery in time. Measure of charging: 1). Plug the charge into the electrical source, and then connect the USB socket of the charge and the unit. - Page 34 After then, the button is used to turn on or turn off the unit: Turn off: press and hold button until it displays “BYEBYE”. Turn on: Press and hold button, it displays the start-up logo and enters the work modes that the last time before you turn it off.
- Page 35 When the button is pushed to the position of “Music”, the unit enters the music mode. Press and hold the “Menu” button, it enters the music mode select menu: Music Mode and Setting Mode. When the button is pushed to the position of “Music” from “Record”, if the unit was under recording status, it will stop and save the recorded file and then shift to the music status of music mode.
- Page 36 Under standby status, press “REC/Pause” button to start recording, the recording indicator twinkles. 2). Pause Recording Under recording status, press “REC/Pause” button to pause. Press it again to resume recording. 3). Save Recorded File Press “Stop” button to save the recorded file. Note: (1).
- Page 37 . Enter the delete menu Under pause or stop status, press “Delete” button to enter the delete menu, it displays “Delete File” and “Delete All”. Operation After entering the delete menu, press “ ” or “ ” button to select “Delete File” or “Delete All”.
- Page 38 3. Enable/Disable Voice-control recording Press “Menu” button to enter the main menu, and then select “Setting Mode” by “ ” or “ ” button and press “Menu” button to enter. Select “VOR Control” by “ ” or “ ” button and press “Menu”...
- Page 39 3). Instruction of Record Type The unit has several record types: Stereo REC, Standard REC, Long REC and Phone REC. The corresponding file format, recording timbre, path of saving and defaulted name are as following: REC Type File Format REC timbre Path of Saving Default Name Stereo REC...
- Page 40 2). Select "Record Type" b y “ ” or “ ” button and then press “Menu” button to enter. Then select the record type you want and press the “Menu” button to confirm. 6. Setup of Record Time Under the stop status of Voice Mode, press “Menu” button to enter the menu. Select “Record Time”...
- Page 41 adjustment. Note: if the power supply is cut off, the setting would be initialized. 2). Record Timer Set a time, and the unit will start to record automatically at the pre-set time. Press “Menu” button to enter the record time interface: The way to adjust the pre-set time is same as the above: set the Y ear, Month, Day, Hour, Minute and Second one by one, and then press “Menu”...
- Page 42 3). Timer Length Press “Menu” button to enter the Time length interface: (the length of time is defaulted as 1 minute) The way of adjusting is as same as the above. Press “Menu” button to confirm and exit. 7. Phone REC 1).
- Page 43 3). Operations of Phone REC Details please refer to “Record by built-in microphone” 8. Transfer recorded files to the external equipment Link the audio cable to the earphone jack and the external equipments’ in-put jack, then press “Stop” button of the recorder and the external equipment’s REC button at the same time. (Please test the external equipment’s REC function before your recording in order to avoid failed recording) Note: during the recording, if the unit was shut off by knock or other actions, all recording...
- Page 44 9. Convert REC format files to WAV format The REC format files can be converted to W A V format through the software in the install CD accessorized with the unit. 1). Open and run "sound converter", click "open" 2). Select the REC files you want to convert 3).
- Page 45 Note: it only plays the music files under the root directory in this mode. 1. Playback Under pause or stop status, press the button to start playback. 2. Next/Previous, FF/REW Press “ ” button to select the previous file; press “ ”...
- Page 46 Under playback status, press “Delete” button to shift among “Repeat One”, “Folder”, “Repeat Folder”, “Random” and “Intro”. 5. Selection of Equalizer Under playback status, press the “Menu” button to enter the playback submenu. Press “ ” or “ ” button to select “Equalizer” and press “Menu” button to enter. Press “ ”...
- Page 47 point A, and it returns to playing normally. If you do not want to replay anymore, operate as per the following ways. 3). Cancel . Press button to cancel the set A-B repeat and pause the playback. . Press “Stop” button to cancel the set A-B repeat and stop the playback. .
- Page 48 10. Lyric Synchronous Display The player supports “*.LRC” lyric files (users may download in “My Favorite Lyric” website or edit via software by yourself), to achieve the synchronous play of lyric and sound. 1) How to use the lyric file? The name of lyric file should be consistent with the name of the song file.
- Page 49 1. Backlight Press “Menu” button to enter the backlight time setting interface (the defaulted time is 30 seconds): Press “ ” or “ ” button to adjust the backlight time. Press “Menu” button to confirm and exit. 2. Language Selection Press the “Menu”...
- Page 50 1) Off Time (Defaulted as 180 seconds) Under “Off time” interface, press “Menu” button to enter the time setting interface. Press “ ” or “ ” button to set the length of time from 0 second to 180 seconds. Press “Menu” button to confirm and exit after setting.
- Page 51 The unit will be power off automatically if there is no operation on it within the set time. If it is set as 0, the function is off. 4. Contrast Press “ ” or “ ” button to set the contrast from 0 to 16. Press “Menu” button to confirm and exit after setting.
-
Page 52: Installation Of Driver
V. Connection with PC Installation of Driver Note: Only Window 98 needs driver. It can be used normally without driver in Windows 2000/ XP/ ME. Do not connect the player with the PC before or during installation. a. Put the CD into the CD-ROM. b. - Page 53 2. Use USB Disk The player is a standard USB Disk, supports these systems including Windows98 (it needs to install the driver), over Windows2K (it's unnecessary to install the driver), Mac OS X 10.3 and above, Linux 2.4.2 and above. 1).
-
Page 54: Troubleshooting
TROUBLE SHOOTING 1.Why can't some MP3 be played? Standard MP3 only includes: the songs in layer 3 of MPEG 1, layer 3 of MPEG 2 and layer 3 of MPEG 2.5. Otherwise, it won't be played in the player except transformed by the corresponding software. - Page 55 4.What causes the MP3 player running slowly? Using or deleting files frequently in a long time will generate fragments in the flash memory, like fragment in the hard disk, which will cause the player running slowly. 5.What if the driving program of the MP3 player be damaged? This is caused by improper operation.
-
Page 56: Specification
SPECIFICATION *Recording time: Long REC mode: about 270 hours; Standard REC mode: about 70 hours; *Continually recording time: Long REC mode: about 18 hours; Standard REC mode: about 20 hours; Stereo mode: about 9 hours Dimension: 107.6mmx34.5mmx11.7mm Weight: 46.6g (included battery) Power source: built-in rechargeable lithium battery Memory medium: Built-in 1GB flash memory Microphone: Built-in capacitor... - Page 57 *Recording time and *continually recording time are related to the setup, usage and environment. It is normal that the actual recording times differ from the manual. IMPORTANT NOTICE FOR THE END USER – WEEE DIRECTIVE 2002/96/CE AND SUBSEQUENT MODIFICATION 2003/108/CE CONCERNING THE WASTE OF ELECTRICAL &...
- Page 58 Notas: H Si no va a utilizar el aparato durante un largo periodo de tiempo, ponga el interruptor en la posición de apagado. H No utilice el aparato en lugares demasiado cálidos, fríos, polvorientos o húmedos. H Proteja el aparato contra posibles caídas. H La duración de la batería puede variar en función de las condiciones de uso y de los modelos.
-
Page 59: Características Principales
CARACTERÍSTICAS PRINCIPALES • Función de grabación one-button, disponible accionando un único botón. • Posibilidad de programar la hora de inicio y la duración de la grabación. • Función de grabación con control vocal. • Posibilidad de grabar conversaciones telefónicas. • Doble micrófono incorporado. Grabación vocal de alta calidad. •... -
Page 60: Descripción Del Aparato
DESCRIPCIÓN DEL APARATO 1. Micrófono incorporado (canal izquierdo) 2. Micrófono incorporado (canal derecho) 3. Indicador luminoso de grabación en curso 4. Salida auriculares 5. Pantalla LCD 6. Selector “One-Touch-Recording” 7. Botón de visualización de los menús 8. Botón de grabación/pausa 9. -
Page 61: Indicaciones En La Pantalla Lcd
INDICACIONES EN LA PANTALLA LCD Duración de la grabación Autonomía restante de 10. Formato de la reproducción Número del archivo grabación 11. Ecualización Nombre del archivo Nivel de carga de la batería 12. Modo de repetición de la Fecha de la grabación Modo de reproducción lectura Formato de la grabación... -
Page 62: Instrucciones Para El Uso
INSTRUCCIONES PARA EL USO Funciones operativas básicas 1. Alimentación El aparato se alimenta mediante la batería recargable incorporada. Cuando la pantalla muestra la indicación “ ”, es necesario recargar la batería. Recarga de la batería La batería del aparato puede recargarse de dos modos: 1) Conectando el adaptador cargador de batería a una toma de corriente y al puerto USB del aparato. - Page 63 Notas: (1) Si se alcanza la hora de apagado mientras que el aparato se encuentra en estado de pausa o de parada, este se apaga automáticamente. (2) Si se apaga el aparato utilizando el selector lateral, al volver a encenderlo se deberán restablecer los ajustes anteriores, por ejemplo el de la hora.
- Page 64 II. Grabación 1. Activación de la grabación 1. Elija el formato de la grabación como se indica en el párrafo “Elección del formato de la grabación” incluido en las páginas siguientes. 2. Haga pasar el selector “One-Button-Recording” desde la posición "Music" hasta la posición "Record": el aparato empezará...
- Page 65 5. Borrado de los archivos 1. Pulse el botón “Delete” mientras el aparato se encuentra en estado de pausa o de parada para entrar en el menú de borrado. La pantalla muestra las opciones “Delete File” y “Delete All”. 2. Seleccione por medio de los botones “ y”...
- Page 66 3. Seleccione la opción “ON” u “OFF” utilizando los botones “ y” o “y ”, dependiendo de si desea activar o desactivar el control vocal de las grabaciones. Notas: (1) El control vocal solo puede activarse cuando se selecciona el formato “Standard REC” o “Long REC”. No se encuentra disponible cuando se selecciona el formato “Stereo REC”, mientras se graban conversaciones telefónicas o cuando se graban archivos en formato MP3.
- Page 67 5. Reproducción de una grabación de voz 1. Mientras el aparato se encuentra en estado de parada y después de seleccionar el modo de funcionamiento “Voice Mode”, pulse el botón “Menu” para acceder al menú principal. 2. Seleccione la opción “Voice File” utilizando los botones “ y”...
- Page 68 Nota (1) Si se apaga el aparato después de haber regulado la hora, los ajustes memorizados se borrarán y deberán ser restablecidos. b. Opción “Record Timer” (programación de la fecha y de la hora de inicio de la grabación) 1. Pulse el botón “Menu” para acceder a la pantalla “Record Timer”: 2.
- Page 69 b. Opción “Timer Length” (programación de la duración de la grabación) 1. Pulse el botón “Menu” para acceder a la pantalla “Timer Length”: 2. La duración predeterminada es de 1 minuto. Para programar la duración deseada, utilice los botones “ y”...
- Page 70 Línea telefónica Cable Entrada audio LINE IN Cable Adaptador telefónico telefónico 8. Transferencia de los archivos a un dispositivo externo Conecte el cable de conexión de audio a la salida PHONES del aparato y al conector de entrada del dispositivo externo y pulse simultáneamente el botón “Stop”...
- Page 71 1) Lance la aplicación “Sound Converter" y haga clic en el botón “Open”. 2) Seleccione los archivos REC que desea convertir. 3) Haga clic en el botón “Convert”, seleccione la posición de destino e introduzca los nombres de los archivos convertidos.
- Page 72 2. Selección de los archivos y búsqueda rápida Para acceder al principio del archivo anterior o del siguiente, pulse brevemente el botón “y ” o “ y”. Para efectuar la búsqueda rápida hacia atrás o hacia adelante mientras se está reproduciendo un archivo, mantenga presionado el botón “y ”...
- Page 73 6. Repetición de la lectura de una sección A-B 1) Programación del punto de inicio. Mientras se están reproduciendo los archivos, pulse el botón “Menu” para acceder al menú secundario de la lectura. Seleccione la opción “Replay” utilizando los botones “ y”...
- Page 74 8. Programación de la duración de la pausa entre las repeticiones Mientras se están reproduciendo los archivos, pulse el botón “Menu” para acceder al menú secundario de la lectura. Seleccione la opción “Replay Gap” utilizando los botones “ y” o “y ”...
- Page 75 IV. Programación de los parámetros de funcionamiento Este modo permite programar los parámetros de funcionamiento y visualizar el estado del sistema. Incluye las opciones “Backlight”, “Language”, “Power off”, “Contrast”, “Memory info”, “Firmware version” y “Exit” (Retroiluminación, Idioma de los menús, Apagado automático, Contraste, Memoria disponible, Versión de programación en firme y Salida).
- Page 76 1) Programación del apagado automático en caso de inactividad (la duración predeterminada es de 180 segundos). En la pantalla “Off Time”, pulse el botón “Menu” para acceder a la pantalla de programación. Seleccione la duración deseada utilizando los botones “ y”...
- Page 77 4. Regulación del contraste de la pantalla Seleccione la regulación deseada utilizando los botones “ y” o “y ” en una escala de 0 a 16 y pulse el botón “Menu” para confirmar y salir. 5. Indicación de la memoria disponible Pulse el botón “Menu”...
-
Page 78: Conexión Al Ordenador
VI. Conexión al ordenador 1. Instalación del controlador Si el ordenador utiliza el sistema operativo Windows 98, deberá instalarse un controlador. Esta operación no es necesaria cuando se utiliza Windows 2000, XP o ME. No conecte el aparato al ordenador antes de haber instalado el controlador o durante su instalación. - Page 79 2. Uso como disco USB Este aparato puede ser utilizado como un disco USB estándar y es compatible con los sistemas operativos Windows 98 (requiere la instalación de un controlador), Windows 2000 (no requiere la instalación de un controlador), Mac OS X 10.3 y versiones posteriores, Linux 2.4.2 y versiones posteriores.
-
Page 80: Resolución De Problemas
RESOLUCIÓN DE PROBLEMAS 1. ¿Por qué no consigo reproducir algunos archivos MP3? Los archivos compatibles con este lector son: pistas de audio en formato MPEG 1 layer 3, MPEG 2 layer 3 y MPEG 2.5 layer 3. Los otros formatos no pueden ser reproducidos sin convertirlos previamente en un formato compatible. 2. -
Page 81: Características Técnicas
CARACTERÍSTICAS TÉCNICAS Duración máx. de grabación*: Long REC unas 270 horas; Standard REC: unas 70 horas Autonomía máx. de grabación*: Long REC unas 18 horas; Standard REC: unas 20 horas; Stereo: unas 9 horas Dimensiones: 107,6 x 34,5 x 11,7 mm Peso: 46,6 g (batería incluida) Alimentación: Batería recargable de litio incorporada Memoria: Flash incorporada 1GB... - Page 82 INFORMACIÓN IMPORTANTE PARA EL USUARIO SEGÚN LO DISPUESTO POR LA DIRECTIVA "RAEE" 2002/96/CE Y POSTERIOR MODIFICACIÓN 2003/108/CE SOBRE LOS DESHECHOS DE EQUIPOS ELÉCTRICOS Y ELECTRÓNICOS. Según lo dispuesto en la directiva "RAEE" 2002/96/CE y la posterior modificación 2003/108/CE, este equipo está marcado con el siguiente símbolo, que representa un contenedor de desperdicios sobre ruedas tachado con una cruz.
- Page 83 Melchioni S.p.A. Via Friuli 18/a 20135 Milano – Italy Tel. +39 02 5794397 – Fax +39.02.57941 www.melchioni.it...
Need help?
Do you have a question about the VR-600M and is the answer not in the manual?
Questions and answers