Table of Contents
Advertisement
Carbon Monoxide
PE R M
PA R TS
w o r N
(L b = Lo
ES ET
TE ST -R
n M o n
C a r b o
A L A R
Please have the following information
CO Model number (located on back of alarm):
CO Assembly number (located on back of alarm):
Date of Manufacture (located on the back of the alarm):
Date of Purchase:
Where Purchased:
Attention: Please take a few minutes to thoroughly read this manual, which should be saved for future
reference and passed on to any subsequent owner. If you have any questions about the operation or instal-
lation of your alarm, please call our toll free Consumer Hotline at 1-800-880-6788.
Alarm
User's Guide
Digital Display and Peak Level Memory
O F C O
IL LI O N
ry )
o B at te
LE V EL
PE A K
o x id e
M
IAS 6-96 SECOND EDITION CO ALARM
ALSO COMPLIES WITH CSA 6.19-01
For questions concerning your Carbon Monoxide Alarm,
please call our Consumer Hotline at 1-800-880-6788.
ready when calling:
CARRIER CO Alarm with
Model: KN-COPP-3-RC
Assembly: COALMCCNRB01-A
IAS 6-96 2ND EDITION CO ALARM
ALSO COMPLIES WITH CSA 6.19-01
See page
23 for "What to do when
the alarm sounds"
US
OMKNCOPP-01
810-2680 REV. A
09/05
Advertisement
Table of Contents

Related Manuals for Carrier KN-COPP-3-RC

Summary of Contents for Carrier KN-COPP-3-RC
- Page 1 Consumer Hotline at 1-800-880-6788. Alarm CARRIER CO Alarm with Digital Display and Peak Level Memory Model: KN-COPP-3-RC Assembly: COALMCCNRB01-A IAS 6-96 SECOND EDITION CO ALARM IAS 6-96 2ND EDITION CO ALARM ALSO COMPLIES WITH CSA 6.19-01...
-
Page 2: Table Of Contents
Quick Set Up Guide Introduction Features • Views • What CO alarms can and cannot do Installation Battery Installation Battery Backup Operation Operation • Normal operating characteristics • Testing the electronics • How to know if your alarm is malfunctioning •... - Page 3 IMPROPER OR MALFUNCTIONING APPLIANCES. IT IS NOT DESIGNED TO DETECT SMOKE, FIRE, OR ANY OTHER GAS. WARNING! THIS CARBON MONOXIDE ALARM IS NOT A SUBSTITUTE FOR INSTALLING AND MAINTAINING AN APPROPRIATE NUMBER OF SMOKE ALARMS IN YOUR HOME. THIS CARBON MONOXIDE WILL NOT SENSE SMOKE, FIRE, OR ANY POISONOUS GAS OTHER THAN CARBON MONOXIDE.
-
Page 4: Quick Set Up Guide
Quick Set Up Guide We urge you to read this entire manual in the sequence it is presented. Listed below are six easy steps for setting up your Carrier CO alarm. Please read this entire guide for complete information. Setting up your alarm for first time operation: Step 1 Determine the best location for your CO alarm(s). - Page 5 Quick Set Up Guide Step 5 If the battery pack has a full charge when first powered up, you will see three eights in the digital display indicating the alarm is warming up. After approximately 20 seconds, the first reading will be dis- played.
-
Page 6: Introduction
Serious problems can develop when combustion by-products are not properly vented outside the house. That’s why it’s so important to your safety that you have a carbon monoxide alarm. Please take the time to completely read this guide to familiarize yourself with the facts about carbon monoxide, how your new unit works, and what to do if it alarms. -
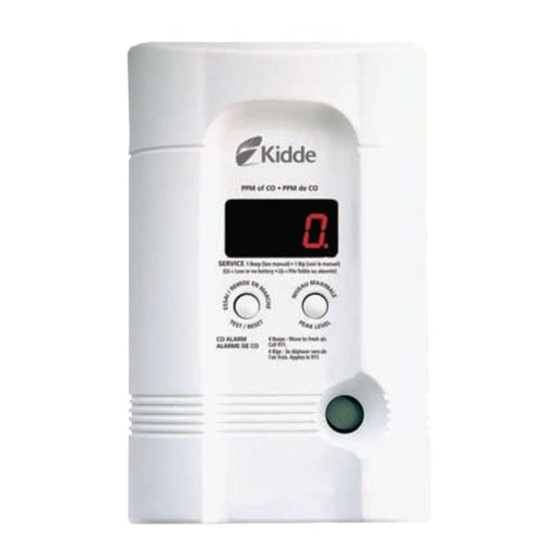
Page 7: Features
Carrier CO Alarm – front view Digital Display Test/Reset Button Carrier CO Alarm – rear view Adapter Thumb Release Key Holes PARTS PER MILLION OF CO (Lb = Low or No Battery) TEST-RESET PEAK LEVEL Carbon Monoxide ALARM Alarm Sounder Thumb Grip for Slide Support for Table Top and Direct Plug Use... -
Page 8: Digital Display
Features Digital Display The continuous digital display shows you the level of carbon monoxide (if any) the unit is sensing. The unit updates the digital display every 15 seconds . Note: If the unit does not sense any CO, the reading is zero (0). In most homes, the unit reads “0”... - Page 9 Features Pull-Out Transformer/Adapter This unique Carrier feature enables the alarm to be used as a direct plug unit, a wall mounted unit or a table top unit. Note: This CO alarm is not battery operated. Warning : Do not use any other type of rechargeable battery in your alarm or attempt to recharge the battery pack yourself.
- Page 10 CO alarms are designed to sense unacceptable levels of CO from malfunctioning furnaces, appliances, gas engines or other sources. This Carbon Monoxide alarm is not a substitute for installing and maintaining an operational smoke alarm. CO alarms provide early warning of the presence of carbon monox- ide, usually before a healthy adult would experience symptoms.
-
Page 11: Installation
WHEN CHOOSING YOUR INSTALLATION LOCATIONS, MAKE SURE YOU CAN HEAR THE ALARM FROM ALL SLEEPING AREAS. IF YOU INSTALL ONLY ONE CARBON MONOXIDE ALARM IN YOUR HOME, INSTALL THE ALARM NEAR BED- ROOMS, NOT IN THE BASEMENT OR FURNACE ROOM. -
Page 12: Where Not To Install Your Co Alarm
Installation Where Not to Install Your CO Alarm To avoid causing damage to the unit, to provide optimum protection, and to prevent unnecessary alarms, follow the directions below : It is recommended that you do not install this CO alarm in garages, kitchens or furnace rooms. - Page 13 Installation Avoid the following: • Excessive spillage or reverse venting of fuel burning appliances caused by outdoor ambient conditions, such as: 1) Wind direction and/or velocity, including high gusts of wind. Heavy air in the vent pipes (cold/humid air with extended periods between cycles).
- Page 14 Installation If the outlet is mounted horizontally (sideways): If you are going to use your alarm as a direct plug and you are going to plug in to an outlet that is mounted horizontally (sideways), you will need to rotate the adapter 90˚. To rotate the adapter: 1.
- Page 15 Installation For a wall-mounted unit, you will need to pull out the removable adapter and power cord. To install: 1. Follow steps 1 through 4 in the previous section under “To Rotate the Adapter.” 2. With the adapter removed, pull the power cord out of the cord recess, remove the twist tie, and extend the power cord.
-
Page 16: Battery Installation
Battery Installation Note: This alarm is shipped from the factory with the battery dis- connected from the alarm. Battery Installation and Operation Install the battery by first removing the battery door Battery and the battery pack. Align the connector with the slot in the battery. -
Page 17: Battery Backup Operation
Battery Backup Operation Battery Backup Operation When the alarm is unplugged or loses AC power and the battery pack is fully charged, the alarm will automatically switch to battery backup operation and you will notice the following: • For the first five minutes of operation on battery, the alarm will operate as if on AC power. -
Page 19: Operation
Operation Normal Operating Characteristics When you first power up the unit, the alarm will sound briefly to let you know the unit is receiving power and that the alarm circuit is functioning. You will see three eights on the digital display, indicating the alarm is in the start-up mode. -
Page 20: Testing The Electronics
Operation Testing the Electronics You should test the alarm once a week, below. If at any time you test the alarm and it does not perform as described below, have it replaced immediately. See “How to know if your alarm is malfunctioning” on page 17 for a description of the characteris- tics of a malfunctioning alarm and what you should do if a malfunction occurs. -
Page 21: How To Know If Your Alarm Is Malfunctioning
After reading the information above, if you are still unsure whether your alarm is operating properly,call the Kidde toll-free consumer hotline at 1-800-880- 6788 to do a quick diagnostic check of the alarm over the phone. The customer serv- ice representative will be able to assist you and answer your questions. -
Page 22: How To Care For Your Alarm
Operation How to Care for Your Alarm To keep your alarm in good working order, you must follow these simple steps: WHAT YOU SHOULD DO: • Test the alarm once a week by pressing the Test/Reset button (see page 5). •... -
Page 23: Peak Level Memory
Operation Peak Level Memory The peak level feature is helpful in identifying CO occurrences below 30 PPM. Although the unit will not automatically display levels below 30 PPM, it will detect and store these readings in memory. By pressing the peak level but- ton, concentration levels as low as 11 and up to 999 PPM will be displayed. -
Page 24: Carbon Monoxide
Carbon Monoxide Home Safety Tips What You Can Do... • Buy only appliances approved by a nationally recognized testing laboratory. • Choose fuel-burning appliances that can be vented to the outdoors, whenever possible. • Make sure appliances are installed according to manufacturer’s instructions and local building codes. -
Page 25: Understand The Effects Of Carbon Monoxide Exposure
Carbon Monoxide Be Aware of the Warning Signs of Carbon Monoxide: Clues You Can See... • Streaks of carbon or soot around the service door of your fuel-burning appli- ances. • Ayellow or orange flame may indicate a problem with natural gas appliances. •... -
Page 26: What To Do When The Alarm Sounds
What To Do When the Alarm Sounds Determine if anyone in the household is experiencing symptoms of CO poison- ing. Many cases of reported CO poisoning indicate that while victims are aware they are not well, they become so disoriented they are unable to save them- selves by either exiting the building or calling for assistance. - Page 27 What To Do When the Alarm Sounds WARNING: indicates the presence of Carbon Monoxide (CO) which can KILL YOU. When the CO alarm senses a dangerous level of CO, the unit will emit a loud alarm pattern. The alarm pattern is 4 short “chirps” – followed by 5 seconds of silence –...
-
Page 28: Specifications
Specifications Power: 120 V AC units: 60 Hz, Current 60 mA max. Sensor: Sensor calibrated at 150 ppm (±25 ppm). Temperature: Operating range: 4.4˚C (40˚F) to 37.8˚C (100˚F). Humidity: Operating range: 5–95% non-condensing. Mounting: Accessories supplied for wall mount, direct plug and tabletop appli- cations. -
Page 29: How The Unit Determines When To Alarm
Specifications How the Unit Determines When to Alarm Your Carrier CO alarm uses advanced technology to monitor the environment in your home and warn you of unacceptable lev- els of carbon monoxide. An internal microcomputer works together with the sensor inside the alarm to determine the lev- els of carbon monoxide in the air and to calculate the rate that CO would be absorbed into the human body. -
Page 30: Display Readings
Display Readings Your new Carrier carbon monoxide alarm is a sophisticated electronic device – yet very simple to understand. Basically, the unit will display a “0” if it senses 30 PPM of CO or less and if you have a good backup battery pack installed. - Page 31 Display Readings AC Powered in Normal Stand-by Operation Display Shows Alarm Sound “0” with flashing dot. “0” alternat- ing with “Lb” Flashes and a flashing alternately dot. “0” alternat- ing with “Lb” and a flashing dot. If at any time you test the alarm and it does not perform as described, have it replaced immediately. DC Powered in Battery Backup Operation Display Shows Alarm Sound...
-
Page 32: Li-Ion Battery Handling Precautions
5 minutes oriented prop- erly. Connect to of operation on AC power to battery backup. fully charge battery. Contact Kidde customer service if condi- tion continues. Confirm battery Operation on connection is battery backup fully seated & and battery is oriented prop- erly. - Page 33 • Do not disassemble or modify the battery pack under any circumstances. Disassembling the battery can cause internal shorts, resulting in bulging/bursting due to excess gas genera- tion, overheat, ignition, explosion or other problems. • Do not pierce the battery with sharp objects or subject to any other mechanical forces.
-
Page 34: Limited Warranty
Important: Do not remove back cover. Back cover removal will void warranty. Your Carrier Carbon Monoxide Alarm is not a substitute for property, disability, life or other insurance of any kind. Appropriate insurance coverage is your responsibility. Consult your insurance agent. - Page 35 For Warranty Service: In many cases the quickest way to exchange your alarm is to return it to the original place of purchase. If you have questions, call the Kidde customer service department at 1-800-880-6788 for assistance. Questions or for more information, call our Consumer Hotline or contact us at our website at www.kiddeUS.com...