
Subscribe to Our Youtube Channel
Related Manuals for Kramer Tavor 8-T


Summary of Contents for Kramer Tavor 8-T
-
Page 1: User Manual
K R A ME R E LE CT R O N IC S L TD . USER MANUAL MODEL: Tavor 8-T Active Ceiling Speaker P/N: 2900-300343 Rev 3... -
Page 3: Table Of Contents
Recycling Kramer Products Overview Defining the Tavor 8-T Installing the Tavor 8-T Choosing the Best Location Determining the Location of the Tavor 8-T Preparing the Tavor 8-T for Operation Installing the Tile Size Speaker Technical Specifications Figures Figure 1: Tile Size ESD Ceiling Speaker (that fits into the ceiling) -
Page 4: Introduction
Sierra Video Products; GROUP 12: Digital Signage; GROUP 13: Audio; and GROUP 14: Collaboration. Congratulations on purchasing your Kramer Tavor 8-T Active Ceiling Speaker, which is ideal for overhead distributed audio for professional applications (music and speech) and educational applications. -
Page 5: Getting Started
Avoid interference from neighboring electrical appliances that may adversely influence signal quality Position your Kramer Tavor 8-T away from moisture, excessive sunlight and dust This equipment is to be used only inside a building. It may only be connected to other equipment that is installed inside a building. -
Page 6: Safety Instructions
Kramer Electronics has made arrangements with the European Advanced Recycling Network (EARN) and will cover any costs of treatment, recycling and recovery of waste Kramer Electronics branded equipment on arrival at the EARN facility. For details of Kramer’s recycling arrangements in your particular country go to our recycling pages at http://www.kramerelectronics.com/support/recycling/. -
Page 7: Overview
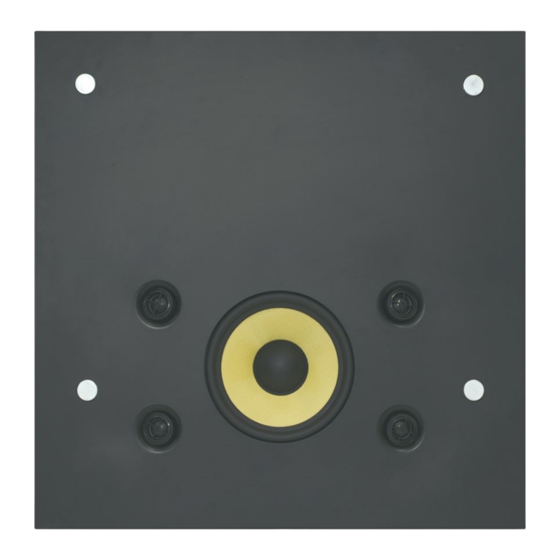
K-overage™ ESD ceiling speaker that can be mounted in the ceiling and appears as a suspended ceiling tile. The Tavor 8-T accepts 3 line level stereo inputs and amplifies them using a built-in amplifier. Each audio input level can be adjusted independently and the overall volume can be adjusted via the master volume trimmer. -
Page 8: Figure 1: Tile Size Esd Ceiling Speaker (That Fits Into The Ceiling)
Figure 1: Tile Size ESD Ceiling Speaker (that fits into the ceiling) The speaker is easily installed and is also available with a 60 X 60cm grille for the US and other markets, if required. Tavor 8-T - Overview... -
Page 9: Defining The Tavor 8-T
Defining the Tavor 8-T Figure 2 defines the Tavor 8-T: Figure 2: Tavor 8-T Feature Function Speaker Tile Base Half-tile size or tile size Anchor Ring Secure the speaker to the ceiling anchoring point Speaker Steel Enclosure Shallow fireproof enclosure... -
Page 10: Figure 3: Tavor 8-T Side View
Figure 3 defines the Tavor 8-T side view: Figure 3: Tavor 8-T Side View Feature Function INPUTS L,G,R Terminal Block Connect an audio source to the unbalanced stereo Connectors (1 to 3) audio input LEVEL Trimmers Set the audio level on each input individually using... -
Page 11: Installing The Tavor 8-T
Installing the Tavor 8-T This section explains how to install the Tavor 8-T, that is: Choosing the best place to locate your speaker (see Section 4.1) Determining the location of the speaker (see Section 4.2) Preparing the speaker for operation (see Section 4.3) -
Page 12: Determining The Location Of The Tavor 8-T
The example in Figure 4 shows the Tavor 8-T installed in a 10m x 5m room. This example also shows how the Tavor 8-T can actually replace several standard speakers in a room. Figure 4: Tavor 8-T vs. Standard Speakers... -
Page 13: Preparing The Tavor 8-T For Operation
L, G and R INPUT terminal block connectors. Note: Do not ground the speakers. Figure 5: Connecting the Inputs Connect the 24V DC power adapter to the Tavor 8-T power socket and to the mains electricity. Tavor 8-T - Installing the Tavor 8-T... -
Page 14: Installing The Tile Size Speaker
Installing the Tile Size Speaker 1. Drop the speaker into the ceiling tile space. Make sure that you position the speaker lengthwise relative to the room shape (see Figure Figure 6: Fitting the Tile Size Speaker Tavor 8-T - Installing the Tavor 8-T... -
Page 15: Figure 7: Securing The Speaker To A Ceiling Anchor Point
The anchor prevents the speaker from falling if the tile itself comes out or falls apart. Figure 7: Securing the Speaker to a Ceiling Anchor Point Do not over-tighten the screws. It may cause damage to both the speakers and the surface. Tavor 8-T - Installing the Tavor 8-T... -
Page 16: Technical Specifications
SHIPPING WEIGHT: 10.5 kg (27.1lbs) approx. ACCESSORIES: 24V DC power adapter, 2 available grilles (595x595mm, 600x600mm) COLORS: Available in white Specifications are within a 10% tolerance and are subject to change without notice at http://www.kramerelectronics.com Tavor 8-T - Technical Specifications... - Page 18 For the latest information on our products and a list of Kramer distributors, visit our Web site where updates to this user manual may be found. We welcome your questions, comments, and feedback. Web site: www.kramerelectronics.com E-mail: info@kramerel.com SAFETY WARNING...
Need help?
Do you have a question about the Tavor 8-T and is the answer not in the manual?
Questions and answers