
Subscribe to Our Youtube Channel
Related Manuals for Kramer Yarden 8-T SPK-C820T


Summary of Contents for Kramer Yarden 8-T SPK-C820T
-
Page 1: User Manual
K R A ME R E LE CT R O N IC S L TD . USER MANUAL MODEL: Yarden 8-T (SPK-C820T) Ceiling Speaker P/N: 2900-300306 Rev 1... - Page 2 This page is intentionally left blank...
-
Page 4: Table Of Contents
Contents Introduction Getting Started Achieving the Best Performance Recycling Kramer Products Overview Defining the Yarden 8-T Installing the Yarden 8-T Choosing the Best Location Connecting the wires Determining the Number of Speakers Needed and their Location Preparing the Yarden 8-T for Operation... -
Page 5: Introduction
Scan Converters and Scalers; GROUP 8: Cables and Connectors; GROUP 9: Room Connectivity; GROUP 10: Accessories and Rack Adapters and GROUP 11: Sierra Products. Congratulations on purchasing your Kramer Yarden 8-T Ceiling Speaker, which is ideal for overhead distributed audio for professional applications (music and speech) and educational applications. -
Page 6: Getting Started
Achieving the Best Performance To achieve the best performance: Use only good quality connection cables (we recommend Kramer high- performance, high-resolution cables) to avoid interference, deterioration in signal quality due to poor matching, and elevated noise levels (often associated with low quality cables) ... -
Page 7: Recycling Kramer Products
Kramer Electronics has made arrangements with the European Advanced Recycling Network (EARN) and will cover any costs of treatment, recycling and recovery of waste Kramer Electronics branded equipment on arrival at the EARN facility. For details of Kramer’s recycling arrangements in your particular country go to our recycling pages at http://www.kramerelectronics.com/support/recycling/. -
Page 8: Overview
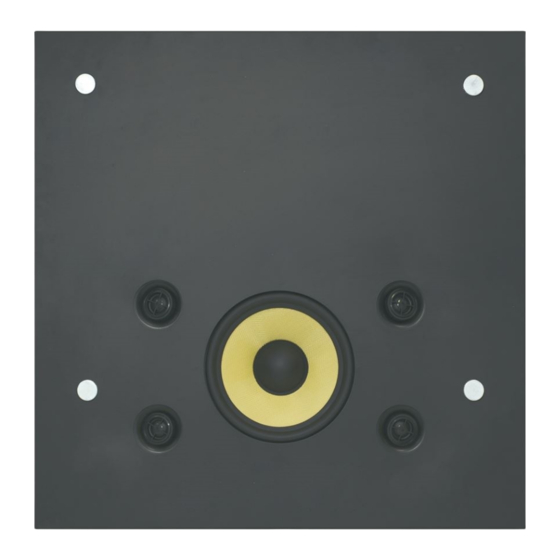
The ESD ceiling speaker is constructed with a central driver and four pivoting tweeters and is housed in an enclosed shallow enclosure. The Kramer complete K-overage ESD provides unmatched sound response in a suspended ceiling device for the professional and educational markets. This means that you get the sound you need but with a reduced number of speakers. -
Page 9: Defining The Yarden 8-T
RoHS compliance Compliance to RoHS means acting in full accordance with RoHS regulations that restrict the use of certain dangerous substances commonly used in electronic equipment A speaker grille that is supported by two screws and held together with a set of magnets ... -
Page 10: Figure 2: Yarden 8-T Top And Underside View
Figure 2: Yarden 8-T Top and Underside View Yarden 8-T - Overview... -
Page 11: Figure 3: Yarden 8-T Side View
Flat Ceiling Speaker Features Feature Function Speaker Tile Base Tile size Speaker Steel Enclosure Shallow fireproof enclosure Anchor Ring Secure the speaker to the ceiling anchoring point Wire Secure Ring Insert the wire through the plastic ring to secure the wires to the speaker Tap Selector and Operation Switches Control the speaker operation mode INPUT Terminal Block Connector Connect to the audio source (see... -
Page 12: Installing The Yarden 8-T
Installing the Yarden 8-T This section explains how to install the Yarden 8-T, that is: Choosing the best place to locate your speaker (see Section 4.1) Connecting the wires (see Section 4.2) Determining the number of speakers (see Section 4.3) ... -
Page 13: Determining The Number Of Speakers Needed And Their Location
The red wires connect to the + pins and the black wires connect to the – pins. Determining the Number of Speakers Needed and their Location When installed in a room with a standard ceiling height of 2.7m (8.8 feet), the optimal distance between the speakers is about 10 meters. -
Page 14: Figure 6: Stereo Layout
If the size of the room only requires a single speaker, we recommend using the mono/stereo speaker for speech or music as required (see Figure 6 Figure Figure 6: Stereo Layout If the size of the room requires more than one speaker, use two or more mono speaker models (see Figure Yarden 8-T - Installing the Yarden 8-T... -
Page 15: Preparing The Yarden 8-T For Operation
Figure 7: Mono Layout Preparing the Yarden 8-T for Operation Once the location of the speaker is determined, prepare the speaker for operation as follows: 1. Move each of the pivoting tweeters outward in an angle that is suited to the room shape and size. -
Page 16: Installing The Tile Size Speaker
Figure 8: Adjust Tap Selector 6. Place the speaker temporarily in place, and test the audio quality. 7. If you are satisfied, disconnect the amplifier and remove the speaker from the ceiling. If not, change the position of the tweeters and check the audio quality again until you are happy with the results. -
Page 17: Figure 9: Fitting The Tile Size Speaker
Figure 9: Fitting the Tile Size Speaker 2. Secure the speaker by connecting the speaker support ring to an independent secure ceiling anchor point (see Figure 10) as appropriate. The anchor prevents the speaker from falling if the tile itself comes out or falls apart. Yarden 8-T - Installing the Yarden 8-T... - Page 18 Figure 10: Securing the Speaker to a Ceiling Anchor Point 3. If required, daisy-chain the next speaker (see Section 4.3). Do not over-tighten the screws. It may cause damage to both the speakers and the surface. Figure 11 shows an example of how the Yarden 8-T can be installed in a boardroom setup: Yarden 8-T - Installing the Yarden 8-T...
- Page 19 Figure 11: Yarden 8-T in a Boardroom Setup Yarden 8-T - Installing the Yarden 8-T...
-
Page 20: Technical Specifications
Technical Specifications Audio and Power DESCRIPTION: Two-way flat ceiling speaker FREQUENCY RESPONSE: 65Hz to 20kHz @ -10dB 80Hz to 20kHz @ ±3dB 8” (200mm) Kevlar(R) with rubber surround WOOFER: 4 x 0.75” (20mm) pivoting titanium dome TWEETER: 8Ω stereo, 4Ω mono (transformer tap in off position) IMPEDANCE: Stereo: 70V –... - Page 22 For the latest information on our products and a list of Kramer distributors, visit our Web site where updates to this user manual may be found. We welcome your questions, comments, and feedback. Web site: www.kramerelectronics.com E-mail: info@kramerel.com SAFETY WARNING...
Need help?
Do you have a question about the Yarden 8-T SPK-C820T and is the answer not in the manual?
Questions and answers