Table of Contents
Advertisement
Advertisement
Table of Contents

Subscribe to Our Youtube Channel
Related Manuals for Koryo KFP 1000

Summary of Contents for Koryo KFP 1000
- Page 1 User's MANUAL...
- Page 2 Dear Customer, Congratulations! Thank you for buying this KORYO appliance. Your new Food Processor has been designed for your convenience. We are sure you will get many years of trouble free service from this appliance. Before commissioning this device please read this user manual carefully.
-
Page 3: Table Of Contents
CONTeNTs Important Safeguards ............ 4 Part Description ............5 Processing Table ............6 Kneading Operation ............7 Chopping Operation ............8 Pureeing Operation ............9 Mincing Operation ............10 Disc Blades - Tips & Warnings ........11 Citrus Juicer ............... 11 Centrifugal Juicer ............ -
Page 4: Important Safeguards
Do not operate any appliance with a damaged power cord or plug, or after an appliance has malfunctioned, or has been dropped or damaged in any way. Contact KORYO Authorized Service Centre for advice on examination, repair or electrical / mechanical adjustment. -
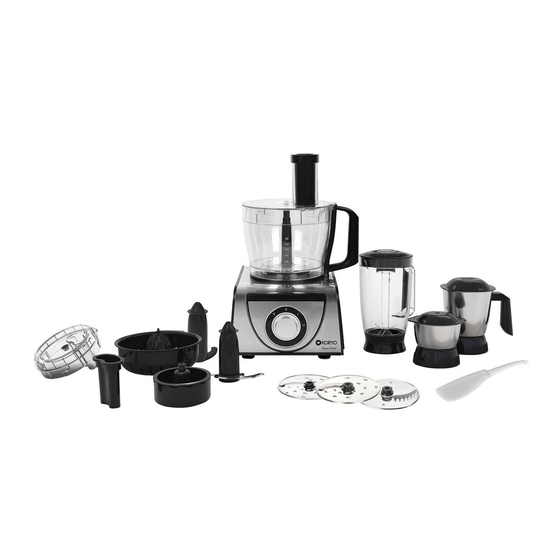
Page 5: Part Description
PArT DesCrIPTION Part Description 10. Chopping blade 21. Chutney jar 1. Processor body 13. Finger chips / 22. Chutney jar gasket for lid French fries blade 2. Speed selector knob 23. Chutney jar lid 14. Spatula 3. Processor spindle 24. Citrus filter 15. -
Page 6: Processing Table
PrOCessING TABLe Description of Quantity Speed Blade Slicing of onions, cucumber, radish, Bowl “1” or “2” or “3” Slicing Blade carrots, potatoes etc. For salads Capacity and cooking Shreds carrots for halwa, potatoes Bowl “1” or “2” or “3” for cheevda. Cucumber for raita, Capacity Grating &... -
Page 7: Kneading Operation
KNeADING OPerATION (Atta, Madia etc.) steps Ensure that the processor is unplugged form the power supply. Fig.1 Place the spindle on the processor coupler. (Fig.1) Place the Bowl on the processor as shown in (Fig2) aligning the unlock marking on the bowl & processor unit & turn clockwise to lock. -
Page 8: Chopping Operation
CHOPPING OPerATION (Onions, cabbage, leafy vegetables, meat mincing, mash potato tomato puree etc.) steps Fig.1 Follow the first 4 steps of kneading operation to fit the spindle & processor bowl. Place the chopping blade at the center of the bowl & on the spindle as shown in the (Fig.3) Fig.2 Cut peeled onions (or any other vegetable to be chopped) into... -
Page 9: Pureeing Operation
PUreeING OPerATION (Tomato etc.) steps Follow the first 4 steps of kneading operation to fit the spindle Fig.1 & processor bowl. Place the chopping blade at the center of the bowl & on the spindle as shown in the (Fig.3) Cut boiled Tomatoes into 1½... -
Page 10: Mincing Operation
MINCING OPerATION (Meat for kheme, kabab etc.) steps Follow the first 4 steps of kneading operation to fit the spindle Fig.1 & processor bowl. Place the chopping blade at the center of the bowl & on the spindle as shown in the (Fig.3) Cut meat into 1 inch size pieces. -
Page 11: Disc Blades - Tips & Warnings
DIsCs BLADes - TIPs AND WArNINGs Do not exert too much pressure on the pusher when you press ingredients down the feeding tube. Do not let the appliance run too long when you shred (hard) cheese. Otherwise the cheese becomes too hot, starts to melt and turns lumpy. -
Page 12: Centrifugal Juicer
CeNTrIFUGAL JUICer (Extract juice from apples, pineapples and carrots) steps Follow the first 4 steps of kneading operation to fit the spindle & processor bowl. Lock extractor mesh into the juicer extractor by turning mesh in Fig.1 anticlockwise direction. Then place the same in the center of the bowl and on the spindle and press firmly (Fig.3) By holding the feeder tube of the juicer lid, lock the lid by rotating clockwise aligning feeder tube with the handle of the processor. -
Page 13: Grinding
GrINDING (Idli batter (soaked rice and black gram) spices, pulses, ground nut, red chili, sugar, green coconut chutney, tomato puree, gravy etc.) steps Ensure that the processor is unplugged from the power supply. Fig.1 Place the grinder jar into its location on the processor body; turn clockwise until the grinder clicks in place. -
Page 14: Chutney Grinder
CHUTNeY GrINDer (Small quantities of spices, groundnut red chill, sugar, green coconut chutney, tomato puree, gravy etc.) steps Ensure that the processor is unplugged from the power supply. Place the chutney grinder jar into its location on the processor body; turn clockwise until the grinder clicks in place. -
Page 15: Trouble Shooting
Tripped due to over load processor. The processor does If it still does not operate, contact not start. the nearest Koryo Authorised Service center. Processor bowl lid cover / Fit the processor bowl lid cover / juice extractor lid cover /... -
Page 16: Warranty
In the event of a defect developing in the product, contact KORYO Customer Care or KORYO Authorized Service Centre and provide information about the defect, the model number and serial number of the product. - Page 18 Also Available Convection MW Ovens Slow Juicer Split Air Conditioner Grill MW Ovens Juicer Mixer Grinder Window Air Conditioner Oven Toaster Grill Mixer Grinder Storage Water Heater Pop Up Toasters Juice Extractor Instant Water Heater Sandwich Maker Food Steamer Immersion Heater Induction Cooker Chopper Room Heaters...
Need help?
Do you have a question about the KFP 1000 and is the answer not in the manual?
Questions and answers