Table of Contents
Advertisement
Quick Links
Advertisement
Table of Contents

Related Manuals for Roland V-Drums TD-20X


Summary of Contents for Roland V-Drums TD-20X
- Page 2 Cover1,4...
-
Page 3: Important Safety Instructions
WARNING: To reduce the risk of fire or electric shock, do not expose this apparatus to rain or moisture. The lightning flash with arrowhead symbol, within an CAUTION equilateral triangle, is intended to alert the user to the RISK OF ELECTRIC SHOCK presence of uninsulated “dangerous voltage”... -
Page 4: Using The Unit Safely
Refer all servicing cord, producing severed elements and short circuits. to your retailer, the nearest Roland Service Center, or Damaged cords are fire and shock hazards! an authorized Roland distributor, as listed on the ........................ - Page 5 Before using the unit in a foreign country, consult with 109a • Before cleaning the unit, turn off the power and your retailer, the nearest Roland Service Center, or an unplug the power cord from the outlet (p. 24). authorized Roland distributor, as listed on the “Information” page.
-
Page 6: Important Notes
POWER switch, then unplug the power cord from the power possible to restore the data, and Roland assumes no liability outlet. For this reason, the outlet into which you choose to concerning such loss of data. - Page 7 Owner’s manual should be read in its entirety. The manual should be saved and kept on hand as a convenient reference. Copyright © 2009 ROLAND CORPORATION All rights reserved. No part of this publication may be reproduced in any form without the written permission of ROLAND CORPORATION.
-
Page 8: Table Of Contents
Top Panel .................................... 16 Rear Panel ................................... 18 Front Panel ..................................19 Getting Ready....................20 Mounting the TD-20X on the Stand.......................... 20 Connecting the Pads ..............................21 Connecting Headphones, Audio Equipment ......................23 Turning On/Off the Power ............................24 Adjusting the Volume ..............................25 Making Hi-hat (VH-12) Settings .......................... - Page 9 Contents Copying a Drum Kit ................................. 42 Copying Fifty Drum Kits at a Time ......................42 Specifying the Order in Which Drum Kits will be Recalled [CHAIN] .............. 43 Creating a Drum Kit Chain..........................43 Naming a Drum Kit Chain [F5 (NAME)] ..................... 44 Copying a Drum Kit Chain ..........................
- Page 10 Contents Chapter 5. Playing Patterns—Sequencer............69 Basic Operation................................. 69 Choosing a Pattern [PATTERN]............................ 70 About the “PATTERN” screen ........................70 Selecting a Pattern from the List [F1 (LIST)] ......................70 Playing Back a Pattern [PLAY]............................71 Making Settings for Each Part [F2 (PART)]....................... 71 Muting a Specific Part [F1 (MUTE)] ......................
- Page 11 About MIDI Connectors..........................115 MIDI Channel Settings [F1 (MIDI CH)]........................115 MIDI Channel Settings for the Entire TD-20X [F2 (GLOBAL)]................116 Playing an External MIDI Sound Module from Another MIDI Controller (Soft Through) ..116 Recording the Pad Performance on an External Sequencer (Local Control) ......117 Setting the Device ID.............................117...
- Page 12 Copying the Drum Kit Chosen in Kit Selection ..................122 Viewing the Output Level (OUPUT MONITOR) [F2 (OUT MON)] ..............122 Viewing Trigger Information for Each Pad [F3 (TRG MON)]................123 Using the TD-20X to Control Images [F5 (V-LINK)] ....................123 What is V-LINK?..............................123 Using V-LINK ..............................123 Viewing the Remaining Memory and the Program Version [F1 (INFO)] ............125...
-
Page 13: Features
Features About the TD-20X A Rich and Wide Variety of Sounds The TD-20X is the most advanced drum & percussion sound 100 Different Drum Kits module in the world. (It is the same as a TD-20 with the TDW- 20 Expansion Board installed.) - Page 14 (V-Edit, etc.). TD-20X gives you matter what style of music you are performing. superior control and allows you to easily customize the sounds to your specific needs.
- Page 15 Direct 7/8 can be used as three sets of stereo outputs. The Digital Out is a coaxial type, 44.1 kHz / 24-bit. You can use the TD-20X as a MIDI drum sound module. In • MIX IN Jack (Stereo) addition to the drum kit section the TD-20X also has a full The MIX IN has its own, independent volume control.
-
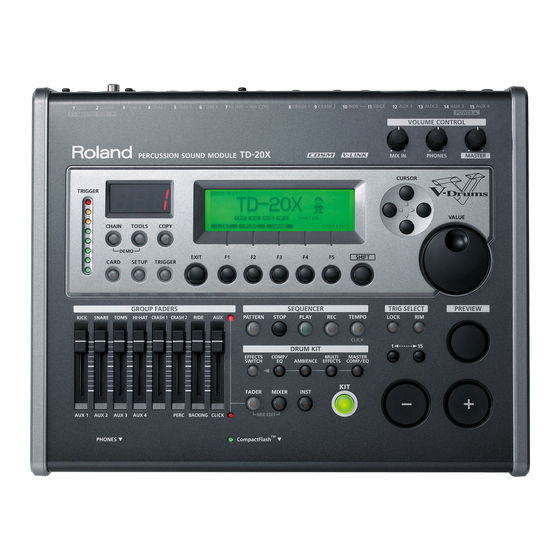
Page 16: Panel Descriptions
Panel Descriptions Top Panel fig.top Trigger Level Indicator [CHAIN] Button This lights up and moves each time a trigger signal is A Drum Kit Chain allows you to set up a customized order for received from a pad. It monitors the pad connection and is playing your kits (p. - Page 17 (p. 25). [SETUP] Button [PHONES] Knob For access to functions that affect the TD-20X globally, such Adjusts the headphone volume (p. 25). Plugging in as MIDI parameters or Output Assign function etc. (p. 108). headphones does not affect the master output (like other audio device).
-
Page 18: Rear Panel
TRIGGER INPUT jacks DIRECT OUT jacks (unbalanced) Use these jacks for connecting your pads to the TD-20X (p. 21). Connect these jacks if you’re using an external mixer. You can Use a stereo (TRS) cable if you’re connecting a dual-trigger make settings in SETUP to specify which of the DIRECT 1–8... -
Page 19: Front Panel
MASTER OUT jacks (p. 23). CompactFlash Card Slot Accepts a CompactFlash card (optional). Each CompactFlash card can store all settings of the TD-20X, such as drum kits and sequencer performance data, etc. (p. 91). The TD-20X supports 3.3V CompactFlash cards (Type I) in a range of 16 MB–4 GB capacities. -
Page 20: Getting Ready
Using the four screws attached to the bottom panel, attach the holder so the unit is oriented as shown in the diagram. ONLY use the 12 mm screws (M5 x 12) provided with the TD-20X. Other screws may damage the unit. -
Page 21: Connecting The Pads
When mounting a TD-20X on an MDS-25 drum stand, use the built-in connection cables. Set up example Connect the various pads to the TD-20X’s TRIGGER INPUT jacks. The names of the corresponding TRIGGER INPUT jacks on the TD-20X are enclosed with a solid line in the illustration below. fig.Kit.e BOW/BELL... - Page 22 Kick “Sensitivity” setting Adjust “Sensitivity” in order to take full advantage of the TD-20X’s capabilities such as the dynamic response of the kick sounds. The “Sensitivity” setting is significantly influenced by differences in the particular pad you’re using, your kick pedal, and your playing style.
-
Page 23: Connecting Headphones, Audio Equipment
Front Panel Turn off the power of all devices before you make • To adjust the volume of the device connected to the MIX IN jack, turn the [MIX IN] knob on the TD-20X’s top connections. panel. • The sound input from the MIX IN jack can be output To prevent malfunction and/or damage to speakers or from the MASTER OUT, PHONES, or DIRECT OUT 5–8... -
Page 24: Turning On/Off The Power
Check the following points. other devices. When using audio equipment fig.VolMin • Is the audio equipment connected to the TD-20X’s MASTER OUT jacks? • Is the input of the audio equipment properly connected? • Is there a problem with any connection cables? •... -
Page 25: Adjusting The Volume
If you’re using the VH-12 V-hi-hat, execute the offset Adjust each tuning bolt little by little, across the adjustment from the TD-20X after making connections. head as indicated in the illustration. This assures This adjustment is required in order to correctly detect open, even tensioning. -
Page 26: Adjusting The Display Contrast
Adjusting the Display Contrast press the [F4 (STOP)] or [STOP] button. If the position in which the TD-20X is placed makes the • When you press the button, you’ll return to the display difficult to read, adjust the display contrast as follows. -
Page 27: Demo Songs
Title Copyright recommended for each song. However, you are free to listen Kit 1:TD-20X Copyright ©2009, Roland Corporation to the demo songs played using a different drum kit. Kit 4:MetalCore Copyright ©2009, Roland Corporation In the “DEMONSTRATION” screen, select the kit Kit 6:40s Bop Copyright ©2009, Roland Corporation... -
Page 28: Overview
Every time you change a value during the editing process, it’s The [-] and [+] buttons and the [VALUE] dial are both used to automatically stored in the TD-20X’s memory. There’s no change the values of settings. Both methods have “write/save”... -
Page 29: Choosing A Pad To Edit
Overview Choosing pads from the TD-20X’s top panel Choosing a Pad to Edit fig.00-007_70 About the upper right display screen indications fig.00-005-snare.eps_70 You can use the TRIG SELECT buttons to select a pad/sound without needing to hit a pad and/or when a pad is not connected. -
Page 30: Using The Group Faders (Group Faders/[Fader])
Overview Example: Adjusting the Snare Volume Using The Group Faders Press the [FADER] button so the upper indicator is (GROUP FADERS/[FADER]) lit. fig.00-009 Move the GROUP FADERS [SNARE] slider. The slider position shows the current snare volume. After switching with the [FADER] button, the values for the GROUP FADERS sliders may not reflect the actual volume of the sound assigned to that fader. -
Page 31: About Memory
The preset memory’s drum kits are organized into two User memory groups: TD-20 and TDW-20. The memory area in the TD-20X is rewritable. Settings stored in preset memory All settings are stored as soon as you edit them. • Drum kits (p. 39) -
Page 32: Playing Methods
Playing with brushes Hit only the head of the pad. With certain snare sounds, With the TD-20X, you can “swish” or “sweep” using brushes playing position will change with the PD-125XS, 4PD-125X, or PD-105X connected to the nuance of the sound. -
Page 33: Hi-Hat (Vh-12)
Overview Hi-Hat (VH-12) Cymbal (CY-15R/14C) Open/closed Bow shot The hi-hat tone changes smoothly and continuously from This is the most common playing method, playing the middle open to closed in response to how far the pedal is pressed. area of the cymbal. It corresponds to the sound of the “head- side”... -
Page 34: Positional Sensing
The trigger signal is input to a TRIGGER INPUT jack on the rear rim. panel of the TD-20X, and is received by the sound generator fig.Play-CYPosi section. Sound generator section This section produces the sound. -
Page 35: Main Functions (Terminology)
If you want to restore the preset drum kit settings to their original condition, you can copy the When the TD-20X is shipped, it contains drum kits 1–100. corresponding TD-20 or TDW-20 drum kit from preset Each drum kit has distinctive instruments and effects for each memory (p. - Page 36 Trigger settings ensure that the trigger signals from the pads applying “effects.” and pedals are appropriately conveyed to the sound The TD-20X provides the following effects; some effects can generator section so that you’ll get the performance you be applied to individual pads, while other effects apply to the expect.
-
Page 37: Convenient Functions
(Factory Reset). phrase to play its sounds. For details on the procedure, refer to “Restoring the Factory For convenient auditioning, the TD-20X provides various Settings [F5 (F RESET)]” (p. 114). drum and backing phrases (“preset patterns”). - Page 38 Playing along with a pattern Backing up data to a CompactFlash card The TD-20X provides a variety of “patterns”—drum sound By using a separately sold CompactFlash card, you can save and backing phrases. It’s easy to play along with these (back up) 99 sets of the contents of user memory.
-
Page 39: Chapter 1. Drum Kit Settings [Kit]
Chapter 1. Drum Kit Settings [KIT] A “drum kit” consists of a sound selection for each pad, Selecting a Drum Kit from the together with effect settings, etc. (p. 35). List [F1 (LIST)] Choosing a Drum Kit You can select a drum kit by accessing the list of available Press the [KIT] button. -
Page 40: Making Settings For Each Drum Kit [F2 (Func)]
Chapter 1. Drum Kit Settings [KIT] Making Settings for Each Drum When you select a kit of which “Kit Tempo” is set to “ON,” the defined tempo appears in the upper right of Kit [F2 (FUNC)] the “DRUM KIT” screen. fig.01-006-kittempo-on.eps_70 Press the [KIT] button. -
Page 41: Viewing The Output Level (Ouput Monitor) [F5 (Monitor)]
Chapter 1. Drum Kit Settings [KIT] Viewing the Output Level (OUPUT Playing Cross Stick [F5 (XSTICK)] MONITOR) [F5 (MONITOR)] For each kit, you can specify whether cross-stick techniques can be used. You can view the volume that is being output from the MASTER OUT, PHONES, or DIRECT OUT jacks. -
Page 42: Copying A Drum Kit
Chapter 1. Drum Kit Settings [KIT] Use the [CURSOR] buttons, [-] [+] buttons, and Copying a Drum Kit [VALUE] dial to specify the copy-source and copy- destination. You can copy a drum kit from preset memory or from a If you selected [F2 (PRESET)] in step 3, specify whether you’re CompactFlash card. -
Page 43: Specifying The Order In Which Drum Kits Will Be Recalled [Chain]
[CHAIN] “Drum Kit Chain” allows you to step through the drum kits of your choice and in the order you want. The TD-20X lets you create and store 16 different chains of up to 32 steps each. You can specify the order in which you’ll be using drum kits Function button in your live performance;... -
Page 44: Naming A Drum Kit Chain [F5 (Name)]
Chapter 1. Drum Kit Settings [KIT] Naming a Drum Kit Chain [F5 (NAME)] Copying a Drum Kit Chain Each chain’s name can use up to 12 characters. You can copy a drum kit chain from preset memory or from a CompactFlash card. -
Page 45: Using A Drum Kit Chain
Chapter 1. Drum Kit Settings [KIT] Use the [CURSOR] buttons, [-] [+] buttons, and Using a Drum Kit Chain [VALUE] dial to specify the copy-source and copy- destination. Here’s how to select a drum kit chain you’ve created, and If you selected [F3 (CARD)] in step 4, select the copy-source step through the drum kits in the order you want to use backup number. -
Page 46: Chapter 2. Instrument Settings [Inst]
To select a pad’s rim, strike the rim. Assign an Instrument to a Pad Choose with the trigger select buttons All the TD-20X sounds are referred to as “instruments (INST).” You can choose an instrument from the TD-20 instruments or Press the [INST] button. -
Page 47: Selecting An Instrument From The List [F1 (List)]
Chapter 2. Instrument Settings [INST] Select the pad that you want to edit. Function button Strike the desired pad, or use the TRIG SELECT buttons to [F1 (LIST)] Displays the instrument list. select it. The “INST LIST” screen for the selected pad will appear. [F2 (EDIT)] Edits instrument settings (p. -
Page 48: Editing Drum Sounds [F2 (Edit)]
Chapter 2. Instrument Settings [INST] Editing Drum Sounds [F2 (EDIT)] Editing Procedure Press the [INST] button. Editing methods differ according to the type of instrument. Press the [F2 (EDIT)] button. Editing Acoustic Drum Sounds (V-EDIT) The “INST EDIT” screen appears. Select the pad that you want to edit. - Page 49 Chapter 2. Instrument Settings [INST] The edit screens for each pad SNARE fig.02-011-snare-f1.eps_70 KICK fig.02-007-kick-f1.eps_70 Parameter Value Description [F1 (SHELL)] button WOOD, STEEL, Parameter Value Description Material Material of the shell BRASS [F1 (SHELL)] button Shell Depth 1.0”–20.0” Depth of the shell NORMAL, Shell Depth Depth of the shell...
- Page 50 Chapter 2. Instrument Settings [INST] HI-HAT fig.02-015-tom-f1.eps_70 fig.02-019-hh-f1.eps_70 Parameter Value Description Parameter Value Description [F1 (SHELL)] button [F1 (SIZE)] button NORMAL, Size 1”–40” Hi-hat diameter Shell Depth Depth of the shell DEEP1–2 [F2 (ADD)] button [F2 (HEAD)] button Allows you to add OFF, CLEAR, tambourine, cabasa, or...
- Page 51 Chapter 2. Instrument Settings [INST] CRASH/SPLASH/CHINA/STACKED CYMBAL/RIDE Instruments for which V-EDIT is not available fig.02-023-cym-f1.eps_70 Electronic instruments (Dynamic Pitch Bend) “Dynamic Pitch Bend” is a function that you can use with the electronic instruments that were added on the TDW-20. You can make the following settings when you’ve selected the “SNARE ELEC,”...
-
Page 52: Using Pads/Pedal As Controllers [F3 (Control)]
Chapter 2. Instrument Settings [INST] Using Pads/Pedal as Controllers Parameter Value Description Specifies whether the Pad Pattern [F3 (CONTROL)] PadPtn OFF, ON function will be used (ON) or not Master Sw used (OFF). Selects the played back pattern Press the [INST] button. OFF, when the pad is struck. -
Page 53: Enabling/Disabling Tonal Change Controlled By Strike Position Or Rim Shot Nuance [F3 (Posi)]
Chapter 2. Instrument Settings [INST] Parameter Value Description Enabling/Disabling Tonal Change 0 (C -)–127 Transmitted MIDI note Controlled by Strike Position or Rim (G 9) number Note No. Shot Nuance [F3 (POSI)] Note messages are not transmitted. Duration of the note sent You can set this for the snare (head, rim), tom (rim), ride from each pad Gate Time... -
Page 54: Copying An Instrument
Chapter 2. Instrument Settings [INST] MIDI note number transmitted by brush Copying an Instrument sweep/cross stick [F5 (BR MIDI)] You can copy an instrument from preset memory or from a Parameter Value Description CompactFlash card. When copying an instrument, you can choose whether to MIDI note number 0 (C -)–127 (G 9) transmitted by brush... -
Page 55: Copying A Set Of Multiple Instruments
Chapter 2. Instrument Settings [INST] Use the [CURSOR] buttons, [-] [+] buttons, and Copying a Set of Multiple Instruments [VALUE] dial to specify the copy-source and copy- destination. You can copy multiple instruments to another drum kit in a If you selected [F2 (PRESET)] in step 3, specify whether you’re single operation. -
Page 56: Chapter 3. Mixer Settings
Press the [MIXER] button. Normally, the GROUP FADERS are used to adjust the volume balance of the TD-20X’s output. However, you can also use The [MIXER] button lights. these faders temporarily to edit the drum kit’s mixer settings. -
Page 57: Copying Mixer Settings
Chapter 3. Mixer Settings Press the [EXIT] or [FADER] button to return to the Use the [F1]–[F3] buttons to select the copy-source. “DRUM KIT” screen. Function button After pressing the [EXIT] or [FADER] button, the values Copy from user memory. for the GROUP FADERS sliders may not reflect the actual Exchanging the copy-source and copy- [F1 (USER)]... -
Page 58: Chapter 4. Effect Settings
Chapter 4. Effect Settings The TD-20X provides the following effects, and allows you to Turning Effects On/Off make detailed settings for each effect. [EFFECTS SWITCH] The TD-20X’s effects • COMP/EQ (Pad compressor/equalizer): These switches allow you to turn the Pad Comp/EQ, These settings are made for each pad. -
Page 59: Adjusting Volume Change And Tone [Comp/Eq]
Chapter 4. Effect Settings For more detailed setting, adjust the parameters below. Adjusting Volume Change and Parameter Value Description Tone [COMP/EQ] Output level of the Gain -15– +20 (dB) compressor Here’s how to adjust the volume change and tone for each pad. Thre Volume level at which -30–0 (dB) -
Page 60: Adjusting The Tone (Equalizer) [F3 (Eq)]
Chapter 4. Effect Settings Adjusting the Tone (Equalizer) [F3 (EQ)] Type of Acoustics for the Room (Ambience) [AMBIENCE] You can use three-band equalizers (for high, middle, and low frequency ranges) to adjust the sound. fig.04-004-padeq.eps_70 You can choose the type of room where the drums are to be played and modify the sound. -
Page 61: Auditioning The Ambience Effect [F5 (Amb Mon)]
Chapter 4. Effect Settings Parameter Value Description Auditioning the Ambience Effect [F3 (ROOM)] button [F5 (AMB MON)] TINY, SMALL, Room Size MEDIUM, Room size In the ambience edit screen, pressing the [F5 (AMB MON)] LARGE, HUGE button will cause the MASTER OUT jacks and PHONES jack to Shape of room and length output only the sound with ambience applied. -
Page 62: Applying Effects To The Sound (Multi-Effects) [Multi Effects]
Chapter 4. Effect Settings Turning the multi-effects switch on/off Applying Effects to the Sound (Multi-Effects) [MULTI EFFECTS] Press the [MULTI EFFECTS] button. The [MULTI EFFECTS] button will light. The multi-effects allow you to further customize your sound Press the [F1] button to turn multi-effects on/off. and also provides a choice of output configurations. -
Page 63: Multi-Effects Parameters
Chapter 4. Effect Settings DELAY Multi-Effects Parameters Adds the delay sound. Parameter Value Description REVERB Time until the delay sound is Adds reverberation to the sound, simulating an acoustic Time 0–2000 (ms) heard space. Amount of the delay sound Feedback -98–98 (%) that is fed back into the effect Parameter... - Page 64 Chapter 4. Effect Settings FLANGER PITCH SHIFT Produces a metallic resonance that rises and falls somewhat Shifts the pitch of the original sound. like a jet airplane taking off or landing. Parameter Value Description Parameter Value Description Setting a higher value results Mode 1–5 in a slower response, but...
-
Page 65: Adjusting The Overall Sound [Master Comp/Eq]
Chapter 4. Effect Settings LO-FI Adjusting the Overall Sound Intentionally degrades the sound quality for creative purposes. [MASTER COMP/EQ] Parameter Value Description You can make settings for the stereo compressor/limiter and Fs Rate OFF, 1/2–1/32 Sample rate three-band parametric EQ (equalizer) that are applied to the final stage of the master output. -
Page 66: Editing The Master Comp/Eq Settings
Chapter 4. Effect Settings Parameter Value Description Editing the Master Comp/EQ Settings Gain -12– +12 (dB) Amount of boost/cut Press the [MASTER COMP/EQ] button. The sound may be distorted in a certain setting. The [MASTER COMP/EQ] button lights. fig.04-011-mastercomp.eps_70 You can choose whether the master compressor/ equalizer settings will be independent for each kit, or be shared for all kits (p. - Page 67 [F5 (DEFAULT)] button when “Master Comp/ EQ” (p. 112) is set to “EACH KIT.” The TD-20X’s preset memory drum kits are adjusted so Compressing the volume peaks to limit excessive that if you turn the master comp/EQ on, the loudness...
-
Page 68: Copying Effect Settings
Chapter 4. Effect Settings Use the [F1]–[F3] buttons to select the copy-source. Copying Effect Settings Function button Here’s how a drum kit’s ambience settings (AMBIENCE) or Copy from user memory. multi-effect settings (MFX) can be copied to another drum kit Exchanging the copy-source and copy- [F1 (USER)] destination is possible only if the copy-source... -
Page 69: Chapter 5. Playing Patterns-Sequencer
Chapter 5. Playing Patterns—Sequencer The TD-20X’s sequencer organizes music into six “parts.” The Basic Operation Drum Kit part is used to record/play back what is played on the pads. Additionally, Melody Part, Bass Part, Backing 1 Part, and Backing 2 Part are the four backing instrument parts, and fig.06-001... -
Page 70: Choosing A Pattern [Pattern]
Chapter 5. Playing Patterns—Sequencer Choosing a Pattern [PATTERN] When you have finished making the settings, press the [PATTERN] button to bring up the “PATTERN” screen. This prevents data from being overwritten inadvertently Press the [PATTERN] button. during performance. The [PATTERN] button lights, and the “PATTERN” screen appears. -
Page 71: Playing Back A Pattern [Play]
Chapter 5. Playing Patterns—Sequencer Playing Back a Pattern [PLAY] If a preset pattern is selected, you won’t be able to change any settings other than [F1 (MUTE)]. Unavailable editing icons are shown as “ ”. Select the pattern to play. Press the [PLAY] button. -
Page 72: Specifying The Instruments For The Backing Parts [F2 (Backing)]
Chapter 5. Playing Patterns—Sequencer Specifying the Instruments for the Instrument Numbers/Instrument Names Backing Parts [F2 (BACKING)] You can change the tone by changing the instrument number. Selecting different variations within each Here’s how to select the instruments to be used by backing instrument number changes the instrument name, with parts (parts other than the drum and percussion parts), and a different tone being selected. -
Page 73: Percussion Part Settings [F3 (Perc)]
In the “PERCUSSION SET EDIT” screen, use the About the Percussion Sets [CURSOR (up/down)] buttons to select the note The TD-20X features eight percussion sets. number. You can select which percussion set is to be used in each pattern in the “PERCUSSION PART” screen. - Page 74 Chapter 5. Playing Patterns—Sequencer Selecting a percussion instrument from the Settings the volume and pan for each list [F1 (LIST)] percussion instrument [F2 (EDIT)] Here you can select from the list of all available instruments. Set the volume, pan, pitch, decay, etc. for each percussion instrument.
- Page 75 Chapter 5. Playing Patterns—Sequencer Naming a percussion set [F3 (NAME)] Copying a percussion set Each percussion set can be named (up to 12 characters). You can copy a percussion set from preset memory or from a CompactFlash card. In the “PERCUSSION SET EDIT” screen (p. 73), press For user memory, you can rearrange the data by exchanging the [F3 (NAME)] button.
-
Page 76: Setting The Volume And Pan Of Each Part [F4 (Mixer)]
Chapter 5. Playing Patterns—Sequencer Use the [CURSOR], [-] [+] buttons, and [VALUE] dial Setting the Volume and Pan of Each to specify the copy-source and copy-destination. Part [F4 (MIXER)] If you selected [F3 (CARD)] in step 4, select the copy-source backup number. -
Page 77: Applying Reverb/Chorus To The Backing Parts [F5 (Rev/Cho)]
Chapter 5. Playing Patterns—Sequencer Press the [F1] and/or [F5] buttons to turn the Applying Reverb/Chorus to the Backing reverb/chorus ON or OFF. Parts [F5 (REV/CHO)] Function button [F1] Reverb On/Off Set the amount of reverb and chorus for each backing part. [F5] Chorus On/Off In the “PATTERN PART”... -
Page 78: Specifying The Playback Type [F2 (Type)]
Chapter 5. Playing Patterns—Sequencer Parameter Value Description Specifying the Playback Type When set to Pad Pattern (p. 52), the [F2 (TYPE)] sounds are played back in sequence each time the pad is pressed. (You can use the [PLAY] button instead of Press the [PATTERN] button. -
Page 79: Naming A Pattern [F5 (Name)]
Chapter 5. Playing Patterns—Sequencer Naming a Pattern [F5 (NAME)] Specifying the Tempo [TEMPO] Each pattern can be named (up to 12 characters). Press the [TEMPO] button. The [TEMPO] button lights, and the “TEMPO” screen appears. Press the [PATTERN] button. fig.05-029-tempo.eps_70 The “PATTERN”... -
Page 80: Setting The Tempo By Hitting A Pad (Tap Tempo) [F3 (Tap)]
Synchronizing to the playback of an external sequencer Device [F2 (SYNC)] In this case, the TD-20X will be the slave and an external sequencer will be master. This section discusses the settings that allow an external MIDI sequencer and the TD-20X’s sequencer to be synchronized. -
Page 81: Starting And Stopping The Metronome (Click) On/Off [F5]
Chapter 5. Playing Patterns—Sequencer Starting and Stopping the Metronome Making Click Settings [F1 (CLICK)] (Click) On/Off [F5] Press the [TEMPO] button. Press the [TEMPO] button. Press the [F1 (CLICK)] button. The [TEMPO] button lights, and the “TEMPO” screen appears. The “CLICK SETTINGS” screen appears. fig.05-034-click-inst.eps_70 Press the [F5] button to turn the click ON and OFF. - Page 82 Chapter 5. Playing Patterns—Sequencer Parameter Value Description MASTER +PHONES, Output destination for the PHONES ONLY, click DIRECT 5, DIRECT 6, This setting can also be Output DIRECT 5+6, made by pressing the DIRECT 7, [SETUP] button and DIRECT 8, pressing the [F2 (OUTPUT)] DIRECT 7+8 button (p.
-
Page 83: Chapter 6. Recording And Editing Patterns-Sequencer
Please keep in mind that even though there are 100 user patterns, the amount of memory available will be determined by how much data is recorded into TD-20X. Use the [CURSOR] buttons to select the parameter. Storing performance data that describes every instance... - Page 84 64th note, pattern is recorded exactly as information, refer to “MIDI Channel Settings for the played. Entire TD-20X [F2 (GLOBAL)]” (p. 116). When using Tap Playback to play back a pattern you have created, (4) Part Setting first make sure that this is not set to “OFF,”...
-
Page 85: Checking The Tones And Phrases During Recording (Rehearsal)
Chapter 6. Recording and Editing Patterns—Sequencer (6) Recording Editing a Pattern [F4 (EDIT)] Press the [PLAY] button to begin recording. When you want to edit a pattern, for example by copying a The [PLAY] button stops flashing and remains lit, and the pattern or joining two patterns, access the “PATTERN EDIT”... -
Page 86: Copying A Pattern [F1 (Copy)]
Chapter 6. Recording and Editing Patterns—Sequencer Press the [F5 (COPY)] button. Copying a Pattern [F1 (COPY)] The confirmation screen appears. fig.06-011-ptn-copy-conf.eps_70 Copy the pattern as is to the user patterns. fig.07-Cpy1 To cancel, press the [F1 (CANCEL)] button. Press the [F5 (EXECUTE)] button. You can copy selected measures of a part or pattern. -
Page 87: Connecting Two Patterns [F2 (Append)]
Chapter 6. Recording and Editing Patterns—Sequencer Connecting Two Patterns Erasing a Pattern [F3 (ERASE)] [F2 (APPEND)] This erases the pattern. Performance data is erased, while beat, measure length, and other settings are left intact. This connects two patterns to create one pattern. The pattern fig.07-Ers1 specified as “Dst”... -
Page 88: Deleting A Pattern [F4 (Delete)]
Chapter 6. Recording and Editing Patterns—Sequencer Use the [-] [+] buttons or the [VALUE] dial to select In the “PATTERN EDIT” screen (p. 85), press the [F4 the pattern, part, and measures. (DELETE)] button. The “PATTERN DELETE” screen appears. Pattern Part Measure fig.06-17-ptn-delete.eps_70... -
Page 89: Saving A Pattern [F5 (Card)]
You can select an empty backup pattern with the lowest • The TD-20X can use CompactFlash cards rated for number by pressing the [F4 (NEW)] button. 3.3V in a capacity range of 16 MB–4 GB (type 1). -
Page 90: Loading A Pattern From A Compactflash Card [F2 (Load)]
TD-20X. card. Insert a CompactFlash card into the CompactFlash Insert a CompactFlash card into the CompactFlash card slot on the TD-20X’s front panel. card slot on the TD-20X’s front panel. Press the [PATTERN] button. Press the [PATTERN] button. Press the [F4 (EDIT)] button. -
Page 91: Chapter 7. Using Compactflash Cards [Card]
• Save 100 patterns (separately from the backups). [F1 (SAVE)] Saves the TD-20X’s data as a backup. • Load backup data from a CompactFlash card into the TD-20X, Loads data from the CompactFlash card [F2 (LOAD)] or copy specified settings such as drum kits or instruments (p. -
Page 92: Saving Data To A Compactflash Card [F1 (Save)]
All user memory data (p. 31) will be saved up to 99 sets. [F4 (NAME)] button. Insert a CompactFlash card into the CompactFlash The “CARD SAVE NAME” screen appears. card slot on the TD-20X’s front panel. fig.07-005-card-name.eps_70 Press the [CARD] button. The [CARD] button and the CompactFlash indicator light, and the “CARD A”... -
Page 93: Loading Data From A Compactflash Card [F2 (Load)]
You can also load data from a TD-20 that has a TDW-20 Insert the CompactFlash card containing data installed. saved by the TD-20 into the TD-20X’s front panel Insert the CompactFlash card into the CompactFlash slot. CompactFlash card slot on the TD-20X’s front Press the [CARD] button. -
Page 94: Deleting Data From A Compactflash Card [F4 (Delete)]
CompactFlash Card [F4 (DELETE)] Card [F1 (FORMAT)] You can delete the unneeded data from a CompactFlash When a card is being used for the first time by the TD-20X, card. you must execute the following procedure to initialize the card. -
Page 95: Checking The State Of A Compactflash Card [F2 (Info)]
CompactFlash the “CARD A” screen appears. card in the TD-20X, the name that appears when looking at it in your computer is different. Press the [F5 (A<>B)] button to access the “CARD B”... -
Page 96: Chapter 8. Trigger Settings For Each Pad [Trigger]
To ensure that the signals from the pads can be processed ✕ ✕ ✕ ✕ KD-140 KD140 appropriately by the TD-20X, you must specify the type of ✕ ✕ ✕ ✕ pad you’re using (the trigger type) for each trigger input. KD-120... -
Page 97: Trigger Inputs And Playing Methods Corresponding Chart
Chapter 8. Trigger Settings for Each Pad [TRIGGER] Pad Sensitivity Settings When you select the trigger type, the trigger parameters (except the crosstalk cancel parameters) are [F2 (BASIC)] automatically set to the most efficient values for each pad. Make settings for the parameter as needed. When you set the trigger type (p. -
Page 98: Adjusting The Pad Sensitivity (Sensitivity)
Chapter 8. Trigger Settings for Each Pad [TRIGGER] Adjusting the Pad Sensitivity Specifying How Volume Responds to (Sensitivity) Velocity (Velocity Curve) You can adjust the sensitivity of the pads to accommodate This setting allows you to control the relation between your personal playing style. -
Page 99: Hi-Hat Settings [F3 (Hi-Hat)]
Adjusting the offset of VH-12 automatically If you’re using the VH-12 V-hi-hat, execute the offset automatically adjustment from the TD-20X after making connections. This adjustment is required in order to correctly detect open, Use the [CURSOR (up/down)] buttons to select the close, and pedal operations. -
Page 100: Settings For The Vh-11
(Initial Value: 90) While reading the meter displayed on the right side the pedal down completely. of the TD-20X’s screen, adjust the offset with the Amount of Data Resolution that is transmitted from Hi- VH-11’s VH offset adjustment screw. -
Page 101: Eliminate Crosstalk Between Pads [F4 (Xtalk)]
Chapter 8. Trigger Settings for Each Pad [TRIGGER] Use the [-] [+] buttons or the [VALUE] dial to adjust Eliminate Crosstalk Between the setting. Pads [F4 (XTALK)] Parameter Value Description [F1 (XTALK)] button When two pads are mounted on the same stand, hitting one pad may trigger the sound from another pad unintentionally. -
Page 102: Advanced Trigger Parameters [F5 (Advance)]
Chapter 8. Trigger Settings for Each Pad [TRIGGER] Advanced Trigger Parameters Detailed Settings for Trigger Signal Detection [F1 (SCAN)] [F5 (ADVANCE)] fig.08-016-scan.eps_70 The following parameters (advanced trigger parameters) are automatically set to the most efficient values for each pad when you select the Trigger Type (p. 96), and don’t require adjustment, except if you experience any of the problems that are discussed in the explanation of each parameter. - Page 103 Chapter 8. Trigger Settings for Each Pad [TRIGGER] Detecting trigger signal attenuation Double triggering prevention (Mask Time) (Retrigger Cancel) When playing a kick trigger the beater can bounce back and hit the head a second time immediately after the intended Important if you are using acoustic drum triggers.
-
Page 104: Detailed Settings For Rim Shots [F2 (Rim)]
Chapter 8. Trigger Settings for Each Pad [TRIGGER] Cross stick threshold (XStick Thrshld) Detailed Settings for Rim Shots When using a V-pad such as the PD-125X, you can adjust the [F2 (RIM)] force at which you’ll switch between the cross stick sound and the open rim shot sound. -
Page 105: Settings For Separate Triggering Of Ride Strikes [F3 (3-Way)]
Connect as shown in page 21, set 3Way Trigger to “ON.” Correspondences between playing method and trigger input Parameter Value Description Trig Type See p. 96. Playing Method TD-20X TRIGGER INPUT Position Detect Bow Shot 10 RIDE head Head Positional sensing ON, OFF on/off Bell Shot... -
Page 106: Naming A Trigger Bank [F5 (Name)]
Chapter 8. Trigger Settings for Each Pad [TRIGGER] Naming a Trigger Bank Copying a Trigger Bank [F5 (Name)] You can copy a trigger bank from preset memory or from a CompactFlash card. Each trigger bank can be named (up to 12 characters). For user memory, you can rearrange the data by exchanging the copy-source and copy-destination trigger banks. - Page 107 Chapter 8. Trigger Settings for Each Pad [TRIGGER] Use the [CURSOR] buttons, [-] [+] buttons, and [VALUE] dial to specify the copy-source and copy- destination. If you selected [F3 (CARD)] in step 4, select the copy-source backup number. Press the [F4 (EXCHNG)] or [F5 (COPY)] button. If you selected [F1 (USER)] in step 4, you can exchange the copy-source and copy-destination by pressing the [F4 (EXCHNG)] button.
-
Page 108: Chapter 9. Settings For The Entire Td-20X [Setup]
Chapter 9. Settings for the Entire TD-20X [SETUP] The “setup” settings apply to the entire TD-20X; they include [F2 (DIR 1-4)] button the output destination assignments for the TD-20X’s sounds, fig.09-003-dir1.eps_70 and footswitch. To edit the setup settings, proceed as follows to access the “SETUP”... -
Page 109: Example Settings
Chapter 9. Settings for the Entire TD-20X [SETUP] • [F4 (OTHER)] screen Sending the same audio for monitoring and Indication Description With these settings, the same sound will be output from the Ambience (p. 60) PHONES jack, the MASTER OUT L/R jacks, and the DIRECT OUT Multi-effects (p. -
Page 110: Assigning A Function To A Footswitch Or Pad [F3 (Control)]
Chapter 9. Settings for the Entire TD-20X [SETUP] Use the [-] [+] buttons or the [VALUE] dial to select Assigning a Function to a the function for footswitches. When setting to “USER,” use the [CURSOR] buttons to move Footswitch or Pad the cursor to “SW1”... -
Page 111: Using Pads As Switches [F2 (Pad Sw)]
Chapter 9. Settings for the Entire TD-20X [SETUP] Functions that can be assigned only if “Function” Function Description is set to “USER” Calls up the next drum kit CHAIN Head CHAIN# INC Indication Description chain SELECT1 Calls up the previous drum PTN PLAY Plays back the pattern. -
Page 112: Other Settings [F4 (Option)]
Chapter 9. Settings for the Entire TD-20X [SETUP] Functions that can be assigned only if “Function” Use the [-] [+] buttons or the [VALUE] dial to make is set to “USER” settings. Parameter Value Description Indication Description No velocity. Level is fixed. -
Page 113: Using The Mix In Jacks As Two Monaural Inputs [F3 (Mix In)]
The MIX IN jacks can handle mono or stereo signal. The display contrast is strongly influenced by the location of the TD-20X and the lighting of the room it’s in. Adjust this If it occurs that the audio signal going to the MIX IN jack has a parameter when needed. -
Page 114: Restoring The Factory Settings [F5 (F Reset)]
This restores the TD-20X to the original factory settings (Factory Reset). All data and settings stored in the TD-20X are lost in Loosen the clutch screw of the top hi-hat and let it carrying out this operation. So if necessary, save your sit on the bottom hi-hat. -
Page 115: Chapter 10. Midi Settings
MIDI (Musical Instrument Digital Interface) is a standard specification that allows musical data to be transferred For each part, you can specify the channel on which the TD-20X between electronic musical instruments and computers. If a will receive and transmit MIDI messages. -
Page 116: Midi Channel Settings For The Entire Td-20X [F2 (Global)]
Entire TD-20X [F2 (GLOBAL)] (Soft Through) Press the [SETUP] button. This section explains how you can use the Roland SPD-20 (a The [SETUP] button lights, and the “SETUP” screen appears. MIDI controller) together with the TD-20X’s pads to play internal sounds and an external sound module. -
Page 117: Recording The Pad Performance On An External Sequencer (Local Control)
Suppose that when data was saved via bulk dump (p. 119), the TD-20X’s Device ID was set to “17.” When re-transmitting this data back to the TD-20X, it won’t receive if the Device ID is set to something other than “17.”... -
Page 118: Midi Settings For V-Link
Set this ID to match the device ID number of the device is when you are triggering which is controlled by the TD-20X. If this is set to “128,” you an external sound module. can control the device regardless of the device ID number of... -
Page 119: Specifying The Drum Kits Recalled By Program Changes [F4 (Prog)]
To save data, use the external sequencer as you would when recording musical data, and perform the following steps on Press the [SETUP] button. the TD-20X as shown in the following diagram. The [SETUP] button lights, and the “SETUP” screen appears. Connect the TD-20X’s MIDI OUT connector with a Press the [F1 (MIDI)] button. - Page 120 Use the [VALUE] dial, the [-] [+], and [CURSOR (up/ Loading data to the TD-20X down)] buttons to select the content to be sent. At this time, all the TD-20X’s current data is overwritten. Transmit Data Description Make sure you have made the needed backup.
-
Page 121: Chapter 11. Other Functions [Tools]
If you want to use a drum kit from a CompactFlash card, Function button (“TOOLS A” screen) insert the card into the TD-20X before you continue. Allows you to play a drum kit saved on a In the “TOOLS A” screen, press the [F1 (KIT SEL)] [F1 (KIT SEL)] CompactFlash card without loading the kit. -
Page 122: Copying The Drum Kit Chosen In Kit Selection
Chapter 11. Other Functions [TOOLS] Use the function buttons, [CURSOR], [-] [+] buttons, Press the [F5 (COPY)] button. and [VALUE] dial to select the desired drum kit. A confirmation message will appear. fig.11-005-prekit-copy-conf.eps_70 Function button [F1 (LIST)] Displays a list of drum kits. Copies the selected drum kit to a drum kit in [F5 (COPY)] user memory. -
Page 123: Viewing Trigger Information For Each Pad [F3 (Trg Mon)]
Chapter 11. Other Functions [TOOLS] Viewing Trigger Information for Using the TD-20X to Control Each Pad [F3 (TRG MON)] Images [F5 (V-LINK)] You can view realtime information that shows the force What is V-LINK? (velocity) with which each pad is struck, how far the hi-hat is open, and the strike position on the snare, ride cymbal, toms, and AUX. - Page 124 Chapter 11. Other Functions [TOOLS] V-LINK functions that the TD-20X can Control and MIDI messages Palette No. Note No. Clip No. Note No. When playing a pattern by hitting a pad (Pad Pattern; p. 52), Palette 1 37 (C#2) Clip 1...
-
Page 125: Viewing The Remaining Memory And The Program Version [F1 (Info)]
[F1 (MEMORY)] button: Information of the internal memory fig.11-009-info-ptn.eps_70 [F2 (CARD)] button: CompactFlash card information fig.11-010-info-cf.eps_70 [F5 (VERSION)] button: TD-20X’s internal program version fig.11-012-info-version.eps_70 Press the [EXIT] button to return to the “TOOLS B” screen. -
Page 126: Messages And Error Messages
Messages and Error Messages This section lists the messages (error messages) that the TD-20X produces and explains the meaning of each message, giving you the appropriate action to take. fig.99-001-error-accept.eps_70 When an indication of “ACCEPT” is shown above the [F5] button as in the figure, pressing that button will close the message window. - Page 127 There are no empty backup pattern on the CompactFlash Delete unneeded backup pattern (p. 90). Backup Pattern! card. Power On Too Long. Please Turn Off! The power remains ON for a long time. Turn the TD-20X’s power off, then turn on again. Auto Shutdown Completed. Please Turn Off!
-
Page 128: Preset Drum Kit List
Preset Drum Kit List Preset Drum Kit List Kit Name Pad Ptn Description TD-20X Allows you to explore the expressive capabilities of the V-Drums. 50s King This kit features dry and vintage sounds. CtrlRoom A dry, “recording studio” type sounding kit. - Page 129 Preset Drum Kit List Kit Name Pad Ptn Description LA BeBop Typical drum kit for bebop. MBsHouse Perfect for house and trance music. Bronze Kit with compressor and ambience adjusted for tight sound. DarkComper Heavily compressed kit. Drums&DJ A very hybrid kit. GATED This features the new gate ambience.
- Page 130 Preset Drum Kit List Kit Name Pad Ptn Description Shallow Kit with shallow-bodied toms. Ballad LOOP Loop pattern is played on Clash 2’s bow. Raspy Dry-sounding kit for jazz. PopReggae LOOP Loop pattern is played on Clash 2’s bow. BrassBiggie Kit with a brass snare.
-
Page 131: Drum Instrument List
Drum Instrument List KICK KICK ELEC SNARE PROCESSED Name Name Remark Name 22”Birch K Cosmic K Basis S 22”Solid K Hi-Q K Chunk S 22”StdMple K Analog1 K ClapTailS 22”Maple K Analog2 K ClubDry S 24”Carbon K Analog3 K Dump S 22”CbnMple K ClascElec1 K HopRim1 S... - Page 132 Drum Instrument List HI-HAT Name Remark Ballad T3 Name Remark Name Ballad T4 12”Birch T1 14”P-HatHH Swing T1 12”Birch T1R 14”P-HatHHEg Swing T2 13”Birch T2 13”Hatz HH Swing T3 13”Birch T2R 13”Hatz HHEg Swing T4 16”Birch T3 14”Hatz HH Pop1 T1 16”Birch T3R 14”Hatz HHEg Pop1 T2...
- Page 133 Drum Instrument List RIDE PERC ANALOG Name Cabasa Name Remark Name Cuica Hi 18”PRideRd CR78Cowbell Cuica Lo 18”PRideRdBl CR78Guiro Cuica Acc 18”PRideRdEg CR78Maracas Pandeiro 18”Bop Rd CR78MtlBeat PandeiroMute 18”Bop RdBl CR78Tamb PandeiroSlap 18”Bop RdEg TR808Clap Surdo Hi 20”HeavyRd TR808Claves Surdo HiMute 20”HeavyRdBl TR808Cowbell Surdo Lo...
- Page 134 Drum Instrument List OTHER EXP KICK PROCESSED Name Remark 50sKingMt SR Name Name WhiteAsh S Click Tight1 WhiteAsh SR Beep Tight2 Popcorn S Sticks Tight3 Popcorn SR Sticks2 Tight4 MetroBell Tight5 EXP SNARE PROCESSED MetroClick Tight6 FingerSnaps Solid1 Name Remark Clap Solid2 PrcsWood S...
- Page 135 Drum Instrument List EXP TOM EXP HI-HAT EXP RIDE Name Remark Name Name Remark 8”NCMpl T1 14”CstmDK HB 20”JazZ Rd 8”NCMpl T1R 14”CstmDK HE 20”JazZ RdBl 10”NCMpl T2 14”Medium HB 20”JazZ RdEg 10”NCMpl T2R 14”Medium HE 20”HvyDKRd 12”NCMpl T3 13”KZComb HB 20”HvyDKRdBl 12”NCMpl T3R 13”KZComb HE...
- Page 136 TD-20X. Ripping SpaceAlien Reproduction or duplication of any of SpaceWarp *BRUSH: the sound contained in the TD-20X, Shake Can be played using “Brush Sweep.” ShakeDown either as they exist on this sound Gear module or by any means of...
-
Page 137: Note Number (Factory Settings)
Note Number (Factory Settings) Percussion Set Drum Kit Note No. Bongo Hi Bongo Lo 1. Latin Toys Drum Kit 1–50 Conga Hi Conga HiSlap (Trigger Inputs) Conga Lo Timbale Hi Note No. Timbale Lo Bass Gliss – Agogo Hi GuitarScrtch –... -
Page 138: Backing Instrument List
Backing Instrument List SYN. BASS CC0 Name VOICES CHURCH ORG.1 CHURCH ORG.2 SYNTH BASS 1 CHURCH ORG.3 PIANO SYNTHBASS101 SYNTH BASS 3 REED ORGAN PIANO 1 TB33 BS 1 PIANO 1W ACCORDION FR TB33 BS 2 PIANO 1D ACCORDION IT TB33 BS 3 PIANO 2 HARMONICA... - Page 139 Backing Instrument List SYN. BRASS BASS & LEAD STEEL DRUMS BIG & RAW SYNTH BRASS1 WOODBLOCK FAT & PERKY SYNTH BRASS3 CASTANETS ANALOGBRASS1 SYN. PAD TAIKO SYNTH BRASS5 CONCERT BD POLY BRASS FANTASIA QUACK BRASS MELO. TOM 1 WARM PAD OCTAVE BRASS MELO.
-
Page 140: Preset Pattern List
Preset Pattern List Name T.Sig Tempo PlayT Name T.Sig Tempo PlayT 1 Preview 4/ 4 LOOP 51 Slow 4/ 4 LOOP 2 Preview Jazz 4/ 4 LOOP 52 Reggae 4/ 4 LOOP 3 Drums Basic 4/ 4 LOOP 53 Rastamon 4/ 4 LOOP 4 Drums Fill... - Page 141 Preset Pattern List T.Sig: Time Signature Name T.Sig Tempo PlayT Len: Pattern Length 101 Drums POP 4/ 4 LOOP 102 Drums JAZZ 4/ 4 LOOP Play T (Play Type): See p. 78. 103 Drums BALLAD 12/8 LOOP 104 Drums H.ROCK 4/ 4 LOOP 105 Roll Snr Rim...
-
Page 142: Midi Implementation Chart
MIDI Implementation Chart PERCUSSION SOUND MODULE Date : July 1, 2009 (SOUND GENERATOR SECTION) MIDI Implementation Chart Model TD-20X Version : 1.00 Transmitted Recognized Function... Remarks Basic Default 1–16, OFF 1–16, OFF Memorized Channel Changed 1–16, OFF 1–16, OFF Default... - Page 143 PERCUSSION SOUND MODULE Date : July 1, 2009 (SEQUENCER SECTION) MIDI Implementation Chart Model TD-20X Version : 1.00 Transmitted Recognized Function... Remarks Basic Default 1–16, OFF 1–16, OFF Memorized Channel Changed 1–16, OFF 1–16, OFF Default Mode 3 Mode 3...
-
Page 144: Block Diagram
REV Send BACK 1 INST Volume Volume REV Send BACK 2 INST Volume Volume REV Send PATTERN GROUP /PART FADERS /BACKING PART REVERB Type Time TEMPO/CLICK/INST Click INST AMB Send CLICK CLICK ([SHIFT] + [TEMPO]) switch with [FADER] TD-20X Block Diagram... - Page 145 MULTI MIXER EFFECTS /PAN MFX Send MFX Send SETUP MFX Send /OUTPUT MASTER /MASTER MFX Send COMP/EQ MFX Send COMP MFX Send COMP MFX Send MFX Send MFX Send MFX Send DIGITAL MFX Send SETUP MFX Send /OUTPUT /DIRECT MFX Send L/MONO MFX Send MASTER...
-
Page 146: Specifications
Specifications TD-20X: Percussion Sound Module User Patterns: 100 Preset Patterns: 150 Parts: 6 Sound Variable Drum Modeling Play Type: Oneshot, Loop, Tap Generator Sequencer Tempo: 20–260 Maximum Resolution: 192 ticks per quarter note 64 Voices Polyphony Recording Method: Realtime Maximum Note Storage: approx. 20,000 Notes... -
Page 147: Index
Index Symbols CompactFlash ..............19, 31, 89–95 Formatting ..................94 [-] [+] buttons ..................17, 28 Compressor ....................59 Compressor/equalizer (COMP/EQ) ..........36, 58 Numerics Connecting ..................21, 23 3Way Trigger (Ride & Edge) ............... 105 [COPY] button ........16, 42, 44, 54, 57, 68, 75, 106 Copying Drum Kit .................... - Page 148 Index Hit Pad Start ....................84 Hold ....................... 59 Edge shot ....................33 Edit ......................74, 85 EDIT LOCK ....................46 Initialize Editing Compact Flash ................... 94 Pattern ....................85 Input ......................113 Editing Drum Sounds ................48 INST ........................ 46 Effects ....................
- Page 149 Index Mesh Head ....................25 OUPUT MONITOR ................41, 122 Message ....................127 OutGain (dB) ..................60, 62 Metronome ....................81 Output ......................82 MFX SEND LEVEL ..................56 Output Assignments ................108 Mic Position .................. 49–51, 61 Output Level Monitor ................122 Mic Size ......................
- Page 150 Index Power ......................24 Selecting [POWER] switch ................. 18, 24 Drum Kit ....................39 Preset Drum Kit List ................128 Drum Kit Chain .................. 45 Preset drum kits ..................35 Instrument ..................47 Preset memory ..................31 Pattern ....................70 Preset pattern ....................
- Page 151 Index Trigger Information ................123 TRIGGER INPUT jacks ................18 Trigger Level Indicator ................16 Trigger Settings ................. 36, 96 Trigger Type ....................96 Tx Channel ....................53 Tx/Rx ......................115 Type .................. 59–60, 62, 66, 77 User memory ..................... 31 User pattern ..................
- Page 152 For EU Countries This product complies with the requirements of EMCD 2004/108/EC and LVD 2006/95/EC. For the USA FEDERAL COMMUNICATIONS COMMISSION RADIO FREQUENCY INTERFERENCE STATEMENT This equipment has been tested and found to comply with the limits for a Class B digital device, pursuant to Part 15 of the FCC Rules.
- Page 153 For EU Countries For China...
- Page 154 Information When you need repair service, call your nearest Roland Service Center or authorized Roland distributor in your country as shown below. AFRICA PHILIPPINES CURACAO URUGUAY NORWAY JORDAN G.A. Yupangco & Co. Inc. Zeelandia Music Center Inc. Todo Musica S.A.
- Page 155 Cover1,4...