Table of Contents
Advertisement
Quick Links
Advertisement
Table of Contents
Troubleshooting

Related Manuals for Crysalli CR-2

Summary of Contents for Crysalli CR-2
- Page 1 CR-2 Countertop & CR-UC2 Undercounter Installation & Service Manual 100112...
- Page 2 IMPORTANT: This manual is a guide for installing, operating, servicing and maintaining this equipment. Refer to Table of Contents for page location of detailed information to answer questions that arise during installation, operating, service and maintenance, or installation of this equipment.
-
Page 3: Table Of Contents
SYSTEM DESCRIPTION ..................2 DESIGN DATA ....................... 3 MODEL LINE DRAWINGS………………………………………………………………4 CR-2 EXPLODED VIEW ..................5 DESCRIPTION, EXPLODED VIEW, CR-2 ............6 CR-UC2 EXPLODED VIEW ................... 8 DESCRIPTION, EXPLODED VIEW, CR-UC2 ............9 COMMON PARTS LIST………………………………………………………………..11 ELECTRICAL SCHEMATIC, DUAL CARB, DIRECT WIRE ........ 12 ELECTRICAL SCHEMATIC, S-68-B .............. - Page 4 TABLE OF CONTENTS (cont’d) ..............PAGE CR-2 CABINET MAINTENANCE……………………………………………………...34 CLEANING CONDENSER COIL ................. 34 CHECKING/CHANGING WATER BATH ............. 35 WATER PUMP MAINTENANCE ................. 36 CARBONATOR MAINTENANCE ................ 37 SERVICING CHECK VALVES ................37 REPLENISHING CO2 SUPPLY ................40 CHANGING WATER FILTER CARTRIDGE ............40 ADJUSTMENT OF CO2 REG ................
-
Page 5: Preface
PREFACE Crysalli is manufactured on behalf of Western Pacific Distributors by International Carbonic Inc. INTERNATIONAL CARBONIC INC. has enjoyed over 53 years of manufacturing excellence in the field of carbonation and in the beverage related industry. They have had a long and proud history with quality as their standard and innovation as their goal. -
Page 6: Chapter I General Description
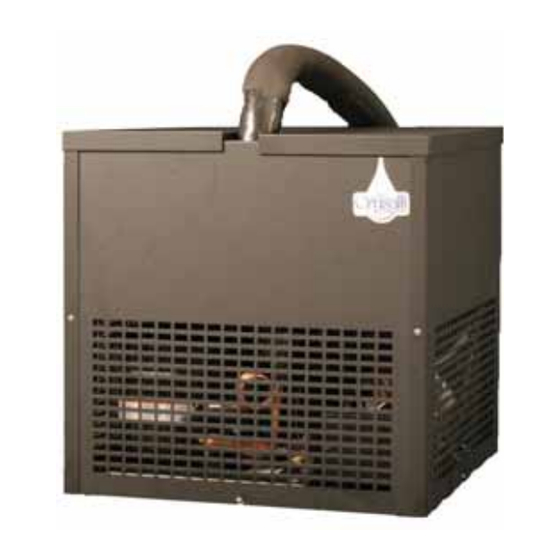
CHAPTER I GENERAL DESCRIPTION This chapter gives the description, theory of operation, and design data for the CR-2 and CR-UC2 Crysalli units and related components. SYSTEM DESCRIPTION The Crysalli CR-UC2 series of Undercounter Artisan Water units are a configuration of cold dispensed sparkling and still filtered water, requiring a draft tower to dispense the product. -
Page 7: Design Data
Depth 22” 20” Weights: Shipping Dry weight Operational Weight Ice Bank Capacities: CR-2 Unit water bath (no ice bank) 9 gallons Refrigerant requirement (R-134-A) 250 grams Ambient operating temperature 40 F to 100 F. Capacities: CR-UC2 Unit water bath (no ice bank) -
Page 9: Exploded View
CR-2 TITLE SC-BF INTERNATIONAL CARBONIC INC. CR-2 I C I BIG FELLA POST MIX DATE 1/6/05 DRN. BY CHK. BY APPR. BY ADELANTO, CALIFORNIA... -
Page 10: Description, Exploded View, Cr-2
CR-2 PART NO. DESCRIPTION S0653 S0262-LF CARBONATOR TANK ASSEMBLY S0073-48 PROBE ASSEMBLY S0660 SERVICE PANEL, SIDE S0678 SERVICE PANEL, REAR S0684 WATER COIL, COPPER S0208-A WATER REGULATOR, NOT SHOWN, OPTIONAL S0669 WATER LINE, COPPER S0203 UNION CONNECTOR S0661 EVAPORATOR COIL RETAINER... - Page 11 CR-2 Cont. PART NO. DESCRIPTION S0655 FRAME, COMPLETE E0276 TRANSFORMER, 40 VA, TWO REQUIRED W/8 VALVES S1308 CONTROL BOX, W/COVER S1335 TERMINAL BOARD SPACER, NYLON, 3/8" S1310 CONTROL BOX COVER S0068B LIQUID LEVEL CONTROL, (LLC) E0664 STRAIN RELIEF S0046 BUSHING...
-
Page 12: Cr-Uc2 Exploded View
CR-UC2 SC-R TITLE INTERNATIONAL CARBONIC INC. I C I CR-UC2 SPACE CADET REM OTE DATE 1/6/05 DRN. BY CHK. BY APPR. BY ADELANTO, CALIFORNIA... -
Page 13: Description, Exploded View, Cr-Uc2
CR-UC2 PART NO. DESCRIPTION S0680 LID ASSEMBLY A0020 SCREW, 8-32 X 3/8 T.H., S.S. S0679 SERVICE PANEL, SIDE S0678 SERVICE PANEL, LARGE, FRONT & REAR S0657 STANDPIPE, 7 3/4" S0658 OVERFLOW, 8" G0016 TY-RAP LARGE S0840 AGITATOR PUMP S0668 WATER LINE, COPPER S0203 UNION S0262... - Page 14 CR-UC2 Cont. SYM QTY PART NO. DESCRIPTION S0663 EVAPORATOR ASSEMBLY S0509 ACCUMULATOR Z0010 CAP TUBE, 9' - .050 S0656 BUCKET COMPLETE W/INSULATION S0655 FRAME, COMPLETE S1325 SQUARE GROMMET NUT A0014 SCREW, #10 X 1/2" PH T.H., S.S. COMBO 1 SET S0765 LEGS S0103...
-
Page 15: Common Parts List
Common parts list for both Models... -
Page 16: Electrical Schematic, Dual Carb, Direct Wire
S-68-B ELECTRICAL SCHEMATIC 120 VOLT FAN M OTO R ICE BANK CONTROL CO MPR ESSOR TRANSFORMER GREEN GREEN INTERNATIONAL CARBONIC INC. WHITE 120 VAC BLACK IBC1 POWE R IBC2 ON /OFF ON/OFF ON /OFF MO TOR2 CONDENSING WHITE BLACK UNIT MO TOR1 AGITATOR PUMP LONG... - Page 17 DIRECT WIRE CARB-RECIRC "USE COPPER CONDUCTOR WIRE ONL Y" TERMINAL BLOCK BOARD #1 BLACK CONDENSING UNIT BLACK BOARD #1 WHITE WHITE CONDENSING UNIT WHITE BOARD #1 GREEN GREEN ON/OFF TOGGLE BLACK FROM DIRECT WIRE BAR CONDENSING WHITE UNIT RECIRC GREEN ON/OFF MOTOR GREEN...
-
Page 18: Theory Of Operation
This gas must be at a pressure greater than the incoming water by at least 25-PSI to assure the proper function of the carbonator As discussed earlier plain water enters the Crysalli through the incoming water line. This water proceeds through the water coil where it is chilled prior to entering the carbonator tank or in the case of non-carbonated water chilled prior to going directly to a valve. - Page 19 The level of the carbonated water within the stainless steel mixing tank is used to operate the motor driven pump. The liquid level control, in conjunction with a probe housed in the carbonator tank, controls the pump motor. The motor will come on when the carbonated water within the mixing tank recedes to a predetermined low level and stops the pump motor when the carbonated water reaches a predetermined high level.
- Page 20 CAUTION: In order to have even distribution of cold water, the cold-water circulating lines must always be run in series even on multiple station installations. IMPORTANT: Be sure to leave all connections and fittings exposed until after the entire system has been pressure tested. In order to insure maximum heat transfer between the braided plastic lines (through which the water and soda are carried) and the circulating tubing, it is necessary to tape these lines firmly together.
-
Page 21: Chapter Ii Installation
* Optional SELECTING LOCATION IMPORTANT: Ambient temperature for CR-2 and CR-UC2 should not exceed 100 degrees “F.” Operation of cooling unit in ambient above 100 degrees “F” can and will contribute to early failure of condensing unit and poor quality of finished product. -
Page 22: Location Recommendations For Cr
LOCATION RECOMMENDATIONS FOR CR-UC2 Position unit as close as possible to proper electrical source, 120V 60HZ. Position unit with a minimum of 6” space between bulkhead and cabinet for sufficient ventilation (air in and air out). Pour ventilation can cause the unit to overheat and shut down or have pour performance characteristics. - Page 23 SAMPLE OF POSSIBLE INSTALLATION (CR-UC2 to two towers)
-
Page 24: Cr-Uc2 Installation
CR-UC2 INSTALL UNDERCOUNTER Select a counter location for your draft tower and a well ventilated undercounter or remote location for your CR-UC# Crysalli unit. Place the CR-UC# unit as close as possible to water filter connection & 120-volt electrical outlet. -
Page 25: Cr-Uc2 Install Diagram
Check draft tower and connections for leaks. Wrap all exposed lines with insulation. Once unit has built the ice bank you are ready to dispense chilled still and chilled sparkling water. - Page 26 CR-2 INSTALL Countertop Select a location for you chilled water dispenser. Place unit as close as possible to water filter connection & 120-volt electrical outlet. Make sure sufficient space between bulkheads, walls and overheads is available for proper air circulation around cooling unit Connect water inlet line from unit to your water filter system.
-
Page 28: Installation
INSTALLATION Cont Make all connections: C02 gas, plain water . Place CR-UC2 in position. Make sure sufficient space between bulkheads, walls and overheads is available for proper air circulation around cooling unit. INSTALL HIGH PRESSURE C02 REGULATOR, C02 CYLINDER AND LINES 1. -
Page 29: Install Water Filter Assembly
INSTALL WATER FILTER ASSY. 1. Install water filter assembly on wall or other supporting structure. 2. Connect water filter assembly to inlet of valve on water supply line using minimum 3/8" I.D. water line. Everpure QC71 Twin filter heads have ¾” fmp and must be reduced down. -
Page 30: Install Drain Line
ACCORDING TO FEDERAL, STATE, AND LOCAL LAWS. The water connection on the CR-UC2 and CR-2 is made to a flexible water line by means of a 3/8”, male flare. Due to the large capacity of the pump, any restriction of the incoming fresh water supply would starve the water pump and create noise within the pump, poor carbonation and extremely long running time. -
Page 31: Connecting Cbr-V2 Draft Tower
CONNECTING THE DRAFT TOWER (CBR-V2) TO CR-UC2 The CBR-V2 draft tower contains two water lines plumbed to the faucets, one for carbonated sparkling water the other for still water. Connect these lines to the labeled braided lines from the trunk line, which extends from the CR-UC2 unit. The CBR-V2 also has two re-circ line which should be connected to the clear re-circ lines also from the trunk line. -
Page 32: Electrical Requirements
TWO CBR-V2 TOWERS INSTSALL DETAIL. ELECTRICAL REQUIREMENTS: The CR-UC# requires a 120 VAC, single phase, 60-Hertz power circuit, and must be wired in accordance with N.E.C. or local ordinance. NOTE: Check CHAPTER I for running amperage and connect to appropriate electrical circuit. -
Page 33: Chapter Iii Preparation
(S-657). (water will drain from standpipe until ice bank is completely made) 4. Open water inlet supply line. Plug CR-2 or CR-UC2 power cord into electrical receptacle box. Make sure compressor, condenser fan motor, agitator motor start. The process of cooling the water bath will now commence. -
Page 34: Chapter Iv Operators Instructions
CHAPTER IV OPERATORS INSTRUCTIONS This chapter covers operator’s responsibilities for daily pre-operation check, adjustments, replenishing C02 and syrup supplies, cleaning, and sanitizing. DAILY PRE-OPERATION CHECK 1. Make sure high-pressure C02 regulator's pound per square inch indicator is not in shaded portion of dial. If so, C02 cylinder is almost empty and must be replaced. NOTE: This reading should be carried out at normal room temperature. -
Page 35: Changing Water Bath
CHANGING WATER BATH Drain water bath a minimum of twice a year. This can be accomplished by siphoning water with short hose into bucket or removing over flow standpipe. Once water is drained and ice bank is melted, water bath, water coils, bath walls, tank, etc. should be cleaned. Fill water bath to the top of the standpipe, (S-657). -
Page 37: Chapter V Service And Maintenance
CHAPTER V SERVICE AND MAINTENANCE This chapter describes service and maintenance procedures to be performed on SCR units and related components. PERIODIC INSPECTION AND CLEANING 1. If Sparkling water no longer has any bubble, check the CO2 tank and pressures. It is likely the CO2 is empty or at a lower pressure than the water pressure. -
Page 38: Cr-Uc2 Cabinet Maintenance
DO NOT USE ABRASIVE TYPE CLEANERS. CR-2 CABINET MAINTENANCE The CR-2 exterior finish is a mirrored stainless steel. Windex cleans it nicely without leaving behind streaks. Wipe the top and louvers clean of dust. DO NOT USE ABRASIVE TYPE CLEANERS OR SCRUB PADS. -
Page 39: Checking/Changing Water Bath
CHECKING / CHANGING WATER BATH Semi-Annually check water level in water bath. If it is low, more water should be added for maximum product cooling. Before adding more water, water bath and ice bank should be checked for excessive mineral deposit build up. NOTE: The water in water bath should be changed and all components in water bath should be cleaned as often as necessary to keep it clean. -
Page 40: Water Pump Maintenance
WATER PUMP MAINTENANCE (RECOMMEND THIS BE DONE BY A TRAINED SERVICE TECH) Warning: The water pump inlet strainer screen must be inspected and serviced at least once a year under normal circumstances of after any disruptions (plumbing work, earthquake, etc.), to the water supply systems that might cause clogged flow of water through system. -
Page 41: Carbonator Maintenance
CARBONATOR MAINTENANCE SAME AS WP 1. Unplug refrigeration unit power cord from electrical socket. 2. Remove lid from unit. 3. Look down into water bath (if necessary, use flashlight) and inspect carbonator tank for leak. Air bubbles will arise from place of leak, if leak is below surface of water. If leak is above surface of water soap bubbles should be used to find any leak. - Page 42 ALWAYS INSTALL NEW “O” RING, (S-13). 5. Assemble check valves together as shown. 6. Connect water inlet line to double check valve assembly. 7. Activate the system as outlined in CHAPTER III. S-15 S-13 S-12 S-11 S-14 S-10 S-11 S-12 S-16 S-22 GAS CHECK S-20 WATER...
- Page 43 SYM QTY PART NO. DESCRIPTION S-14 HOUSING, CHECK VALVE 1/4" M.F. S-13 SEAT "O" RING CHECK VALVE S-12 SLEEVE, SEAT RETAINER CHECK VALVE S-11 BALL, CHECK VALVE S-10 SPRING, CHECK VALVE GASKET, CHECK VALVE S-6 1/8 BODY, BASE, CHECK VALVE S-16 ADAPTOR HOUSING, DOUBLE CHECK VALVE S-15...
-
Page 44: Replenishing Co2 Supply
REPLENISHING C02 SUPPLY 1. Close empty C02 cylinder shutoff valve. 2. Disconnect high pressure C02 regulator, then remove empty C02 cylinder 3. Install full C02 cylinder and connect high pressure C02 regulator. See installation procedure in CHAPTER II. MAKE SURE C02 CYLINDER IS POSITIONED IN UPRIGHT POSITION AND FASTENED WITH SAFETY CHAIN. -
Page 45: Sanitizing Proceedures
2. Turn the water back on and the CO2 off. 3. Pull valves on Crysalli to draw water and sanitizer through into another bucket. 4. Flush each line for at least 1 minute (hold both faucets open and dispense into a bucket) until water consistency and clarity changes back (flush until free of detergent), continue pulling water for to thoroughly flush out. -
Page 46: Chapter Vi Troulbeshooting
TROUBLE SHOOTING IMPORTANT: Only qualified personnel should service the SCR unit and components. WARNING: To avoid personal injury and or property damage, always disconnect electrical power, shut off plain water and CO2 supplies before starting any repairs. If repairs are to be made to the carbonated water system, bleed carbonated water system pressure before proceeding. -
Page 47: Frozen Water Bath
Frozen water Bad ice bank control. Replace bad ice bank control. bath Refrigerant leak causing Repair leak, evacuate and re- undercharge. charge. Defective agitator motor. Replace defective agitator. Dirty water bath. Melt ice, empty & clean bath. Replenish w/fresh water. Cooling or No electrical power. -
Page 48: Compressor Will Not Stop After Sufficient Ice Bank Is Produced
Note: Ice bank freezes from bottom of evaporator upward. A refrigerant leak or insufficient charge might show ice at bottom and not at top of evaporator. Compressor will Ice bank control capillary tube Replace ice bank control. not stop after kinked or broken. -
Page 49: Dispensed Product Makes Foam As It Leaves Nozzle
Dispensed Pressure of CO2 to high. Adjust high-pressure regulator as product makes instructed. foam as it Clean contaminated nozzle and leaves sanitize as instructed. dispensing See refrigeration/machine valve specifications vs volume requirements. Dirty nozzle and valve cavity. Temperature above quality limits. Dispensed Oil film or soap scum in cup or Use clean cups and glasses. -
Page 50: Carbonation Troubleshooting Flow Chart #1
CARBONATION TROUBLE SHOOTING FLOW CHART #1 MOTOR/PUMP NOT OP ERATIONAL Valves dispensing gas & syrup only Electrode Carbonator short cycles Disconnect electrical Disconnect Check ground electrical connection at Remove spades f rom board and box terminal Motor #1 on LLC & install on any Remove spade f rom open "A"... -
Page 51: Carbonation Troubleshooting Flow Chart #2
CARBONATION TROUBLE SHOOTING FLOW CHART #2 MOTOR/PUMP DOES NOT COME ON Non-carbonated water & syrup bei ng dispensed only Check water pressure Check CO2 s upply Water pressure greater than or clos e to CO2 pres sure will stop the carbonation process C02 cy linder is empty Install or adjust water Change C02 cy linder... -
Page 52: Carbonation Troubleshooting Flow Chart #3
CARBONATION TROUBLE SHOOTING FLOW CHART #3 CARBONATOR NOT OPERATIONAL Water Pump Motor runs continuously NO EXCESSIVE PRESSURE AT VALVE OR PRESSURE RELIEF EXCESSIVE PRESSURE AT VALVE SYMPTONS SYMPTONS Valve will dispense syrup and gas Valve will dispense syrup only and/or only. -
Page 53: Note Section
NOTE SECTION Frequently Called Numbers: __________________________________ ____________________________ __________________________________ ____________________________ __________________________________ ____________________________ __________________________________ ____________________________ __________________________________ ____________________________ __________________________________ ____________________________ CO2 SETTINGS: High Pressure ________________________ PSI Low Pressure ________________________ PSI Product Setup: _____________________________________ __________________________________ _____________________________________________________________________________________________ _____________________________________________________________________________________________ _____________________________________________________________________________________________ _____________________________________________________________________________________________ _____________________________________________________________________________________________ ___________________________________________________ _____________________________________________________________________________________________ _____________________________________________________________________________________________ _____________________________________________________________________________________________ _____________________________________________________________________________________________ _____________________________________________________________________________________________ ___________________________________________________...
Need help?
Do you have a question about the CR-2 and is the answer not in the manual?
Questions and answers