Table of Contents
Advertisement
Advertisement
Table of Contents

Related Manuals for Bernina Funlock 004D


Summary of Contents for Bernina Funlock 004D
-
Page 2: Safety Regulations
Dear customer Congratulations on your choice! Your Bernette Funlock 004D/004 is made to the highest standards. It will cut, sew and neaten for you in one smooth operation giving a professional look to anything you make. The 4 thread Bernette Funlock is particularly suited to sewing stretch fabrics. Let your wardrobe and home benefit from the Bernette’s superb sewing qualities. -
Page 3: Table Of Contents
Retyped by Mastersewusa.com Contents Safety regulations Contents Details of the machine Setting/Practical sewing ● Accessories ● Presser foot pressure ● Roll hemming ● Sewing in tape Preparing the machine ● Thread breakage, unpicking seams ● Foot control ● Assembling the thread stand Maintenance ●... -
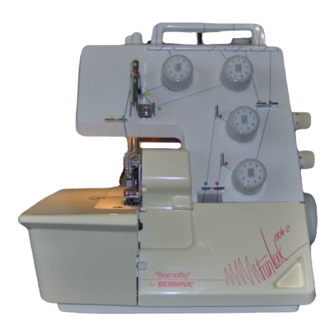
Page 4: Components View
Retyped by Mastersewusa.com Details of the machine Details of the machine 1. Looper cover 2. Looper cover opening indent 3. Knife guard 4. Cloth plate opening lever 5. Cloth plate 6. Stitch plate 7. Presser foot 8. Lower looper thread tension dial 9. -
Page 5: Accessories
Details of the machine View with looper cover open 1. Upper looper 2. Upper knife 3. Lower knife 4. Selection lever for overlocking or roll hemming 5. Lower looper 6. Lower knife setscrew View with cloth plate open 1. Cutting with adjustment knob 2. -
Page 6: Preparing The Machine
Preparing the machine Attaching the foot control Plug foot control into machine socket (A) and then into main socket (B). The foot control regulates the sewing speed. The sewing speed can be adjusted by increasing or decreasing the pressure on the foot control. Thread guide Raise, the support rod fully, turning slightly until the positioning catches engage (C). -
Page 7: Thread Cones/Spools
Preparing the machine Thread cones/spools The anti-vibration cone should be used with the wider edge at the bottom on the spool holder pin when sewing with cones. Large spools If large industrial spools are used, position the anti-vibration cone upside down on the spool holder pin, i.e. with the wider edge at the top. -
Page 8: Using The Machine
Using the machine Power/light switch The power/light switch is conveniently placed on the hand- wheel side of the machine in front of the socket. • Off (A) • On without light (B) • On with light (C) Handwheel The handwheel turns forward, i.e. in the same direction as on a household sewing machine. -
Page 9: Presser Foot Lifter
Using the machine Two-step presser foot lifter To raise the presser foot, raise the presser foot lever on the rear of the machine, until it engages (A). It can be raised again to maximum height and held in this position to provide more space between presser foot and stitch plate (B). -
Page 10: Inserting The Needles
Using the machine Inserting the needles Needles can be inserted quickly and easily with the practical brush-cum-needle inserter (A). • Turn power switch to “O”. • Turn handwheel towards you until needles are fully raised. • Lower the presser foot. Using the small screwdriver, loosen the needle set- screws and remove the needles (B). -
Page 11: Threading
Threading Preparation/Tips • Turn power switch to “O” • Support rod with thread guide must be fully raised. • Open the looper cover and cloth plate. • Turn the handwheel towards you until needles are fully raised. • Raise the upper knife. Thread the machine carefully and in the correct sequence. -
Page 12: Upper And Lower Looper
Threading 1. Upper looper thread, blue markings Place the spool on the spool holder pin underneath the blue marking on the thread guide. (1) Bring thread up from spool and take it through the blue guide. (2,3) Make S-loop around thread guide bar. (4) Thread guide. - Page 13 Threading 1. Lower looper thread, red markings Place the spool on the spool holder pin underneath the red marking on the thread guide. (1,2) Bring thread up from spool and take it through the red guide. (3,4) Make S-loop around thread guide bar. (5) Thread guide.
-
Page 14: Right-Hand And Left-Hand Needle
Threading 3. Right-hand wheel needle, green markings Place the spool on the spool holder pin underneath the green marking on the thread guide. (1,2) Bring thread up from spool and take it through the green guides. (3,4) Make S-loop around the thread guide bar. (5) Thread tension dial. - Page 15 Threading 4. Left-hand needle, yellow markings Place the spool on the spool holder pin underneath the yellow marking on the thread guide. (1) Bring the thread up from the spool and take it through the yellow guide. (2,3) Make S-loop around thread guide bar. (4) Thread tension dial.
-
Page 16: Threading/Trial Sewing
Threading, Trial sewing 3 thread overlock (right needle) For a 3-5 mm wide 3 thread overlock stitch, remove the left-hand needle. Then thread both loopers and the right- hand needle. (See Page 11-13). 3 thread overlock (left needle) For a 5-7 mm wide 3 thread overlock stitch, remove the right-hand needle. -
Page 17: Thread Tension
Thread tension Check your trial run 1. Upper looper thread (blue) 2. Lower looper thread (red) 3. Right-hand needle thread (green) 4. Left-hand needle thread (yellow) Perfect stitch formation is when both looper threads meet at the fabric edge. The needle threads form straight stitches for a stretchy and durable seam. -
Page 18: Adjusting Tension
Thread tension Adjusting the thread tension Turn tension dials by only half or one number then test sew again and check the results. The loops are formed on the underside; Tighten the upper lower thread tension, blue or loosen the lower looper tension, red (A). The loops are formed on the upper side;... -
Page 19: Adjustments And Settings
Adjustments and settings Stitch length 004: • Turn power switch to “O”. • Open cloth plate, loosen knob and adjust to desired length. Tighten knob and close cloth plate. 004D: • Turn dial to stitch length desired can be adjusted while sewing. -
Page 20: Differential Feed
Adjustments and settings Differential feed There are two feed dogs one front (A) and one rear (B). The two feed dogs move independently and the distance each feed dog travels during one complete movement can be adjusted. The differential feed prevents fluting or waving in knitted or stretch fabrics and movements between the layers of fabric. -
Page 21: Gathering
Adjustments and settings Adjusting the differential feed The differential feed can be adjusted by simply turning the differential feed adjustments knob in the direction desired. Always make a trial run. The differential feed is infinitely variable and can be adjusted while sewing. Effect Fabric Thick wool knits, and... -
Page 22: Setting/Practical Sewing
Settings, practical sewing Presser foot pressure he presser foot pressure is factory adjusted to a medium setting. Should you wish to adjust it, simply turn the knob in the direction desired: osition of knob for normal pressure (A). ore pressure: for thick or stiff fabrics such as denim, tweed, firm linen (B). -
Page 23: Roll Hemming
Settings, practical sewing Rolled hem • Application: Edge finish • Stitch: 3 thread overlock, right needle. • Stitch selection: roll hemming • Thread: Darning thread, fine polyester thread, wooly nylon thread (only in upper looper) • Needle: 70/80 • Stitch length: 1-1.5 •... -
Page 24: Sewing In Tape
Settings, practical sewing Sewing in tape The standard presser foot is equipped with a tape guide. A tape can be sewn into the shoulder or side seams of garments made from knits or stretch fabrics to prevent stretching. • Turn the handwheel towards you until needles are fully raised. •... -
Page 25: Changing Lower Knife
Maintenance Changing the upper knife The upper knife (moving knife) is made from special hardened material. Should it get damaged, it can be replaced by your local Bernette dealer. Changing the lower knife • Disconnect machine from electricity supply. • Turn handwheel towards you until needles are fully raised. -
Page 26: Trouble Shooting Guide
Trouble shooting guide Problem Cause Solution Page Fabric does not feed……………… Presser foot pressure is too low Adjust the presser foot pressure…………… 21 evenly Lower knife is blunt or wrongly positioned Replace the lower knife Thread breaks…………………….. Thread tensions is too tight for thread Reduce thread tension…………………. -
Page 27: Technical Data
Trouble shooting guide Stitch choice………………….. 2 needles, 4 thread Overlock with integral safety seam 1 needle, 3 thread Overlock Needle system………………… 130/705 H Seam width…………………… 3 – 7 mm (3 thread overlock) 5 – 7 mm (4 thread overlock) Stitch length…………………... 1 – 4 mm Differential feed………………... -
Page 28: Important Safety Instructions
“IMPORTANT SAFETY INSTRUCTIONS” “When using an electrical appliance, basic precautions should always be followed, including the following:” “Read all instructions before using this sewing machine.” “DANGER___ To reduce the risk of electric shock:” 1. “An appliance should never be left unattended when plugged in. Always unplug immediately after using and before cleaning.”... - Page 29 © Copyright by Fritz Gegauf Ltd. Bernina Sewing Machines 8266 Steckborn, Switzerland No. 501 661 13 GB/E...
- Page 30 Our manuals are: BERNINA * BROTHER * CONSEW * FEIYUE-YAMATA * ELNA * GN * PFAFF * JUKI * MORSE * NECCHI * NEW HOME * SEARS KENMORE * SIMPLICITY * SINGER * WHITE For Reprints Visit on the web.