Table of Contents
Advertisement
Advertisement
Table of Contents

Related Manuals for Chamberlain Merlin MT60P


Summary of Contents for Chamberlain Merlin MT60P
- Page 1 MT60P Sectional and Tilt Garage Door Opener Installation and Operating Instructions Owners Copy: Please keep these instructions for future reference This manual contains IMPORTANT SAFETY information. DO NOT PROCEED WITH THE INSTALLATION BEFORE READING THOROUGHLY.
-
Page 2: Table Of Contents
START BY READING THESE IMPORTANT SAFETY INSTRUCTIONS WARNING • Failure to comply with the following instructions may result in serious personal injury or property damage. • Read and follow all instructions carefully. • The garage door opener is designed and tested to offer safe service provided it is installed and operated in strict accordance with the instructions in this manual. -
Page 3: Door Types
DOOR TYPES A. One-Piece Door with Horizontal Track Only B. Sectional Door with curved track C. One-Piece Door without track To suit spring balanced sectional doors up to 12.5m spring balanced Tilt doors up to 8.5m TOOLS REQUIRED 8mm hex 10mm, 8mm, head driver 4.5mm, 4mm... - Page 4 MT60P OPENER CARTON (1) MT60P Opener (2) Angled door arm (3) Door mounting Bracket (4) Straight door arm (5) Chain pack and joiner (6) Stop collar, nut & bolt (7) Header bracket (8) Pole kit adaptor (9) Idler pulley assembly...
-
Page 5: Before You Begin
BEFORE YOU BEGIN: 1. Look at the wall or ceiling above the garage door. The header bracket must be securely fastened to structural supports. 2. Do you have a finished ceiling in your garage? If so, a support bracket and additional fastening hardware (not supplied) may be required. - Page 6 INSTALL THE TROLLEY AND IDLER PULLEY fig 1 Slide the trolley assembly (1) onto the pole (3) taking note of the door direction arrow (fig 1). The trolley should be located midway along the pole. Insert the pole (3) into the idler pulley assembly (2) as illustrated.
- Page 7 INSTALL THE CHAIN Fitting the Chain: fig. 1 Wrap the chain around the idler pulley (1) and drive sprocket (as illustrated in fig 1), ensuring the chain passes through the trolley assembly (3). NOTE: Locate the chain connector as illustrated above approximately 300mm from the Idler pulley.
-
Page 8: Installation
INSTALLATION SECTION Wear protective goggles when working overhead to protect your eyes from injury. Disengage all existing garage door locks to avoid damage to the garage door. To avoid serious personal injury from entanglement, remove all ropes connected to the garage door before installing the opener. -
Page 9: Position The Opener
ATTACH POLE ASSEMBLY TO HEADER BRACKET Position opener on garage floor below the header bracket. Use packing material to protect the cover. NOTE: To enable the pole to clear sectional door springs, it may be necessary to lift opener onto a temporary support. The opener must either be secured to a support or held firmly in place by another person. -
Page 10: Hang The Opener
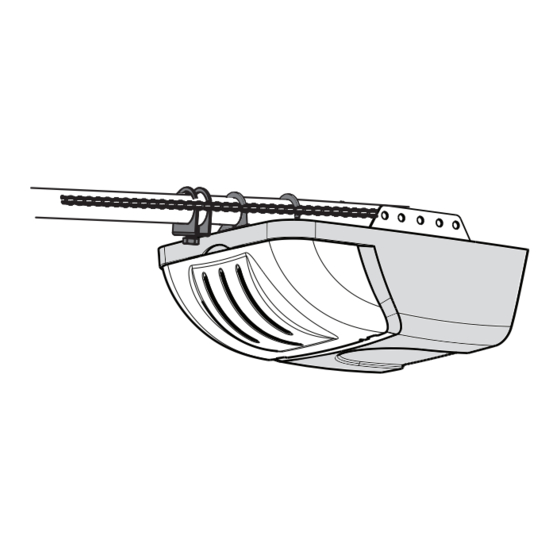
HANG THE OPENER The opener must be securely fastened to a structural support of the garage. Three representative installations are shown. Yours may be different. Hanging brackets (1) should be angled (Figure A) to provide rigid support. On finished ceilings, (Figure B) attach a sturdy metal bracket (not supplied) (4) to a structural support before installing the opener. -
Page 11: Fasten Door Bracket
2-1/2 minutes when power is connected. After 2-1/2 minutes it will turn off. To close, gently push diffuser up until engaged. Replace burnt out bulbs with Chamberlain 041A0079 or reputable light bulbs. FASTEN DOOR BRACKET... -
Page 12: Installation
CONNECT DOOR ARM SECTIONAL DOORS Figure 1 Pulley Trolley Make sure garage door is fully closed. Pull the emergency release handle to disengage the trolley. Slide the trolley assembly back 200mm from the idler pulley. Figure 1. Ring • Fasten straight door arm section to trolley Clevis Pin Fastener assembly using the hardware provided with... -
Page 13: Adjustment
ADJUSTMENT SECTION SETTING THE LIMITS Travel limits regulate the points at which the door will stop when moving up or down. Follow the steps below to set the limits. NOTE: The door must be in the mid or closed position to begin setting the limits. -
Page 14: Test The Safety Reverse System
INSTALL THE PROTECTOR SYSTEM™ (See accessories) SAFETY FIRST! Whilst Chamberlain have engineered safety features into your garage door opener, we urge you to consider fitting IR Beams to your new garage door opener. In many countries these devices are compulsory to prevent serious injury or property damage. -
Page 15: Wireless Programming
INSTALLING THE CM128 WIRELESS WALL BUTTON Carefully pry open the CM128 and locate the two screw for mounting. To attach to the wall, use the two screws and wall anchors provided if mount to plaster wall (if using a recessed wall box do not use anchors). NOTE: Tightening the wall mount screws will reduce clearance between bracket and wall. - Page 16 KEYLESS DEVICES PROGRAMMING (OPTIONAL ACCESSORIES) NOTE: Your Keyless Entry must programmed to operate your garage door opener. Program Receiver Match Additional Transmitter Code Using the orange “LEARN” Button: 1. Press and release the orange “learn” button (1) on opener. The learn indicator light will glow steadily for 30 seconds.
- Page 17 INSTALL DOOR CONTROL (OPTIONAL) Locate door control where the garage door is visible, away from door and door hardware and out of the reach of children. Mount at least 1.5m (5 feet) above the floor Serious personal injury from a moving garage door may result from misuse of opener. Do not allow children to operate the door control or transmitter.
-
Page 18: Special Features
USING THE MOTION DETECTING CONTROL PANEL (optional accessory) Press the push bar (1) to open or close the door. Press again to stop the door. Light feature Press the light button to turn the opener light on or off. It will not control the opener lights when the door is in motion. -
Page 19: Accessories
ACCESSORIES (1) Model CM844 4 Channel transmitter (8) Model C77 The Protector System IR Beams (2) Model CM128 Wireless Wall Button (9) Model CM1702 Quick Release Lock (3) Model C940 Single-Channel transmitter (10) Model 760E Outside Keyswitch (4) Model C943 3-Channel transmitter (11) Model C379 Wireless Fingerprint Access System... -
Page 20: Replacement Parts
REPLACEMENT PARTS 0 4 1A 2 8 2 8 17 8 B 0 0 8 6 B 0 12 B 0 9 0 5 17 8 B 0 0 3 4 B 0 12 B 0 9 0 6 0 8 3 A 0 0 11-1 002A1659 002A1658 0 0 1A 7 3 5 0... -
Page 21: Care Of Your Opener
REPLACEMENT PARTS 158A0049 041A5797 041A5908 041A5735C 041A0079 041D0577 204C0240-2 If the supply cord is damaged, it must be replaced by the manufacturer, its service agent or similarly qualified persons in order to avoid hazard. 031D0587 108C0082 CARE OF YOUR OPENER When properly installed your opener will operate with minimal maintenance. -
Page 22: Troubleshooting
TROUBLE SHOOTING 1. Opener doesn't operate from either door control or 13. Opener won't activate due to power failure: remote: • Pull manual release rope and handle down to disconnect • Does the opener have electric power? Plug lamp into outlet. If trolley. -
Page 23: Operation Of Your Opener
2. when the power is briefly interrupted; 3. when the opener is activated. The light turns off automatically after 2-1/2 minutes. Bulb size is 24V/21W maximum. SPECIAL NOTE: Chamberlain strongly recommends that the Protector System be installed on all garage door openers. -
Page 24: Warranty
Zealand Limited (Seller) warrants to the original from breach of law or contract or for negligence, exceed the purchaser of the Merlin MT60P Garage Door Opener cost of repairing or replacing the Unit or refunding the (Unit) that it is free from defects in material and/or purchase price of the Unit.