Belkin F5D7000 User Manual
Belkin wireless g desktop card
Hide thumbs
Also See for F5D7000:
- User manual (19 pages) ,
- Supplementary manual (2 pages) ,
- Reference (54 pages)
Table of Contents
Advertisement
Quick Links
Download this manual
See also:
Reference
Belkin Tech Support
US: 877-736-5771
800-223-5546 ext. 2263
310-898-1100 ext. 2263
UK: 0845 607 77 87
Australia: 1800 235 546
New Zealand: 0800 235 546
Singapore: 65 64857620
Europe: www.belkin.com/support
Belkin International, Inc.
501 West Walnut Street
Los Angeles, CA 90220-5221, USA
310-898-1100
310-898-1111 fax
Belkin Ltd.
Express Business Park, Shipton Way
Rushden, NN10 6GL, United Kingdom
+44 (0) 1933 35 2000
+44 (0) 1933 31 2000 fax
© 2007 Belkin International, Inc. All rights reserved. All trade names are registered trademarks of
respective manufacturers listed. Windows and Windows Vista are either registered trademarks or
trademarks of Microsoft Corporation in the United States and/or other countries.
Wireless G
Desktop Card
Belkin Ltd.
4 Pioneer Avenue
Tuggerah Business Park
Tuggerah, NSW 2259, Australia
+61 (0) 2 4350 4600
+61 (0) 2 4350 4700 fax
Belkin B.V.
Boeing Avenue 333
1119 PH Schiphol-Rijk, The Netherlands
+31 (0) 20 654 7300
+31 (0) 20 654 7349 fax
P74685-F
Advertisement
Table of Contents

Subscribe to Our Youtube Channel
Related Manuals for Belkin F5D7000


Summary of Contents for Belkin F5D7000
- Page 1 +44 (0) 1933 35 2000 +44 (0) 1933 31 2000 fax © 2007 Belkin International, Inc. All rights reserved. All trade names are registered trademarks of respective manufacturers listed. Windows and Windows Vista are either registered trademarks or trademarks of Microsoft Corporation in the United States and/or other countries.
- Page 2 Wireless G Desktop Card User Manual F5D7000...
-
Page 4: Table Of Contents
Step 3: Configure..........15 4 Using the Belkin Wireless Networking Utility ......16 Accessing the Belkin Wireless Networking Utility from the Windows System Tray . -
Page 6: Introduction
• Simultaneously play games online, check Internet email, and chat Advantages of a Wireless Network Here are some of the advantages of setting up a Belkin wireless network: • Mobility – you’ll no longer need a dedicated “computer room”— now you can work on a networked laptop or desktop computer anywhere within your wireless range •... -
Page 7: Placement Of Your Wireless Networking Hardware For Optimal Performance
To achieve the best wireless network coverage for your “wireless clients,” (i.e. computers enabled by Belkin Wireless Notebook Cards, Wireless Desktop Cards, and Wireless USB Adapters): •... - Page 8 Introduction Avoid Obstacles and Interference Avoid placing your wireless router (or access point) near devices that may emit radio “noise”, such as microwave ovens. Other objects that can inhibit wireless communication can include: • Refrigerators • Washers and/or dryers • Metal cabinets •...
- Page 9 For more Belkin wireless networking products, use the detailed Site Survey and wireless channel information included in your User Manual. Secure Connections, VPNs, and AOL Secure connections typically require a user name and password, and are used where security is important.
-
Page 10: Overview
Overview Product Features The Card complies with the IEEE 802.11g standard in order to communicate with other 802.11g-compliant wireless devices at 54Mbps. The Card is compatible with all 802.11g devices as well as other 802.11b products at 11Mbps. 802.11g products operate on the same 2.4GHz frequency band as 802.11b Wi-Fi products. -
Page 11: Applications And Advantages
Overview Applications and Advantages • Wireless roaming with a laptop around the home or office Offers the freedom of networking—without cables • Connection rates of up to 54Mbps Provides immediate wireless connectivity at home, work, and hotspot locations without compromising the use of existing 802.11b and 802.11g products •... -
Page 12: System Requirements
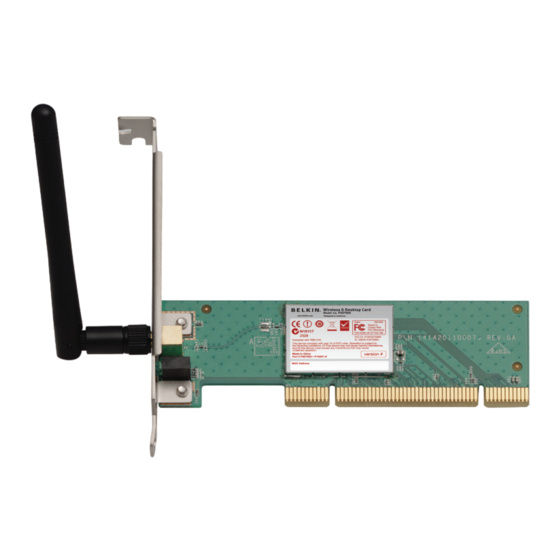
Overview Overview (a) Link LED Lights up when the Card links to a wireless network (b) Activity LED Lights up and flashes when the Card is active (c) Card Connector Fits securely into your computer’s PCI slot (d) Antenna System Requirements •... -
Page 13: Installing And Setting Up The Card
Installing and Setting up the Card For users of Windows Vista, refer to the following installation steps: Step 1A Install IMPORTANT: INSTALL THE SOFTWARE BEFORE INSERTING THE CARD. 1A.1 Insert the Installation Software CD into your CD-ROM drive. 1A.2 Select the “Run Installer.exe” option. 1A.3 You may see a window titled, “A program needs your permission to continue”. - Page 14 Installing and Setting up the Card 1A.5 A window may appear with the message, “Windows can’t verify the publisher of this driver software” across the top. This is normal and does not indicate a problem. Our software has been fully tested and is compatible with this operating system.
- Page 15 Installing and Setting up the Card 1A.10 In the Network and Sharing Center, click on “Connect to a network”. 1A.11 Select an available wireless network and click “Connect”. 1A.12 Your Card will attempt to connect to the selected network. 1A.13 Depending on the security settings of your wireless network, you may be prompted to enter...
- Page 16 Installing and Setting up the Card 1A.14 After connecting to the network, you may choose to save this network and connect automatically once your Card is in range. 1A.15 The Network and Sharing Center should now show the network connection that you have just made.
- Page 17 1B.1 Insert the Installation Software CD into your CD-ROM drive. 1B.2 The Belkin Wireless Card Installer screen will automatically appear. (This may take 15–20 seconds.) Click “install” to start the installation. Note: If the Belkin Wireless Networking Utility screen does not appear within 20 seconds, access your CD-ROM by double-clicking on the “My...
-
Page 18: Step 2 Insert
Installing and Setting up the Card Step 2 Insert Insert the Card into an Available PCI Slot on your Desktop Computer Shut down your computer and disconnect your power cord. Remove the screws behind your computer case that secure the computer cover and remove cover. - Page 19 Replace the computer’s cover. Now that the Card is installed, you can reconnect the power cord and turn the computer back on. The Belkin Wireless Networking Utility installation is now complete. Click “Finish” to close the Wizard and restart your computer.
-
Page 20: Step 3 Configure
Installing and Setting up the Card Step 3 Configure Connect to a Network After restarting your computer, double-click the Belkin Wireless Networking Utility icon located on the desktop screen. The Wireless Networking Utility screen will appear. Select a network to connect to by selecting a network from the “Available Networks”... -
Page 21: Using The Belkin Wireless Networking Utility
To access the WNU, simply place your mouse pointer and right-click over the WNU icon on the Windows system tray on the lower right-hand corner of your computer’s desktop. If the icon is not present, click on “Start > Programs > Belkin > Wireless Networking Utility”. - Page 22 Using the Belkin Wireless Networking Utility The WNU’s default screen is the “Current Status” tab. The “Current Status” tab displays the current network status and available networks. Network Status This window displays the connectivity status of the current network, between the computer and router, and between the router and the Internet.
- Page 23 Using the Belkin Wireless Networking Utility Connection Failure Other options will appear during attempts to reconnect. To stop connecting, click “Stop” and to reattempt connection, click “Retry”. Network Status and Solution Tips To further understand the current Network Status, click “Open Wireless Utility”.
-
Page 24: Setting Wireless Network Profiles
Using the Belkin Wireless Networking Utility The WNU also features a “Solution Tips” section that provides troubleshooting guidelines. Setting Wireless Network Profiles The “My Connections” tab on the WNU allows you to add, edit, and delete connection profiles. It also displays signal strength, security, and network type. - Page 25 Using the Belkin Wireless Networking Utility At the time of publication, four Encryption Methods are available: Encryption Methods: Using the Belkin Wireless Networking Utility Name 64-Bit Wired 128-Bit Wi-Fi Protected Wi-Fi Equivalent Encryption Access Protected Privacy Access 2 Acronym 64-bit WEP...
- Page 26 Using the Belkin Wireless Networking Utility older equipment that only supports 64-bit WEP. All Belkin wireless products will support both 64-bit and 128-bit WEP. Encryption Keys After selecting either the 64-bit or 128-bit WEP encryption mode, it is critical that you generate an encryption key. If the encryption key is not consistent throughout the entire wireless network, your wireless networking devices will be unable to communicate with one another.
-
Page 27: Configuring Your Belkin Wireless G Desktop Card To Use Security
WPA or WEP. In order for you to gain a wireless connection, you will need to set your Wireless G Desktop Card to use the same security settings. Changing the Wireless Security Settings Your Belkin Wireless G Desktop Card supports advanced security technology, including Wi-Fi Protected Access 2 (WPA2... - Page 28 Using the Belkin Wireless Networking Utility Push-Button Configuration (PBC) Method. Advanced Configuration Method: For manual connection to a secured network. WPS uses WPA2 (described below) for encryption. It does not provide additional security. Instead, it standardizes the method for securing your wireless network.
- Page 29 Using the Belkin Wireless Networking Utility The client will be automatically enrolled into your wireless network within two minutes. If desired, you may connect manually to a WPS-enabled network. Click on the “Advanced” tab to open the following window: Enter in the encryption key and security method in order to join this network.
- Page 30 Using the Belkin Wireless Networking Utility Click “Edit” to change settings. WEP Setup 64-Bit WEP Encryption Select “WEP” from the drop-down menu. After selecting your WEP encryption mode, you can enter your key by typing in the hex key manually, or you can type in a passphrase in the “Passphrase”...
- Page 31 Using the Belkin Wireless Networking Utility 128-Bit WEP Encryption Select “WEP” from the drop-down menu. After selecting your WEP encryption mode, you can enter your key manually by typing in the hex key manually, or you can type in a passphrase in the “Passphrase”...
- Page 32 Using the Belkin Wireless Networking Utility connection until you activate security on your wireless client. Please record the key prior to applying changes in the wireless router (or access point). If you don’t remember the hex key, your client will be locked out of the wireless router (or access point).
- Page 33 Using the Belkin Wireless Networking Utility The “Options” tab on the WNU provides the user the ability to customize his or her WNU settings. Wireless Networking Utility Help The WNU “Help” tab provides users with access to online and telephone support, as well as advanced diagnostic tools.
- Page 34 Using the Belkin Wireless Networking Utility performance.
-
Page 35: Troubleshooting
If you are unable to connect to the Internet from a wireless computer, please check the following items: Look at the lights on your wireless router. If you’re using a Belkin Wireless Router, the lights should be as follows: • The “Power” light should be on. - Page 36 If you are still unable to access the Internet after connecting to the wireless network, please contact Belkin Technical Support. The name of your wireless network DOES NOT appear in the list of “Available Networks”.
- Page 37 SSID. For more information about setting up an SSID, please refer to your router manufacturer’s user manual. If issues persist even at close range, please contact Belkin Technical Support.
- Page 38 (or access point) must be exactly the same in order for the Card to connect to the router. If issues persist even at close range, please contact Belkin Technical Support. Data transfer is sometimes slow.
- Page 39 Troubleshooting If issues persist even at close range, please contact Belkin Technical Support. Why are there two wireless utilities in my system tray? Which one should I use? There are several features and advantages to using the Belkin Wireless Networking Utility over the Windows XP Wireless Zero Configuration utility.
- Page 40 Troubleshooting 2. Touch any metal part of the case to discharge static electricity, which could damage your product or your computer. 3. Remove the Card. 4. Locate a different empty PCI expansion slot. It is usually white in color. 5. Confirm that the Card will fit into the slot you have chosen. Keep in mind that the included antenna needs to be oriented with the top pointing up.
- Page 41 802.11n release, promises speeds that exceed 802.11g, and up to twice the wireless coverage area. See the following chart for more detailed information. Wireless Comparison Chart Wireless 802.11b 802.11g 802.11a Belkin Pre-N Technology 600% faster Speed* 11Mbps 54Mbps 54Mbps than standard 802.11g*...
- Page 42 . If you want to contact technical support by phone, please call: US: 877-736-5771 800-223-5546 ext. 2263 310-898-1100 ext. 2263 UK: 0845 607 77 87 Australia: 1800 235 546 New Zealand: 0800 235 546 Singapore: 65 64857620 Europe: www.belkin.com/support...
-
Page 43: Information
Information Wi-Fi Interoperability Certificate ®... - Page 44 Information FCC Statement DECLARATION OF CONFORMITY WITH FCC RULES FOR ELECTROMAGNETIC COMPATIBILITY We, Belkin International, Inc., of 501 West Walnut Street, Compton, CA 90220, declare under our sole responsibility that the product, F5D7000v8 to which this declaration relates, complies with Part 15 of the FCC Rules.
- Page 45 Information Modifications The FCC requires the user to be notified that any changes or modifications to this device that are not expressly approved by Belkin International, Inc., may void the user’s authority to operate the equipment. Canada-Industry Canada (IC) This device has been designed to operate with an antenna having a maximum gain of 5 dBi.
- Page 46 Belkin warrants the Belkin product for the lifetime of the product. What will we do to correct problems? Product Warranty. Belkin will repair or replace, at its option, any defective product free of charge (except for shipping charges for the product). What is not covered by this warranty? All above warranties are null and void if the Belkin product is not provided to Belkin for inspection upon Belkin’s request at the sole expense of...
- Page 47 Information Belkin reserves the right to review the damaged Belkin product. All costs of shipping the Belkin product to Belkin for inspection shall be borne solely by the purchaser. If Belkin determines, in its sole discretion, that it is impractical...
- Page 48 Information...
Need help?
Do you have a question about the F5D7000 and is the answer not in the manual?
Questions and answers