Table of Contents
Advertisement
Quick Links
NOTE
Thank you for purchasing
the SPIRIT Club spin bike.
Please read carefully
through all the precautions
and instructions in this
manual before using this
equipment and keep this
manual for your future
reference.
SERVICE CENTRE
NUMBER
For immediate help with
assembly or for additional
product information,
please call our service
center.
(DBN)
031 702 5784
(JHB)
011 907 1660
(CT)
021 934 0862
(PE)
041 487 0573
please have your model
name ready when you
call us.
MAXIMUM USER
WEIGHT
130kg
CLUB
SPIN BIKE
INSTRUCTION AND USER'S MANUAL
10165
Advertisement
Table of Contents

Subscribe to Our Youtube Channel
Related Manuals for Spirit Club


Summary of Contents for Spirit Club
- Page 1 NOTE Thank you for purchasing the SPIRIT Club spin bike. Please read carefully through all the precautions and instructions in this manual before using this equipment and keep this manual for your future reference. CLUB SPIN BIKE SERVICE CENTRE NUMBER...
-
Page 2: Table Of Contents
CONTENTS SAFETY PRECAUTIONS page 1 PRE-ASSEMBLY CHECK LIST page 2 PARTS LIST page 3-4 HARDWARE PARTS LIST page 5 EXPLODED DIAGRAM page 6 ASSEMBLY INSTRUCTION page 7-10 EXERCISE INSTRUCTIONS page 11-12 WARRANTY INFORMATION page 13-15... -
Page 3: Safety Precautions
4. The Spirit Club Spin Bike should be used by only one person at a time. 5. Be careful to maintain your balance while using, mounting, dismounting, folding, unfolding or assembling the Spirit Club Spin Bike. Loss of balance may result in a fall and / or serious bodily injury. -
Page 4: Pre-Assembly Check List
10165 PRE ASSEMBLY CHECK LIST Thank you for choosing the Spirit Club Spin Bike. We took great pride in producing this quality product and hope it will provide you with many hours of quality exercise to make you feel better, look better and enjoy life to its fullest. -
Page 5: Part List
10165 PART LIST Description Q’ty Description Q’ty 10165-01 Main Frame 10165-24 Bolt (M8 x 20mm) 10165-02 Rear Stabilizer 10165-25 Nut (ø17.5 x ø8 x M6) 10165-03 Rear Stabilizer Cap 10165-26 Pedal (Left Side) 10165-04 Round Foot 10165-27 Crank (Right Side) 10165-05 Hex Head Bolt (M10 x 60mm) 10165-28... - Page 6 10165 PART LIST Description Q’ty Description Q’ty 10165-47 Upper Upright Post 10165-70 Nylon Nut (M8) 10165-48 Bolt (M5 x 9mm) 10165-71 Round Steel-plate 10165-49 Adjustable Knob 10165-72 Spring (2 x 16 x 30) 10165-50 Seat Post 10165-73 Bolt (M10 x 101.5mm) 10165-51 Chain Cover L 10165-74...
-
Page 7: Hardware Parts List
10165 HARDWARE PARTS LIST Description Drawing Q’ty 10165-05 Hex Head Bolt (ø10x30mm) 10165-08 Nut Cap (M10) Plastic Washer 10165-06 (ø10 x ø26 x T 2 mm) Flat Washer 10165-07 (ø10 x ø26 x T 2 mm) Adjustable Knob 10165-60 (for Saddle) Tool-A Screw Driver (14/19) Tool-B... -
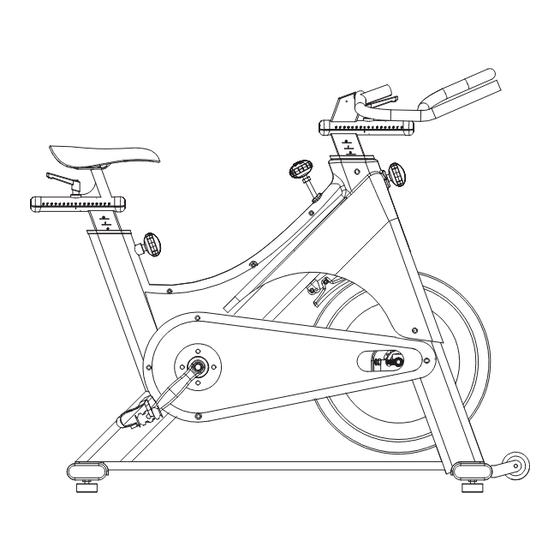
Page 8: Exploded Diagram
10165 EXPLODED DIAGRAM page-6... -
Page 9: Assembly Instruction
10165 ASSEMBLY INSTRUCTION STEP 1 Attach the Stabilizer (9 and 2) to Main Frame (1), through two Steel Plates (84) and secure with four ø10 x 30mm Hex Bolts (5), eight ø10 x ø26 x T2 mm Washers (7), four ø10 x ø26 x T2 mm Plastic Washers (6) and four M10 Nut Caps (8). - Page 10 10165 ASSEMBLY INSTRUCTION STEP 2 Loosen the Adjustable Knob (49), insert the Upright Post (47) and Seat Post (50) into Main Frame (1). Then tighten the Adjustable Knob (49). page-8...
- Page 11 10165 ASSEMBLY INSTRUCTION STEP 3 Attach the Right Paddle (28) to the Right Crank (27), Left Paddle (26) to the Left Side Crank (23). Fixed Seat (88) to the Seat Adjustable Tube (63). page-9...
- Page 12 10165 ASSEMBLY INSTRUCTION STEP 4 Attach the Handlebar (45) to the Upright Post (47), secure with a Plastic Cap (39), M4 x 10mm Bolt (42) and L-Adjustable Knob (60). page-10...
-
Page 13: Exercise Instructions
10165 EXERCISE INSTRUCTIONS Using your SPINNING BIKE will provide you with several benefits. It will improve your physical fitness, tone muscle and in conjunction with a calorie controlled diet, help you lose weight. 1. The Warm Up Phase This stage helps get the blood flowing around the body and the muscles working properly. It will also reduce the risk of cramp and muscle injury. - Page 14 10165 EXERCISE INSTRUCTIONS 3. The Cool Down Phase This stage is to let your Cardio-vascular System and muscles wind down. This is a repeat of the warm up exercise, however reduce your tempo and continue for approximately 5 minutes. The stretching exercises should now be repeated, again remembering not to force or jerk your muscles into the stretch.
-
Page 15: Warranty Information
10165 SPIRIT 1 YEAR LIMITED WARRANTY Masstores (Pty) Ltd (“the Supplier”) hereby provides a limited warranty to the original purchaser of this product (“the Consumer”) that this product will be free of manufacturing defects in materials and workmanship which under normal, personal, family or household use (commercial use... - Page 16 10165 SPIRIT REPAIRS PROCEDURE 1. Procedure for repairs Should you experience any faults or breakdowns on your Spirit equipment, please adhere to the following procedure to have the fault rectified speedily and professionally. • Do not return the product to the store. • Call the Service Centre to log the faulty product (under warranty or out of warranty). • The operator or technical advisor will try to identify the fault and will book a service. • The service team will take the faulty product back to the service centre.
-
Page 17: Proof Of Purchase
10165 PROOF OF PURCHASE Any claim in terms of the warranty must be supported by a proof of purchase or a warranty number. Warranty numbers can be issued through contacting our Service Centre. If such proof is not available, then not withstanding anything to the contrary herein, the service agent’s prevailing charges for services / repairs including call-out and / or spares will be payable by the Consumer upon collection or delivery of the repaired product.
Need help?
Do you have a question about the Club and is the answer not in the manual?
Questions and answers