Table of Contents
Advertisement
Advertisement
Table of Contents

Subscribe to Our Youtube Channel
Related Manuals for Aastra 6730a


Summary of Contents for Aastra 6730a
-
Page 1: Operation Guide
Aastra 6730a Operation Guide D i t d o c u me n t wo r d t u a a n g e b o d e n d o o r T e l e c o mH u n t e r . D é z a k e l i j k e T e l e c o m we b s h o p . -
Page 2: Table Of Contents
Table of Contents Introduction ............................. 3 Phone Specification ........................3 Phone Parts ............................ 4 Key Panel............................5 Bottom View............................ 7 Basic Operation ..........................8 Dial and Pre-dial ........................8 Call by Handsfree ........................8 Call by Headset ........................8 Music on Hold ........................... 8 Mute............................ -
Page 3: Introduction
Introduction Aastra 6730a is an advanced line-powered analog phone. It supports multi-languages, call log management, volume adjustment, message waiting, configuration lock, and remote control through FSK singnalling. Phone Specification General Color Charcoal Signal Analog Line supported Single Features Handset / Headset (4 levels) -
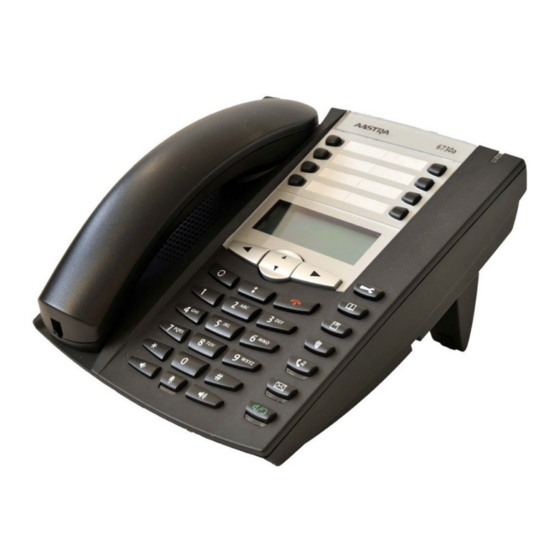
Page 4: Phone Parts
Phone Parts When you unpack your phone, you should ensure that you have all of the following items. If any part is missing, contact the supplier of your phone. D i t d o c u me n t wo r d t u a a n g e b o d e n d o o r T e l e c o mH u n t e r . D é z a k e l i j k e T e l e c o m we b s h o p . T 0 8 8 7 4 6 3 4 4 4 | @ s a l e s @T e l e c o mH u n t e r . -
Page 5: Key Panel
Key Panel D i t d o c u me n t wo r d t u a a n g e b o d e n d o o r T e l e c o mH u n t e r . D é z a k e l i j k e T e l e c o m we b s h o p . T 0 8 8 7 4 6 3 4 4 4 | @ s a l e s @T e l e c o mH u n t e r . - Page 6 Symbols / Français Español Deutsch Português Nederlands Italiano Keys Numérotation Teclas Kurzwahl Snel-kiezen Numeri brevi Speed-dial Marcação rápida abrégée programables Shift / M0-M7 Shift / M0-M7 Shift / M0-M7 Shift / M0-M7 Shift / M0-M7 Shift / M0-M7 Shift / M0-M7 Touches de Teclas de Navigation keys...
-
Page 7: Bottom View
Bottom View Symbols / Français Español Deutsch Português Nederlands Italiano Keys Prise de ligne Puerto Anschlussbuchse Conector de linha Lijnpoort Presa linea Line socket téléphonique conneccion de telefónica telefonica linea Off / Haute DE / Alto AUS/Spannung/ OFF / Hi Volt / UIT / Hi Volt / OFF / Alta OFF / Hi Volt /... -
Page 8: Basic Operation
Basic Operation Dial and Pre-dial Dial Pick up the handset (or press [ ] for handsfree / headset operation) and press numeric key, [*], [#] or [Pause] to dial out. Pre-dial During on-hook, press numeric key, [*], [#] or [Pause] for the number to be dialed (max. 32 digits). Press [ ] or [ ] key or pick up the handset, the phone will dial out the number. -
Page 9: Menu Operation
Menu Operation Press [ ] to enter into main menu. Press [ ] or [ ] to scroll up and down for different options. Press[ ] or [ ] to enter the submenu / confirm selection. Pressing [ ] to visit the previous menu Main Submenu Settings... -
Page 10: Phone Setting
Phone Setting Set Language 1. Press [ ] > PHONE SETTING > SET LANGUAGE 2. Press [ ] or [ ] to choose the favourite language (English, Français, Español, Deutsch, Português, Nederlands, Italiano) 3. Press [ ] or [ ] to confirm Set Ring Volume 1. -
Page 11: Set Handfree Volume
Set Handfree Volume 1. Press [ ] > PHONE SETTING > SET HANDFREE VOL or Press [ ] to activate hansfree 2. Press [ ] or [ ] to adjust the volume on handfree loudspeaker. Handfree Volume Display Icon Level 8 (Max.) ▂... -
Page 12: Set Lock State
Set Lock state 1. Press [ ] > PHONE SETTING > SET LOCK STATE 2. When the display shows “ENTER PASSWORD”, enter the password If the phone was locked: 3. the display shows “UNLOCK?” 4. Press [ ] or [ ] to unlock / Press [ ] or [ ] to quit without change If the phone was unlocked (default): 5. -
Page 13: Time Format
Time Format 1. Press [ ] > PHONE SETTING > TIME FORMAT 2. Press [ ] or [ ] to select the time format (12 Hours or 24 Hours) 3. Press [ ] or[ ] to confirm Area code setting 1. -
Page 14: Alarm Setting
Alarm Setting Alarm clock The alarm clock should be set as 24H, HH/MM and phone should then activate the alarm in 5 sec after the local clock reached the set time in alarm clock 1. Press [ ] > ALARM SETTING > ALARM CLOCK 2. -
Page 15: Call Records
Call Records View Call Records 1. Press [ ] > CALL RECORD 2. Press [ ] or [ ] to select “MISSED CALL” / “DIALED CALL” / “ANSWERED CALL” 3. Press [ ] or [ ] to view the calls list. 4. -
Page 16: Speed Dial Memory
Speed Dial Memory Save a Memory 1. Place the handset on the phone 2. Press “one-touch” memory key (M1 to M7) or “two-touch” memory keys (Shift + M0 to M7) 3. Press [ ] and enter the name to be saved 4. -
Page 17: Message Waiting Memory (Mwm)
Message Waiting Memory (MWM) The message waiting memory normally stores the number to reach the voicemail box. Save MWM 1. Place the handset on the phone and press [ 2. Press [ ] and enter the number to be saved 3. -
Page 18: Phonebook
Phonebook 1. Press [ ], the display shows “SEARCH”. 2. Press [ ] or [ ] to select “SEARCH” or “ADD”. Search Phonebook 1. Select SEARCH and press [ ] key to enter Phonebook viewing state 2. Press [ ] or [ ] to view the records. Hold the [ ] / [ ] key for 3s could activate fast scrolling 3. -
Page 19: Caller Id Display
Caller ID display After receiving a new incoming call, the number will display on LCD and hold for 10s, during this time, if received another new call, it will continue to display for 10s and display corresponding icon. Incoming calls records include the Number, Name, Date/Time, Caller Timer, Repeated call icon, New missed call icon, Missed call icon and Received call icon. - Page 20 EC‐Declaration of conformity Déclaration de conformité CE EG‐Konformitätserklärung Declaración de conformidad CE AASTRA France (1 rue Arnold Schoenberg – 78280 Guyancourt – France) hereby declares that: This product, Aastra 6730a, is in conformity with the essential requirements and other relevant provisions of the European Directive 1999/5/EC (R&TTE Directive) Le poste Aastra 6730a est conforme aux exigences essentielles de la directive 1999/5/EC Dieses Gerät Aastra 6730a entspricht den grundlegenden Anforderungen der Richtlinie 1999/5/EG Este equipo Aastra 6730a cumple con los requisitos esenciales de la directiva 1999/5/CE http://www.aastra.com Ref: AMT/PUD/TR/0107/1/1/EN D i t d o c u me n t wo r d t u a a n g e b o d e n d o o r T e l e c o mH u n t e r . D é z a k e l i j k e T e l e c o m we b s h o p .
Need help?
Do you have a question about the 6730a and is the answer not in the manual?
Questions and answers