Table of Contents
Advertisement
CONTENTS
Unpacking Instructions ........... 2
Package Contents .................. 2
Product Registration ............... 2
Features & Benefits: Sensor ..... 2
Features & Benefits: Clock ...... 3
Setup .................................... 5
Outdoor Sensor Setup ............ 5
Clock Setup ........................... 6
Atomic Clock ......................... 7
Set the Time & Date ............... 7
Questions?
(877) 221-1252 or visit www.AcuRite.com.
SAVE THIS MANUAL FOR FUTURE REFERENCE.
Atomic Dual Alarm Clock
Placement Guidelines ............. 8
Using the Clock...................... 9
USB Charging ........................ 9
Troubleshooting ....................10
Care & Maintenance ............. 11
Specifications ........................ 11
FCC Information ................... 11
Customer Support .................12
Warranty..............................12
Contact Customer Support at
Instruction Manual
models 13022 / 13035
Advertisement
Table of Contents

Related Manuals for AcuRite 13022


Summary of Contents for AcuRite 13022
-
Page 1: Table Of Contents
Instruction Manual Atomic Dual Alarm Clock models 13022 / 13035 CONTENTS Placement Guidelines ..... 8 Unpacking Instructions ... 2 Package Contents ....2 Using the Clock...... 9 Product Registration ....2 USB Charging ......9 Features & Benefits: Sensor ..2 Troubleshooting ....10... -
Page 2: Unpacking Instructions
Congratulations on your new AcuRite product. To ensure the best possible product performance, please read this manual in its entirety and retain it for future reference. Unpacking Instructions Remove the protective film that is applied to the LCD screen prior to using this product. -
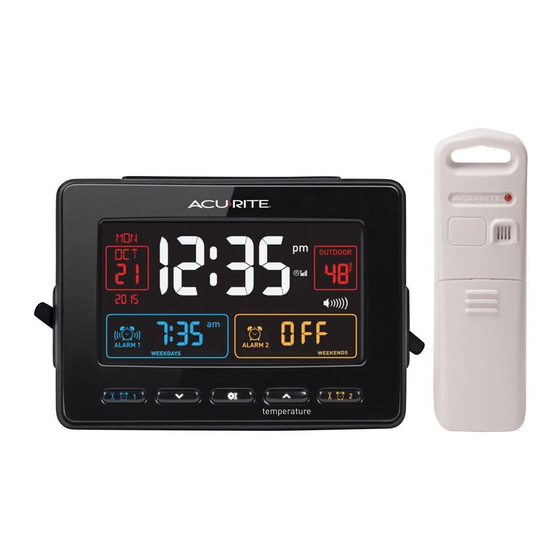
Page 3: Features & Benefits: Clock
Features & Benefits FRONT OF CLOCK 1. Snooze Button/Night Light 2. Alarm #1 ON/OFF Switch 3. Alarm #1 Setup Button 4. DOWN & SET Buttons DIMMER for setup preferences. 5. UP Button Toggles between displaying indoor & outdoor temperature and used for setup preferences. - Page 4 Features & Benefits 1. Date 8. Alarm #2 Time 2. Atomic Clock 9. Alarm #2 Days Active Sets itself to the correct time and Indicates weekday, weekend or every automatically updates for Daylight day alarm. Saving Time. 10. Alarm Volume 3.
-
Page 5: Setup
SETUP Sensor Setup Set the A-B-C Switch conditions. Cold temperatures can cause alkaline batteries The A-B-C switch is located inside to function improperly. Use the battery compartment. It can lithium batteries in the sensor for be set to A, B or C. However, temperatures below -4ºF / -20ºC. -
Page 6: Clock Setup
Clock Setup Set the A-B-C Switch Install or Replace Backup Batteries Locate the A-B-C switch inside the battery compartment. Set 1. Remove the battery the A-B-C switch to A, B or C. compartment cover. You must select the same letter 2. -
Page 7: Atomic Clock
Atomic Clock (RCC) AcuRite atomic clocks use a radio-controlled signal (RCC) to synchronize to the correct time broadcast by the National Institute of Standards and Technology (NIST) Radio Station WWVB, located near Fort Collins, Colorado. WWVB broadcasts the current time and date with split-second accuracy. The atomic clock and calendar will maintain the correct time and date, and automatically update for daylight saving time to provide the most accurate timekeeping standard possible. -
Page 8: Placement Guidelines
Placement for Maximum Accuracy AcuRite sensors are sensitive to surrounding environmental conditions. Proper placement of both the clock and outdoor sensor are critical to the accuracy and performance of this product. Alarm Clock Placement ALARM DIMMER VOLUME Place alarm clock in a dry area free of dirt and dust. To help ensure an accurate indoor temperature measurement, be sure to place the CHARGE DC 4.5 v... -
Page 9: Using The Clock
OPERATION Using the Clock Set the Alarm Time Slide Alarm #1 and/or Alarm #2 switch ON (alarm time cannot be adjusted if the alarm is OFF). Press and release the “ ” or the “ ” button to enter ALARM SET MODE. -
Page 10: Troubleshooting
Troubleshooting If the wireless signal indicator shows no bars: • Relocate the clock and/or the outdoor sensor. The units must be within 330 ft (100 m) of each other. • Make sure both units are placed at least 3 feet No outdoor sensor (.9 m) away from electronics that may interfere with the wireless communication (such as TVs, microwaves,... -
Page 11: Care & Maintenance
Care & Maintenance Clock Care Clean with a soft, damp cloth. Do not use caustic cleaners or abrasives. Keep away from dust, dirt and moisture. Clean ventilation ports regularly with a gentle puff of air. Outdoor Sensor Care Clean with a soft damp cloth. Do not use caustic cleaners or abrasives. Specifications Outdoor: -40ºF to 158ºF;... -
Page 12: Customer Support
Customer Support AcuRite customer support is committed to providing you with best-in- class service. For assistance, please have the model number of this product available and contact us in any of the following ways: (877) 221-1252 info@chaney-inst.com AcuRite 24/7 support at www. .com Installation Videos Register your Product... - Page 14 Weather Temperature Weather Kitchen Clocks Stations & Humidity Alert Radio Thermometers & Timers It’s more than accurate, it’s AcuRite offers an extensive assortment of precision instruments, designed to provide you with information you can depend on to Plan your day with confidence ™...