Table of Contents

Subscribe to Our Youtube Channel
Related Manuals for Kleenmaid TO201X

Summary of Contents for Kleenmaid TO201X
- Page 1 Cooking Collection Instructions for Use and Warranty Details TO201X Gourmet Multi Function Electronic Timer - Stainless Steel TO201W Gourmet Multi Function Electronic Timer - White TO401X Gourmet Multi Function Electronic Timer - Stainless Steel...
-
Page 2: Table Of Contents
Such packaging materials are also to your nearest Kleenmaid Store on 13 13 08. labelled accordingly. We hope your oven will successfully serve its Once the life cycle of your appliance is over, purpose for many years. -
Page 3: Safety Precautions
Safety precautions • To avoid any possible hazard, the appliance Control Lamps must be installed by qualified personnel only. • Any repairs by unqualified persons may result in Illuminated dials electric shock or short circuit. In order to avoid (certain models only) possible injuries to your body or to the The dial above the active knob is illuminated appliance, do not attempt any repairs by... -
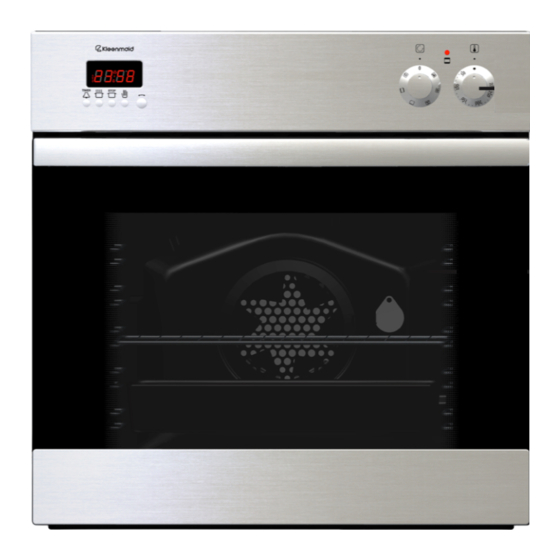
Page 4: Description Of The Appliance
Description of the appliance The figure shows one of the built-in models. These instructions have been prepared for models with different accessory options, so they may contain certain functions and accessories your model might not have. Control panel Oven door handle Oven glass door TO201 TO401... -
Page 5: Prior First Use
Prior rst use Oven Tips for the use of the oven Take all the accessories out of the oven and • If possible use dark, silicone coated or enamel clean it with warm water and a mild detergent. baking pans, because of their excellent thermal Never use aggressive cleaners as they may conductivity. -
Page 6: Oven
Oven Child Lock Function This feature is available only on the models listed below. When locked the oven cannot be operated. All setting of the clock can be used. TO201 TO401 To activate • Functions and temperature dials MUST BE IN THE OFF POSITION •... -
Page 7: Important Warnings
Important warnings! Grill Heat comes directly from the grill element, • Never put aluminium foil on the bottom of the located at the oven ceiling. The grill function is oven, and do not place any crockery upon it. especially suitable for preparing steaks, The oven enamel may be damaged by the sausages, T-bones, pork chops, etc. -
Page 8: Oven Guide Levels
Oven guide levels Fan Defrost This mode uses the fan and no element to Baking pans and accessories (oven grid, grease circulate air around the cavity. It is used for slow receptacle, baking tray, etc.) may be inserted into defrosting of food. the oven in 5 guiding levels. -
Page 9: Oven Accessories
Telescopic slide guides Baking pastry (certain models only) The most appropriate position for baking by using Note! Telescopic side racks and other oven both upper and lower elements. accessories might get very hot! Use kitchen Note. The grease filter must always be gloves or other suitable protection! removed! Telescopic slide guides are located inside the... - Page 10 Baking tips Cheesecake is undercooked Next time reduce the baking temperature and Is pastry baked? extend the baking time. Pierce the cake with a skewer at the thickest part. If the dough does not stick to it, the cake is Warnings regarding the baking baked.
-
Page 11: Grease Filter
Roasting Attention when roasting! Roasting tables indicate suggested temperatures, Best results are obtained with the engagement of guide level and roasting times. The roasting time both upper and lower elements. largely depends upon the type of meat, its size Note! For roasting meat we recommend the and quality, therefore you may expect some use of grease filter (depending on the model). -
Page 12: Roasting
Roasting Table Type of meat Weight Guide level Temp. Temp. Roasting (in grams) (from bottom (°C) (°C) time (in min.) Beef Beef loin 1000 180-190 100-120 200 -220 Beef loin 1500 200-220 170-180 120-150 Roast beef, rare 1000 220-230 180-200 30-40 Roast beef, well 1000... -
Page 13: Grilling And Browning (Barbecue)
Grilling and browning (barbecue) • Take extra precautions when grilling. Intensive heat from the grill element makes the oven and accessories extremely hot. Use protective gloves and barbecue accessories! • Piercing a roast may produce spurting of hot grease (ie sausages). Use long grill tongs to prevent skin burns and protect your eyes. - Page 14 Grill table Type of meat for grill Weight Guide level Temp. Temp. Grill time (in grams) (from bottom up) (°C) (°C) (in min.) Meat and sausages 2 beefsteaks, rare 12-14 2 beefsteaks, medium 16-18 2 beefsteaks, well done 20-22 2 pork fillets 19-22 2 pork chops 20-22...
-
Page 15: Preserving Of Fruit And Vegetables
• Insert the pan with jars into the second guide Preserving of fruit and vegetables from bottom up. Set the temperature regulation knob to 180°C. Pre-heating of the oven is not Use the bottom element mode together with necessary. the fan •... -
Page 16: Cleaning And Maintenance
Cleaning and maintenance Never clean the appliance with a pressurised hot Otherwise respect the following cleaning tips: • Cool the oven completely before cleaning. steam cleaner! Before cleaning switch the oven off and let it cool • The oven and accessories must be cleaned down completely. - Page 17 Removing wire and telescopic guide Grease filter Clean the grease filter after each use with a soft grids brush in hot water with some detergent, or wash it Telescopic side racks or wire racks may be in the dishwasher. removed to facilitate the cleaning of the oven. Side racks are removed by swinging the bottom Removing oven door with a single side inwards and unhooking them.
-
Page 18: Troubleshooting Guide
Troubleshooting guide Any unskilled attempt to repair the appliance is (programmed)? Switch the mode button to the extremely dangerous as it can cause electric position "Manual mode". shock and short circuit. To avoid such injuries any Baking results are disappointing... repairs must be performed by qualified personnel only. -
Page 19: Replacement Of Parts
The oven tray, biscuit tray, etc. may be ordered place. from by contacting your nearest Kleenmaid Store In case of side light on 13 13 08. When ordering please quote the remove the glass cover code and the type or model of the appliance. -
Page 20: Installation Of Electric Oven
Installation of electric oven • Panels and furniture lining of the kitchen • Push the appliance into the cabinet so that the cabinet into which the oven is installed must be screw guides located in the oven frame holes treated with temperature resistant adhesives stay on the cabinet side panels. -
Page 21: Electric Connection
Electric connection Electric connection must be carried Connection out by qualified service personnel • Using a screwdriver open the connector cover only! at the rear of the appliance. Release two locks Wrong connection may permanently damage located at either side of the connector bottom. parts of the appliance and render your •... -
Page 22: Technical Information
Technical information TO401X (EVP443-424M) 588x555x548 Dimensions of the appliance (height/width/depth) (mm) Dimensions for mounting 600x560x550 (height/width/depth) (mm) Electric connection AC 240 V Nominal voltage of elements 240 V, 50 Hz 275°C Max. temperature Oven Temperature regulator/ function mode switch Guide levels (telescopic guides in 3 levels-only certain models) 0,9/1,1 Top/bottom element (kW) -
Page 23: Electronic Program Timer With Sensor Probe24
Electronic program timer with sensor probe Electronic timer with sensor probe provides Setting the conventional (manual) programmed oven operation and therefore operation programmed roasting or baking time. The special feature of this timer is the probe for To be able to use the oven in conventional mode, measuring temperature inside a roast. -
Page 24: Automatic Operation
4. After the expiry of preset time - in our case operates for 1 hour and 20 minutes, and stops after 1 hour and 20 minutes - operating at 13.52 hours; arrows 1 and 3 are − the oven stops automatically lit during the operation. -
Page 25: Dimmed Display Illumination
red arrow 4 is lit and the display indicates the Procedure temperature, symbol °C is flashing. Example: roast core temperature is 85°C 5. Once the preset temperature of the meat 1. Connect the probe and stick it inside the roast. centre is reached (in our case 85°C), the oven When you connect the probe the red sector of stops operating (roasting is finished). -
Page 26: Setting The Conventional (Manual) Operation
Setting the conventional (manual) Automatic operation operation In this mode you determine the period of oven operation (period of operation) and the To be able to use the oven in conventional mode, switching off time (end of operation). the symbol AUTO must not flash, so always Maximum setting is 23 hours and 59 minutes! check the program timer: in case the AUTO Setting of switching off time is = current time +... -
Page 27: Program Timer As Alarm
Program timer as alarm Dimmed display illumination Program timer may be used independently (not Between 22.00 and 5.59 hours the display connected with oven operation) as a simple illumination is automatically dimmed if the alarm, to remind you of certain preset future time. program timer is not in operation during this period.
Need help?
Do you have a question about the TO201X and is the answer not in the manual?
Questions and answers