
Related Manuals for LENCO L-81 USB


Summary of Contents for LENCO L-81 USB
- Page 1 Instruction manual L-81 USB Belt-Drive Turntable with Direct RECORD For information and support, www.lenco.eu...
-
Page 2: Safety Instruction
Safety instruction Read these Instructions. Read these Instructions. Keep these Instructions. Heed all Warnings. Follow all Instructions. Do not use this apparatus near water. Clean only with a damp cloth. Do not block any of the ventilation openings. Install in accordance with the manufacture’s instructions. Do not install near nay heat sources such as radiators, heat registers, stoves, or other apparatus (including amplifiers) that produce heat. - Page 3 Description Stylus specification Brand Audio-Technica Model AT-3600L Color Yellow Suggested Stylus Force 3.5±0.5gr Load Impedance: 47KΩ Load Capacitance 100Pf DC Resistance 410Ω±20%...
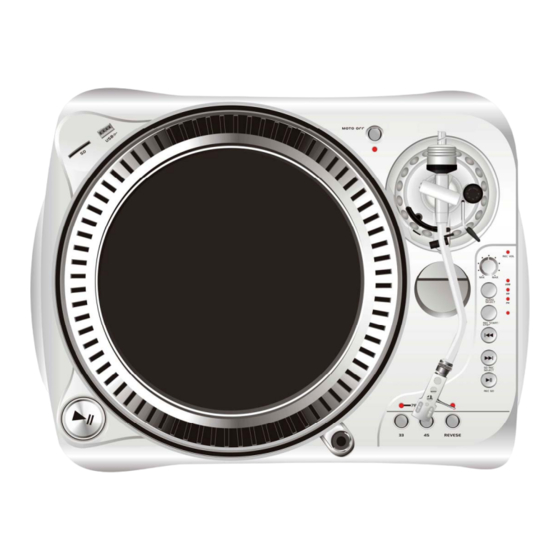
- Page 4 Description 1– Start/stop buttons Tonearm lift Press this button to start or stop the platter. 2– Platter The platter is equipped with a slip mat. This makes it easier to manipulate the record for scratch performances. 3– USB&SD SOCKET Plug USB stick and SD card into, the LED will indicate while worked. 4–...
- Page 5 In order to record to SD (1)Press REC START/STOP (2)Press SD REC SELECT (3)Press REC GO (4)Stop the recording: press the REC START/STOP until the pilot lamp put out. During the recording ,adjust the REC VOL to control the volume In order to record to USD (5)Press REC START/STOP (6)Press REC GO...
- Page 8 FAQ: If at any time in the future you should need to dispose of this product please note that:Waste electrical products should not be disposed of with household waste. Please recycle where facilities exist.Check with your Local Authority or retailer for recycling advice.(Waste Electrical and Electronic Equipment Directive)
- Page 9 Bedienungsanleitung Riemengetriebener Plattenspieler mit Direktaufnahmefunktion Zur Information und Unterstützung, www.lenco.eu...
- Page 10 Sicherheitshinweise Lesen Sie sich diese Anleitung durch. Lesen Sie sich diese Anleitung durch. Bewahren Sie diese Anleitung auf. Beachten Sie alle Warnhinweise. Befolgen Sie alle Anweisungen. Benutzen Sie dieses Gerät nicht in der Nähe von Wasser. Nur mit einem leicht angefeuchteten Tuch reinigen. Blockieren Sie keine der Ventilationsöffnungen.
- Page 11 Beschreibung Abtastnadel - Technische Daten Marke Audio-Technica Modell AT-3600L Farbe Gelb Empfohlener Nadeldruck: 3,5±0,5 g Impedanzladung: 47 kΩ Belastungskapazität: 100 Pf 410Ω ±20% Gleichstromwiderstand:...
- Page 12 Beschreibung 1– Start/Stopp / Tonarm Betätigen Sie diese Taste zum Starten oder Stoppen des Plattentellers. 2– Plattenteller Der Plattenteller ist mit einer rutschfesten Gummimatte versehen. Dies macht die Verwendung von Scratch-Techniken wesentlich einfacher. 3– USB/SD-ANSCHLUSS Stecken Sie hier Ihren USB-Stick oder SD-Karte ein. Eine LED leuchtet auf, um anzuzeigen, dass das Speichermedium erkannt wurde.
- Page 13 Beschreibung 16– USB/SD-Wiedergabe, -Pause und -Aufnahme Jede Betätigung dieser Taste wechselt zwischen Wiedergabe und Pause im USB/SD-Betrieb. Außerdem können Sie mit dieser Taste die Aufnahme von Platten auf USB/SD starten und anhalten, wenn die Plattenwiedergabe zuvor entsprechend vorbereitet wurde (siehe 18). Um auf einer SD-Karte aufzunehmen (nur wenn gleichzeitig ein USB-Stick angeschlossen ist): 1) betätigen Sie REC START/STOP 2) betätigen Sie SD REC SELECT...
-
Page 14: Technische Daten
Technische Daten Motor: Gleichstrommotor Antriebsmechanismus: Riemenantrieb Start- und Stoppverzögerung: unter 1 Sekunde Geschwindigkeitsauswahl: , 45, 78 rpm Tonarm: Statisch ausgerichteter S-förmiger Tonarm Computerschnittstelle: USB-1.1-kompatibel, Windows XP oder MAC OS X Stromversorgung: AC 115/230 V, 60/50 Hz, benutzerdefinierbar Spannungsaufgliederung: AC 100 V, 50/60 Hz (Japan) AC 120 V, 60 Hz (USA und Kanada) AC 127 V, 60 Hz (Mexiko) AC 220 V, 50 Hz (Chile end Argentinien) - Page 15 Audacity - Softwarebeschreibung Aufnahme von Alben mit Audacity 1. Speichern eines Projekts Audacity schreibt alle Audiodaten in ein Verzeichnis mit dem Namen projefcftnam data, das sich an der gleichen Stelle befindet, an der Sie das Projekt gespeichert haben. Wenn Sie dann also Projekt speichern unter... im Dateimenü wählen können Sie einen Pfad und Dateinamen für Ihr Projekt wählen.
- Page 16 2.Aufnahme Bereiten Sie Ihren USB-Plattenspieler auf die Wiedergabe des zur Aufnahme gewünschten Titels bzw. Albums vor. Klicken Sie auf das blaue Pause-Feld, um die Aufnahme vorübergehend anzuhalten. Senken Sie den Tonarm auf dem Plattenspieler. Klicken Sie auf das blaue Pause-Feld, um die Aufnahme vorübergehend anzuhalten. Klicken Sie erneut auf das Feld, um fortzufahren.
- Page 17 Gebruikershandleiding L-81 USB Belt-Drive Draaitafel met direct OPNEMEN Voor informatie en ondersteuning, www.lenco.eu...
- Page 18 Safety instruction Read these Instructions. Lees deze instructies. Bewaar deze instructies. Lees alle waarschuwingen. Volg alle instructies op. Gebruik dit apparaat niet in de buurt van water. Reinig alleen met een vochtige doek. Zorg ervoor dat de ventilatiegaten niet geblokkeerd worden. Installeer in navolging van de instructies van de fabrikant.
- Page 19 Description Stylus specificatie Merk Audio-Technica Model AT-3600L Kleur Geel Voorgestelde Stylus Kracht 3,5±0,5gr Laad impedantie 47KΩ Laad capaciteit 100Pf DC verzet 410Ω±20%...
- Page 20 Description 1– Start/stop knoppen Toonarm lift Druk op deze knop om de draaiplaat te starten of stoppen. 2– Draaiplaat De draaiplaat is uitgevoerd met een slip mat. Dit maakt het makkelijker om ‘scratch’ performances op de plaat ui te voeren. 3–...
- Page 21 Description 14– Contragewicht Aanpassing zorgt voor de juiste neerwaartse druk van de stylus op de plaat. Sluit het gewicht aan door het op de achterkant van de toonarm te schuiven. Draai het een beetje en het zal zich vastschroeven op de achterschacht van de toonarm.
-
Page 22: Specifications
Specifications Motor: DC motor Aanvoer methode: Belt Drive Start & rem tijd: Minder dan 1 sec. Snelheden: , 45, 78 rpm Toonarm type: Statisch gebalanceerde S-vormige toonarm Computer interface; USB 1.1 compliant, Windows XP of MAC OS X Stroomvoorziening: AC 115/230V, 60/50Hz, door gebruiker te selecteren Enkel Voltage: AC 100V, 50/60Hz (Japan) AC 120V, 60Hz (VS en Canada) - Page 23 Audacity software overview Albums Opnemen met Audacity 1. Een project opslaan Audacity schrijft alle veranderde en opgenomen audio naar een map die projectnaam data heet, daar te vinden waar u de map van het project zelf heeft opgeslagen. Selecteer dus Bewaar project als in de Audacity Bestandstab en kies een locatie en bestandsnaam voor uw project.
- Page 24 2. Hoe op te nemen Stel uw USB draaitafel in om het nummer of album af te spelen dat u wilt opnemen. Klik op de blauwe Pauze knop om het opnemen te pauzeren. Zet de toonarm van de USB draaitafel op de plaat en het nummer dat u wilt opnemen. Klik op de blauwe Pauze knop om het opnemen te pauzeren.
-
Page 25: Manuel D'utilisation
Manuel d’utilisation L-81 USB Platine avec courroie d’entrainement et enregistrement direct Pour information & support technique, www.lenco.eu... - Page 26 Instructions de sécurité Read these Instructions. Lisez ces instructions. Conservez ces instructions. Observez tous les avertissements. Suivez ces instructions. N’utilisez pas cet appareil près de points d’eau. Essuyez l’appareil uniquement avec un tissu sec. Les ouvertures ne doivent pas être obstruées. Installez l’unité conformément aux instructions du fabricant. Le produit doit être placé...
- Page 27 Description Spécifications du feutre Marque Audio-Technica Modèle AT-3600L Coloris Jaune Force de feutre suggérée 3.5±0.5gr Impédance de charge : 47KΩ Capacité de charge 100Pf Résistance CC 410Ω±20%...
- Page 28 Description 1– Touches Start/stop levier du bras de lecture Appuyez sur cette touche pour lancer/arrêter la rotation du plateau. 2– Plateau Le plateau est équipé d’un tapis. Ceci aide à la manipulation de l’enregistrement et évite les rayures. 3– Connecteur USB et emplacement pour carte mémoire SD Raccordez un disque amovible USB /carte mémoire SD, le témoin lumineux s’allume en cours de lecture.
- Page 29 Description 14– Contrepoids Le réglage du contrepoids crée une force d’appui du feutre sur le disque. Réglez celui-ci en faisant glisser le contrepoids sur la partie arrière du bras de lecture. Tournez-le légèrement pour le visser sur l’axe arrière du bras de lecture.
-
Page 30: Spécifications
Spécifications Moteur : Moteur DC Méthode d’entraînement : Courroie d’entrainement Durée de démarrage et d’arrêt : Moins d’une sec Réglage de la vitesse : , 45, 78 tpm Type de bras de lecture : Bras de lecture en S avec équilibrage statique Interface ;... - Page 31 Présentation du logiciel Audacity Enregistrement d’albums sous Audacity 1. Sauvegarder un projet Audacity écrit tous les fichiers audio enregistrés et modifiés dans le répertoire projefcftname data, qui se trouve au même emplacement de sauvegarde que le projet Ainsi, sélectionnez Sauvegarder le projet sous depuis l’onglet Fichier de Audacity puis sélectionnez un emplacement et un nom de fichier pour votre projet Veuillez noter que lorsque vous démarrez Audacity, seule l’option du menu “Sauvegarder sous…”...
- Page 32 2. Comment enregistrer Configurez votre platine USB pour lire la musique ou l’album que vous souhaitez enregistrer Cliquez sur le bouton bleu Pause pour mettre l’enregistrement en pause. Baissez le bras de lecture sur la platine USB, l’album et la piste que vous souhaitez enregistrer. Cliquez sur le bouton bleu Pause pour mettre l’enregistrement en pause.
- Page 33 Manual de instrucciones L-81 USB Giradiscos de tracción por correa con grabación directa Para obtener información y apoyo, www.lenco.eu...
- Page 34 Instrucciones de seguridad Lea estas instrucciones. Lea estas instrucciones. Conserve estas instrucciones. Respete todas las advertencias. Siga todas las instrucciones. No use este aparato cerca de agua. Límpielo únicamente con un paño húmedo. No bloquee ninguna de las aberturas de ventilación. Instálelo siguiendo las instrucciones del fabricante. No lo instale cerca de ninguna fuente de calor como radiadores, generadores de calor, hornos u otros aparatos (incluyendo amplificadores) que produzcan calor.
- Page 35 Descripción Especificaciones de la aguja Marca Audio-Technica Modelo AT-3600L Color Amarilla Fuerza de aguja sugerida 3.5±0.5g Impedancia de carga 47KΩ Capacidad de carga 100Pf Resistencia DC 410Ω±20%...
- Page 36 Descripción 1– Botones Start/Stop Tonearm lift Pulse este botón para encender y detener el plato. 2– Plato El plato está equipado con patinador. Esto hace que el disco sea más fácil manipular para hacer scratch. 3– TOMA USB y SD Conecte una memoria USB o una tarjeta SD y el LED indicará...
- Page 37 Descripción 16– Reproducir y pausar la canción del USB y SD y empezar a grabar Cada vez que se pulsa este botón hace que reproduzca/pause la pista del USB o SD. Además, este botón inicia y pausa la grabación del disco al SD/USB cuando se haya preparado el disco (véase el núm.
-
Page 38: Especificaciones
Especificaciones Motor: Motor DC Método de tracción: Por correa Tiempo de arranque y frenado: Menos de 1 segundo Ajuste de velocidad: , 45, 78 rpm Tipo de brazo: Estático, balanceado y con forma de s Interfaz de ordenador; Compatible con USB 1.1, Windows XP ó MACOS X Suministro eléctrico: AC 115/230V, 60/50Hz, seleccionable por el usuario Monotensión:... - Page 39 Resumen del software Audacity Grabar discos con Audacity 1. Guardar un proyecto Audacity guardará todo el audio modificado y grabado en un directorio llamado projefcftnam data, que se encuentra justo donde guardó el proyecto. De este modo, seleccione Save project as en el menú File y elija la ubicación y el nombre para su proyecto. Por favor tenga en cuenta que cuando recién ejecuta Audacity, solo estará...
-
Page 40: Problemas Y Soluciones
2. Cómo grabar Prepare su giradiscos USB para reproducir la canción o el álbum que quiera grabar. Haga clic en el botón Pause azul para pausar la grabación. Baje el brazo del giradiscos USB sobre el álbum o la pista que quiera grabar. Haga clic en el botón Pause azul para pausar la grabación.