Table of Contents
Advertisement
Quick Links
40-6600_6610
4/22/05
4:56 PM
Page 1
™
Self-Leveling 3-Line Laser Level
Model Nos. 40-6600 and 40-6610
Instruction Manual
Congratulations on your choice of this Self-Leveling 3-Line Laser
Level. We suggest you read this instruction manual thoroughly before
using the instrument. Save this instruction manual for future use.
This tool emits one laser cross and one vertical line at 90°. The tool
features quick damping, visual and audible out of range indication, and
a synchronized power-off/pendulum-locking design. Beam visibility
depends upon lighting conditions in the work area.
This is a Class II laser tool and is manufactured to comply with CFR 21,
parts 1040 .10 and 1040 .11 as well as international safety rule IEC 285.
©2005 Johnson Level & Tool
1
Advertisement
Table of Contents

Subscribe to Our Youtube Channel
Related Manuals for AccuLine 40-6600


Summary of Contents for AccuLine 40-6600
- Page 1 4:56 PM Page 1 ™ Self-Leveling 3-Line Laser Level Model Nos. 40-6600 and 40-6610 Instruction Manual Congratulations on your choice of this Self-Leveling 3-Line Laser Level. We suggest you read this instruction manual thoroughly before using the instrument. Save this instruction manual for future use.
-
Page 2: Table Of Contents
12. Product Warranty 5. Location of Parts/Components 13. Product Registration 6. Operating Instructions 14. Accessories 7. Using the Product 1. Kit Contents For Model No. 40-6600 Description Qty. Self-Leveling 3-Line Laser Level Tripod/Wall Mount Bracket “AA” Alkaline Batteries Tinted Goggles... -
Page 3: Features And Functions
40-6600_6610 4/22/05 4:56 PM Page 3 2. Features and Functions • Able to project one cross laser, and one vertical line at 90 degrees. • Magnetic dampening compensation system. • Laser flashes and audible alarm when product is beyond leveling range. •... - Page 4 • Use only original AccuLine Pro ™ parts and accessories purchased from your AccuLine Pro authorized dealer. Use of non-AccuLine Pro parts and accessories will void warranty. WARNING! The tinted goggles are designed to enhance the visibility of the laser beam. They DO NOT offer protection to the eyes from direct exposure of the laser beam.
-
Page 5: Location/Content
40-6600_6610 4/22/05 4:56 PM Page 5 4. Location/Content of Warning Labels ©2005 Johnson Level & Tool... -
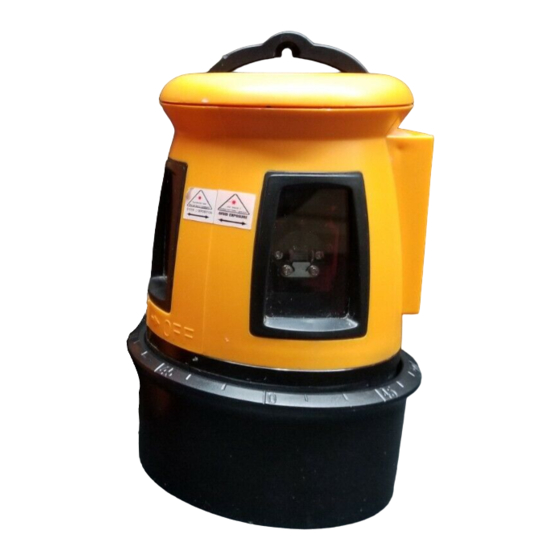
Page 6: Location Of Parts/Components
40-6600_6610 4/22/05 4:56 PM Page 6 5. Location of Part/Components 1. Front Laser Emitting Window 2. Front Vertical-beam Button V1 3. Front Vertical-beam Indicator Lamp 4. Front Horizontal-beam Side Button H 5. Front Horizontal-beam Indicator Lamp 6. Side Vertical-beam Indicator Lamp 7. -
Page 7: Operating Instructions
40-6600_6610 4/22/05 4:56 PM Page 7 6. Operating Instructions IMPORTANT: It is the responsibility of the user to verify the calibration of the instrument before each use. Battery Installation Note: Always check to be sure that the on/off switch is in the off position before removing and replacing batteries. -
Page 8: Using The Product
40-6600_6610 4/22/05 4:56 PM Page 8 7. Using the Product Unlocking 1. The unit should be in locked state when it is not in use. Unlock the unit by rotating the base clockwise (according to indicated direction shown on the unit) to set it to unlocked position when you start to use it. -
Page 9: Self-Check And Calibration
40-6600_6610 4/22/05 4:56 PM Page 9 Note: Check whether the unit is in locked position before it is put into carrying case. If not, during movement the unit will give an alarm as reminder, with automatic laser beam flashing at the same time. Tripod/Wall Mount Bracket 1. - Page 10 40-6600_6610 4/22/05 4:56 PM Page 10 4. Turn the unit 180°, have the cross located on staff B and note the value of b1. 5. Move the tripod to Survey-staff B Survey-staff A change the distance between the unit and staff A to 2 ft.
-
Page 11: Technical Specifications
40-6600_6610 4/22/05 4:56 PM Page 11 9. Technical Specifications Laser Wavelength 635nm±10nm Laser Classification Class II Maximum Output <1mW Horizontal Accuracy ±3/8"/100 ft. (±3mm/10m) Vertical Accuracy ±3/8"/100 ft. (±3mm/10m) Working Range Maximum 100 ft. (30m) depending upon light conditions Self-leveling Range ±3.5°... -
Page 12: Application Demonstrations
40-6600_6610 4/22/05 4:56 PM Page 12 10. Application Demonstrations Reference for installing cabinets Plumb reference for baseboard installation Reference for installing Reference for installing doors suspended ceilings and windows Reference for installing partitions Reference for laying tile Reference for hanging pictures Reference for dormer installation ©2005 Johnson Level &... -
Page 13: Care And Handling
Do not return this product to the store/retailer or place of purchase. Required repair/calibration must be done by an authorized AccuLine Pro™ service center or Johnson Level & Tool's limited warranty, if applicable, will be void and there will be NO WARRANTY. Contact our... -
Page 14: Product Registration
40-6600_6610 4/22/05 4:56 PM Page 14 Customer Service Department to obtain a Return Material Authorization (RMA) number for return to an authorized service center. Proof of purchase is required. NOTE: The user is responsible for the proper use and care of the product. -
Page 15: Accessories
14. Accessories AccuLine Pro™ accessories are available for purchase through authorized AccuLine Pro dealers. Use of non-AccuLine Pro accessories will void any applicable limited warranty and there will be NO WARRANTY. If you need any assistance in locating any accessories, please contact our Customer Service Department.
Need help?
Do you have a question about the 40-6600 and is the answer not in the manual?
Questions and answers