Advertisement
Quick Links
F
F
IND OUT MORE
IND OUT MORE
.
.
ON THE WEB
ON THE WEB
WILBURCURTIS.COM
WILBURCURTIS.COM
Models Included
ALPHA-1DS
ALPHA-2DS
ALPHA-3DS
ALPHA-3DSR
ALPHA-3DSL
ALPHA-5DSR
ALPHA-5DSL
ALPHA-5DS
WARNING HOT LIQUID,
Scalding may occur.
Avoid splashing.
CAUTION:
CAUTION:
CAUTION: Please use
CAUTION:
CAUTION:
this setup procedure
before attempting to use
this brewer. Failure to follow the
instructions can result in injury or
the voiding of the warranty.
CAUTION:
CAUTION:
CAUTION: DO NOT
CAUTION:
CAUTION:
connect this brewer to
hot water. The inlet valve
is not rated for hot water.
WARNING TO AVOID
SCALDING, Do not
remove brewcone whil
brew light is flashing.
C
ISO 9001 REGISTERED
WILBUR CURTIS COMPANY
Montebello, CA 90640
W W W W W
ILBUR
ILBUR
ILBUR
ILBUR
ILBUR
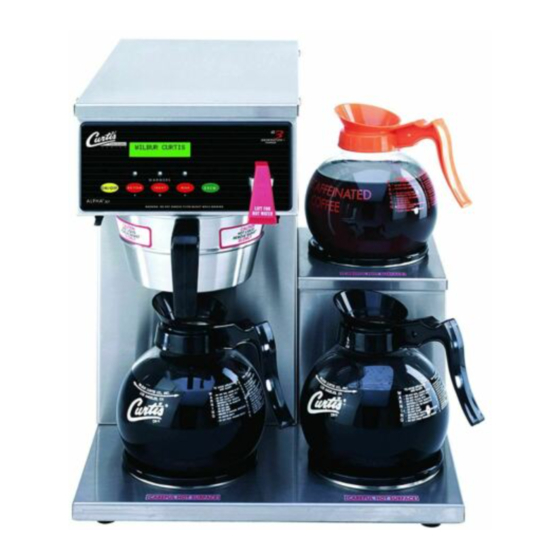
Alpha DS Decanter Brewer Instructions
Important Safeguards/Conventions
This appliance is designed for commercial use. Any servicing other than cleaning and maintenance should be performed by an
authorized Wilbur Curtis service center.
• Do NOT immerse the unit in water or any other liquid
• To reduce the risk of fire or electric shock, do NOT open top or rear panel. No user serviceable parts inside. Repair should
be done only by authorized service personnel.
• Keep hands and other items away from hot parts of unit during operation.
• Never clean with scouring powders, bleach or harsh implements.
Conventions
Conventions
Conventions
Conventions
Conventions
W W W W W ARNINGS –
ARNINGS –
ARNINGS – T T T T T o help a
ARNINGS –
o help a
o help a
o help avoid personal injur
void personal injury y y y y
void personal injur
void personal injur
ARNINGS –
o help a
void personal injur
Important Notes/Cautions – from the factor
Important Notes/Cautions – from the factor
Important Notes/Cautions – from the factory y y y y
Important Notes/Cautions – from the factor
Important Notes/Cautions – from the factor
Sanita
Sanitation Requirements
Sanita
Sanita
Sanita
tion Requirements
tion Requirements
tion Requirements
tion Requirements
Y Y Y Y Y our Curtis
our Curtis
our Curtis ADS System is F
our Curtis
our Curtis
ADS System is F
ADS System is Factor
ADS System is F
ADS System is F
actory Pre-Set and Read
actor
actor
actor
Following are the Factory Settings for your ALPHA™ DS Coffee Brewing Systems:
• Brew
• Brew T T T T T empera
• Brew
• Brew
• Brew
empera
empera
emperature = 200°F
empera
ture = 200°F
ture = 200°F
ture = 200°F
ture = 200°F
• Brew V V V V V olume = Set to dispensing vessel requirements (60 oz)
• Brew
• Brew
• Brew
• Brew
olume = Set to dispensing vessel requirements (60 oz)
olume = Set to dispensing vessel requirements (60 oz)
olume = Set to dispensing vessel requirements (60 oz)
olume = Set to dispensing vessel requirements (60 oz)
• • • • • W W W W W armer Setting on HIGH with Quality
armer Setting on HIGH with Quality
armer Setting on HIGH with Quality T T T T T imer OFF
armer Setting on HIGH with Quality
armer Setting on HIGH with Quality
Generally there will never be a reason to change your ADS programming. However, should you need to make slight adjustments to
meet your brewing needs, programming instructions are provided later in this manual.
System Requirements:
• • • • • W W W W W a a a a a ter Source
ter Source
ter Source
ter Source 20 – 90 PSI (Minimum Flow Rate of 1 GPM)
ter Source
• Electrical:
• Electrical:
• Electrical:
• Electrical:
• Electrical: See attached schematic for standard model or visit www.wilburcurtis.com for your model.
Equipment to be installed to comply with applicable federal, state, or local plumbing/electrical codes having jurisdiction.
SETUP STEPS
SETUP STEPS
SETUP STEPS
SETUP STEPS
SETUP STEPS
The unit should be level (left to right and front to back), located on a solid counter top. Connect a water line from the water filter to the
brewer. NOTE: Some type of water filtration device must be used to maintain a trouble-free operation. (In areas with extremely hard
water, we suggest that a sedimentary and taste & odor filter be installed.) This will prolong the life of your brewing system and
enhance coffee quality.
The National Sanitation Foundation requires the following water connection:
1. A quick disconnect or additional coiled tubing (at least 2x the depth of the unit) so that the machine can be moved for
cleaning underneath.
2. In some areas an approved backflow prevention device may be required between the brewer and the water supply.
1. A 3/8" NPT x 1/4" Flare elbow has been supplied for water line connection. Use tubing sized sufficiently to provide a minimum of
1.0 GPM.
2. Connect the unit to an appropriate electrical power circuit.
3. Turn on the toggle (STANDBY/ON) switch behind the unit. The heating tank will start to fill. When the water level in the tank rises
to the correct volume, the heating elements will energize automatically. With ADS Systems there is no danger of element burnout
caused by an empty tank.
4. The heating tank will require 20 to 30 minutes to reach operating temperature (200°F) as indicated by the READY-TO-BREW
indicator.
5. Prior to brewing, dispense 12 ounces of hot water through the hot water faucet.
6. Brew a cycle of at least 12 ounces, to purge the water lines of any air that may be trapped after filling.
BREWING INSTR
BREWING INSTRUCTIONS
BREWING INSTR
UCTIONS
UCTIONS
UCTIONS
BREWING INSTR
BREWING INSTR
UCTIONS
1. Brewer should be ON (Confirm at rear toggle switch, then press ON/OFF button). Ready-to-Brew light should be ON.
2. Place empty DB-12 Decanter (not included) on warmer.
3. Place filter in Brewcone.
4. Pour ground
coffee into
brewcone.
FOR THE LATEST SPECIFICATIONS AND INFORMATION GO TO
C C C C C
C C C C C
URTIS
URTIS
OMP
OMP
URTIS
URTIS
URTIS
OMP
OMP
OMPANY
y Pre-Set and Read
y Pre-Set and Read
y Pre-Set and Read
y Pre-Set and Ready to Go... Right from the Carton.
y to Go... Right from the Carton.
y to Go... Right from the Carton.
y to Go... Right from the Carton.
y to Go... Right from the Carton.
imer OFF
imer OFF
imer OFF
imer OFF
5. Position
brewcone into
brew rails.
WWW.WILBURCURTIS.COM
, I , I , I , I , I
. . . . .
ANY
ANY
NC
NC
ANY
ANY
NC
NC
NC
6. Press Brew
button.
1
Advertisement

Related Manuals for Curtis ALPHA-1DS


Summary of Contents for Curtis ALPHA-1DS
- Page 1 Requirements CAUTION: CAUTION: CAUTION: Please use CAUTION: CAUTION: this setup procedure Y Y Y Y Y our Curtis our Curtis our Curtis our Curtis our Curtis ADS System is F ADS System is F ADS System is F ADS System is F...
- Page 2 STEPS TO PROGRAMMING ONLY REQUIRED IF FACTORY SETTINGS MUST BE CHANGED PROGRAMMING Changing the ADS™ System Program WARNING These steps involve IMPORTANT – Before entering the program mode, allow the unit to reach brewing temperature, then press the BREW working with hot water. Scalding button to dispense at least 12 ounces of water.
- Page 3 PARTS DIAGRAMS Illustrated Parts List (Alpha 3DS Model Shown) Illustrated Parts List (Alpha 3DS Model Shown) Illustrated Parts List (Alpha 3DS Model Shown) Illustrated Parts List (Alpha 3DS Model Shown) Illustrated Parts List (Alpha 3DS Model Shown) Item Item Item P P P P P art No. art No.
- Page 4 The warranty covers original equipment at time of purchase only. The Wilbur Curtis Company, Inc., assumes no responsibility for substitute replacement parts installed on Curtis equipment that have not been purchased from the Wilbur Curtis Company. Inc The Wilbur Curtis Company will not accept any responsibility if the following conditions are not met. The warranty does not cover and is void under these circumstances: 1) Improper operation of equipment.