Table of Contents
Advertisement
Quick Links
Heavy-duty
Set up and OpeRating inStRuctiOnS
visit our website at: http://www.harborfreight.com
Read this material before using this product.
Failure to do so can result in serious injury.
Save tHiS Manual.
©
Copyright
2003 by Harbor Freight Tools
contained herein may be reproduced in any shape or form without the express written consent of
Harbor Freight Tools. Diagrams within this manual may not be drawn proportionally. Due to continuing
improvements, actual product may differ slightly from the product described herein. Tools required for
assembly and service may not be included.
For technical questions or replacement parts, please call 1-800-444-3353.
Manual revised 10f
1
/
2
Model
3273
®
. All rights reserved. No portion of this manual or any artwork
" vSR dRill
Advertisement
Table of Contents

Related Manuals for Drill Master HEAVY-DUTY 1/2" VSR DRILL 3273


Summary of Contents for Drill Master HEAVY-DUTY 1/2" VSR DRILL 3273
- Page 1 Harbor Freight Tools. Diagrams within this manual may not be drawn proportionally. Due to continuing improvements, actual product may differ slightly from the product described herein. Tools required for assembly and service may not be included.
-
Page 2: Table Of Contents
SaFety inFORMatiOn ... 3 geneRal pOweR tOOl SaFety waRningS... 3 dRill and iMpact dRill SaFety waRningS... 5 vibRatiOn SaFety ... 6 gROunding ... 7 dOuble inSulated tOOlS: tOOlS witH twO pROng plugS ...7 extenSiOn cORdS ... 8 SyMbOlOgy ... 8 SpeciFicatiOnS ... -
Page 3: Important Safety Information
Save tHiS Manual Keep this manual for the safety warnings and precautions, assembly, operating, inspection, maintenance and cleaning procedures. Write the product’s serial number in the back of the manual near the assembly diagram (or month and year of purchase if product has no number). - Page 4 electrical safety power tool plugs must match the outlet. never modify the plug in any way. do not use any adapter plugs with grounded power tools. Unmodified plugs and matching outlets will reduce risk of electric shock. avoid body contact with grounded surfaces such as pipes, radiators, ranges and refrigerators.
-
Page 5: Drill And Impact Drill Safety Warnings
″live″ and shock the operator. Maintain labels and nameplates on the tool. These carry important safety information. If unreadable or missing, contact Harbor Freight Tools for a replacement. Avoid unintentional starting. Prepare to begin work before turning on the tool. -
Page 6: Vibration Safety
parts can grab the surface and pull the tool out of your control. When using a handheld power tool, maintain a firm grip on the tool with both hands to resist starting torque. Do not leave the tool unattended when it is plugged into an electrical outlet. -
Page 7: Grounding
not being caused or worsened from use. Pregnant women or people who have impaired blood circulation to the hand, past hand injuries, nervous system disorders, diabetes, or Raynaud’s Disease should not use this tool. If you feel any symptoms related to vibration (such as tingling, numbness, and white or blue fingers), seek medical advice as soon as possible. -
Page 8: Extension Cords
in the preceding illustration. (See Outlets for 2-prong plug.) extension cords Grounded tools require a three wire extension cord. Double Insulated tools can use either a two or three wire extension cord. As the distance from the supply outlet increases, you must use a heavier gauge extension cord. -
Page 9: Specifications
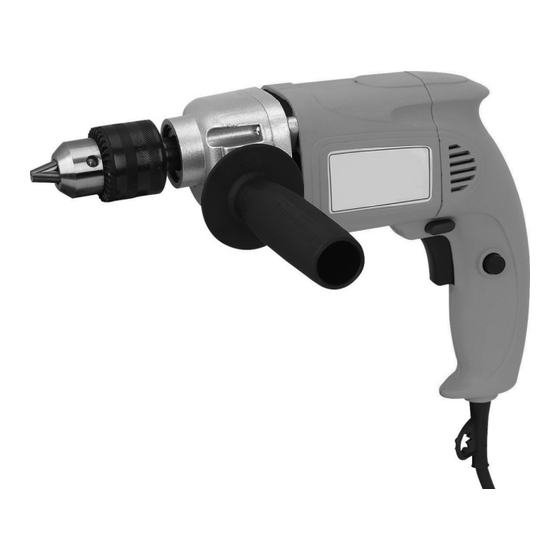
Assembly Diagram near the end of this manual. SKU 3273 For technical questions, please call 1-800-444-3353. assembly Thread the auxiliary handle securely into the left or right side of the drill. Functions chuck Ring chuck key Hole... -
Page 10: Work Piece And Work Area Set Up
Slide the bit into the Jaws as far as it will go without inserting the drill flutes into the chuck. Hold the bit centered in the Jaws while turning the Chuck Key clockwise to secure it in place. Firmly tighten the Jaws using the Chuck Key. -
Page 11: Metal Drilling
Metal drilling Use high speed steel, carbide, TiN coated, or specialty bits for metal drilling. Secure the work piece to keep it from moving during the drilling operation. To make starting the hole easier, use a punch to create a dimple at the hole center. -
Page 12: Maintenance And Servicing
Maintenance and SeRvicing Procedures not specifically explained in this manual must be performed only by a qualified technician. tO pRevent SeRiOuS injuRy FROM accidental OpeRatiOn: disengage the trigger and unplug the tool from its electrical outlet before performing any inspection, maintenance, or cleaning procedures. -
Page 13: Troubleshooting
Excessive noise or Internal damage or wear. (Carbon rattling. brushes or bearings, for example.) Drill bit slips in chuck Jaws are loose. Bit is jammed in work piece. Overheating. Forcing tool to work too fast. Accessory dull, damaged, or bent. -
Page 14: Parts List
pleaSe Read tHe FOllOwing caReFully THE MANUFACTURER AND/OR DISTRIBUTOR HAS PROvIDED THE PARTS LIST AND ASSEMBLY DIAgRAM IN THIS MANUAL AS A REFERENCE TOOL ONLY. NEITHER THE MANUFACTURER OR DISTRIBUTOR MAKES ANY REPRESENTATION OR WARRANTY OF ANY KIND TO THE BUYER THAT HE OR SHE IS qUALIFIED TO MAKE ANY REPAIRS TO THE PRODUCT, OR THAT HE OR SHE IS qUALIFIED TO REPLACE ANY PARTS OF THE PRODUCT. -
Page 15: Assembly Diagram
aSSeMbly diagRaM SKU 3273 For technical questions, please call 1-800-444-3353. Page 15... -
Page 16: Limited 90 Day Warranty
90 day waRRanty Harbor Freight Tools Co. makes every effort to assure that its products meet high quality and durability standards, and warrants to the original purchaser that this product is free from defects in materials and workmanship for the period of 90 days from the date of purchase.