Table of Contents
Advertisement
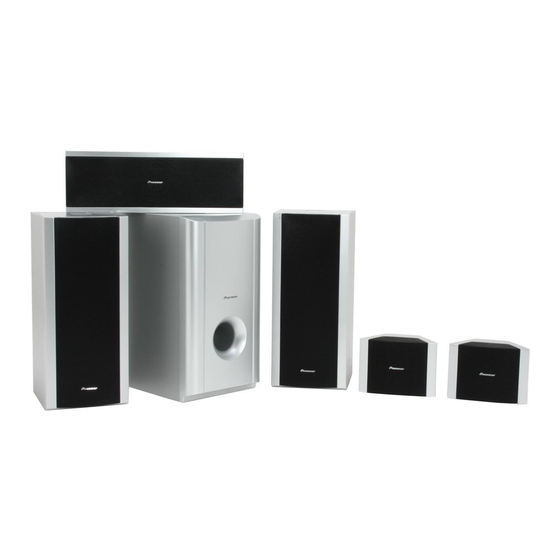
DVD/CD Receiver
XV-HTD640
Speaker System
S-HTD540
S-HTD630
Digital Wireless Speaker System
XW-HTD640
XW-HTD630
HTD-645DV
DIRECT PLAY
1
2
3
4
5
DVD/CD
STANDBY/ON
PHONES
DISC
1
2
3
4
5
XV-HTD640/S-HTD540/XW-HTD640
Register your product at:
www.pioneerelectronics.com
• Protect your new investment
The details of your purchase will be on file for reference in the event of an
insurance claim such as loss or theft.
• Receive free tips, updates and service bulletins on
your new product
• Improve product development
Your input helps us continue to design products that meet your needs.
• Receive a free Pioneer newsletter
Registered customers can opt in to receive a monthly newsletter.
Operating Instructions
HTD-641DV
FM/AM/ST.
TUNER
TV/L1/L2
DISC SKIP
EXCHANGE
OPEN/CLOSE
VOLUME
CD MODE TIMER
DOWN
UP
Digital
wireless
TUNED
speaker system
AUTO
STEREO MODE
POWER
WIRELESS
VOLUME
OFF
OFF
ON
ON
MODE
CHANNEL
SURROUND
STEREO
AUTO ON/OFF
MIN
MAX
DIRECT PLAY
FM/AM/ST.
1
2
3
4
5
DVD/CD
TUNER
TV/L1/L2
STANDBY/ON
PHONES
DISC
1
2
3
4
5
CD MODE TIMER
XV-HTD640/S-HTD630/XW-HTD630
DISC SKIP
EXCHANGE
OPEN/CLOSE
VOLUME
DOWN
UP
Advertisement
Table of Contents

Subscribe to Our Youtube Channel
Related Manuals for Pioneer XV-HTD640


Summary of Contents for Pioneer XV-HTD640
-
Page 1: Speaker System
• Receive free tips, updates and service bulletins on your new product • Improve product development Your input helps us continue to design products that meet your needs. • Receive a free Pioneer newsletter Registered customers can opt in to receive a monthly newsletter. Operating Instructions... - Page 2 CAUTION RISK OF ELECTRIC SHOCK DO NOT OPEN CAUTION: The lightning flash with arrowhead, within The exclamation point within an equilateral an equilateral triangle, is intended to alert TO PREVENT THE RISK OF ELECTRIC triangle is intended to alert the user to the the user to the presence of uninsulated SHOCK, DO NOT REMOVE COVER (OR presence of important operating and...
-
Page 3: Important Safety Instructions
IMPORTANT SAFETY INSTRUCTIONS READ INSTRUCTIONS — All the safety and GROUNDING OR POLARIZATION OBJECT AND LIQUID ENTRY — Never push operating instructions should be read before the • If this product is equipped with a polarized objects of any kind into this product through product is operated. - Page 4 [Excluding XW-HTD630/640] [For Canadian model only] [Pour le modèle Canadien] This Class B digital apparatus complies with Canadian ICES-003. Cet appareil numérique de la Classe B est conforme à la norme NMB-003 du Canada. D8-10-1-3_EF Information to User Alteration or modifications carried out without appropriate authorization may invalidate the user’s right to operate the equipment.
-
Page 5: Table Of Contents
Thank you for buying this Pioneer product. Please read through these operating instructions so that you will know how to operate your model properly. After you have finished reading the instructions, put them in a safe place for future reference. - Page 6 ......47 SR+ control options for Pioneer plasma Adjusting the bass and treble ..48 displays.
- Page 7 Connecting auxiliary components ..81 Recording mode ....81 Troubleshooting ..... 83 General .
-
Page 8: Before You Start
Before you start Chapter 1 Before you start Features • Wireless speaker system The wireless speaker system can be used for • DVD-Audio and SACD compatible multichannel sound with your main setup, or Experience the super high-quality audio perfor- as a second stereo speaker system. mance of DVD-Audio and Super Audio CD •... -
Page 9: Putting The Batteries In The Remote
Before you start Putting the batteries in the • Remote operation may become unreliable if strong sunlight or fluorescent light is remote control shining on the system unit’s remote sensor. • Open the battery compartment cover and insert the batteries as shown. •... -
Page 10: Cd-R/Rw Compatibility
Before you start CD-R/RW compatibility Compressed audio compatibility • This system will play CD-R and CD-RW • Compatible formats: MPEG-1 Audio Layer 3 discs recorded in CD Audio or Video CD (MP3) format, or as a CD-ROM containing MP3 or •... -
Page 11: Connecting Up
WIRELESS Transmitter Surround right Surround left (HTD-645DV only) (HTD-645DV only) VIDEO CONTROL S-VIDEO VIDEO SPEAKERS FRONT SURROUND CENTER WOOFER AUDIO Gray Blue COAXIAL IN WIRELESS LINE 2 LINE 1 XV-HTD640 Subwoofer Front right Front left Center Green Purple White... - Page 12 ANTENNA AUDIO COAXIAL IN WIRELESS UNBAL LINE 2 Connect to the speaker terminals on the LINE 1 XV-HTD640 rear of the speakers in the same way. • Do not use any AC adapter but the one provided with this system.
-
Page 13: Placing The Speakers
Connecting up When you’re finished connect the Center Front left Front right power cord to a household power outlet. • HTD-645DV only – Before doing this, plug the supplied power cord into the wireless Subwoofer speaker AC IN inlet (see below). Listening position Surround Surround... -
Page 14: Placing The Wireless Speaker System
Connecting up The above illustrations are for the HTD-645DV improves sound quality, but also reduces only. If you connected surround speakers to the the risk of damage or injury resulting from HTD-641DV, place them on either side of the speakers being knocked over or falling in front speakers as shown below. -
Page 15: Wall-Mounting The Center And Surround Speaker System
• As well as setting the wireless mode on the speakers, you must also set the mode on • Pioneer is not responsible for any the main unit. See Using the wireless accidents or damage that result from speaker system on page 41 for more on improper installation. -
Page 16: Connecting To Your Tv
Connecting up Connecting to your TV Connecting using the S-video output If your TV has an S-video input, you can use this This system has three different kinds of video instead of the standard video output for a output that you can use to connect up your TV. better quality picture. -
Page 17: Connecting Using The Component Video
Connecting up Connecting using the component Watching progressive scan video from the component video outputs video output Compared to interlace video, progressive scan If your TV has component video inputs, you can video effectively doubles the scanning rate of use these instead of the standard video output the picture, resulting in a very stable, flicker- to connect this system to your TV. -
Page 18: Listening To Tv Audio Through This
Using this unit with a Pioneer 1110HD, PRO-910HD, PDP-4300, PDP-5031 plasma display Projection monitor receiver If you have a Pioneer plasma display (models SD-533HD5, SD-643HD5, PRO-710HD, PRO- PRO-1110HD, PRO-910HD, PDP-5040HD, 610HD, PRO-510HD, PRO-720HD, PRO-620HD, PDP-4340HD), you can use an SR+ cable (see... -
Page 19: Using The Sr+ Mode With A Pioneer Plasma Display
Make sure that the plasma display and this unit are switched on and that they are connected with an SR+ cable. See Using this unit with a Pioneer plasma display above for more on connecting these components. To switch SR+ mode on/off, press SR+ (SHIFT + 7). -
Page 20: Connecting The Supplied Antennas
Connecting up Connecting the supplied antennas The supplied antennas provide a simple way to listen to AM and FM radio. If you find that reception quality is poor, an outdoor antenna should give you better sound quality—see Connecting external antennas on page 80 for more on how to do this. FM wire (PAL) antenna AM loop antenna... -
Page 21: Fm Wire Antenna
Connecting up Connecting the power Before connecting the power and switching on • It’s also possible to fix the AM antenna to a for the first time make sure that everything is wall using two screws (see illustration connected properly. below). -
Page 22: Controls And Displays
Controls and displays Chapter 3 Controls and displays Front panel 9 10 FM/AM/ST. DIRECT PLAY DVD/CD TUNER TV/L1/L2 DISC SKIP EXCHANGE OPEN/CLOSE STANDBY/ON PHONES VOLUME DISC CD MODE TIMER DOWN STANDBY/ON (page 30) • When in listening to the tuner, use to tune Press to switch the system on or into standby. -
Page 23: 17 Display
Controls and displays 10 EXCHANGE (page 36) 16 CD MODE indicator (page 49) Press during playback to open the disc tray Lights when the CD Mode is on. In this mode, without stopping playback. Press again to the system only plays audio CDs and MP3 close the disc tray. - Page 24 Controls and displays Stereo (2.1 channel) sound Lights to indicate random or repeat play of all discs loaded. 3.1 channel sound with Dialogue PGM (page 53) enhancement on the center Lights when a program list has been channel programmed. 5.1 channel surround sound with RPT and RPT-1 (page 52) Virtual Surround Back mode active RPT lights during repeat play.
-
Page 25: Remote Control
Controls and displays Remote control OPEN/CLOSE Press to open/close the disc tray. Function select buttons Press to select the source you want to listen to STANDBY/ON OPEN/CLOSE (DVD/CD, TUNER, TV, LINE). SOUND MODE FM/AM L1/L2 DVD/CD TUNER LINE Press to access the sound menu, from which BASS MODE DIALOGUE VIR.SR... - Page 26 Controls and displays ANGLE (page 58) 12 DVD MENU / TOP MENU Press to change camera angle during DVD • Press to display a DVD-Video disc menu, or multi-angle scene playback. the Disc Navigator if a VR mode DVD-RW, CD, Video CD, MP3 or JPEG disc is loaded. ZOOM (page 58) •...
- Page 27 Controls and displays / FOLDER – DIMMER (SHIFT + 9) Press to jump to the beginning of the Press to switch between normal and current chapter/track, then to previous dimmed front panel display. chapters/tracks. CLEAR Press SHIFT + to jump to the Press to clear an entry.
-
Page 28: Transmitter (Htd-645Dv)
Controls and displays Transmitter (HTD-645DV) With the HTD-641DV model, please refer to the XW-HTD630 wireless speaker manual. CHANNEL Wireless speaker (HTD-645DV) With the HTD-641DV model, please refer to the XW-HTD630 wireless speaker manual. STEREO MODE STEREO MODE WIRELESS WIRELESS POWER VOLUME POWER MODE... - Page 29 Controls and displays Transmitter antenna TUNED indicator Transmits signals to the wireless speaker. Lights when the signal from the transmitter is properly received. Wireless speaker antenna Receives signals from the transmitter. POWER Press to switch the unit on or off. •...
-
Page 30: Getting Started
Welcome to Pioneer DVD! Thank you for purchasing this Pioneer DVD player. Before using, please take a little time to setup your DVD player Put the batteries into the remote control... -
Page 31: Setting The Clock
Getting started Press ENTER again to finish setting up. If ‘Clock ADJ?’ isn’t already shown in the display, press (cursor left or right) until you see it. Let's Get Started Menu Press ENTER. Setup complete Use the (cursor up/down) buttons If you're finished setting up, choose [Complete], to set the hour. -
Page 32: Setting Up The Remote To Control
Room Setup. and an external video source. Setting up the remote to control your TV • The default setting is for a Pioneer TV. You can set up the supplied remote to control your TV using the TV CONTROL buttons. -
Page 33: Using The On-Screen Displays
Getting started Using the on-screen displays For ease of use, this system makes extensive • Throughout this manual, ‘Select’ means use of graphical on-screen displays (OSDs). use the cursor buttons to highlight an item You should get used to the way these work as on-screen, then press ENTER. -
Page 34: Basic Playback Controls
Getting started Press OPEN/CLOSE to open the disc If you’re playing a DVD or Video CD, a menu tray. may appear. See DVD-Video disc menus on page 37 and Video CD PBC menus on page 38 Load a disc. for how to navigate these. Load a disc with the label side facing up in the If you’re playing an MP3 or JPEG disc, it may front-most disc space, using the disc tray... -
Page 35: Resume And Last Memory
Getting started Button What it does Button What it does Numbers Starts playback. Use to enter a title/track num- Video CD ENTER DVD and : If the display ber. Press to select (or shows Resume or Last Mem wait a few seconds). playback starts from the resume •... -
Page 36: Changing Discs
Getting started Load a disc with the label side facing For DVD discs only: If you change discs using the DISC SKIP, DISC or DIRECT PLAY buttons, up, using the disc tray guide to align the or take the disc out of the player, the play posi- disc. -
Page 37: Dvd-Video Disc Menus
Getting started Most likely, the disc is the wrong region for • My DVD-Audio disc starts playing, but then your system. The region number should be suddenly stops! printed on the disc; check it against the The disc may have been illegally copied. region number of the system (which you can find on the rear panel). -
Page 38: Video Cd Pbc Menus
Getting started You can play a PBC Video CD without having to navigate the PBC menu by pressing (stop) Button What it does then starting playback using a number button to select a track, rather than (play) (or TOP MENU Displays the ‘top menu’... -
Page 39: Listening To The Radio
Getting started Listening to the radio Tune to a frequency. There are three tuning modes—manual, auto, The tuner can receive both FM and AM and high-speed: broadcasts, and lets you memorize your • Auto tuning: Press and hold TUNE +/– favorite stations so you don’t have to manually until the frequency display starts to move, tune in every time you want to listen. -
Page 40: Memorizing Stations
Getting started Memorizing stations Listening to other sources You can save up to 30 station presets so that You can connect up to three external sources you always have easy access to your favorite (TV, satellite receiver, etc.) to this system, stations without having to tune in manually including one digital source. -
Page 41: Using The Wireless Speaker System
Getting started Using the wireless speaker • W.Stereo – Any source playing through the main system is heard in stereo through system the wireless speakers (multichannel The wireless speaker supplied with your sources will be downmixed to stereo). system can be used for multichannel sound with your main setup, or as a second stereo Center Front left... - Page 42 Getting started • Normal – Use for surround sound with the • Right Side – Use for surround sound with wireless speaker placed behind the the wireless speaker placed to the right of listening position. the listening position. Center Center Front left Front right Front left...
-
Page 43: Listening To Your System
Listening to your system Chapter 5 Listening to your system About the listening modes • When using the wireless speaker system for multichannel sound, it is As explained in Placing the speakers on recommended that you do not use the 3- page 13, there are two basic surround speaker spot setup (page 13). -
Page 44: Listening In Surround Sound
Listening to your system • PL II Music – Pro Logic II 5.1 channel surround sound, especially suited to music sources, for use with any two-channel • Any previously active Dolby Pro Logic or source (see also Dolby Pro Logic II Music Advanced Surround mode is canceled settings below) when Auto listening mode is selected. -
Page 45: Using The Advanced Surround Effects
Listening to your system Using the Advanced Surround Using Front Surround effects Note that the HTD-641DV does not include surround speakers, which are necessary to use Advanced Surround effects can be used with the Front surround modes. If connected, follow multichannel or stereo sources for a variety of the instructions for speaker orientation below. -
Page 46: Adjusting The Advanced And Front Surround Effect Level
Listening to your system • ExtraPower – The Extra Power mode gives Use the (cursor up/down) buttons to adjust the effect level. additional energy and depth to a stereo source by using the surround speakers in The effect level can be adjusted from 10 (min) to 90 (max). -
Page 47: Enhancing Dialogue
Listening to your system Enhancing dialogue • Default setting: Dialog Off • You can’t use Virtual Surround Back when The Dialogue Enhancement feature is using the Stereo listening mode (or Auto designed to make the dialog stand out from with stereo sources). other background sounds in a TV or movie •... -
Page 48: Adjusting The Bass And Treble
Listening to your system Adjusting the bass and treble Boosting the bass level Use the bass and treble controls to adjust the There are three bass modes you can use to overall tone. enhance the bass in a source. BASS MODE SOUND MODE SHIFT... -
Page 49: Playing Discs
Playing discs Chapter 6 Playing discs • Some DVD discs restrict the use of some • You can't switch on CD mode while playing functions (random or repeat, for example). a DVD or Video CD. Stop playback first. This is not a malfunction. •... -
Page 50: Frame Advance/Frame Reverse
Playing discs During playback, press (pause). • With most discs, you can also press DVD MENU to go directly to the Disc Navigator. Press and hold until slow motion playback starts. Select what you want to play. • The slow motion speed is shown on- Depending on the type of disc you have loaded, screen. -
Page 51: Looping A Section Of A Disc
Playing discs • Not all VR format DVD-RW discs have a • For DVD-Audio discs featuring browsable Playlist. pictures (page 91), press to view the previous/next picture. Disc Navigator DVD-RW Title(1-03) Looping a section of a disc 01. 3/31 FIRST LEAGUE Original 02. -
Page 52: Using Repeat Play
Playing discs Using repeat play For DVD-Audio discs, select Group Repeat or Track Repeat (or Repeat Off). There are various repeat play options, depending on the kind of disc loaded. It’s also Play Mode possible to use repeat play together with program play to repeat the tracks/chapters in A-B Repeat Group Repeat... -
Page 53: Creating And Editing A Dvd Program
Playing discs Press HOME MENU and select ‘Play Mode’. Select ‘Random’ from the list of • Use the following controls during random functions on the left. play: Button What it does Play Mode Stop and cancel random play. A-B Repeat Random Title Repeat Random Chapter... -
Page 54: List
Playing discs Press HOME MENU and select ‘Play Press ENTER to add the highlighted Mode’. item to the program list. • Alternatively, press PROGRAM (SHIFT + The program step number automatically 1) and skip to step 5. moves to the next position. Select ‘Program’... - Page 55 Playing discs Make sure that a non-DVD disc is in the • When this screen first appears, the first play position. folder or track of the disc in the play Use the DIRECT PLAY buttons on the front position is highlighted. From here you can panel to select a disc.
-
Page 56: Other Functions Available From The Program Menu
Playing discs • To insert a step in the program list, move to • With Video CDs that feature PBC playback, the Program Step column and highlight make sure that the disc is stopped before the step where you want a new step to you start making the program list. -
Page 57: Switching Subtitles
Playing discs Use the number buttons to enter a title, chapter, folder or track number, or a time. • Some discs only allow you to change Play Mode subtitle language from the disc menu. Press DVD MENU to access. A-B Repeat Title Search Input Chapter Repeat... -
Page 58: Zooming The Screen
Playing discs Zooming the screen Displaying disc information Using the zoom feature you can magnify a part of the screen by a factor of 2 or 4, while OSD disc information watching a DVD-Video, DVD-Audio or Video Various track, chapter and title information can be displayed on-screen while a disc is playing. - Page 59 Playing discs • MP3 disc displays Disc no. 0 3 5 Track no. Elapsed track time Disc no. 4 E V E R Y B O D Track name Disc no. 4 B E S T _ O F _ Folder name •...
-
Page 60: Viewing Jpeg Discs
Viewing JPEG discs Chapter 7 Viewing JPEG discs Playing a JPEG slideshow After loading a CD/CD-R/RW containing JPEG pictures, press (play) to start a slideshow from the first folder/picture on the disc. The (pause), ANGLE and ZOOM buttons • The pictures in each folder are displayed in do not work while the display shows alphabetical order. -
Page 61: Zooming The Screen
Viewing JPEG discs Use the cursor buttons ( ) to Zooming the screen navigate. Using the zoom feature you can magnify a part When a file is highlighted, a thumbnail image of the screen by a factor of 2 or 4, while viewing is displayed. -
Page 62: Using The Timer
Using the timer Chapter 8 Using the timer Setting the wake-up timer Select the source you want played. For example, press TUNER (TUNER FM/AM/ Use the wake-up timer to set the system to ST. on the front panel) to select the radio as switch on at any time and start playing your source. -
Page 63: Turning The Wake-Up Timer On/Off
Using the timer STANDBY/ON • You can check the timer settings in FM/AM L1/L2 standby by pressing TIMER (SHIFT + 6) DVD/CD TUNER LINE twice. (Press TIMER (SHIFT + 6) once to display the current time.) TIMER ENTER Turning the wake-up timer on/off If the wake-up timer is on, it will switch on the SHIFT system everyday at the time you have set. -
Page 64: Surround Sound And Other Settings
System Setup menu. All the available settings in the setup menu are listed in Surround and sound setup options and SR+ control options for Pioneer plasma displays below. See the notes in each section for • The System Setup menu is exited additional information about the settings. -
Page 65: Sr+ Control Options For Pioneer Plasma
• This setting works only with Dolby Digital Make the following settings if you have and some DTS soundtracks. For other connected a Pioneer plasma display to this sources you can create a similar effect unit using an SR+ cable (not supplied). -
Page 66: Setting The Channel Levels
Surround sound and other settings Function setting for DVD input Setting the channel levels • DVD -> OFF/PDP1–5/PDPTV – Matches You can set the relative channel levels from the DVD function of this unit with a your main listening position for all of the numbered video input on the plasma listening modes independently. - Page 67 Surround sound and other settings • RS – Right surround speaker • LS – Left surround speaker • SW – Subwoofer Use the VOLUME +/– button to adjust the volume to an appropriate level. Turn down the volume to 40 or less to ensure you have adequate headroom.
-
Page 68: Video Adjust Menu
Video Adjust menu Chapter 10 Video Adjust menu Video Adjust Press (cursor down) to select ‘Detailed Settings’ then press ENTER. • Default setting: Standard From the Video Adjust screen you can select Video Adjust the standard video presentation or define Memory1 presets of your own. -
Page 69: Initial Settings Menu
Initial Settings menu Chapter 11 Initial Settings menu Using the Initial Settings menu Use the cursor buttons and ENTER to The Initial Settings menu gives you complete select the setting and option you want to control in setting up your DVD system, including video output settings and parental set. -
Page 70: Language Settings
Initial Settings menu Setting Option What it means S-Video Out Standard setting. (See also Connecting If you find that the picture is stretched or distorted on the using the S-video output default S2 setting, try changing it to this setting. on page 16.) Language settings Setting... -
Page 71: Options
Initial Settings menu Setting Option What it means On Screen Display Operation displays (Play, Resume, Scan, and so on) are shown on-screen. Operation displays are not shown. Angle Indicator A camera icon is displayed on-screen during multi-angle scenes on a DVD disc. No multi-angle indication is shown. -
Page 72: Parental Lock
Initial Settings menu Parental Lock Changing your password To change your password, confirm your • Default level: Off; Default password: none; existing password then enter a new one. Default Country code: us (2119) To give you some control over what your Select ‘Password Change’. -
Page 73: Bonus Group
Initial Settings menu Bonus Group Initial Settings Video Output Parental Lock Language Bonus Group Display Auto Disc Menu Options Group Playback DVD Playback Mode SACD Playback PhotoViewer Some DVD-Audio discs have an extra ‘bonus’ group that requires a 4-digit key number to access. -
Page 74: Additional Information
Additional information Chapter 12 Additional information Optional system settings System Setup menu options in standby Below are all the available settings in the setup These settings are accessed by using the menu. The first setting in each section is the System Setup menu while in standby. -
Page 75: Resetting The System
Additional information Line attenuator setting Press the front panel button. All the system’s settings are now reset, and If the source connected to the LINE analog you should see the ‘Let’s Get Started’ screen. input is distorting, the attenuator can reduce the signal level. -
Page 76: Dvd Video Regions
Additional information DVD Video regions Wipe lightly from the center of the disc using straight strokes. All DVD Video discs carry a region mark on the case somewhere that indicates which region(s) of the world the disc is compatible with. Your DVD system also has a region mark, which you can find on the rear panel. -
Page 77: Discs To Avoid
Use of shaped discs is not recommended for this product. Pioneer disclaims all liability arising Cleaning the pickup lens in connection with the use of shaped discs. The DVD player’s lens should not become dirty... -
Page 78: Power Cord Caution
If you find it damaged, ask your nearest or electrocution. Pioneer authorized service center or your • Do not attempt to plug in or remove the AC dealer for a replacement. -
Page 79: Radio Wave Reflections
Additional information Radio wave reflections • Discrimination systems for train or emergency vehicles The radio waves received by the receiver include the radio wave coming directly from the transmitter (direct wave) and waves coming from various directions due to reflections by walls, furniture and building •... -
Page 80: For Safety In Operation
In this case, unplugging the power cord and then re- plugging it in will usually reset the unit for proper operation. If this does not correct the problem, please consult your nearest Pioneer service center. -
Page 81: Connecting Auxiliary Components
Additional information Connecting auxiliary components These include digital components such as an MD player, digital satellite, or a game system. This system has both stereo analog inputs and Connect using a coaxial digital cable (not outputs, as well as a coaxial digital input. Use supplied). - Page 82 Additional information • When Recording mode is on, most surround sound-related functions cannot be used. The display will briefly blink RecMode On if you try and use a prohibited function while Recording mode is on. • When Recording mode is off, the audio from the analog output may be interrupted, depending on the operation.
-
Page 83: Troubleshooting
Sometimes the trouble may lie in another component. Investigate the other components and electrical appliances being used. If the trouble cannot be rectified even after exercising the checks listed below, ask your nearest Pioneer authorized service center or your dealer to carry out repair work. -
Page 84: Dvd/Cd/Video Cd Player
• Check that the speakers are connected correctly. • Make sure the voltage of the mains power source is correct for the model. • If the problem persists, take it to your nearest Pioneer authorized service center or your dealer for servicing. DVD/CD/Video CD player... -
Page 85: Mp3/Jpeg Discs
Additional information Problem Remedy When recorded on a VCR • This system uses copy-protection technology which may prevent or passed through an AV recording or cause picture problems when connected through a VCR or AV selector, there is selector. This is not a malfunction. disturbance in the playback picture. -
Page 86: Wireless Speaker System
Additional information Problem Remedy Considerable noise in • Tune into the correct frequency. radio broadcasts. • Connect the antenna (see Connecting the supplied antennas on page 20 and Connecting external antennas on page 80). • Fully extend the FM wire antenna, position for best reception, and secure to a wall. -
Page 87: Error Messages
AV equipment. When the system is switched • It is likely that the system is malfunctioning. Ask your nearest Pioneer on, or during operation: authorized service center or your dealer to carry out repair work. HTD-645DV – The POWER indicator goes out. -
Page 88: Screen Sizes And Disc Formats
Additional information Screen sizes and disc formats Set to 4:3 (Pan&Scan), widescreen discs are shown with the left and right sides cropped. DVD-Video discs come in several different Although the picture looks larger, you don’t screen aspects, ranging from TV programs, actually see the whole picture. -
Page 89: Language Code List
Additional information Language code list Language (Language code letter), Language code Japanese (ja), 1001 Estonian (et), 0520 Lingala (ln), 1214 Slovak (sk), 1911 English (en), 0514 Basque (eu), 0521 Laothian (lo), 1215 Slovenian (sl), 1912 French (fr), 0618 Persian (fa), 0601 Lithuanian (lt), 1220 Samoan (sm), 1913 German (de), 0405... -
Page 90: Preset Code List
653, 654, 655 654, 655, 656, 607, 636, 651 FIRSTLINE 640, 644 MAGNADYNE 632, 649 SABA 631, 636, 642, 651 PIONEER 600, 631, 632, 607, FISHER 632, 635, 638, 645 MAGNAFON 649 SAISHO 639, 644, 646 636, 642, 651 FORMENTI 632, 607, 642... -
Page 91: Glossary
Additional information Glossary ISO 9660 International standard for the volume and format file structure of CD-ROM discs. Analog Direct representation of sound by an JPEG A standard file format used for still audio electrical signal. See also Digital audio. images. JPEG files are identified by the file Aspect ratio The width of a TV screen relative to its extension “.jpg”. -
Page 92: Specifications
Additional information Specifications Speakers: Woofer ....10 cm cone type Tweeter ....5.2 cm cone type Amplifier section Nominal impedance . -
Page 93: Wireless Speaker
Additional information Accessories (S-HTD540) Speaker System (S-HTD630) Speaker cables......6 (Front speakers x2, center speaker x1, subwoofer Non-skid pads . - Page 94 Additional information Digital Wireless Rear Speaker System • Specifications and design subject to possible modification without notice, due (XW-HTD630) to improvements. General Digital Wireless Rear Speaker System (Transmitter / Wireless speaker) Transmitter AC adaptor: Power requirements ... .AC120V, 60 Hz Power consumption .
- Page 96 253 Alexandra Road, #04-01, Singapore 159936 TEL: 65-6472-1111 PIONEER ELECTRONICS AUSTRALIA PTY. LTD. 178-184 Boundary Road, Braeside, Victoria 3195, Australia, TEL: (03) 9586-6300 PIONEER ELECTRONICS DE MEXICO S.A. DE C.V. Blvd.Manuel Avila Camacho 138 10 piso Col.Lomas de Chapultepec, Mexico,D.F. 11000 TEL: 55-9178-4270 K002E <04C000001>...
Need help?
Do you have a question about the XV-HTD640 and is the answer not in the manual?
Questions and answers