Table of Contents
Advertisement
1
Preliminary notes
Thank you for selecting our Bluetooth car radio SilverCrest CRB-532. In order for you to utilise this device and all its options, we
recommend that you read the corresponding instructions in this manual before initial use of the device, even if you are familiar
with handling electronic devices. Please pay particular attention to the chapter "Important safety instructions" on page 71. Store
this manual in a safe location for future reference. If you sell or transfer this device, please be sure to pass along these
instructions as well.
For all product descriptions and user instructions, the German version is the ultimately valid reference in the event of possible
deviations in other languages.
2
Copyright
The contents of this manual may not be reproduced, copied or otherwise duplicated in electronic, mechanical, magnetic, optical,
chemical, manual, or any other form without the permission of our company, nor may they be stored in a search engine nor
translated into another language.
3
Manufacturer information
JNC Datum Tech GmbH
Benzstraße 33
71083 Herrenberg
Germany
www.jnc-digital.de
More information can also be found at:
www.mysilvercrest.de
67
Advertisement
Table of Contents

Related Manuals for Silvercrest CRB-532


Summary of Contents for Silvercrest CRB-532
-
Page 1: Preliminary Notes
Preliminary notes Thank you for selecting our Bluetooth car radio SilverCrest CRB-532. In order for you to utilise this device and all its options, we recommend that you read the corresponding instructions in this manual before initial use of the device, even if you are familiar with handling electronic devices. -
Page 2: Table Of Contents
Table of contents Preliminary notes ........................67 Copyright ............................. 67 Manufacturer information ......................67 Table of contents ........................68 Important safety instructions ....................71 Scope of delivery ........................72 Installation........................... 74 Installing the device Connecting the antenna Supply voltage Speakers Removal Operating panel .......................... - Page 3 11.1 Turning on/off 11.2 Changing the volume 11.3 Muting the speakers Radio (Tuner) Mode ........................92 12.1 Selection of the radio station 12.2 Select the wavelength range 12.3 Find and save radio stations 12.4 12.5 Traffic Announcement (“TA”, Traffic Programme “TP”) 12.6 Alternative frequencies (“AF”) 12.7...
- Page 4 14.9 Skipping forward or backward in increments of ten 14.10 Pause 14.11 Repeat functions (Repeat) 14.12 Intro 14.13 Random playback (random) 14.14 Turning the subwoofer on/off AUX IN ............................106 Settings ............................. 107 16.1 Menu level 1 16.2 Menu level 2 16.3 Recording and copying function 16.4...
-
Page 5: Important Safety Instructions
Important safety instructions Please read and strictly observe the following instructions! You are not permitted to disassemble, modify or repair the car radio. Never open the case of the car radio; it does not contain any serviceable parts! If the case is open, there is a risk of fatality due to electric shock. Do not give your car radio and especially the accessories to children. -
Page 6: Scope Of Delivery
Scope of delivery CRB-532 Bluetooth car radio Case for operating panel Installation frame Aux-in connection cable External microphone Screws and nuts... - Page 7 Remote control User manual Note: The design and technical data are subject to change without any notification. Illustrations are not to scale.
-
Page 8: Installation
Installation 7.1 Installing the device Note: Please observe the following safety instructions for the connection of the device: Read the entire installation section before connecting the device. Disconnect the negative pole of the vehicle battery for the duration of the installation. Observe the vehicle manufacturer’s safety instructions during this task. - Page 9 transport safety screws Fig. 8.2 Fig. 8.0 Fig. 8.1 Note: We recommend that you have the device installed by a specialist company. Then you will have created the prerequisites for a problem-free functioning of the device. If at any point during the installation you are unsure that you can correctly connect the device by yourself, contact a specialist.
- Page 10 4. Now attach the installation frame by bending the installation brackets towards the outside with a screwdriver. The frame is properly installed when it can no longer be pulled out, yet also keeps from sliding further into the installation slot. 5.
- Page 11 Fig. 8.3 Fig. 8.4 Line out plug right (red) Caution: Line out plug left (white) This device is distinguished by a high output level. This results in strong heat generation during operation. Therefore no cables or other Subwoofer output (blue RCA jack) components must be allowed near the device.
-
Page 12: Connecting The Antenna
7.2 Connecting the antenna The device is designed for antennas with an impedance of 75 to 150 . To connect the antenna, plug the antenna cable into the antenna socket of the device (black cable, socket on the rear of the device). 7.3 Supply voltage ISO plug A: A4: Attach the connection for +12V operational voltage (diameter at least 2.5 mm²... -
Page 13: Speakers
7.4 Speakers Cable adapter ISO plug B Front speakers Back speakers Maximum output for 4-8 speakers: 4 x 40W right + grey right + purple Music output right - grey/black right - purple/black left + white left + green left - white/black left - green/black... -
Page 14: Removal
7.5 Removal Turn off the device. Remove the operating panel and place it into the case. Clamp off the negative pole of the vehicle battery for the duration of the disassembly process. First remove the front frame of the device. Then insert the two release keys into the openings on both sides of the front of the device and slide these as far as the stops. -
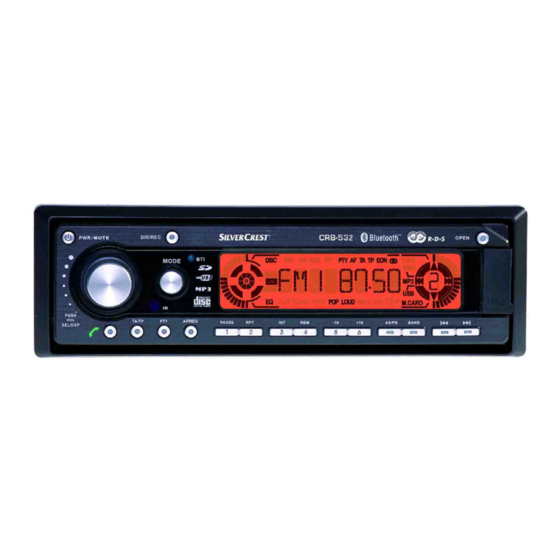
Page 15: Operating Panel
Operating panel Front view (level 1) Button to turn the device on/off, button to mute the device Volume control dial (turned) Settings dial for menu level 1 - VOL, BAS, TRE, BAL, FAD (pressed) Settings dial for menu level 2 - INVOL - ADJ - TAVOL - EON - REC - TELVOL - DSP - LOUD - LOC - STEREO (if pressed for more than 2 seconds) - Page 16 Radio mode: Station selection buttons 1-6. Pressing for more than 2 seconds stores the current station under this button. Music mode: Pause button Repeat track Scan track (approximately 10 seconds) Random playback of tracks MP3/WMA/OGG track – 10 MP3/WMA/OGG track + 10 AS/PS button Radio mode:...
- Page 17 AUX-IN jack for the connection of external audio sources, Button to flip down the operating panel Display Bluetooth activity indicator DIS/REC button: Button to record and erase tracks on SD/MMC/USB storage media. MODE button for the source selection between radio, CD (if inserted), memory card (if inserted), USB (if connected) and AUX-IN IR sensor (infrared sensor for the remote control)
- Page 18 SD/MMC card slot CD eject button Status indicator for the device - continuously illuminated when the operating panel is flipped open - flashes when the operating panel has been removed. CD slot to insert the CD Reset button to restore factory default settings. Note: When the factory settings are restored, the clock and the stored radio stations will also be reset or erased.
-
Page 19: Display
Display 9.1 General Display (entire view) Display (partial view left) Display (partial view right Level indicator, CD status indicator (lights up when a CD is inserted, turns when the CD is being read or played, lights up in pause mode), Preset button number of the current radio station, REC flashes while recording. -
Page 20: Radio Mode
9.2 Radio Mode The display of the device can show the following messages during radio operation: HITRADIO Alternative frequency has been activated Example): RDS programme name 100.60 Frequency in the FM range Readiness for traffic alerts has been activated A broadcast programme with traffic information is CT 16:08 Time being received... -
Page 21: Mp3/Wma/Ogg-Cd Mode
9.4 MP3/WMA/OGG-CD Mode During MP3/WMA/OGG-CD operation, the display can show the following additional messages to those for audio CD An MP3 file is being played An OGG file is being played The name of the current album is being shown as A WMA file is being played ALBUM scrolling text... -
Page 22: Usb Mode
9.6 USB Mode The display can show the following messages during the operation of a USB source as a music source directory: A USB device has been selected as the source or is The name of the current album is being shown as ALBUM connected. -
Page 23: Activation
10 Activation 10.1 Insertion of the operating panel In order to activate the car radio, you first have to insert the operating panel. First slide the operating panel tilted slightly from the right onto the left guide pin, as shown in the illustration on the right. -
Page 24: Basic Functions
11 Basic functions 11.1 Turning on/off To turn on the device, briefly press the “PWR/MUTE” button on the operating panel. To turn the device off, press the “PWR/MUTE” button for more than two seconds. The device will then turn off. Note: If the device is activated after the ignition has been started, it will automatically turn on and off with the ignition during subsequent operation. -
Page 25: Muting The Speakers
11.3 Muting the speakers To mute the connected speakers, briefly press the “PWR/MUTE” button . “MUTE” will appear in the display. In order to return to the original volume, briefly press the “PWR/MUTE” button again or turn the volume control dial. The message “MUTE” will turn off and the volume will be at the same level as before it was muted. -
Page 26: Radio (Tuner) Mode
12 Radio (Tuner) Mode 12.1 Selection of the radio station Turn on the SilverCrest CRB-532 Bluetooth car radio with the “PWR/MUTE” button . If the device was turned off while it was in RADIO mode, the last selected station will be heard. If the device is set to an operation with one of the different data storage media, press the “MODE”... - Page 27 Store stations with the station buttons With the station buttons 1, 2, 3, 4, 5, and 6 ( ) you can preset 6 programming spaces on each level of the wave band (e.g. “FM 1”, “FM 2”, or “FM 3”). To store the station, select the corresponding station with the station search or manually.
-
Page 28: Rds
12.4 RDS RDS is an information system whose signals are additionally broadcast by most FM stations. With RDS programmes, the name of the programme appears as an abbreviation on the display. Further information, such as frequency, time and programme type (PTY) may be faded in. -
Page 29: Alternative Frequencies ("Af")
12.6 Alternative frequencies (“AF”) To activate the “AF” function, briefly press the “AF/REG” button . The message “AF” appears and the function is turned on. To turn off the “AF” function, briefly press the “AF/REG” button . The message “AF” disappears and the function is deactivated. Note: The “AF”... -
Page 30: Regional Programmes ("Reg")
12.7 Regional programmes (“REG”) Some radio stations divide their programmes into regional stations with different content at specific times. If reception is deteriorating, the “REG” function prevents the car radio from changing to alternative frequencies that have different programme contents. To turn the “REG”... -
Page 31: Cd Mode
13 CD Mode The SilverCrest CRB-532 Bluetooth car radio supports the formats CD-Audio; CD-R; CD-RW and MP3/WMA/OGG-CD. Note: Conditional on the quality differences of the media as well the characteristics of the recording, it may happen that some individually recorded CDs are unable to be read. Such events do not constitute a malfunction of the device. -
Page 32: Inserting / Ejecting A Cd
13.2 Inserting / ejecting a CD To insert a CD, press the button on the device. Then the operating panel automatically flips down and uncovers the CD insertion slot. Before you insert a CD, press the button to make sure that no other CD has already been inserted. -
Page 33: Playback / Pause
13.3 Playback / pause To pause playback, briefly press the pause button . “PAUSE” will be indicated on the display. To continue playback, press the “1” button again. The device does not have a stop function. 13.4 Selecting or repeating tracks By briefly pressing the button , the playback jumps to the next track. -
Page 34: Intro 100
13.7 Intro To scan the tracks, briefly press the station button “3” during playback. Then all tracks will be scanned for approximately ten seconds. The abbreviation “INT” will appear on the display. To end the INTRO function, briefly press the station button “3” again. -
Page 35: Usb/Mp3/Wma/Ogg And Sd/Mmc Mode
14 USB/MP3/WMA/OGG and SD/MMC Mode 14.1 Connecting/removing a USB storage medium To connect a USB storage medium, remove the protective rubber cap on the USB connection . Now plug the storage medium directly into the USB connection of the device. The display switches to “USB” and the device searches through the storage medium for data that are suitable for playback. -
Page 36: Selecting A Usb Storage Medium As Data Source 102
USB storage media. Note: ® Please note that the memory of an iPod is differentiated into two different memory levels. The CRB-532 can only play back ® data from the mass storage level. The iTunes level is not supported. -
Page 37: Insert / Remove Sd/Mmc 103
14.4 Insert / remove SD/MMC To insert an SD/MMC card, please press the button on the device. Then the operating panel automatically flips down and uncovers the SD/MMC insertion slot. Now insert your SD/MMC card into the card slot with the contacts to the left until it audibly snaps into position. -
Page 38: Searching For Track Numbers 104
14.7 Searching for track numbers When searching for track numbers, you have the option of quickly selecting the desired track number. To start searching for track numbers, briefly press the “AS/PS” button. The message “001” will appear on the display, whereby the last digit is flashing. -
Page 39: Skipping Forward Or Backward In Increments Of Ten
14.9 Skipping forward or backward in increments of ten If you briefly press the station button “5” during playback, the device will skip back by ten tracks. If you want to skip ten tracks ahead, press the station button “6” 14.10 Pause To suspend playback of the current title, press the PAUSE / station button “1”... -
Page 40: Random Playback (Random)
Set the volume of the playback device to a medium level and subsequently regulate the volume with your Silvercrest CRB-532. If the playback source of the Silvercrest CRB-532 has not been set to AUX yet, press the “MODE”... -
Page 41: Settings
16 Settings 16.1 Menu level 1 By briefly pressing the volume control dial once or several times, the functions of menu level 1, volume control, bass setting, treble setting, and the speaker balance between the left and right as well as front and rear speaker groups can be selected and set. - Page 42 Note: If the ratio is set to “0”, the volume on both speaker groups is the same. If the control dial is set to the maximum position of “8” on one of the two sides, the speaker group in the opposite side will be mute.
-
Page 43: Menu Level 2
16.2 Menu level 2 Menu level 2 is reached if the control dial is pressed for approximately two seconds. The individual menu items can be selected by repeatedly pressing the control dial. On menu level 2, the functions “INVOL” (initial volume), “ADJ” (setting the time), “TAVOL” (standard volume for traffic announcements), “EON”... - Page 44 “TAVOL”: Volume for traffic announcements The “TAVOL” function enables an adjustment of playback volume when the device is turned on according to individual preferences. To change the device’s volume for traffic announcements, press the control dial until menu level 2 is reached. The “INVOL” function will appear.
- Page 45 not change anything on the device for approximately five seconds). If you confirm the selection by pressing the control dial you advance to the next possible setting. If you use automatic storage, the device will return to the standard display. “TELVOL”: Standard volume for telephone conversations The “TELVOL”...
- Page 46 To activate the “LOUD” function, press the control dial until menu level 2 is reached. The “INVOL” function will appear. Press the control dial repeatedly until you get to the menu item “LOUDNESS”. Here you will have the option of activating (“LOUD ON”) or deactivating (“LOUD OFF”) the function by turning the dial.
-
Page 47: Recording And Copying Function
16.3 Recording and copying function With the Silvercrest CRB-532 you have the option of recording music tracks, radio features, news etc onto removable SD/MMC or USB removable storage devices. The compression types WMA and MP3 are available for this. How you can change the compression mode is described above in section “REC”... - Page 48 Important: Please inform yourself of the legal situation that applies in your country to the recording of works that are protected by copyright. In case of doubt, consult expert opinion. Recording from radio and AUX IN If you want to record from the radio or through AUX IN, select the radio station or AUX IN by means of the “MODE” button and then press the “DIS/REC”...
-
Page 49: Deleting Tracks
16.4 Deleting tracks During playback from an SD/MMC memory card and USB removable storage device, it is possible to delete the current track from the data storage medium. To do this, press the “DIS/REC” button for more than three seconds during playback of the respective track. -
Page 50: Bluetooth ® Telephone Function
Bluetooth device. As soon as the search is finished, your mobile phone will report a new device with the label “CRB-532”. Choose this device and enter “0000” as the password. - Page 51 Note: A mobile phone with the activated option “visible to everyone” also allows third parties to see your device and potentially access it. Making calls Make sure that your telephone is paired with the device. Now press the telephone button for 2 seconds.
- Page 52 Overview of Bluetooth functions Condition Action Function LCD display BTI-LED LED flashes every 5 Device ready No action seconds Press telephone button LED flashes every Pair with mobile phone for two seconds second Briefly press telephone button to display L- Repeat dialling of last Devices are connected DAIL, briefly press...
- Page 53 Condition Action Function LCD display BTI-LED Press telephone button for two seconds (Some telephones Change voice output to LED continuously require that the button radio illuminated is pressed longer for this activity) Incoming call while a conversation is already in progress (third party Press telephone button Number of incoming LED continuously...
-
Page 54: Factory Settings ("Reset")
AVRCP (Audio/Video Remote Control Profile) AVRCP makes it possible to use your mobile phone as a remote control and therefore remotely regulate the audio functions. To obtain exact information about this and whether your mobile phone supports this function, please consult the user manual of your mobile phone. -
Page 55: Remote Control
17 Remote control 17.1 Description of the buttons The buttons of the remote control fulfil the same functions as the buttons with the same names on the device. Button Function Chapter Turning device on/off 12.1 Traffic announcements 13.5 PTY button to select the programme style 13.4 Alternative frequencies 13.6 Automatic station search, track search... - Page 56 Button Function Chapter Muting 12.3 13.3 Station button 1, pause 14.3, 15.11 13.3 Station button 2, repeat track (repeat) 14.6 13.3 Station button 3, intro 14.7 13.3 Station button 4, random playback 14.8 Station button 5 13.3 MP3 / WMA/OGG track - 10 15.10 Station button 6 13.3...
-
Page 57: Changing The Battery
17.2 Changing the battery To change the battery, press the lock on the left side of the battery case slightly to the right. Now the battery compartment can be pulled out towards the front. Now replace the old battery with a new one of the same type (CR 2025). Please pay attention to the polarity ("+ pole"... -
Page 58: Product Information
18 Product information 18.1 General information Removable flip-down operating panel General information Semi dot matrix LCD display Amber-coloured button illumination Radio component PLL tuner with 18FM/12AM station presets RDS (PTY, TA, AF, PS, PI) CD component Playback of CD/CD-R/CD-RW/MP3/WMA/OGG-CD ESP anti-shock CD/MP3/WMA/OGG Mechanical anti-shock Operation with memory card SD/MMC cards (up to max. -
Page 59: Technical Specifications
18.2 Technical specifications General Power supply 12V DC (11V-16V) Maximum power output (PEAK) 40W x 4 channels Appropriate speaker impedance 4 – 8 Appropriate speaker output (RMS) 20W x 4 channels Fuse FM stereo radio Frequency range 87.5-108.0MHz Sensitivity 10dB V (S/N 30 dB) Frequency response 30Hz –... -
Page 60: Disposal
19 Disposal Please consider that your electronic entertainment device is subject to the European Directive 2002/96/EC for the reduction of electronic waste. You are therefore not permitted to dispose of such equipment in your household waste. You can receive information regarding the disposal of old/unwanted equipment from your local authority, waste disposal department or the store where you purchased this product. -
Page 61: Troubleshooting
20 Troubleshooting If a fault occurs, please consider these instructions before you have the device repaired. If you are unable to solve a problem despite these instructions, please ring our hotline. Do not try repairing the device yourself under any circumstances. In that event, the warranty would be void. - Page 62 Problem Cause Solution The inserted CD The CD was inserted with the printed side Flip the CD over and try again. cannot be played. to the bottom. The CD has too many scratches. Create another CD from the original or have the CD repaired.
-
Page 63: Warranty Information
21 Warranty information This product is subject to a warranty period of three years from the date of purchase. For information about our after-sales service, please visit www.jnc-digital.de or call our hotline. The national numbers are as follows: Country Hotline No. Country Hotline No.