Table of Contents
Advertisement
Quick Links
EC Declaration of Conformity
We declare that our products (lighting equipments) comply with the
following specification and bears CE mark in accordance with the
provision of the Electromagnetic Compatibility (EMC) Directive
TM
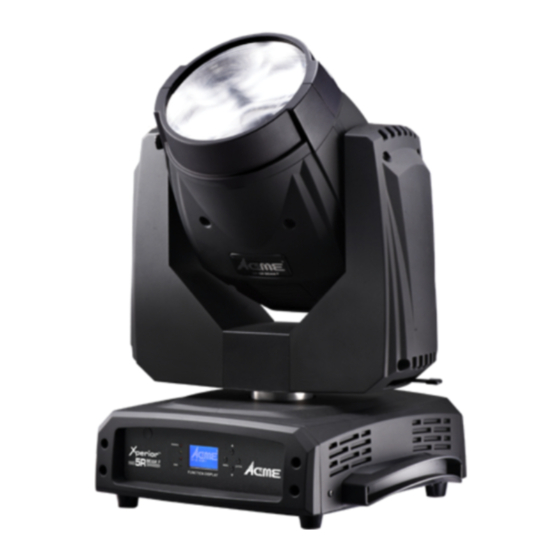
Xperior
5R BEAM
2004/108/EC.
EN55103-1:1996; EN55103-2:1996;
EN61000-3-2:2006
EN61000-3-3:2008
&
Harmonized Standard
EN 60598-2-17: 1989 +A2: 1991
EN60598-1:2008+A11:2009
Part 1:General requirements and test
Following the provisions of the low voltage directive 2006/95/EC
Innovation, Quality, Performance
User Guide
Please read these instructions carefully before use
www.bluelight.at
www.bluelight.at
Advertisement
Table of Contents

Subscribe to Our Youtube Channel
Related Manuals for ACME Xperior 5R BEAM


Summary of Contents for ACME Xperior 5R BEAM
- Page 1 EC Declaration of Conformity We declare that our products (lighting equipments) comply with the following specification and bears CE mark in accordance with the provision of the Electromagnetic Compatibility (EMC) Directive Xperior 5R BEAM 2004/108/EC. EN55103-1:1996; EN55103-2:1996; EN61000-3-2:2006 EN61000-3-3:2008 & Harmonized Standard EN 60598-2-17: 1989 +A2: 1991 EN60598-1:2008+A11:2009...
- Page 2 EC Declaration of Conformity We declare that our products (lighting equipments) comply with the following specification and bears CE mark in accordance with the provision of the Electromagnetic Compatibility (EMC) Directive Xperior 5R BEAM 2004/108/EC. EN55103-1:1996; EN55103-2:1996; EN61000-3-2:2006 EN61000-3-3:2008 & Harmonized Standard EN 60598-2-17: 1989 +A2: 1991 EN60598-1:2008+A11:2009...
-
Page 3: Table Of Contents
XP-5R Beam B. Do maintain the fixtures every two months and make sure that all the screws and terminals have been locked firmly to make sure the normal performance of the fixtures. TABLE OF CONTENTS Negligence of maintenance would cause malfunction of the fixture. Cleaning: 1. - Page 4 XP-5R Beam B. Do maintain the fixtures every two months and make sure that all the screws and terminals have been locked firmly to make sure the normal performance of the fixtures. TABLE OF CONTENTS Negligence of maintenance would cause malfunction of the fixture. Cleaning: 1.
-
Page 5: Safety Instruction
XP-5R Beam 3. Loosen the screws (C). 1. Safety Instruction 4. Unplug all the connect wires over the belt. Please read carefully the instruction manual, which includes important 5. Change a new belt (D), put the belt around the information about the installation, usage and maintenance. WARNING axis gear and motor gear. - Page 6 XP-5R Beam 3. Loosen the screws (C). 1. Safety Instruction 4. Unplug all the connect wires over the belt. Please read carefully the instruction manual, which includes important 5. Change a new belt (D), put the belt around the information about the installation, usage and maintenance. WARNING axis gear and motor gear.
- Page 7 XP-5R Beam during its operation, and allow about 15 minutes for cooling the unit down before 9. Troubleshooting replacing bulb or maintenance as it could be very hot. Following are a few common problems that may occur during operation. Here are Avoid any inflammable liquids, water or metal objects entering the unit.
- Page 8 XP-5R Beam during its operation, and allow about 15 minutes for cooling the unit down before 9. Troubleshooting replacing bulb or maintenance as it could be very hot. Following are a few common problems that may occur during operation. Here are Avoid any inflammable liquids, water or metal objects entering the unit.
-
Page 9: Installation
The whole series of Xperior fixtures’ personalities have been built into the most widely used 5. Unlock the lock module (2) take out omega clamps. consoles from Avolites, Compulite, Daslight, MA Lighting, Wholehog and Zero 88. Please visit their websites or ours: http://www.acme.com.cn/ to download the latest Fixture Installation: Personality Library. - Page 10 The whole series of Xperior fixtures’ personalities have been built into the most widely used 5. Unlock the lock module (2) take out omega clamps. consoles from Avolites, Compulite, Daslight, MA Lighting, Wholehog and Zero 88. Please visit their websites or ours: http://www.acme.com.cn/ to download the latest Fixture Installation: Personality Library.
-
Page 11: Technical Specification
XP-5R Beam installing the fixture. 20Channels(Mode 3) Make absolute sure that the unit is firmly fixed in way that no vibrating or slipping would occur during operation. Ch14 Ch15 Ch16 The equipment must be installed beyond the areas where persons may walk by or be seated. - Page 12 XP-5R Beam installing the fixture. 20Channels(Mode 3) Make absolute sure that the unit is firmly fixed in way that no vibrating or slipping would occur during operation. Ch14 Ch15 Ch16 The equipment must be installed beyond the areas where persons may walk by or be seated.
- Page 13 XP-5R Beam 20 Channels mode 3: - Pan/Tilt position lock for transporting protection. Dimmer/Shutter 20Channels(Mode 3) - Mechanical dimmer Dimmer Gobo Strobe Prism Prism Rotation Color Wheel - Mechanical shutter and adjustable speed strobe effect 250-255 Gobo16 Shaking 252-255 Open 244-249 Gobo15 Shaking 128-255 Prism inserted 255 Fast Rotation...
- Page 14 XP-5R Beam 20 Channels mode 3: - Pan/Tilt position lock for transporting protection. Dimmer/Shutter 20Channels(Mode 3) - Mechanical dimmer Dimmer Gobo Strobe Prism Prism Rotation Color Wheel - Mechanical shutter and adjustable speed strobe effect 250-255 Gobo16 Shaking 252-255 Open 244-249 Gobo15 Shaking 128-255 Prism inserted 255 Fast Rotation...
- Page 15 XP-5R Beam DMX Channels 16Channels(Mode 2) Ch10 Ch11 Ch12 Ch13 Mode Mode 1 Mode 2 Mode 3 Prism movement Frost effect Focus Pan Fine Tilt Tilt Fine 19-CH 16-CH 20-CH COLOUR WHEE COLOUR WHEEL 100% PAN FINE STOP / STROBE STOP / STROBE TILT DIMMER...
- Page 16 XP-5R Beam DMX Channels 16Channels(Mode 2) Ch10 Ch11 Ch12 Ch13 Mode Mode 1 Mode 2 Mode 3 Prism movement Frost effect Focus Pan Fine Tilt Tilt Fine 19-CH 16-CH 20-CH COLOUR WHEE COLOUR WHEEL 100% PAN FINE STOP / STROBE STOP / STROBE TILT DIMMER...
-
Page 17: Description
XP-5R Beam 16 Channels mode 2: 4. Description 4.1 Description of the fixture 16Channels(Mode 2) Strobe Dimmer Gobo Prism Prism Rotation Color Wheel 250-255 Gobo16 Shaking 252-255 Open 244-249 Gobo15Shaking 1. Antenna (for XP-5R BEAM WT only) 128-255 Prism inserted 255 Fast Rotation 237-243 Gobo14 Shaking 231-236 Gobo13Shaking... - Page 18 XP-5R Beam 16 Channels mode 2: 4. Description 4.1 Description of the fixture 16Channels(Mode 2) Strobe Dimmer Gobo Prism Prism Rotation Color Wheel 250-255 Gobo16 Shaking 252-255 Open 244-249 Gobo15Shaking 1. Antenna (for XP-5R BEAM WT only) 128-255 Prism inserted 255 Fast Rotation 237-243 Gobo14 Shaking 231-236 Gobo13Shaking...
-
Page 19: Gobo-Wheel And Lamp
XP-5R Beam ○ Button Ch10 Ch11 Prism Gobo Prism Rotation Color MENU To enter into, move backward or leave the menu 255 Fast Rotation 251-255 Prism rotation effects 28 255 Fast Rotation 247-250 Prism rotation effects 27 194 Slow Rotation 242-246 Prism rotation effects 26 Move up in the menu 190-193 Stop... - Page 20 XP-5R Beam ○ Button Ch10 Ch11 Prism Gobo Prism Rotation Color MENU To enter into, move backward or leave the menu 255 Fast Rotation 251-255 Prism rotation effects 28 255 Fast Rotation 247-250 Prism rotation effects 27 194 Slow Rotation 242-246 Prism rotation effects 26 Move up in the menu 190-193 Stop...
-
Page 21: Lamp
XP-5R Beam 19 Channels mode1: DANGER! Install/change the gobo-wheel with the device switched off only. 19Channels(Mode1) 5.2 Lamp Pan Fine Tilt Tilt Fine Pan/Tilt Speed Philips MSD Platinum 5R (8000K) Slow Because of its high internal pressure, there might be a risk that the Discharge lamp would explode during operation. - Page 22 XP-5R Beam 19 Channels mode1: DANGER! Install/change the gobo-wheel with the device switched off only. 19Channels(Mode1) 5.2 Lamp Pan Fine Tilt Tilt Fine Pan/Tilt Speed Philips MSD Platinum 5R (8000K) Slow Because of its high internal pressure, there might be a risk that the Discharge lamp would explode during operation.
-
Page 23: Change The Lamp
XP-5R Beam 5.3 Change the Lamp 7.4 DMX 512 Configuration Please refer to below configurations to control the fixtures Fig1 Fig2 Attention: 1. The unit will maintain the last condition until reset if you cut-off the DMX signal. 2. For the channel Function, keep the value for about 5 seconds, then the corresponding function will take into effect. - Page 24 XP-5R Beam 5.3 Change the Lamp 7.4 DMX 512 Configuration Please refer to below configurations to control the fixtures Fig1 Fig2 Attention: 1. The unit will maintain the last condition until reset if you cut-off the DMX signal. 2. For the channel Function, keep the value for about 5 seconds, then the corresponding function will take into effect.
-
Page 25: How To Set The Unit
XP-5R Beam 5. The end of the DMX 512 system should be terminated to reduce signal errors. 6. How To Set The Unit 6. 3 pin XLR connectors are more popular than 5 pins XLR. 6.1 Power On Display 3 pin XLR: Pin 1: GND, Pin 2: Negative signal (-), Pin 3: Positive signal (+) Every time you turn on the unit, it will run built-in program to reset all motors to their home 5 pin XLR: Pin 1: GND, Pin 2: Negative signal (-), Pin 3: Positive signal (+), Pin4, Pin5 not position, the display will show as fig.4, you may hear some noises for about 20 seconds. - Page 26 XP-5R Beam 5. The end of the DMX 512 system should be terminated to reduce signal errors. 6. How To Set The Unit 6. 3 pin XLR connectors are more popular than 5 pins XLR. 6.1 Power On Display 3 pin XLR: Pin 1: GND, Pin 2: Negative signal (-), Pin 3: Positive signal (+) Every time you turn on the unit, it will run built-in program to reset all motors to their home 5 pin XLR: Pin 1: GND, Pin 2: Negative signal (-), Pin 3: Positive signal (+), Pin4, Pin5 not position, the display will show as fig.4, you may hear some noises for about 20 seconds.
- Page 27 XP-5R Beam 7. Control By Universal DMX Controller 7.1 Connection 1. At last unit, the DMX cable has to be terminated with a terminator. Solder a 120-ohm 1/4W resistor between pin 2(DMX-) and pin 3(DMX+) into a 3-pin XLR-plug and plug it in the DMX-output of the last unit.
- Page 28 XP-5R Beam 7. Control By Universal DMX Controller 7.1 Connection 1. At last unit, the DMX cable has to be terminated with a terminator. Solder a 120-ohm 1/4W resistor between pin 2(DMX-) and pin 3(DMX+) into a 3-pin XLR-plug and plug it in the DMX-output of the last unit.
- Page 29 XP-5R Beam 6.4. Error Information Lamp Startup Fail It appears when there is no lamp or some wires are damaged. Temperature Sense Error It appears when temperature check board is damaged. Lamp Too Hot Power Off It appears when temperature is detected higher than 110℃. Check if the unit is properly ventilated, or fans or temperature check board may is damaged.
- Page 30 XP-5R Beam 6.4. Error Information Lamp Startup Fail It appears when there is no lamp or some wires are damaged. Temperature Sense Error It appears when temperature check board is damaged. Lamp Too Hot Power Off It appears when temperature is detected higher than 110℃. Check if the unit is properly ventilated, or fans or temperature check board may is damaged.
- Page 31 XP-5R Beam — will blink on the display, use UP and DOWN button to select Mode1 (19 channels Gobo Gobo home position adjust mode) or Mode 2 (16channels mode) or Mode 3 (20 channels mode), press ENTER Enter offset mode, Select Gobo, press ENTER button to confirm, the present position will button to store.
- Page 32 XP-5R Beam — will blink on the display, use UP and DOWN button to select Mode1 (19 channels Gobo Gobo home position adjust mode) or Mode 2 (16channels mode) or Mode 3 (20 channels mode), press ENTER Enter offset mode, Select Gobo, press ENTER button to confirm, the present position will button to store.
- Page 33 XP-5R Beam return to the last menu. Press MENU button to exit. Fixture Setting Enter menu mode, select Fixture Setting, press ENTER button to confirm, use UP and DOWN button to select Pan Inverse, Tile Inverse, BL.O. P/T Moving, BL.O. Color Change or BL.O.
- Page 34 XP-5R Beam return to the last menu. Press MENU button to exit. Fixture Setting Enter menu mode, select Fixture Setting, press ENTER button to confirm, use UP and DOWN button to select Pan Inverse, Tile Inverse, BL.O. P/T Moving, BL.O. Color Change or BL.O.
-
Page 35: Home Position Adjustment
XP-5R Beam on the display, use UP and DOWN button to select No (normal while change color) or to select Yes (the unit will run built-in program to reset zoom, frost and frost to their Yes (blackout while change color), press ENTER button to store. Press MENU button home positions) or No, press ENTER button to store. - Page 36 XP-5R Beam on the display, use UP and DOWN button to select No (normal while change color) or to select Yes (the unit will run built-in program to reset zoom, frost and frost to their Yes (blackout while change color), press ENTER button to store. Press MENU button home positions) or No, press ENTER button to store.
- Page 37 XP-5R Beam Firmware Version button to store. Press MENU button back to the last menu or let the unit idle one minute Select Firmware Version, press ENTER button to confirm, firmware version will show to exit menu mode. on the display, press MENU button back to exit. (When you operate the unit via DMX controller, set the value of channel “special function”...
- Page 38 XP-5R Beam Firmware Version button to store. Press MENU button back to the last menu or let the unit idle one minute Select Firmware Version, press ENTER button to confirm, firmware version will show to exit menu mode. on the display, press MENU button back to exit. (When you operate the unit via DMX controller, set the value of channel “special function”...
- Page 39 XP-5R Beam DOWN button to select Auto Test or Manual Test Display Setting Enter menu mode, select Display Setting, press ENTER button to confirm, use UP Auto Test and DOWN button to select Display Inverse, Backlight Auto Off, Backlight Intensity Select Auto Test, press ENTER button to confirm, the unit will run built-in programs to or Temperature unit.
- Page 40 XP-5R Beam DOWN button to select Auto Test or Manual Test Display Setting Enter menu mode, select Display Setting, press ENTER button to confirm, use UP Auto Test and DOWN button to select Display Inverse, Backlight Auto Off, Backlight Intensity Select Auto Test, press ENTER button to confirm, the unit will run built-in programs to or Temperature unit.
Need help?
Do you have a question about the Xperior 5R BEAM and is the answer not in the manual?
Questions and answers