
Related Manuals for Haier HPRD12HC5


Summary of Contents for Haier HPRD12HC5
- Page 1 ® PORTABLE AIR CONDITIONER CLIMATISEUR PORTATIF ACONDICIONADOR DE AIRE PORTATIL Model# HPRD12XC5 Modèle# HPRD12HC5 Modelo#...
-
Page 2: A Word From Haier
A Word From Haier Thank You for buying a dependable, energy saving and easy to operate HAIER air conditioner. This manual contains useful information for you to maintain, operate, install and safely use your air conditioner. Your air conditioner cleans, cools and dehumidifies the air in your room to provide you with the ultimate level of comfort. -
Page 3: Safety Precautions
The wall receptacle MUST be properly grounded. Do not operate air conditioner if power cord is frayed or otherwise damaged. Also avoid using it if there are cracks or abrasion damage along the length, plug connector or if the unit malfunctions or is damaged in any manner. -
Page 4: Table Of Contents
English Table Of Contents PAGE A Word From Haier...1 Product Registration ...1 Safety Precautions ...2 Advantages ...4 Parts and Features ...5 Assembly and Installation...6 Operation ...9 Product Specification ...12 Care and Cleaning ...12 Storage ...12 Trouble Shooting ...13 Warranty Information ...14... -
Page 5: Advantages
This model is easy to operate. The electronic control panel has a timer, thermostat, three speed cooling speeds, three fan speeds and one speed dehumidification function (dry). This portable air conditioner does not require water to be added. The unit has a unique design which evaporates the water. Therefore no condensation tank is necessary, thus avoiding you to have to wake up in the middle of the night to empty the bucket and turn on the unit. -
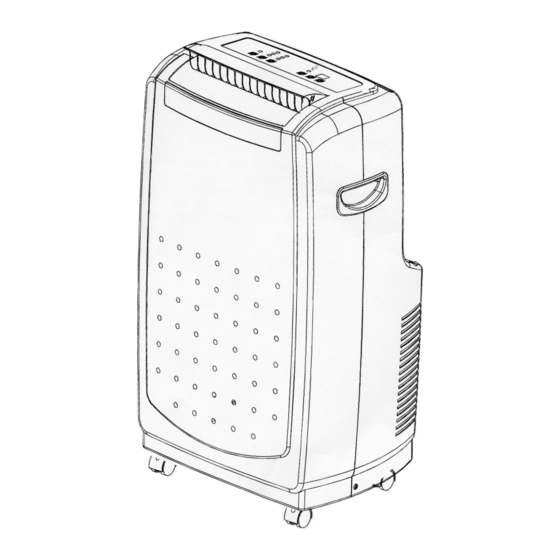
Page 6: Parts And Features
English Parts and Features 1. Control Panel 2. Cold Air Outlet 3. Signal Receptor 4. Transport Handle 5. Air Outlet Hose 6. Evaporator Air Intake 7. Air Intake Hose 8. Drain Port 9. Power Supply Fig. 1... -
Page 7: Assembly And Installation
English Assembly and Installation Assembly Instruction A. Connect exhaust hose to the back of the unit. Extend hose to desired length and connect with window kit. USING EXHAUST DUCT SET 1. Insert ends of Exhaust hose into air outlet nozzle and Exhaust duct “A”... -
Page 8: Installation Instruction
Your window kit has been designed to fit most standard vertical and horizontal window applications. However, it may be necessary for you to improvise/modify some aspects of the installation procedures for certain type windows. Please refer to for minimum and maximum window openings. Note: Window kit is just available for some models. - Page 9 English Installation Sequence Before Starting this Unit 1. Select a suitable location, making sure you have easy access to an electrical outlet. 2. Install the flexible exhaust hose and adjustable window slider kit as depicted in Fig. 2 & 3. Note: 1.
-
Page 10: Operation
1. Wait for 3 minutes before restarting the unit after a normal shut down so as to complete the compressor cycle. 2. Use an 115v 15 amp outlet for the air conditioner. Do not use any other electrical appliances on this line or you may trip the fuse. Use a dedicated line for this air conditioner. -
Page 11: Control Panel
(10) Dehumidifier Mode • Air is dehumidified as it passes through the air conditioner, without being in full cooling mode. (Note: The warm air exhaust hose must vent inside the room, not outside as it does when cooling. If the unit is vented outside some cooling will occur.) -
Page 12: Remote Control
Timer Auto turn off: With machine in fan mode, press timer button to select number of hours you would like the unit to run in air conditioning mode until automatically shuts off. Auto turn on: With machine powered off, press timer button to select number of hours until you would like the unit to automatically start running in air conditioning mode. -
Page 13: Product Specification
English Air Conditioner Remote Control The functions work the same as your air conditioner’s touch controls. Batteries: remove the cover on the back of the remote controller and insert the batteries with the (+) and (-) poles pointing in the proper direction. -
Page 14: Care And Cleaning
Wipe dry with a soft cloth. Storage • To store your air conditioner when not being used for a long period of time, drain condensed water using the drain pipe. Remove exhaust hose, clean filters, cover with plastic bag and store away. -
Page 15: Warranty Information
(commercial or rental application, the warranty is 90 days). 2. The sealed system and compressor contained in this Haier product is for a period of 5 years, from the date of purchase (excluding labor costs after the initial 12 month period). In commercial or rental...