Advertisement
GE
Security
TruVision DVR 10 Quick Start Guide
Content
Contact information
For contact information see our Web site:
www.gesecurity.com.
Package contents
The TruVision DVR 10 (model TVR 10) is shipped with the
following items:
•
•
IR (infrared) remote control
•
Two AAA batteries
•
USB mouse
•
Power supply
•
AC power cord
•
TruVision DVR 10 Quick Start Guide
•
TruVision DVR 10 User Manual (on CD)
Installation environment
Refer to the user manual for detailed information, but
observe these important requirements:
•
Place the TVR 10 in a secure location.
•
Ensure that the TVR 10 is in a well-ventilated area.
•
Do not expose the unit to rain or moisture.
Setting up the TVR 10
To quickly put the TVR 10 into operation:
1.
Connect all the devices required to the back panel of
the TVR 10. See Figure 1 on page 2.
2.
Turn on the unit using the power switch on the back
panel. After running automatic diagnostic tests on the
devices, the TVR 10 displays video images on-screen.
3.
Press the Menu button on the front panel to access the
main menu. The log on screen appears.
4.
Enter the default user ID and password.
User ID: admin
Password: 1234
The main menu screen appears.
5.
Modify the TVR 10 preconfigured settings as required,
using the various dialog screens. (See "TVR 10 screen
map" on page 6.)
6.
When customization is complete, press ESC to exit to
the main menu and return to live mode.
Connecting the devices
Use Figure 1 on page 2 as a visual guide to connect the
various peripherals to the TVR 10.
© 2009 GE Security, Inc.
P/N 1068259 • REV A • ISS 06JUL09
Advertisement

Related Manuals for GE TruVision DVR 10


Summary of Contents for GE TruVision DVR 10
-
Page 1: Table Of Contents
Enter the default user ID and password. Package contents User ID: admin Password: 1234 The TruVision DVR 10 (model TVR 10) is shipped with the The main menu screen appears. following items: Modify the TVR 10 preconfigured settings as required, •... -
Page 2: Control Options
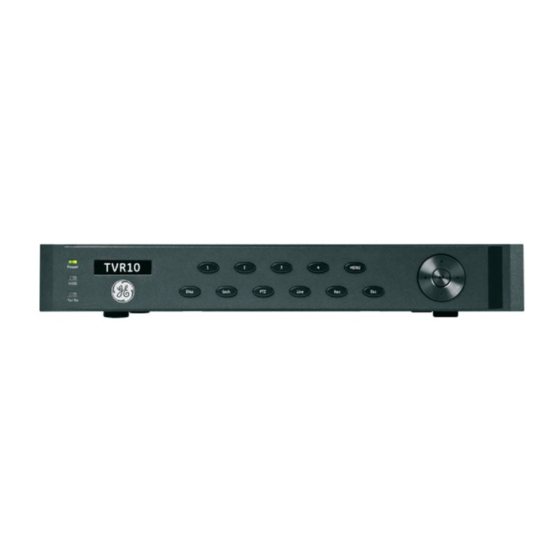
Blinking green: Network data is being transferred to SRCH Displays the Play Back screen for video or from the TVR 10. playback. Accesses the PTZ control mode. LIVE Displays Camera 1 in live mode. Displays the Manual Record screen. TruVision DVR 10 Quick Start Guide... - Page 3 This menu lets you carry out any TVR 10 operation. Connect the mouse using the USB port located at the back panel. Figure 3: Front panel Power TVR10 MENU Disp Srch Live Tx/Rx TruVision DVR 10 Quick Start Guide...
-
Page 4: Live Mode
Refer to the user manual for more information. default settings to suit your installation. You must be in live mode to access the main menu. To display the main menu, right-click the mouse, and then click Main Menu You can TruVision DVR 10 Quick Start Guide... -
Page 5: Logging On
Enter a user name and Dispose of the batteries as required by local ordinances password if required. or regulations. Wait 10 seconds then turn off the power switch located on the back of the unit. TruVision DVR 10 Quick Start Guide... -
Page 6: Tvr 10 Screen Map
TVR 10 screen map TruVision DVR 10 Quick Start Guide...