Table of Contents
Advertisement
Advertisement
Table of Contents

Related Manuals for Gravely 990018, 990020


Summary of Contents for Gravely 990018, 990020
- Page 1 Promaster 144Z / 148Z / 152Z / 160Z Owner/Operator Manual Models 992042 19HP-144Z 992043 21HP-148Z 992044 23HP-152Z 992051 23HP-160Z 992054 25HP-152Z 992055 25HP-160Z 992310 19HP-144Z 992311 21HP-148Z US Patent 6,301,864 ENGLISH FRANÇAIS ESPAÑOL 08498100C 2/03 Supercedes 08498100,A,B Printed in USA...
- Page 2 firmante - Undertegnede, - Undertecknaren av detta dokument, - Me, allekirjoittaneet, ARIENS COMPANY, declare that the Lawn Mower- certifie que la tondeuse à gazon - erklärt, dass der Rasenmäher - verklaart dat de maaitrekker - dichiara che il tosaerba - certifica que el cortacésped - erklærer, at græsslåmaskinen - erklærer at plenklipperen - intygar att gräsklipparen:...
- Page 3 Stated Sound Power Levels are established following Annex VIII “Full Quality Assurance” of directive 2000/14/EC. Les déclarations de niveau de puissance acoustique sont établies conformément à l’Article VIII « Assurance qualité totale » de la directive 2000/14/EC. Die angegebenen Geräuschpegel wurden gemäß Anhang VIII „Totales Qualitäts-Management“ der EU-Richtlinie 2000/14/EC.
-
Page 4: Controls And Features
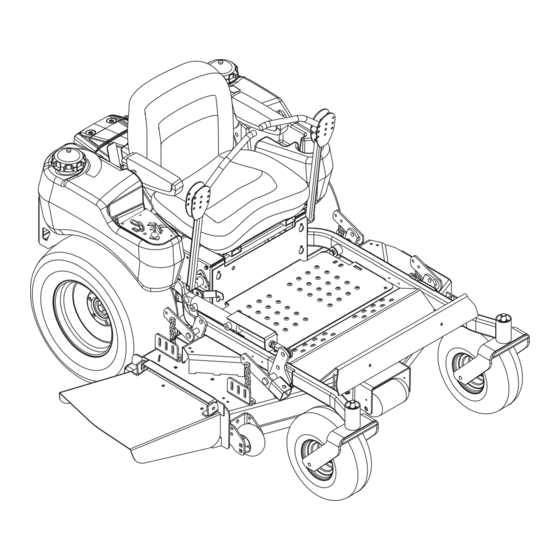
ENGLISH 1. Choke Control 2. Throttle Lever 3. Wing Knob 4. Hydraulic Oil Reservoir 5. Fuel Tanks and Caps 6. Steering Levers 7. Battery 8. Mower Lift Lever 9. Fuel Shut Off Valve 10. Mower Deck with Chute Deflector 11. Cylinder Stops 12. -
Page 5: Table Of Contents
Warranty ....... 26 INTRODUCTION PRODUCT REGISTRATION The Gravely dealer must register the product at the time of purchase. Registering the product will help the company process warranty claims or contact you with the latest service information. -
Page 6: Safety
(On). See Safety Interlock System on page 12. 3. Fill out Original Purchaser Registration Card and return the card to Gravely. 4. Explain Gravely Limited Warranty Policy. 5. Explain recommended lubrication and maintenance. Advise customer on adjustments. Instruct customer on controls and operation of unit. -
Page 7: Safety Decals And Locations
SAFETY DECALS AND LOCATIONS ALWAYS replace missing or damaged Safety Decals. Refer to Figure 3 for Safety Decal locations. • Avoid injury - Stay clear of rotating parts. • Risque de blessures - ne pas s’approcher des pièces en mouvement. •... -
Page 8: Hot Surfaces
Always stand clear of discharge area. Do not direct discharge toward other people. OL0910 Keep people away from unit while operating. OL3292 Shut off engine, remove key, read manual before you adjust or repair unit. OL4010 NO STEP! Always keep feet away from rotating parts. - Page 9 NEVER place your hands or any part of your body or clothing inside or near any moving part while unit is running. ALWAYS keep hands and feet away from all rotating parts during operation. Rotating parts can cut off body parts.
- Page 10 Fuel is highly flammable and its vapors are explosive. Handle with care. Use an approved fuel container. NO smoking, NO sparks, NO flames. ALWAYS allow engine to cool before servicing. NEVER fill fuel tank when engine is running or hot from operation.
-
Page 11: Assembly
WARNING: AVOID INJURY. Read and understand entire Safety section before proceeding. UNIT ASSEMBLY Package Contents: Unit, Mower Deck and Literature Pack Preparation Checklist Refer to the Owner/Operator manual as required. 1. Unpack Unit - Remove shrink wrap and packaging materials. 2. -
Page 12: Operation
Perform the following tests to ensure the safety interlock system is working properly. If the unit does not perform as stated, contact your Gravely dealer for repairs. NOTE: When the parking brake is engaged, the steering levers are locked in neutral. -
Page 13: Filling Fuel Tank
NOTE: The engine will not start unless the steering con- trol levers are in the neutral position, the PTO switch is in the “Off” position and parking brake is set. Mower Lift Lever Use the mower lift lever, located on the left side of tractor, to raise and lower the mower deck. -
Page 14: Stopping In An Emergency
STOPPING IN AN EMERGENCY The unit can be stopped immediately at any time by turning the ignition key to the "Off" position. STARTING AND SHUT OFF CAUTION: Read entire Owner/Operator Manual, Clutch Manual, and Engine Manual first. DO NOT attempt to start engine at this time. To start the engine: 1. -
Page 15: For Best Performance
FOR BEST PERFORMANCE Cut grass when it is dry. Keep mower blades sharp. Keep mower deck properly leveled. Adjust anti-scalp rollers to prevent scalping. Do not set height of cut too low. For very tall grass, mow twice. Do not travel too fast. WARNING: AVOID INJURY. -
Page 16: Service Position
Gravely Dealers will provide any service which may be required to keep your unit operating at peak efficiency. Should engine service be required, it can be obtained from a Gravely Dealer or the engine manufacturer’s authorized service center. WARNING: AVOID INJURY. Read and understand entire Safety section before proceeding. -
Page 17: Mower Blades
7. Add new oil to the oil tank. It will take about 4 quarts. Use Mobil 15W50 synthetic oil for best pump and wheel motor life. 8. Properly dispose of waste oil. MOWER BLADES Remove CAUTION: Use sturdy gloves or padding to protect hands when working with mower blades. -
Page 18: Lubricate Unit
3. Return seat to operating position. Clean Battery Keep battery and its terminals clean. Inspect every 100 operating hours or monthly for best performance. 1. Negative terminal 3. Battery 2. Positive terminal Figure 8 1. Remove battery from unit. See Remove Battery on page 17. -
Page 19: Steering Control Neutral Adjustment
STEERING CONTROL NEUTRAL ADJUSTMENT If the steering levers do not line up (match) or the unit has excessive creeping when the steering levers are in neutral, adjust as follows. Adjusting the Steering Levers to Line Up (Match) (Figure 10) 1. Shut OFF engine. Engage parking brake. Remove the ignition key. -
Page 20: Adjusting The Parking Brake
If tire pressure adjustment does not solve tracking problem, adjust the limiter bolts on the stop bracket (Figure 11). Front bolts adjust forward and rear bolts adjust reverse. Lengthen the limiter bolt (move closer to lever) on side which is too fast. 1. -
Page 21: Belt Access
4. Turn the return nuts clockwise to decrease the distance or counterclockwise to increase the distance until there is 1/16 to 1/8" (1.59 to 3.18 mm) between the return nuts and trunnion. 5. Tighten return nuts together. BELTS WARNING: MOVING PARTS can cut or amputate body parts. -
Page 22: Removing The Mower Deck
5. Remove old hydro pump belt from right hand hydrostat sheave first (Figure 16). 6. Install new hydro pump belt by positioning belt on sheaves. Put belt onto right hand hydrostat sheave last. 7. Replace clutch anchor. 8. Replace long mower belt on mower clutch sheave. See Replacing Mower Belts on page 21. -
Page 23: Short Term
4. Measure from bottom of mower blade end to ground. 5. Set hydraulic lift cylinder so cut of height reads the same as blade height measurement. 6. Loosen the locknuts on the side where the chains are slack and slide the bolt down the slot until the chain is tight. -
Page 24: Accessories
ACCESSORIES Part No. Description 78805300 44" Mulching Kit 78803400 48" Mulching Kit 78803500 52" Mulching Kit 79200300 60" Mulching Kit 78805400 44" Bahia/Tall Grass Baffle Kit 78803800 48" Bahia/Tall Grass Baffle Kit 78803900 52" Bahia/Tall Grass Baffle Kit 79201600 60" Bahia/Tall Grass Baffle Kit 79202800 44", 48", and 52"... -
Page 25: Specifications
Model Number 992042 Model 144Z Length – cm (in) Height – cm (in) Width – cm (in) 145 (57) Weight Actual – kg (lbs) 430 (946) Battery Brakes Turning Radius Tire SizeFront 15 x 6 - 6 Rear 23 x 9.5 - 12 Engine –... -
Page 26: Year Limited Warranty
• Four to twelve months - Prorated over 12 months Gravely may from time to time change the design of its products. Nothing contained in this warranty shall be construed as obligating Gravely to incorporate such design changes into previously manufactured products, nor shall such changes be construed as an admission that previous designs were defective. - Page 27 GRAVELY A Division of Ariens Company 655 West Ryan Street P.O. Box 157 Brillion, WI 54110-0157 920-756-2141 Fax 920-756-2407 www.gravely.com...
Need help?
Do you have a question about the 990018, 990020 and is the answer not in the manual?
Questions and answers