Table of Contents
Advertisement
Quick Links
Advertisement
Table of Contents

Related Manuals for Alcatel SpeedTouch 610


Summary of Contents for Alcatel SpeedTouch 610
- Page 1 SpeedTouch 610/610i/610s/610v Business DSL Router Orientation Guide SERIES...
- Page 3 SpeedTouch Orientation Guide 3EC 37770 AAAA TCZZA Ed. 02...
- Page 4 Status Released Change Note PeckelbeenS Short Title CD-UG ST610 R4.1 Copyright © 2002 THOMSON multimedia. All rights reserved. Passing on, and copying of this docu- ment, use and communication of its contents is not permitted without written authorization from THOMSON multimedia. The content of this document is furnished for informational use only, may be subject to change without notice, and should not be construed as a commit- ment by THOMSON multimedia.
-
Page 5: Table Of Contents
Contents 1 SpeedTouch™610 Installation ........3 1.1. Get Acquainted with the SpeedTouch™610 ............ 4 1.2. SpeedTouch™610 Wiring ................... 8 1.3. SpeedTouch™610 Configuration Setup ............11 1.3.1. Configuration Setup for MS Windows OSs ................12 1.3.2. Configuration Setup for other OSs .................... 16 1.4. - Page 6 4 Troubleshooting ............49 3EC 37770 AAAA TCZZA Ed. 02...
-
Page 7: Speedtouch™610 Installation
1 SpeedTouch™610 Installation 1 SpeedTouch™610 Installation Introduction Thank you for purchasing the SpeedTouch610 Business DSL router ! Specially designed for Small/Medium Enterprises (SMEs) and Small Office/Home Office (SOHO), the SpeedTouch610 Business Digital Subscriber Line (DSL) router offers plenty of capabilities. With an easy installation, embedded firewall, embedded IPSec based IP Virtual Private Networking (VPN) and remote management tools, the Speed- Touch610 is a highly secure device. -
Page 8: Get Acquainted With The Speedtouch™610
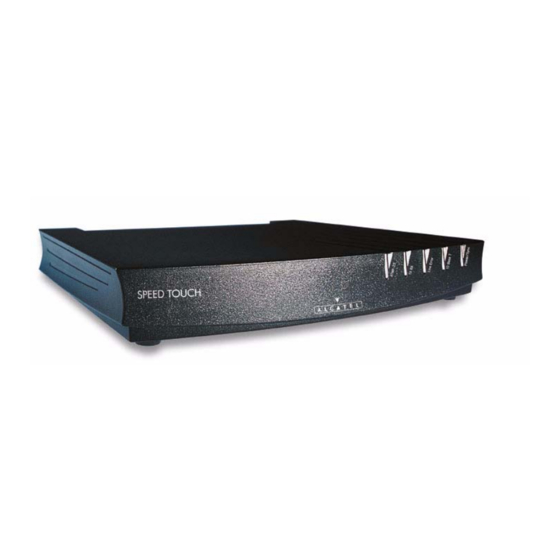
1 SpeedTouch™610 Installation 1.1. Get Acquainted with the SpeedTouch™610 Delivery check Check your SpeedTouch610 box for the following items: • The SpeedTouch 610/610i/610s/610v • One power adapter • One Cat.5 straight-through Ethernet cable (RJ45/RJ45) • One DSL cable (RJ11/RJ11, RJ14/RJ14) •... - Page 9 1 SpeedTouch™610 Installation Front and back panel The SpeedTouch610 is presented in a slimline housing: layout Depending on the SpeedTouch610 model you purchased, the device can be equipped with: • One single 10/100Base-T Half-/Full-duplex MDI-X Ethernet port (optionally with one 25.6Mb/s ATM-Forum port): Power Switch 25.6Mb/s Dip Switches...
- Page 10 1 SpeedTouch™610 Installation Front panel LEDs The SpeedTouch™610 is equipped with 5 LEDs on its front panel, indicating the state of the device during normal operation: Indicator Description Name Color State Green Flashing Ethernet LAN activity. No Ethernet LAN activity. Line TX Green Flashing...
- Page 11 1 SpeedTouch™610 Installation DSL variants Four DSL variants of the SpeedTouch610 Business DSL routers exist: • The SpeedTouch 610 : The ADSL/POTS variant connecting to an analog POTS(*) line • The SpeedTouch 610i : The ADSL/ISDN variant connecting to a digital ISDN(**) line ...
-
Page 12: Speedtouch™610 Wiring
1 SpeedTouch™610 Installation 1.2. SpeedTouch™610 Wiring Local network For Ethernet connectivity you need at least: • A computer with installed Ethernet Network Interface Card (NIC) • If needed, a hub or switch and the necessary connection cables. Ethernet Cables In the SpeedTouch610 box, a full wired Cat.5 straight-through RJ45/RJ45 Ethernet cable, further referred to as LAN cable is included. - Page 13 1 SpeedTouch™610 Installation Single PC wiring Once all connections are made the result should look similar as below. LAN wiring Using the SpeedTouch610 switch (if equipped) and/or an external hub you can connect multiple PCs to your SpeedTouch610: 3EC 37770 AAAA TCZZA Ed. 02...
- Page 14 1 SpeedTouch™610 Installation Powering Once all previous steps are completed, you can turn the SpeedTouch 610 on (I) with the power switch. POST phases As soon your SpeedTouch610 is turned on, you can check the “PWR/Alarm” LED to see how the Power On Self Test (POST) progresses. Phase “PWR/Alarm”...
-
Page 15: Speedtouch™610 Configuration Setup
1 SpeedTouch™610 Installation 1.3. SpeedTouch™610 Configuration Setup Internet connectivity As soon as the SpeedTouch610 is installed as described in section “1.2. SpeedTouch™610 Wiring” on page 8 the SpeedTouch610 can be prepared for Internet connectivity. The configuration of your SpeedTouch610 can be done semi-automatically via the SpeedTouch™... -
Page 16: Configuration Setup For Ms Windows Oss
1 SpeedTouch™610 Installation 1.3.1. Configuration Setup for MS Windows OSs Microsoft Windows One of the following OSs must be installed on your PC(s): • Microsoft Windows 95 • Microsoft Windows 98 or 98SE • Microsoft Windows ME • Microsoft Windows NT4.0 •... - Page 17 1 SpeedTouch™610 Installation Step Action The Welcome to the SpeedTouch™ Setup Wizard window pops up: Click Next to proceed. The Software License Agreement for SpeedTouch™ window pops up: Click Yes to accept the terms of the agreement and to continue with the Setup wizard.
- Page 18 1 SpeedTouch™610 Installation Step Action The setup wizard should find your SpeedTouch610 device on the local network. This is indicated by following window: If the wizard does not find a SpeedTouch610 on the network an error window pops up. In this case check that: •...
- Page 19 1 SpeedTouch™610 Installation Step Action The following window invites you to select the appropriate connection profile for your Internet connectivity: Select the connection profile and click Next to continue. Note: In case the Service Provider included a separate disk with a dedicated connection profile, click Have Disk to navigate to the location of the appro- priate connection profile file.
-
Page 20: Configuration Setup For Other Oss
1 SpeedTouch™610 Installation 1.3.2. Configuration Setup for other OSs Supported OSs As the SpeedTouch610 is OS independent, this configuration setup can be used by any computer system Note: In fact the following procedure may equally be used on MS Windows OSs for configuring the SpeedTouch™610. -
Page 21: Speedtouch™610 Internet Connectivity
1 SpeedTouch™610 Installation 1.4. SpeedTouch™610 Internet Connectivity Surfing the Internet As soon as the SpeedTouch610 and the computer(s) are configured as described in the previous section, you are able to establish connectivity to the Internet. Connection Services The SpeedTouch610 supports various scenarios to establish end-to-end connectivity and Packet Services with the BroadBand Remote Access Server (BBRAS) and the Internet. - Page 22 1 SpeedTouch™610 Installation Example: Using the Via the SpeedTouch610 web interface you are able to establish PPP (PPPoA or PPPoE) SpeedTouch™ PPP dial-in connections, configured by the SpeedTouch Setup wizard or by uploading the Dial-in appropriate configuration file. Note: The following provides only an example on how you can establish your Internet connection.
-
Page 23: The Speedtouch™610 Web Interface
2 The SpeedTouch™610 Web Interface 2 The SpeedTouch™610 Web Interface Introduction The SpeedTouch™610 comes with integrated local configuration capabilities. The local configuration via the SpeedTouch™610 web interface, is based on the HTTP server/Web browser concept. It allows configuration of your SpeedTouch™610 via a Web browser through HTML pages from any local PC attached to the Ethernet interface(s). -
Page 24: General Principles
2 The SpeedTouch™610 Web Interface 2.1. General Principles Procedure Step Action Start the web browser on your PC or computer. Contact the SpeedTouch™610 by entering its IP address (in most cases 10.0.0.138) in the URL field. If a system password was set an authentication window will pop up. Enter a user name and the system password in the appropriate fields. - Page 25 2 The SpeedTouch™610 Web Interface Topic links On each of the SpeedTouch™610 web pages the Tasks Menu offers you the following Configuration Places: Quick, IP Router, Connections, LAN Services, System Config, and Advanced. Each of these offers you a set of specific links, leading you to a configuration aspect of the SpeedTouch™610.
- Page 26 2 The SpeedTouch™610 Web Interface Click ... To ... “ Add-On” Manage software keys. “ SNTP” Overview/configure SNTP services. “ Syslog” Overview/configure Syslog services. “2.7. Advanced Tasks Links” “ CLI” Open the web based Command Line Interface. Saving The Save All link on the tasks menu allows you to save the SpeedTouch™610 settings to SpeedTouch™610 memory.
-
Page 27: Quick Tasks Links
2 The SpeedTouch™610 Web Interface 2.2. Quick Tasks Links Dial-in Clicking this button pops up the PPP Dial-in Connections page. This page allows to: • Establish dial-in connections, if applicable: See section “1.4. SpeedTouch™610 Internet Connectivity” on page 17 for more infor- mation on how to use the Dial-in Connections table. - Page 28 2 The SpeedTouch™610 Web Interface System Setup Clicking this button pops up the System Setup page. This page allows to: • Configure a System password to restrict access to the SpeedTouch™610: It is highly advised to configure a System password. To protect the Speed- Touch™610 you should change the System password on a regular basis.
- Page 29 2 The SpeedTouch™610 Web Interface Syslog Clicking this button pops up the Syslog page. This page allows to: • Overview the syslog messages generated by the SpeedTouch™610: This page is every 30 seconds refreshed. Via the CLI you can configure additional syslog events to be notified by syslog messages in addition to the standard set of syslog events.
-
Page 30: Ip Router Tasks Links
2 The SpeedTouch™610 Web Interface 2.3. IP Router Tasks Links Static Routing Clicking this button pops up the IP Address- and Routing Tables page. This page allows to: • Overview or add/delete specific IP address entries for the SpeedTouch™610 interfaces: You can add a static IP address for one of SpeedTouch™610's interfaces by clicking New. - Page 31 2 The SpeedTouch™610 Web Interface For more information, see the application note “SpeedTouch™610 LAN Management”. Clicking this button pops up the Routing Information Protocol (RIP) page. This page allows to: • Overview or configure the SpeedTouch™610's general RIP configuration: Via the RIP Settings tab you can enable/disable the master RIP daemon and specify which RIP version should be used.
- Page 32 2 The SpeedTouch™610 Web Interface • Define one or more RIP neighbors in case multicast messages can not be sent or received among the network Do not forget to save your changes to persistent memory by clicking Save All. For more information, see the application note “SpeedTouch™610 LAN Management”. NAPT Clicking this button pops up the Network Address and Port Translation (NAPT) page.
- Page 33 2 The SpeedTouch™610 Web Interface IPSec/VPN To use the IP Security and IPSec enabled VPN features of the SpeedTouch™610, the IPSec VPN software key must be installed. See the topic Add-On in the System Config configuration place for more information, or check the application note “Speed- Touch™610 Operation and Maintenance”.
- Page 34 2 The SpeedTouch™610 Web Interface • In case certificates are used for authentication, overview/configure the certificate configuration: The certificate configuration window contains four tabs, to overview/configure: • The Secure Storage • Off-line Request-Import • Certificate Revocation List (CRL) • Certificate Enrollment Protocol (CEP) Following dynamic key distributions are supported: •...
-
Page 35: Connection Tasks Links
2 The SpeedTouch™610 Web Interface 2.4. Connection Tasks Links Phonebook Clicking this link pops up the Phonebook page. This page allows to: • Overview or add/delete ATM Virtual Channels (VCs), that are used for end-to-end connectivity over the DSL line via the Ethernet interface(s): •... - Page 36 2 The SpeedTouch™610 Web Interface Clicking this button pops up the Routed Point-to-Point Protocol (PPP) page. This page is used to configure both the SpeedTouch™610 Routed PPP over ATM (PPPoA) and Routed PPP over Ethernet (PPPoE) Packet Services. This page allows to: •...
- Page 37 2 The SpeedTouch™610 Web Interface • Overview some statistics in case of a running session: For more information, see the application notes “The SpeedTouch™ Routed PPPoA Packet Service” and “The SpeedTouch™ Routed PPPoE Packet Service”. Clicking this button pops up the Routed Ethernet page. Routed Ethernet is often referred to as MAC Encapsulated Routing or MER.
- Page 38 2 The SpeedTouch™610 Web Interface IPoA Clicking this button pops up the Routed IP over ATM (IPoA) page. This page allows to: • Overview/configure the SpeedTouch™610 Routed IPoA connection entries: For more information, see the application note “The SpeedTouch™ Routed IPoA Packet Service”.
- Page 39 2 The SpeedTouch™610 Web Interface Bridging Clicking this button pops up the Bridged Ethernet page. Bridged Ethernet is commonly known as IEEE802.1D Transparent Bridging or RFC1483/Bridged. The Bridged Ethernet Packet Service is also used for the Bridged PPP over Ethernet (PPPoE) Packet Service.
-
Page 40: Lan Services Tasks Links
2 The SpeedTouch™610 Web Interface 2.5. LAN Services Tasks Links DHCP Clicking this button pops up the Dynamic Host Configuration Protocol (DHCP) page. This page allows to: • Enable/disable the SpeedTouch™610 (Auto)DHCP server: The SpeedTouch™610 features a DHCP server which allows the PCs/computers on your local network to automatically obtain an IP address (select DHCP Server). - Page 41 2 The SpeedTouch™610 Web Interface • Overview the current leases the SpeedTouch™610 DHCP server supplied to DHCP clients: Via this table you can also manually add static DHCP leases for specific hosts, if applicable. • Overview the current SpeedTouch™610 DHCP client status : Via this table you can also manually add static SpeedTouch™610 DHCP client entries for specific interfaces, if applicable.
- Page 42 2 The SpeedTouch™610 Web Interface • Overview the current SpeedTouch™610 DNS server hostname leases: Via this table you can also add static DNS hostname entries. This may be useful for devices which do not support DNS, e.g. a printer. By adding a name for your network printer, identified by its IP address, you will be able to contact this printer by name rather than by IP address.
-
Page 43: System Config Tasks Links
2 The SpeedTouch™610 Web Interface 2.6. System Config Tasks Links Initial Setup Clicking this button pops up the Initial Setup page. This page allows to: • Configure a user defined IP address and (sub)netmask for the SpeedTouch™610. Enter the IP address and (sub)netmask in the appropriate fields. Click Apply to apply the changes. - Page 44 2 The SpeedTouch™610 Web Interface Step Action Click Upload. As a result the SpeedTouch™610 upgrade system software name will appear in the 'Passive software version' field. Note: Uploading software may take up to four minutes to complete. Click Switch Over. As a result the SpeedTouch™610 will switch the two system software versions, will reboot and come online with the upgrade system software.
- Page 45 2 The SpeedTouch™610 Web Interface Add-On Clicking this button pops up the Software Activation Key page. To use the IP Security and IPSec enabled VPN features of the SpeedTouch™610, the IPSec VPN software key must be installed. This page allows to: •...
- Page 46 2 The SpeedTouch™610 Web Interface SNTP Clicking this button pops up the Simple Network Time Protocol (SNTP) page. This page allows to: • Configure an NTP server on the Internet to which the SpeedTouch™610 is able to synchronize its internal clock: You can check on the Internet for available NTP time servers.
-
Page 47: Advanced Tasks Links
2 The SpeedTouch™610 Web Interface 2.7. Advanced Tasks Links Clicking this button pops up a new web browser page with the SpeedTouch™610 Web based Command Line Interface (CLI): The CLI is meant for in depth configuration of the SpeedTouch™610, giving full control on all configurational aspects of the device. - Page 48 2 The SpeedTouch™610 Web Interface 3EC 37770 AAAA TCZZA Ed. 02...
-
Page 49: Speedtouch™610 Advanced Concepts
3 SpeedTouch™610 Advanced Concepts 3 SpeedTouch™610 Advanced Concepts Introduction This chapter is intended to introduce some advanced features the SpeedTouch™610 supports. Overview The following concepts will be briefly described: • Native CLI access • SNMP. 3EC 37770 AAAA TCZZA Ed. 02... -
Page 50: Native Command Line Interface Access
3 SpeedTouch™610 Advanced Concepts 3.1. Native Command Line Interface Access Accessing the The SpeedTouch™610 provides two methods for accessing its Command Line Inter- Command Line face: Interface • Via a TCP/IP Telnet session • Via the serial “Console” interface. Note: For both access methods, authentication is required in case the Speed- Touch™610 is protected by a system password. - Page 51 3 SpeedTouch™610 Advanced Concepts Semi-graphical CLI To use the semi-graphical Command Line Interface, execute 'menu' from the prompt: The semi-graphical CLI offers you an attractive and easy-to-use configuration environ- ment for the CLI. You can browse through the CLI command groups via the arrow keys. Pressing Enter executes your selection.
-
Page 52: Simple Network Management Protocol
3 SpeedTouch™610 Advanced Concepts 3.2. Simple Network Management Protocol Introduction The Simple Network Management Protocol (SNMP) is a standard way to retrieve counters, status variables and other diagnostic information of the SpeedTouch™610. SpeedTouch™610 In the following topics, a short description of the MIBs that are most important to and MIBs specific for the SpeedTouch™610 is provided. -
Page 53: Troubleshooting
4 Troubleshooting 4 Troubleshooting Introduction This appendix provides information on how to identify and correct some common problems you may encounter when using and configuring the SpeedTouch™610. If the following troubleshooting tips have not resolved the problem contact the company from which you purchased the SpeedTouch™610 for assistance. Configuration problems In case you encounter DSL connectivity problems due to misconfiguration you might consider a hardware reset to factory defaults as described in this appendix. - Page 54 4 Troubleshooting Problem Solution No Line synchronization achieved. Make sure DSL service (ADSL, SHDSL or Line Sync LED keeps flashing VDSL) is enabled on the wall outlet your SpeedTouch™ is connected to. Make sure the correct SpeedTouch™ variant is used for your DSL service (ADSL, SHDSL or VDSL).
Need help?
Do you have a question about the SpeedTouch 610 and is the answer not in the manual?
Questions and answers