Table of Contents
Advertisement
Quick Links
Advertisement
Table of Contents

Subscribe to Our Youtube Channel
Related Manuals for Doro 514C


Summary of Contents for Doro 514C
- Page 1 514c...
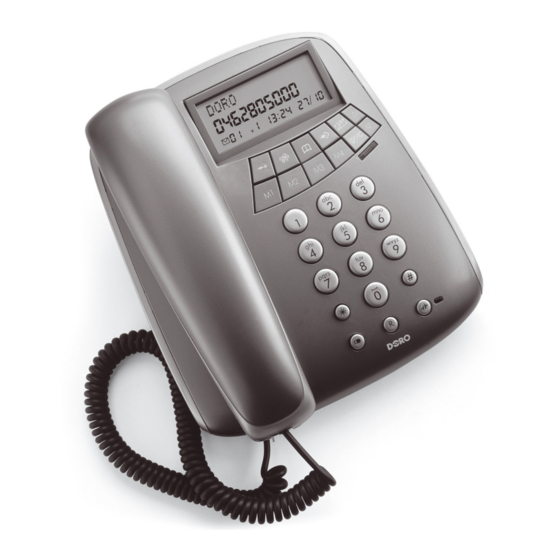
- Page 2 4 5 6 7 English 1 Hanging Peg for Handset 9 Call number 2 Handset Volume Control 10 Scrolling buttons 3 Mute 11 Confirm/delete 4 Memory button 12 Ringer Indicator 5 Caller ID 13 Speed dial buttons M1 - M4 6 Phonebook 14 Hold button and LED 7 New number indicator 15 Redial function 8 Store button...
-
Page 3: Making A Call
English Connection/Basic setting 1. Connect the curly cord to the handset and to the socket marked on the telephone. 2. Replace the handset. 3. Connect the batteries (see below). 4. The display flashes ENGLISH. If not, hold the button down for around 4 seconds. 5. Scroll to the desired language using . Press 6. Scroll to the desired contrast setting (2=normal) using . Press 7. Scroll to the desired hour (���24) using Scroll to the desired hour (���24) using . Press 8. Scroll to the desired minute using . Press 9. Scroll to the desired day using . Press 10. Scroll to the desired month using . Press 11. Connect the telephone cord to the network wall socket and to the socket marked on the telephone. -
Page 4: Redial Function
English Redial function If the number dialled is engaged or if you wish to redial the last number dialled, lift the handset and press the redial button Volume control The handset earpiece volume may be adjusted during a call using . Ring signal There is a ringer properties switch underneath the telephone: Ring volume Ring melody Ringer tone On Hold Press to place a call on hold. The call can be resumed by lifting the handset on any parallel connected telephone on the same line. Phonebook Use the Phonebook to store names and telephone numbers. A stored phone number can be dialled using fewer keystrokes than if dialled manually. If you subscribe to a Caller ID service, the name/number of the caller will be shown when you receive an incoming call (for those numbers stored in the Phonebook or the memories). The Phonebook will store 32 sets of names and phone numbers. Entries in the Phonebook are arranged alphabetically. Each name can be up to 16 characters in length, and telephone numbers can be up to 22 digits in length. Storing names/numbers 1. Press 2. Press 3. Press again. 4. Enter the phone number to be stored (up to 22 digits). Press 5. Enter name. Press the corresponding number key one or more times for the first letter. Press Press if you want a break in the telephone number. - Page 5 English Dialling from the Phonebook 1. Press 2. Scroll through the entries using . It is also possible to quick�search in the Phonebook by pressing the corresponding number key one or more times for the first letter. 3. Press and lift the handset to dial the number, or just wait to return to standby mode. Changing phone numbers/names 1. Press 2. Scroll to desired entry as above. 3. Press and hold until the display shows CHANGE? Press 4. Correct/change the number using and . Press 5. Correct/change the name. Press Deleting a Phonebook entry 1. Press 2. Scroll to desired entry as above. 3. Press : DELETE ? is displayed. 4. Hold down until the number disappears. Deleting all entries in the Phonebook 1. Press 2. Scroll to any entry as above. 3. Press and hold until the display shows DELETE ALL LIST? 4. Hold...
- Page 6 English Memory The telephone has 4 one�touch memories and 1� two�touch memories for frequently dialled telephone numbers. When a number is stored in memory, you need only press one or two buttons dependent on location to make a call. The one�touch memories are numbered M1�M4, two�touch memories are stored using the telephone keypad digits ��9. Storing One-Touch Memories 1. Press 2. Enter the phone number to be stored (up to 22 digits). Press 3. Enter name. Press the corresponding number key one or more times for the first letter. Press 4. Select memory location (M1�M4) by pressing the corresponding button. Dialling using One-Touch Memories 1. Pick up the receiver and wait for a dialling tone. 2. Select the desired memory location (M1�M4) by pressing the corresponding button. Storing speed dial memory locations 1. Press 2. Enter the phone number to be stored (up to 22 digits). Press 3. Enter name. Press the corresponding number key one or more times for the first letter. Press 4. Select a memory location by pressing one of the keypad numbers � Dialling using speed dial memories 1. Pick up the receiver and wait for a dialling tone. 2. Press 3. Select the number by pressing the relevant keypad number �...
- Page 7 English Caller ID Caller ID allows you to see who is calling before you answer a call or to see who has called in your absence. If the number is stored in the Phonebook, the name is shown instead. Received calls are stored chronologically. The sequence number is shown in the top right�hand side of the display. When the memory is full, the oldest number will be deleted automatically as the new call is logged. New calls are indicated in standby mode in plain text and by the red indicator flashing. Please note! You must subscribe to this service from your network operator in order for this feature to function. Retrieving and dialling incoming numbers 1. Press and to scroll through phone numbers of call received. 2. Press and lift the handset to dial the number, or just wait to return to standby mode. Messages Apart from phone numbers, the display can show: EXTERNAL CALL It is an International call or a call from a PBX (no information received). UNKNOWN The call comes from a blocked number or a PBX.
-
Page 8: Troubleshooting
� It may not be possible to receive Caller ID information if the phone is connected to a PBX system. If the telephone still does not work, contact the place of purchase. Don’t forget the receipt or a copy of the invoice. Guarantee This product is guaranteed for a period of 12 months from the date of purchase. Proof of purchase is required for any service or support required during the guarantee period. This guarantee shall not apply to a fault caused by an accident or a similar incident or damage, liquid ingress, negligence, abnormal usage, not reasonably maintained or any other circumstances on the purchaser’s part. Furthermore, this guarantee shall not apply to a fault caused by a thunderstorm or any other voltage fluctuations. This guarantee does not in any way affect your statutory rights. (As a matter of precaution, we recommend disconnecting the telephone during a thunderstorm.) Declaration of conformity Doro hereby declares that the Doro 514c conforms to the essential requirements and other relevant regulations contained in the Directives 1999/5/EC and 2��2/95/EC. A copy of the manufacturer’s declaration is available at www.doro.com/dofc If you cannot resolve the fault using the faultfinder section, technical support is available by �email on tech@doro�uk.com -premium rate telephone number: 0905 895 0854, calls cost 50 pence per minute (prices correct at the time of publication). You can also contact us in writing (regarding any Spares or Technical query): Customer Services Doro UK Ltd 1 High Street Chalfont St Peter Buckinghamshire SL9 9QE. -
Page 9: Wall Mounting
English Wall mounting The telephone can be wall mounted. Use two vertically mounted screws, 1�� mm apart. The screws should then fit into the two ‘keyholes’ on the back of the telephone. - Page 12 English Version 1.1...
Need help?
Do you have a question about the 514C and is the answer not in the manual?
Questions and answers