
Related Manuals for AEG Electrolux 78001KF-MN


Summary of Contents for AEG Electrolux 78001KF-MN
- Page 1 78001KF-MN Induktions-Glaskeramik-Kochfeld Ceramic glass induction hob Glaskeramische inductie-kookplaat Montage- und Gebrauchsanweisung Installation and Operating Instructions Montage- en gebruiksaanwijzing...
-
Page 2: Dear Customer
Dear Customer, Please read these user instructions carefully and keep them to refer to later. Please pass the user instructions on to any future owner of the appli- ance. The following symbols are used in the text: Safety instructions Warning! Information that affects your personal safety. Important! Information that prevents damage to the appliance. -
Page 3: Table Of Contents
Contents Operating Instructions ........36 Safety instructions. -
Page 4: Operating Instructions
Operating Instructions 1 Safety instructions Please comply with these instructions. If you do not, any damage re- sulting is not covered by the warranty. This appliance conforms with the following EU Directives: – 73/23/EEC dated 19.02.1973 Low Voltage Directive – 89/336/EEC dated 03.05.1989 EMC Directive inclusive of Amending Directive 92/31/EEC –... -
Page 5: Safety During Use
Safety during use • Remove stickers and film from the glass ceramic. • There is the risk of burns from the appliance if used carelessly. • Cables from electrical appliances must not touch the hot surface of the appliance or hot cookware. •... -
Page 6: Description Of The Appliance
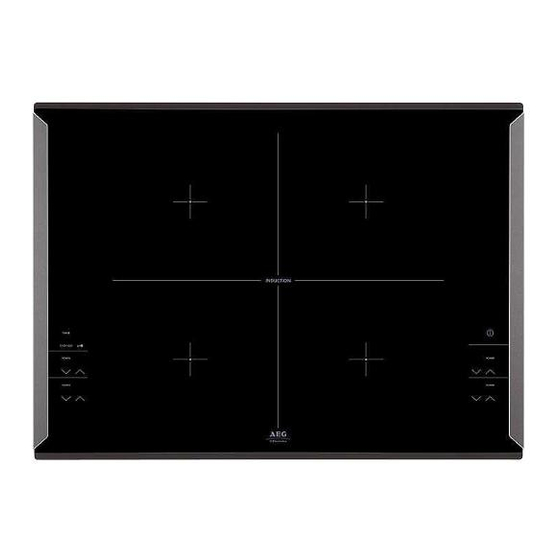
Description of the Appliance Cooking surface layout Induction cooking zone 2300W Induction cooking zone 2300W with power function 3200W with power function 3200W Control panel Control panel Induction cooking zone 2300W Induction cooking zone 2300W with power function 3200W with power function 3200W The cooking surface is divided into four cooking zones. -
Page 7: Control Panel Layout
Control panel layout Cooking zone indicators Timer function On/Off Timer with power indicator Timer display STOP+GO Power function Lock Heat setting selection Power function Display Touch Control sensor fields The appliance is operated using Touch Control sensor fields. Functions are controlled by touching sensor fields and confirmed by displays and acoustic signals. -
Page 8: Displays
Displays Display Description ¾ Cooking zone is switched off Keep warm setting Keep warm setting/STOP+GO function is set ¿ Ç Heat settings Heat setting is set Heating setting plus Intermediate heat setting is set decimal point Automatic warm up Automatic warm-up function is function activated Fault... -
Page 9: Operating The Appliance
Operating the appliance Use the induction cooking zones with suitable cookware. Switching the appliance on and off Control panel Display Pilot light ¾ Switch on Touch for 2 seconds lights up Switch off Touch for 1 second / none goes out After switching on, within approx. -
Page 10: Switching The Stop+Go Function On And Off
Switching the STOP+GO function on and off The STOP+GO function simultaneously switches all cooking zones that are switched on to the keep warm setting and then back to the heat setting that was previously set. This function can be used to briefly in- terrupt and then continue the cooking process e.g. -
Page 11: Locking/Unlocking The Control Panel
Heat Length of the Intermediate Length of the setting automatic warm up heat automatic warm up [min:sec] setting [min:sec] 0:10 0:10 0:10 1:20 3:10 4:20 5:50 8:10 10:10 10:30 2:00 2:00 2:30 2:50 Locking/unlocking the control panel The control panel, with the exception of the “On/Off” sensor field, can be locked at any time in order to prevent the settings being changed e.g. -
Page 12: Using The Child Safety Device
Using the child safety device The child safety device prevents unintentional use of the appliance. Setting the child safety device Step Control panel Display/Signal ¾ Switch on the appliance (Do not set a heat setting) Touch until the signal sounds Acoustic signal Touch Appliance switches off. -
Page 13: Switching The Power Function On And Off
Switching the power function on and off The power function makes more power available to the induction cooking zones, e.g. to bring a large quantity of water to the boil quick- The power function is activated for 10 minutes. After that the induc- tion cooking zone automatically switches back to heat setting 9. -
Page 14: Using The Timer
Using the timer All cooking zones can use each use one of the two timer functions at the same time. Function Condition Outcome after the time has elapsed Automatic cut-out a heat setting is set acoustic signal flashes Cooking zone switches off Countdown timer cooking zones not in use... -
Page 15: Setting The Time
If the pilot light is flashing more slowly, the heat setting indicator ap- pears again and the heat setting can be re-set or modified. If other timer functions are set, after a few seconds the shortest re- maining time of all the timer functions is displayed and the corre- sponding pilot light flashes. -
Page 16: Cooking Over Two Cooking Zones
Changing the time Step Control panel field Display Select cooking Pilot light of the cooking zone select- zone ed flashes faster The time remaining is displayed 01 to 99 minutes Touch the cooking zone se- lected After a few seconds the pilot light flashes more slowly. The time is set. -
Page 17: Safety Cut-Out
Safety cut-out Cooking surface • If after switching on the cooking surface, a heat setting is not set for a cooking zone within approx. 10 seconds, the cooking surface auto- matically switches itself off. • If one or more sensor fields are covered by objects (a pan, cloths, etc.) for longer than approx. -
Page 18: Tips On Cooking And Frying
Tips on Cooking and Frying Information on acrylamides According to the latest scientific knowledge, intensive browning of food, especially in products containing starch, can constitute a health risk due to acrylamides. Therefore we recommend cooking at the lowest possible temperatures and not browning foods too much. Cookware for induction cooking zones Cookware material Cookware material... -
Page 19: Tips On Energy Saving
Tips on energy saving Place cookware on the cooking zone before it is switched on. If possible, always place a lid on the cookware. Examples of cooking applications The information given in the following table is for guidance only. Heat Cooking- Cooking set-... - Page 20 Heat Cooking- Cooking set- suitable for Tips/Hints process time ting Hash browns, loin steaks, Heavy 5-15 mins. Turn halfway through steaks, Flädle (pancakes Frying per pan cooking for garnishing soup) Boiling Searing Boiling large quantities of water, cooking pasta, searing meat Deep (goulash, pot roast), deep frying chips frying...
-
Page 21: Cleaning And Care
Cleaning and Care Take care! Risk of burns from residual heat. Warning! Sharp objects and abrasive cleaning materials will damage the appliance. Clean with water and washing up liquid. Warning! Residues from cleaning agents will damage the appliance. Remove residues with water and washing up liquid. Cleaning the appliance after each use 1. -
Page 22: What To Do If
What to do if … Problem Possible cause Remedy The appliance cannot be More than 10 seconds have Switch the appliance on switched on or is not oper- passed since the appliance again. ating was switched on The lock is switched on Switch off the lock (See the section “Locking/un- locking the control panel”) - Page 23 Problem Possible cause Remedy Acoustic signal sounds and The On/Off sensor field has Do not place any objects appliance switches itself on been covered up, e.g. by a on the control panel and then off again; after 5 cloth seconds another acoustic signal sounds Display changes between Power Management is re-...
-
Page 24: Disposal
If the appliance has been wrongly operated, the visit from the customer service technician or dealer may not take place free of charge, even during the warranty period. Disposal Packaging material The packaging materials are environmentally friendly and can be recy- cled. -
Page 25: Installation Instructions
Installation Instructions Safety instructions The laws, ordinances, directives and standards in force in the country of use are to be followed (safety regulations, proper recycling in accord- ance with the regulations, etc.) Installation may only be carried out by a qualified electrician. The minimum distances to other appliances and units are to be ob- served. - Page 26 A device must be provided in the electrical installation which allows the appliance to be disconnected from the mains at all poles with a contact opening width of at least 3 mm. Suitable isolation devices include line protecting cut-outs, fuses (screw type fuses are to be removed from the holder), earth leakage trips and contactors.
-
Page 27: Guarantee Conditions
Guarantee Conditions Belgium DECLARATION OF GUARANTEE TERMS. Our appliances are produced with the greatest of care. However, a defect may still occur. Our con- sumer services department will repair this upon request, either during or after the guarantee peri- od. The service life of the appliance will not, however, be reduced as a result. This declaration of guarantee terms is based on European Union Directive 99/44/EC and the provi- sions of the Civil Code. - Page 28 In diesen Ländern gelten die Garantiebedingungen der örtlichen Part- ner. Diese können dort eingesehen werden. Further after-sales service agencies overseas In these countries our AEG-Electrolux agents’ own guarantee conditi- ons are applicable. Please obtain further details direct. Autres agences étrangères assurant le service après-vente Dans ces pays, les conditions de garantie des concessionnaires de la ré-...
-
Page 29: Customer Service Centres
Fax: 905 829 3985 Tel.: 25355 Tel.: 2024181719 Australia Korea (South) Namibia The Andi-Co Group Core Incorp. AEG NAMIBIA (PTY) 1 Stamford Road 3/F Chewoo Bldg. LIMITED-Jeppe Street Oakleigh VIC 3166 200 Nonhyun-Dong Northern Industrial Area Tel.: (03) 9569 1255... - Page 30 143-006 Tokyo Tel.: 0120-13-7117 Fax: 03-3790-5257 Thailand Slovakia Rep. South Africa Olympia Thai Tower, 444 Electrolux Slovakia S.R.O. AEG (Pty) Ltd. Rachadapiser Road Seberiniho 1 55, 12th Road Samsennok- Huaykwang 821 03 Bratislava P.O. Box 1 02 64 10320 Bangkok Tel.: 02 4333 4322, 4355...
-
Page 31: Service
Service In the event of technical faults, please first check whether you can remedy the problem yourself with the help of the operating instruc- tions (section “What to do if…”). If you were not able to remedy the problem yourself, please contact the Customer Care Department or one of our service partners. -
Page 32: Montage
Montage... - Page 35 Typenschild / Rating Plate / Typeplaatje 78001KF-MN 949 592 498 55GDDD4AG 230 V 50 Hz induction 7,4 kW 7,4 kW AEG-ELECTROLUX...
- Page 37 USD 14 billion in more than 150 countries around the world. AEG Hausgeräte GmbH Postfach 1036 D-90327 Nürnberg http://www.aeg-electrolux.de © Copyright by AEG Änderungen vorbehalten Subject to change without notice 822 925 523-B-180106-02 Wijzigingen voorbehouden...