Table of Contents
Advertisement
Advertisement
Table of Contents

Related Manuals for GMC DP21


Summary of Contents for GMC DP21
- Page 1 250W 5 SPEED DRILL PRESS INSTRUCTION MANUAL...
-
Page 2: Table Of Contents
Contents Warranty Introduction Environmental protection Description of symbols Specifications Safety instructions Additional safety rules for drill presses Know your product Accessories Unpacking Assembly Adjusting the table height Adjusting the table angle Installing and removing drill bits Setting the drilling depth... -
Page 3: Introduction
Introduction Your new GMC power tool will more than satisfy your expectations. It has been manufactured under stringent GMC Quality Standards to meet superior performance criteria. You will find your new tool easy and safe to operate, and, with proper care, it will give you many years of dependable service. -
Page 4: Safety Instructions
Safety Instructions WARNING. Read all instructions. Failure to follow all instructions listed below may result in electric shock, fire and/or serious personal injury. The term “power tool” in all of the warnings listed below refers to your mains- operated (corded) power tool or battery-operated (cordless) power tool. -
Page 5: Additional Safety Rules For Drill Presses
When a tool ear protectors, especially during extended periods of operation. 4. Do not try to drill material too small to be securely held. Do not drill material that does not have a flat surface unless it is clamped securely. - Page 6 18. Never turn your drill press on before clearing the table of all objects (tools, scraps of wood etc.) 19. Before starting the operation, jog the motor switch to make sure the drill bit does not wobble or vibrate.
-
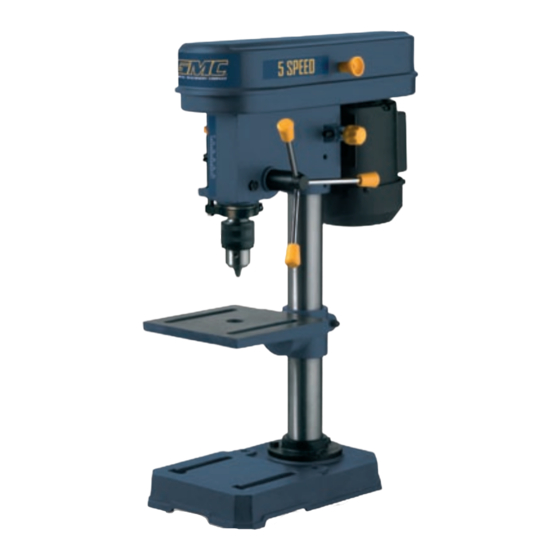
Page 7: Know Your Product
Know your product Before using the drill press, familiarise yourself with all the operating features and safety requirements. Use the tool only for the applications intended. All other applications are expressly ruled out. 1. Pulley cover 2. Belt tension lock knob 3. -
Page 8: Accessories
4mm hex key (supplied) • Wrench (not supplied) • Phillips head screwdriver (not supplied) Assembly time The DP2 drill press will take approximately 15 minutes to assemble. IMPORTANT. If any parts are missing , please contact the place of purchase. DO NOT attempt to operate the machine until the missing parts are available. - Page 9 Lift the head assembly (13) and slide it onto the column assembly (5) as far as possible. Align the head assembly with the table assembly (10) and base (8). Using the hex key (18) tighten the head lock set screw (3) into the head assembly. This will secure the head onto the column.
-
Page 10: Adjusting The Table Height
Adjusting the table angle CAUTION. Always ensure that the drill press is switched off and the plug is removed from the power point before making any adjustments. Loosen the screw under the table by rotating it in an anti- clockwise direction. -
Page 11: Installing And Removing Drill Bits
Rotate the feed wheel (4) to the desired depth on the depth scale (12). Ensuring the drill bit is tight in the chuck use the feed wheel to lower the spindle until the drill bit just touches the work piece. -
Page 12: Turning On And Off
Note. The belt should push down no more than 13mm. To select a faster drill speed, move the belt up to a higher step on the front and central pulleys and lower step on the central and rear pulleys. Rotating the pulleys and “rolling”... -
Page 13: Maintenance And Repair
- Produce off-centre or irregular shaped holes • When drilling large holes in metal it is recommended to drill with a small bit at first, then finish with a larger bit. Also, lubricate the bit with oil to improve drilling action and increase bit life. - Page 16 GMC customer assist If your product needs repairing or you simply need help or advice, please contact us on our Customer Assist Line 1300 880 001 (Australia) or 0800 445 721 (New Zealand). For prompt service we suggest you log your service request online at www.gmcservice.com.au.