
Subscribe to Our Youtube Channel
Related Manuals for Tempest POWER BLOWER


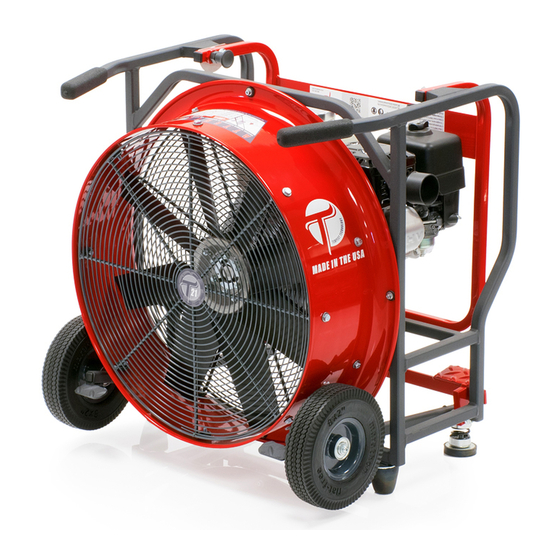
Summary of Contents for Tempest POWER BLOWER
- Page 1 POWER BLOWER OPERATIONS MANUAL APRIL 2007 Tempest Technology, Inc. 4708 N. Blythe Ave Fresno, CA 93722 800-346-2143 www.tempest-edge.com...
- Page 2 TEMPEST began business as a manufacturer of gasoline and electric powered blowers for the fire service, whose departments use the ®TEMPEST POWER BLOWER to provide “Positive Pressure Ventilation”(PPV) to remove heat, gases and smoke from the interior of a burning structure.
-
Page 3: About This Manual
About This Manual This manual is produced solely for the use of purchasers and operators of ®TEMPEST TECHNOLOGY CORPORATION equipment. Any reproduction, retransmission, or other use of the contents of this manual without written consent of ®TEMPEST TECHNOLOGY CORPORATION is strictly prohibited. -
Page 4: Table Of Contents
Table of Contents SAFETY PAGE Safety Guide GENERAL INFORMATION Blower Identification Warranty Card Power Blower Data Power Blower Information OPERATION Operating Procedures Pre-Operation Fuel, and Fuel Tank Capacities Operation Set-Up, Starting and Stopping Instructions MAINTENANCE Maintenance Procedures Oil Change Air Cleaner and Elements... - Page 5 PPV Set-up Procedures Single Blower Placement Multiple Blower Placement Exhaust Opening Weather Effects on PPV TROUBLESHOOTING Blower Troubleshooting Blower Fails To Start Poor Blower Performance Blower Movement PART NUMBERS Honda Belt Drive Blowers Honda Direct Drive Blowers Tecumseh Belt Drive Blowers Tecumseh Direct Drive Blowers Briggs &...
-
Page 6: Safety Guide
1. Carefully read this Operation and Maintenance Manual before attempting to operate, service or disassemble any part of your ®TEMPEST POWER BLOWER. 2. Never operate the unit when mentally or physically fatigued. - Page 7 12. It is the sole responsibility of the owner/operator to develop and practice the proper use of the ®TEMPEST POWER BLOWER in accordance with generally accepted ventilation procedures as well as the department’s own operating procedures before placing the unit into service.
-
Page 8: General Information
General Information Blower Identification Each ®TEMPEST POWER BLOWER has a model number as well as a serial number (Figure 1.1). The model number signifies information such as blade diameter, engine TEMPEST TECHNOLOGY CORP. type and horsepower. The serial number relates... -
Page 9: Warranty Card
Warranty Be sure to fill out and return the warranty card to TEMPEST TECHNOLOGY CORPORATION in order to activate the warranty. (Figure 1.2) Figure 1.2 General Information... -
Page 10: Power Blower Data
Power Blower Data TYPE: Positive Pressure Ventilator BLADE: Air Flex Fiberglass Reinforced Polyamide High Strength Blades, Die Cast Aluminum or Polypropylene. BUSHING: Keyed Shaft and Set or Cap Screws. SHROUD: Turbo 2000 Tapered Aluminum. DRIVE: Industrial-Type, Straight-Banded V-Belt (On Belt-Drive Blowers) or Direct Drive (On Direct Drive Blowers). - Page 11 Power Blower Data continued… VIBRATION DAMPENERS: Steel-Reinforced Rubber. GAS ENGINES: TYPE: Single Cylinder, 4 Stroke, Gasoline COOLING: Forced Air LUBRICATION: Splash Type Oil Reservoir STARTING: Recoil with Auto Rewind Belt Drive Gasoline Power Blowers BELT-DRIVE ENGINE WIDTH DEPTH HEIGHT LBS BD 18-T-5.5...
- Page 12 Power Blower Data continued… ELECTRIC MOTORS: All electric motors are single phase, 60 Hz, rigid base, 56 frame, with ball bearings and manual reset overload protection. ELECTRIC ENGINE HP WIDTH DEPTH HEIGHT LBS UNITS EB-12 ELECTRIC 1 TEFC 7,683 N.A.
-
Page 13: Power Blower Information
Power Blower Information The ®Tempest Power Blower is a high powered, portable blower used for Positive Pressure Ventilation (PPV), a ventilation technique that quickly and efficiently replaces hazardous interior environments. PPV was pioneered in the fire fighting industry where fire fighters use the ®Tempest Power Blower to ventilate smoke, heat, and harmful gases from buildings. - Page 14 For additional information on how to accomplish PPV, refer to “PPV Set-Up Procedures” in this Manual. Note: The ®Tempest Power Blower is the most efficient tool for PPV for two reasons. First, the exclusive Tempest tapered shroud design creates a wide, stable, conical air pattern.
-
Page 15: Operating Procedures
Operating Procedures The information and instructions in this section should be routinely reviewed and followed before the actual operation of ®Tempest Power Blowers Pre-Operation VISUAL INSPECTION After receiving and unpacking your blower, be sure to carefully inspect it for any damage that might have occurred during shipping. - Page 16 Pre-Operation continued… OIL SUMP CAPACITIES ENGINE CAPACITY QUARTS / LITRES BRIGGS 5.5 HP 20 FL. OZ. .66 QUARTS OR .59 LITERS HONDA GX160 5.5 HP 20 FL. OZ. .63 QUARTS OR .6 LITERS HONDA GX200 6.5 HP 20 FL. OZ. .63 QUARTS OR .6 LITERS HONDA GX390 13 HP 37 FL.
-
Page 17: Operation
Pre-Operation continued… CAUTION: PRECAUTIONS MUST BE FOLLOWED WHENEVER REFUELING GASOLINE ENGINES. PLEASE FOLLOW THE LISTED GUIDELINES. NEVER FILL THE FUEL TANK INDOORS. NEVER FILL THE FUEL TANK WHILE THE ENGINE IS RUNNING OR HOT. DO NOT SMOKE DURING REFUELING. NEVER FILL THE FUEL TANK COMPLETELY. FILL THE TANK TO BOTTOM OF FILLER NECK TO PROVIDE SPACE FOR FUEL EXPANSION. - Page 18 Operation continued… run. Please review the engine manufacturers Owners Manual regarding starting and stopping as well as the instructions in this section before actually starting the blower. CAUTION: NEVER MOVE THE BLOWER WHILE IT IS IN OPERATION. SEVERE PERSONAL INJURY IS POSSIBLE AS WELL AS DAMAGE TO THE BLOWER.
- Page 19 6. If equipped with a choke, move the choke lever to the ½ position until the engine runs smoothly and then to the open or off position. Move the throttle to the desired speed. NOTE: Some blowers may tend to “walk” if the throttle is not in the full position STOPPING 1.
-
Page 20: Maintenance
Maintenance Procedures Proper maintenance is necessary to ensure that your ®Tempest Power Blower operates as efficiently and trouble-free as possible. By following the instructions in this section you will be providing the maintenance needed to achieve this goal. CAUTION: THE ENGINE MAY START SIMPLY BY ROTATING THE BLADES. - Page 21 Maintenance Procedures continued… 5. Remove the oil filler cap and refill with the recommended oil (refer to the Pre-Operation instructions in the Operations section) and check the oil level. AIR CLEANER A dirty air cleaner will restrict airflow to the carburetor.
- Page 22 SPARK PLUG A correctly firing spark plug is essential for the power blower to operate properly. Check the engine spark plug yearly or every 100 hours by following the listed procedures. 1. Clean the area around the spark plug.
-
Page 23: Emissions Control System
Engine performance may differ at various altitudes and climates. If you feel that the carburetor on your blower needs adjusting contact Tempest Technology or your local engine dealer. EMISSION CONTROL SYSTEM State regulations require that all manufacturers of gas powered engines furnish written instructions describing the Operation and Maintenance of the emission control systems. - Page 24 Maintenance Procedures continued… every 25 hours of operating time. Operating the blower with a loose belt will cause excessive wear and reduce performance. Follow the procedures listed to properly adjust the drive belt. 1. Remove the eight bolts holding the front grill in place and remove the grill.
- Page 25 Maintenance Procedures continued… 4. Use a lever to pry or push the engine downward to tighten the belt (s). The belt(s) should be snug and have very little play. DO NOT OVERTIGHTEN THE BELT (S). 5. Tighten the front engine mount bolts. On the Honda 13 HP models the rear mounting studs must also be tightened.
-
Page 26: Blade Removal
Maintenance Procedures continued… BLADE REMOVAL PROCEDURES 1. Remove the eight bolts holding the front grill in place and remove the grill. (Figure 4.1) 2. Remove the three cap screws in the center of the fan blade bushing with an 5/32 hex bit (Allen wrench). -
Page 27: Blade Installation
Maintenance Procedures continued… BLADE INSTALLATION 1. Put bushing on motor shaft (Fig. 4.8). Tighten the allen screw on the bushing. Put blade on bushing (Fig. 4.7). Put lock washers on the three allen screws and insert into drilled holes of blade. Turn each screw and tighten evenly. - Page 28 Maintenance Procedures continued… BLADE INSTALLATION PROCEDURES FOR DD16 1. Make sure that the shaft and keyway are clean and smooth before installing the blade. 2. Insert the cap screws through the clearance holes in the bushing and place loosely into the hub of the blade.
-
Page 29: Maintenance Schedule
Maintenance Procedures continued… 6. Carefully turn the blade and check for clearance between the blade and shroud. Confirm that the blade is free to rotate without hitting other parts. 7. Reinstall the front grill and test the blower. 8. If you have any trouble removing or installing the blade on your blower, contact the factory for assistance at 800-346-2143. -
Page 30: Ppv Set-Up Procedures
By tilting blowers back about 17° maximum, the entrance opening may be more effectively covered with the cone of air. All Tempest Blowers have "tilt-back” features to facilitate operation. However, if a blower cannot be tilted... -
Page 31: Multiple Blower Placement
PPV Set-up Procedures continued… back to achieve proper coverage of the entrance opening with pressurized air, move it as far back as possible from the entrance opening. This technique can be used effectively on raised porches to achieve a seal. Multiple Blower Placement The use of more than one blower can dramatically increase airflow (volume) and reduce the time... - Page 32 PPV Set-up Procedures continued… entrance opening with pressurized air and increases the capacity of blower A by approximately ten percent. For standard entrance openings, multiple blowers in a parallel (side-by-side) configuration are less effective than multiple blowers in an in-line configuration.
-
Page 33: Exhaust Opening
PPV Set-up Procedures continued… of the building and past the area to be ventilated. The blower should be placed in the bottom portion of the opening and will provide pressurized air that will create positive pressure within the area to be ventilated and force the contaminants out of the upper portion of the entrance opening. - Page 34 PPV Set-up Procedures continued… Figure 5.4 1. A single blower powered by 1/3 HP to 4 HP electric motor or gas engine is most effective when utilized with exhaust openings that are three-fourths or slightly less than the size of the entrance opening.
- Page 35 PPV Set-up Procedures continued… Remember that these guidelines have been generalized and that optimum efficiency is easily obtained by a combination of training and experience. Exhaust If a gasoline-powered blower is being utilized and a gasoline-exhaust odor is noticeable inside the building or area to be ventilated, this is an indication that the building's exhaust opening is not large enough.
-
Page 36: Troubleshooting
Blower Troubleshooting Many factors can contribute to or be the sole cause of problems for gas and electric power blowers. This section will identify some of these problems and provide solutions to correct them. Blower fails to start • CHECK FOR FUEL IN THE TANK; MAKE SURE THE FUEL SHUT OFF VALVE IS OPEN. -
Page 37: Poor Blower Performance
Troubleshooting continued… Poor Blower Performance • CHECK THE AIR FILTER FOR CLEANLINESS, CLEAN IF DIRTY- REFER TO PAGE 5.2. • IF THE BLOWER IS A BELT-DRIVE, MAKE SURE THE BELT(S) IS/ARE TIGHT. REFER TO PAGE 5.4 FOR INSTRUCTIONS ON CHECKING AND TIGHTENING THE BELT(S). - Page 38 PARTS and PART NUMBERS HONDA POWERED BELT DRIVE BLOWER PARTS SCHEMATIC REFERENCE 2003 BD18-H-5.5 BD21-H-6.5 BD24-H-6.5 BD27-H-13 ITEM # DISCRIPTION PART # PART # PART # PART # FRONT GRILL 230-032 230-029 230-030 230-031 GRILL EMBLEM 400-028 400-029 400-030 400-031 NEOWASHER 120-004 120-004...
- Page 39 HONDA POWERED DIRECT DRIVE / ELECTRIC BLOWER PA SCHEMATIC REFERENCE 2003 DD16-H-5.5 DD18-H-5.5 DD21-H-6.5 DD 24-H6.5 ITEM # DISCRIPTION PART # PART # PART # PART # FRONT GRILL 230-027 230-032 230-029 230-030 GRILL EMBLEM 400-040 400-028 400-029 400-030 NEOWASHER 120-004 120-004 120-004...
- Page 40 TECUMSEH POWERED BELT DRIVE BLOWER PARTS SCHEMATIC REFERENCE 2003 BD18-T-5.5 BD21-T-5.5 BD24-T-5.5 BD 27-T-10 ITEM # DISCRIPTION PART # PART # PART # PART # FRONT GRILL 230-032 230-029 230-030 230-031 GRILL EMBLEM 400-028 400-029 400-030 400-031 NEOWASHER 120-004 120-004 120-004 120-004 GRILL BOLT...
- Page 41 TECUMSEH POWERED DIRECT DRIVE / ELECTRIC BLOWER SCHEMATIC REFERENCE 2003 DD16-T-5.5 DD18-T-5.5 DD21-T-5.5 DD 24-T-5.5 ITEM # DISCRIPTION PART # PART # PART # PART # FRONT GRILL 230-027 230-032 230-029 230-030 GRILL EMBLEM 400-040 400-028 400-029 400-030 NEOWASHER 120-004 120-004 120-004 120-004...
- Page 42 BRIGGS POWERED DIRECT DRIVE / ELECTRIC BLOWER PARTS SCHEMATIC REFERENCE 2003 EB12 DD21-B-5.5 DD 24-B5.5 DD36-B-5.5 ITEM # DISCRIPTION PART # PART # PART # PART # FRONT GRILL 230-015 230-029 230-030 230-017 GRILL EMBLEM 400-039 400-029 400-030 400-041 NEOWASHER 120-004 120-004 120-004...
-
Page 43: Belt Drive Unit
TEMPEST TECHNOLOGY CORPORATION 4708 N. BLYTHE AVENUE FRESNO, CA 93722 800-346-2143 559-277-7577 FAX: 559-277-7579 TEMPEST POSITIVE PRESSURE POWER BLOWER PARTS LIST DO NOT REMOVE PULLEYS, THIS WILL VOID WARRANTY CONTACT FACTORY FOR PROPER PROCEDURE BELT-DRIVE UNITS ITEM DESCRIPTION ITEM DESCRIPTION... - Page 44 TEMPEST TECHNOLOGY CORPORATION 4708 N. BLYTHE AVENUE FRESNO, CA 93722 800-346-2143 559-277-7577 FAX: 559-277-7579 TEMPEST POSITIVE PRESSURE POWER BLOWER PARTS LIST DIRECT-DRIVE UNITS (GAS OR ELECTRIC) ITEM DESCRIPTION ITEM DESCRIPTION ITEM DESCRIPTION FRONT GRILL NYLOCK GAS ENGINE 1A GRILL EMBLEM NEOWASHER 11A SHAFT KEY / GAS ENG.
- Page 45 TEMPEST TECHNOLOGY CORPORATION 4708 N. BLYTHE AVENUE FRESNO, CA 93722 800-346-2143 559-277-7577 FAX: 559-277-7579 TEMPEST POSITIVE PRESSURE POWER BLOWER PARTS LIST POLE MOUNT (GOLF) ELECTRIC UNIT ITEM DESCRIPTION ITEM DESCRIPTION ITEM DESCRIPTION FRONT GRILL FRONT TRIM ELECTRIC MOTOR 1A GRILL EMBLEM...
Need help?
Do you have a question about the POWER BLOWER and is the answer not in the manual?
Questions and answers