Table of Contents
Advertisement
Advertisement
Table of Contents

Related Manuals for LG-Ericsson iPECS LIP-8050V


Summary of Contents for LG-Ericsson iPECS LIP-8050V
- Page 1 LIP-8050V User Guide...
-
Page 2: Revision History
This material is copyrighted by LG-Ericsson Co. Ltd. Any unauthorized reproductions, use or disclosure of this material, or any part thereof, is strictly prohibited and is a violation of Copyright Laws. LG- Ericsson reserves the right to make changes in specifications at any time without notice. The information furnished by LG-Ericsson in this material is believed to be accurate and reliable, but is not warranted to be true in all cases. -
Page 3: Important Safety Information
Warning: To reduce the possibility of electric shock, do not expose your phone to high humidity areas, such as a bathroom, swimming area, etc. Caution: Use only LG-Ericsson approved batteries and desktop chargers to avoid the damage to the phone. Using other batteries or chargers voids your warranty and may cause an explosion. -
Page 4: Table Of Contents
....................1 NTRODUCTION 1.1 General ........................1 1.2 Feature Information ....................1 1.3 Feature Groupings ....................1 1.4 iPECS LIP-8050V Phone Description ..............2 1.5 LIP-8050V Phone Installation ................3 1.5.1 Power ......................4 1.5.2 Wall Mount ....................5 LCD, S &... - Page 5 LIP-8050V User Guide Issue 1.0 5.1.1 Using Camp-On when calling a busy station ..........46 5.1.2 Leaving a Message Wait ................47 5.2 External Calls .......................47 5.2.1 Placing external CO/VoIP calls..............47 5.2.2 Waiting for the next available CO/IP line ..........48 5.2.3 Account Codes: Tracking External calls for billing ........
- Page 6 LIP-8050V User Guide Issue 1.0 10.1 Access PBX or Centrex features ................70 10.2 Access the ISDN Network ..................70 10.2.1 Using the Keypad facility to access ISDN features........70 10.2.2 Using ISDN Supplementary Services ............71 10.2.3 Activating ISDN Caller ID Restriction ............71 11.
-
Page 7: Introduction
NTRODUCTION 1. Introduction General Your telephone is connected to an advanced-technology, highly- versatile, fully-featured telecom system designed to make office communications easy and productive. Employing state-of-the- art Voice over Internet Protocol (VoIP) technology, voice and data converge on a single IP packet network. Because each iPECS Phone is an IP appliance, it can be moved easily throughout the office LAN and maintain normal operation. -
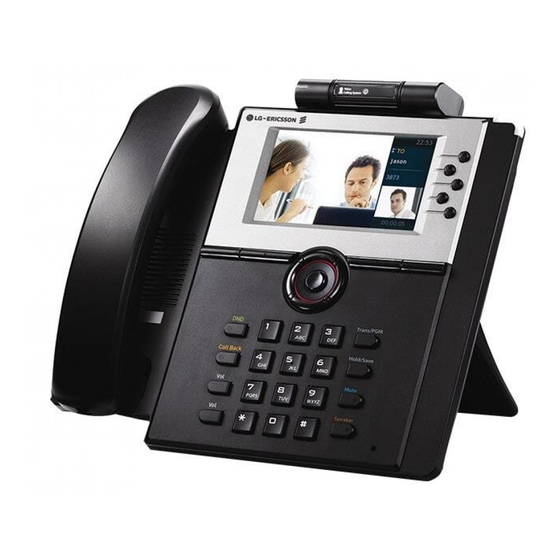
Page 8: Ipecs Lip-8050V Phone Description
LIP-8050V Phone Description The iPECS LIP-8050DV Phone incorporates the latest in VoIP technology and user interface to provide you with a cost effective, simple to use, productive communications tool. includes a 4.3‖ (480 x 272 - pixel) color graphic LCD, refer to Phone Diagrams which follow. -
Page 9: Lip-8050V Phone Installation
Ring/MWI LED iPECS LIP-8050V Diagram LIP-8050V Phone Installation The phone handset is attached as shown (A). The LIP-8050V has two RJ-45 and 10/100 Base-T LAN connection ports. One port is for connecting to the LAN (D), and the other can be... -
Page 10: Power
LIP-8050V Connections 1.5.1 Power All LIP-8000 series phones can be powered by the AC/DC Adapter-K- (48 VDC @ 0.3A; shown as ―C‖ in the previous graphic) or over the LAN cable using the POE8 or other 802.3af compliant switch. -
Page 11: Wall Mount
2. LCD & the Display Using the LCD Menu The iPECS LIP-8050V has a 4.3‖ (480 x 272 pixel) color graphic LCD which is divided into 3 sections. The upper section consists of a line to display various icons, date, time and station... -
Page 12: Display Menu
The middle section includes designations for the five Flexible buttons and information on the active call (called/calling party Id, feature status, etc. The lower section, which consists of a single line, is an interactive menu to guide you through feature access, User Program selections, and the Display Menu discussed below. -
Page 13: Preference
2.2.1 Preference You can configure the Call Preference menu and flexible button label. 2.2.1.1 Call preference You can configure the call preference items. 2.2.1.2 Flexible button label... -
Page 14: Contacts
You can set the label (name) for each flexible button. If the label is not set then the feature name displays. 2.2.2 Contacts You can configure call history and phone book in the contacts menu. 2.2.2.1 Phonebook You can access the Phonebook menu from the Display Menu or, while idle, with the left navigation button. - Page 15 Press the CALL button, to call the Main number (in yellow) or MENU to select a different number available for the contact (Mobile/Home/Office/Station). To add or edit a contact record in the Phonebook, select Add from the Phonebook menu or Edit from the Search menu.
- Page 16 You can enter various telephone numbers, identify the Main number and select the CO line for calling the contact. use LIST for available CO codes. Scroll down; you can assign a ring tone and photo image that displays if the incoming Call ID matches an assigned contact. You can assign the CO line to use when calling a contact number.
- Page 17 2.2.2.2 Call History You can go to the Call History from the Display Menu or, while idle, with the right navigation button. The Call History includes several call categories, incoming calls, outgoing calls, missed calls and all calls. The display indicates time and date for the call as well as any photo assigned and the duration of the call.
-
Page 18: Sms Short Message Service
2.2.3 SMS Short Message Service You can send SMS messages to internal stations or, with SMS service, over the public network. 2.2.3.1 New SMS You can enter and send an SMS message using edit box. - Page 19 To edit new message: Enter your message in the test box and check the box for recipients you desire and select S 2.2.3.2 Received SMS You can check and view your received messages. The navigation button is used to move message. If you press OK button then you can view the message in detail.
- Page 20 2.2.3.3 Send SMS You can check and view sent messages. Select the highlighted message to view the recipient list and time stamp. 2.2.3.4 Delete SMS You can delete the Received, Sent or all messages.
-
Page 21: Organizer
2.2.4 Organizer You can set the alarm clock and organize your schedule. 2.2.4.1 Alarm You can configure the local phone Alarm Clock with up to ten (10) different alarm times. For each alarm, set the condition as once or repeated daily, the time, the alarm notification interval, the Ring tone group and ring... - Page 22 tone for notification. If you lift the handset the alarm notification will cease. 2.2.4.2 Schedule You can configure your schedule from the Organizer menu to notify you of a scheduled event. You can assign up to 30 event schedules. If you press the A button the new schedule screen appears.
-
Page 23: Tools
To show saved schedules use the M pop-up to see the list of all or today‘s schedules. Today‘s scheduled events are displayed in yellow. 2.2.5 Tools You can record and play video and audio files and also copy from/to USB memory. - Page 24 2.2.5.1 Camera You can take pictures and configure it in the photo album. You can record video and configure it in the video album. Take photo You can adjust resolution using the navigation button before you Capture a picture. Supported Resolution are: 120 90 320 240 352 288 480...
- Page 25 Record video You can adjust resolution using the navigation button before you Record a video. Supported resolutions are: 176 144 352 Image gallery You can manage photo files. There are three categories Basic Images (photos stored in the phone at the factory), Taken Images (photos captured by you) and Received Images.
- Page 26 Video album You can manage video files. There are two categories, Recorded Videos and Received Videos. Select a category to display the list of videos and a thumb nail of the highlighted video. 2.2.5.2 Audio You can record and play audio files.
- Page 27 To record sound, select 1. Record Audio then select record to record your audio. In the Audio Gallery, you can view and manage your recorded audio files. 2.2.5.3 Internal memory You can review the internal memory status.
- Page 28 2.2.5.4 External memory You can review the external memory status and copy some files from/to USB memory. External memory You can review the external memory status. Copy from USB You can copy files from USB memory card that you connect to the back of the phone.
- Page 29 You can copy image (photo) files from USB. The supported formats are jpg and png. Please do not remove USB while in use. If image size is over 200 Kbyte then it could not copy. You can copy audio files from USB. Support formats are MP3, AMR and WAV (CCITT u-law 8,000 kHz, 8bit, mono).
- Page 30 You can copy video files from USB. Support formats are MP4 and 3GP. Copy to USB You can copy files to the USB memory card that you connect to the back of the phone.
-
Page 31: Sound
2.2.6 Sound You can assign tone for intercom ring and CO ring as well as the alert tone for received SMS messages. 2.2.6.1 ICM-CO Ring You can assign ICM and CO ring type. The sound files available are divided into four categories. These include basic audio (MP3), main ring (wav), received audio and system ring files. -
Page 32: Display
2.2.7 Display You can assign a picture for background image or video substitute image. You can also configure characteristics off the LCD. 2.2.7.1 Background image You can select a picture for background image from one of three categories, Basic Images, Taken Photos or Received Images. - Page 33 2.2.7.2 Brightness You can adjust the LCD brightness. 2.2.7.3 Substitute image You can select a picture for the video substitute image from one of three categories, Substitute images, Taken photos and Received images. 2.2.7.4 Window color...
-
Page 34: Settings
2.2.7.5 Font 2.2.7.6 Language 2.2.8 Settings From the Settings menu you can manage the Phone settings, configure network and initialize the LIP-8050. 2.2.8.1 Phone Management Under Phone management you can assign a station name, password, station number and maximum video frame rate. - Page 35 To register name: To change password: You can request a station number:...
- Page 36 You can assign the maximum video frame rate. 2.2.8.2 Network Configuration You can review and set some items related to your LAN and VLAN. LAN information...
- Page 37 You can review the network mode (static or DHCP), IP address, Subnet mask, Default gateway, DNS address, MAC address. LAN Configuration You can set the network mode (static or DHCP), IP address, Subnet mask, Default gateway and primary and secondary DNS address.
- Page 38 Check network You can ping and trace the route to an IP address. Ping Trace route...
- Page 39 2.2.8.3 System Configuration You can set the system IP address and connection mode (Local / Local-Remote / Remote). 2.2.8.4 Initialization You can initialize some configuration and restart phone itself. Set to default...
-
Page 40: Lcd, Speakerphone Elated Eatures
You can initialize the Call History, PhoneBook, Multimedia data, Alarm clock and schedule and configuration Settings. Reboot You can restart phone from the Reboot menu. LCD, S & R PEAKERPHONE ELATED EATURES 3. LCD, Speakerphone Using the Speakerphone & Related Features Activate the iPECS Speakerphone at any time (except for Paging) in place of lifting the handset to receive or place calls. -
Page 41: Using A Serial Dss
Using a Serial DSS The LIP-8012DSS, LIP-8012LSS, and LIP-8048DSS can be connected with the LIP-8050V using the RS-232 cable. Be sure to verify the serial DSS and LSS capacities with the iPECS System to ensure usability (refer to iPECS Manual). The following graphics show the front and rear view of each. -
Page 42: Receiving Calls
LIP-8012LDSS LIP-8012DSS LIP-8048DSS 4. Receiving Calls... -
Page 43: Answering A Call While Idle
ECEIVING CALLS Answering a Call While Idle There are 3 basic types of incoming calls; internal/external ringing calls, Intercom Voice Announce calls, and Hold recalls. Your phone may be assigned Ringing Line Preference; in this case, calls that ring are answered by lifting the handset. Otherwise, you must press the flashing Flex button. -
Page 44: Using Answering Machine Emulation (Ame)
tone on top of the existing call, as an indication of another call waiting. While busy, certain stations can activate Voice-Over to your phone. In this case, audio is received from both the active call and the Voice-Over announcement at the same time. Respond to any of these Off-hook Signals in one of several ways;... -
Page 45: Differential Ring Signals
Differential Ring Signals When multiple phones in a small area ring, it can be difficult to tell which are ringing. With the LIP-8050V, 12 ring tones are available for differentiating one phone‘s ringing from another. These tones are stored on the phone‘s permanent memory. -
Page 46: Answering Calls At Night
Answering Calls at Night In the Night mode, Loud Bell Control may be used to send ring signals to external bells. You may answer these calls with Universal Night Answer (UNA). To answer a call ringing during night mode: Lift the handset, ... -
Page 47: Using Do-Not-Disturb (Dnd) To Block Incoming Calls
Using Do-Not-Disturb (DND) to Block Incoming Calls Activate Do-Not-Disturb when you wish not to be interrupted by pressing the DND button; the phone will block incoming calls. Internal callers will receive a fast busy tone and the display will show the DND status. Activate Do-Not-Disturb while busy (One- Time DND);... - Page 48 Highlight the Forward type desired and select OK. Select forward destination. (Station, VM(VSF) group, Hunt group or Speed Dial number. The forward status will be updated on your LCD.
- Page 49 When you forward calls from a different station or a remote location, you may need to enter your Authorization Code. In addition, from a remote location, you must access the system through a DISA enabled CO line. To activate Call Forward, Off Premise (forward to an external number) from a different phone: ...
-
Page 50: Forwarding Callers To A Text Message
4.8.2 Forwarding callers to a Text Message Using an iPECS Phone, the system can be setup to return a ‗Text Message‘ to internal callers. When calling your Station, internal callers will automatically receive the selected message or you can send a text message you select in response to an internal call, Silent Text Message. - Page 51 To activate Custom or Pre-Defined Message Forward: Press TRANS Dial User Program feature code 51, Dial the two-digit text Message code (00-20), Dial any auxiliary input for messages 01-04 and 06-08, Press , forward confirmed. HOLD SAVE To cancel activated Message:...
-
Page 52: Placing A Call
LACING A CALL Internal Calls You can place calls to other stations in the system over the Intercom. The call will ring, or for an ICM Voice Announce call, a splash tone will be heard. Ring or Voice Announce is normally determined by settings at the called station but you may change this by dialing ‗#‘... -
Page 53: Leaving A Message Wait
If you are the Attendant or Secretary, you may activate Intrusion. You may also use Step Call; dial the next station by dialing the last digit of the Intercom number. To Camp-On (wait off-hook) for a busy station: Press * and await an answer. To request a Callback (wait on-hook) for a busy station: ... -
Page 54: Waiting For The Next Available Co/Ip Line
801-820 for iPECS-50 & 100, 801-872 for iPECS-300 & 600, or 8001-8200 for iPECS-1200. Any CO/IP Line access— When dialing on a CO line which uses pulse style signals, you may activate Dial Pulse to Tone Switchover changing to DTMF style dialing (for banking services, etc.). When placing an IP call, you must dial an IP address using the ‗*‘... -
Page 55: Account Codes: Tracking External Calls For Billing
To activate a queue if the selected/dialed line is busy: Select/dial CO/IP line; when the busy tone is returned, press the CALL BACK button, Return to an idle state by going on-hook; when the line is available, the Station will be notified with ringing. 5.2.3 Account Codes: Tracking External calls for billing In some cases, you or your company may desire to track calls... -
Page 56: Temporarily Override Dialing Restrictions At A Phone
To deactivate Temporary COS: Press TRANS Dial 22 (User Program code), Dial your Authorization code, Press HOLD SAVE 5.2.5 Temporarily override dialing restrictions at a phone Override the dialing restrictions at any phone by activating Walking COS. The Walking COS dialing restriction levels are applied for a single call only. -
Page 57: Using And Entering Saved Number Dial
5.3.2 Using and Entering Saved Number Dial You may store the last number dialed on an external call to the Saved Number Dial buffer for convenient dialing at a later time. The Saved number is stored until a new number is saved. To place a call using Save Number Dial: ... -
Page 58: Using And Entering Station Speed Dial Numbers
5.3.4 Using and Entering Station Speed Dial Numbers Each station in the iPECS-100 System is allocated memory for 20 Station Speed Dial numbers (bins 00-19) each up to 48 digits. The iPECS-300 & 600 &1200 support 100 Station Speed Dial numbers (bins 000-099). These numbers are entered at the user‘s station and may include several ‗special‘... -
Page 59: Using Dial By Name And Entering Your Name
To place a call using Station Speed Dial: Lift the handset, Press the button, SPEED Dial the desired Station Speed Dial bin number (00-19 or 000- 099). To enter a Station Speed Dial number with CO Line and Name: ... - Page 60 To make call by name, Press SPEED button twice. Select a type (ICM, Station speed or system speed). Select a person and press SEND button to place the call.
-
Page 61: Using Automatic Called Number Redial (Acnr)
5.3.6 Using Automatic Called Number Redial (ACNR) When making an external call and a busy signal is received, the system can be set to retry the number until the call is connected, the feature is cancelled, or the maximum number of retries is attempted—this is Automatic Called Number Redial (ACNR). -
Page 62: Placing A Call
LACING A CALL Call Transfer: Sending a call to a different destination You can send an active call to another station or other resource of the system, Call Transfer. You can screen the transfer with the receiving party (Screened Call Transfer) or complete the transfer without screening (Unscreened Call Transfer). -
Page 63: Broker Call: Switching Between Two Calls
Broker Call: Switching between two calls You may switch between the active call and a call on Hold, placing the active call on Hold acting as a broker between two or more parties (Broker Call). iPECS Phone users may ‗broker‘ for multiple calls up to the number of CO/IP line buttons. -
Page 64: Call Park: Placing A Call On Hold To Page
In addition to establishing a Conference, up to 9 Conference Rooms can be set up, letting up to 24 parties converse when using a MCIM. When setting up a Conference Room, a password can be designated for invited parties (internal and external parties) to use for accessing the established Conference Room. -
Page 65: Two-Way Record: Recording A Call
station in the system. Typically, this feature is used with Paging to notify the desired user of a parked call. Parked calls are subject to Hold Recall after the Call Park timer. To place a Conference on Hold: Press the button. -
Page 66: Send & Retrieve Messages
& R ETRIEVE ESSAGES 7. Send & Retrieve Responding to a Station Message Waiting Messages Indication Another station can leave an ICM Message Waiting indication (MWI) when you do not answer or your phone is in DND mode. The message icon will be displayed on the LCD screen. If programmed, a flashing MSG LED on the iPECS Phone also will indicate when there is a Message Waiting. - Page 67 VMIM/VSF module, the iPECS Feature Server or an external Voice Mail system. These Voice Mail systems allow access to and management of received voice messages. While in your Mail Box, you have control of your password and Mail Box greeting. In addition, you can remotely control Call Forward for your station to Voice Mail.
-
Page 68: Remote System Access
EMOTE YSTEM CCESS 8. Remote System Direct Inward System Access (DISA) Access DISA (Direct Inward System Access) allows remote users to gain access to the system‘s resources (remote users may be required to enter an Authorization Code). The system will recognize remote user dialed inputs to call other stations, place calls over CO/IP lines, review voice mails, etc. - Page 69 To register a mobile phone number: Press the button, TRANS Dial 37, Dial the mobile phone number, button. Press the HOLD SAVE To activate a registered mobile phone: Press the button, TRANS Dial 38, ...
- Page 70 To Transfer a call from the mobile extension using the iPECS: Dial ―*‖ while on an iPECS call, Dial the desired extension, the call is transferred and the mobile phone returns to idle. Reconnect to the transfer by pressing the # key. NOTE—The mobile extension may reconnect to the transfer by pressing the # key.
-
Page 71: 9. Misc. Features
EATURES 9. Misc. Features Call Log Users can view a log of incoming, outgoing and missed calls on A CALL HISTORY button the display (up to 100 records). provides simple access to all calls (incoming (called), outgoing (dialed) and missed (lost) calls) at any time. The right navigation button will access the Call Logs while idle. -
Page 72: Background Music And Music On Hold
Background Music and Music on Hold Two audio sources can be connected to the system. These sources or an internal source provide input for Background Music (BGM) and Music on Hold (MOH). In addition, a recorded message from the VMIM can be used. BGM is played over the speakers of the iPECS Phone when the station is idle. -
Page 73: Push-To-Talk (Ptt) Page
If the desired Page Zone is busy, the User can elect to be recalled when their turn comes in the queue. Users can also request a paged party answer the Page using Meet-Me Paging. In this case, the paged party may answer the page from any phone in the system by dialing the Meet-Me code. -
Page 74: Power Fail Transfer (Pft)
Alarm Monitor—should the external contact activate, a unique Alarm Ring signal and LCD display may be received. To restart the monitor circuit, the external contacts must be deactivated and the Alarm Ring signal terminated. Door Bell—a unique Door Bell Ring (single tone burst) may be received each time the external contact is activated. - Page 75 Locked (Temporary COS) COS x To hear Date & Time memo: Dial the Voice Memo code (661 for iPECS-100, or *661 for iPECS-300 & 600 & 1200), Date and Time memo is heard, ―Date is May 2nd.Time is xx:xx pm‖.
-
Page 76: Pbx, Centrex & Isdn Features
PBX, C & ISDN 10. PBX, Centrex, & ENTREX FEATURES ISDN Features 10.1 Access PBX or Centrex features The iPECS has been designed to operate with a host PBX system or Centrex services from your service provider. The iPECS connects to a host with analog CO lines. When accessing a CO line, the phone will act as an extension of the host, allowing access to the host system features using the host dial codes. -
Page 77: Using Isdn Supplementary Services
To activate Keypad Facility operation: Press the programmed button to switch to KEYPAD FACILITY keypad mode, Dial as desired. To deactivate Keypad Facility operation: Press KEYPAD FACILITY Press a Feature or Flex button. 10.2.2 Using ISDN Supplementary Services ISDN service providers may incorporate features similar to those of Centrex. -
Page 78: Features & Flex Buttons
& F EATURES LEX BUTTONS 11. Features & Flex 11.1 Entering Station Program Data Buttons A special code set is available for iPECS Phone users to assign certain attributes such as Authorization Codes (Passwords). After entering the User Program mode, dial the codes to select the attribute and setting. -
Page 79: Appendixa Flexible Numbering Plan
Appendix A Flexible Numbering Plan FEATURE iPECS- iPECS- iPECS- iPECS- iPECS- 1200 Intercom Call 100-149 100-169 100-399 1000- 1000- 1599 2199 Internal Page Zone 501-510 501-510 501-535 501-535 301-400 Internal All Call Page Meet Me Page External Page Zone 1~2 545-546 545-546 545-546... -
Page 80: Appendixb User Program Codes
FEATURE iPECS- iPECS- iPECS- iPECS- iPECS- 1200 ACD Reroute Queued Call w/answer ACD Reroute Queued Call w/o answer Enter Conference Room Camp-On Answer Call Parking Locations 601-610 601-610 601-619 601-619 #601- #800 Group Pilot Number 620-659 620-659 620-667 620-667 401-500 Station User VMIM/VSF Features Call Coverage button... - Page 81 CODE FUNCTION REMARK 12 x Differential Ring, CO/IP line Select Ring Tone 1-8 Select ICM Signal mode, 13 x Intercom Answer Mode 1: HF, 2: TONE, 3: Privacy 14 x Call Coverage Attribute Setting 1+: ON/OFF, 2+: ring delay (0-9) 15 x Station Ring Download Select download Ring Tone 0-9...
- Page 82 CODE FUNCTION REMARK Display Serial number/Package for SMEMU Assign R Requires VSF/External SMDI VM Button ECORD Assign ISDN CLIR Button ISDN COLR Button Assign A Button CCOUNT Assign LOOP Button Assign ATD I Button NTRUSION ICM Button Assign C Button Assign K Button EYPAD...