Table of Contents
Advertisement
Quick Links
Advertisement
Chapters
Table of Contents

Related Manuals for Fuji Xerox DocuPrint CP305 d


Summary of Contents for Fuji Xerox DocuPrint CP305 d
- Page 1 DocuPrint CP305 d User Guide...
-
Page 2: Table Of Contents
Contents Specifications................27 Basic Operation ................. 31 Main Components ..................32 Front View..................33 Rear View ..................34 Operator Panel ................35 Securing the Printer ................ 36 Preparing Printer Hardware................. 37 Installing Optional Accessories..............38 Installing the Optional Memory Module .......... 39 Installing the Optional 250-Sheet Feeder ........ - Page 3 Setting Up for Shared Printing ............76 Installing Print Driver on Computers Running Mac OS X ......81 Installing Print Driver on Computers Running Linux (CUPS) ...... 82 Installing the Print Driver..............83 Setting Up the Queue ..............84 Setting the Default Queue .............. 87 Specifying the Printing Options............
- Page 4 Meter Readings ................145 Admin Menu.................. 146 Tray Settings................. 169 Panel Lock Function .................. 173 Enabling the Panel Lock ............... 174 Disabling the Panel Lock .............. 175 Setting the Power Saver Time Option ............176 Resetting to Factory Defaults ..............177 Troubleshooting ...............
- Page 5 Printing the Color Registration Chart ..........229 Determining Values ..............230 Entering Values ................231 Problems With Installed Optional Accessories .......... 233 Other Problems ..................234 Understanding Printer Messages .............. 235 Contacting Service ..................238 Getting Help....................239 LCD Panel Messages ..............240 SimpleMonitor Alerts..............
- Page 6 Removing the Optional 250-Sheet Feeder ........288 Contacting Fuji Xerox ................. 291 Technical Support..................292 Online Services ..................293...
- Page 8 Preface Thank you for purchasing the DocuPrint CP305 d. This guide is intended for users who use the printer for the first time, and provides all the necessary operating information about the printer function. Please read this guide to achieve the best performance from this printer.
-
Page 9: Trademarks And Document Disclaimer
It may be a legal offence to print currency notes, certificates of stocks and securities, or any other documents of similar nature, regardless of whether they will be used. Fuji Xerox is not responsible for any breakdown of machines due to infection of computer virus or computer hacking. -
Page 10: About License
About License RSA BSAFE RSA BSAFE software, produced by RSA Security Inc., has been installed on this printer. This product includes software developed by Eric Young. (eay@mincom.oz.au) © Copyright 2003, Dr BrianGladman, Worcester, UK. All rights reserved. This product uses published AES software provided by Dr Brian Gladmanunder BSD licensing terms. -
Page 11: Types Of Manuals
Types of Manuals Manuals included with the printer The following manuals are provided with the DocuPrint CP305 d. Safety Guide Describes the information you need to know before using the printer and to operate the printer safely. Setup Guide Provides step-by-step instructions on how to set up your printer. -
Page 12: Using This Guide
Using This Guide This section includes: • "Organization" on page 12 • "Conventions" on page 13 Using This Guide... - Page 13 Describes the troubleshooting tips for printer problems such as paper jams. 8 Maintenance Describes how to clean the printer, how to replace consumables, and how to see the printer status. 9 Contacting Fuji Xerox Describes support information. Using This Guide...
- Page 14 Conventions In this guide, personal computers and workstations are collectively called “computers”. The following terms are used throughout this guide: IMPORTANT: • Important information that must be read and followed. NOTE: • Additional information that merits emphasis. See also: • References within this guide.
-
Page 15: Safety Notes
• Any unauthorized alteration including an addition of new functions or connection to external devices may not be covered by the product warranty. Contact your local Fuji Xerox representative for more information. Follow all warning instructions marked on this product. The warning marks stand for the followings: Used for item that if not followed strictly, can lead death or severe or fatal injuries and the possibility to do it is comparatively high. -
Page 16: Electrical Safety
If the power cord is damaged or insulated wires are exposed, contact your local Fuji Xerox representative for its replacement. Do not use a damaged or uninsulated cord to avoid the risk of electric shock and a fire accident. - Page 17 • the power cord is not cracked or worn down. Once you notice any unusual condition, switch off and unplug this product first and contact your local Fuji Xerox representative. Safety Notes...
-
Page 18: Machine Installation
Machine Installation WARNING Do not locate this product where people might step on or trip over the power cord. Friction or excessive pressure may generate heat and eventually cause electric shock or a fire accident. CAUTION Never locate this product in the following places: •... - Page 19 Do not incline the product at more than 10 degree angle. Otherwise, it may fall over and cause injuries. Right Left Right Left 10° 10° Front Rear Front Rear 10° 10° To bundle wires and cables, always use the cable ties and spiral tubes that Fuji Xerox supplies. Otherwise, it may cause some defects. Safety Notes...
-
Page 20: Operational Safety
To avoid the risk of electric shock and a fire accident, switch off and unplug the product promptly in the following conditions, then contact your local Fuji Xerox representative. •... - Page 21 Never throw a toner cartridge into an open flame. Remaining toner in the cartridge may catch fire and cause burn injuries or explosion. If you have a used toner cartridge no longer needed, contact your local Fuji Xerox representative for its disposal.
-
Page 22: Warning And Caution Labels
"High Temperature" or "High Voltage" marks on. BLACK PRODUCT CODE [TYPE- ] To ensure optimum quality and performance of your printer, we recommend only using genuine Fuji Xerox toner. *0000* Not for sale in Japan Safety Notes... - Page 23 • Proper disposal is required for toner cartridges and drum cartridge no longer needed. Do not open toner cartridges and drum cartridge containers. Return them to your local Fuji Xerox representative. Environment...
- Page 24 Connect the equipment into an outlet on a circuit different from that to which the receiver is connected. – Consult the dealer or an experienced radio/TV technician for help. Changes and modifications to this equipment not specifically approved by Fuji Xerox may void the user’s authority to operate this product. Regulation...
-
Page 25: Illegal Copies And Printouts
Illegal Copies and Printouts Copying or printing certain documents may be illegal in your country. Penalties of fines or imprisonment may be imposed on those found guilty. The following are examples of items that may be illegal to copy or print in your country. •... -
Page 26: Product Features
Product Features This section describes the product features and indicates their links. 2 Sided Print (Duplex Print) Using the Stored Print Function (Stored Print) 2 Sided Print is to print two or more pages on the front and back side of a single sheet of The Stored Print feature allows you to paper. - Page 27 Product Features...
-
Page 28: Specifications
First print 15.5 seconds IMPORTANT: • Measurements based on Fuji Xerox test pattern. Time from printer startup until output of the first page is complete. Output Resolution: 600 × 600 dpi Resolution Tone/Color 256 tones/color (16.7 million colors) - Page 29 (Normal/Thick), Letterhead, Glossy Paper (Normal/Thick), Pre-Punched, Colored Paper, Special IMPORTANT: • Fuji Xerox P paper (64 g/m • Use only the recommended paper. Using paper other than that recommended for the printer can cause printing problems. Do not use special ink jet paper.
- Page 30 Items Description Supported OS Standard: PCL6 and PostScript drivers ® ® Microsoft Windows 2000, ® ® Microsoft Windows ® ® Microsoft Windows Server 2003, ® ® Microsoft Windows Server 2008, ® ® Microsoft Windows Vista ® ® Microsoft Windows ® ®...
- Page 31 Items Description Dimensions (main unit only) 400 (W) x 460.9 (D) x 436.4 (H) mm Weight Main Unit: 19.8 kg (main unit only, including consumables) Usage Environment During Use: Temperature: 5 - 32 °C; Humidity: 10 - 85% (except malfunctions due to dew condensation) Non-Use: Temperature: -20 - 40 °C;...
-
Page 32: Basic Operation
Basic Operation This chapter includes: • "Main Components" on page 32 • "Preparing Printer Hardware" on page 37 • "Installing Optional Accessories" on page 38 • "Turning on the Printer" on page 46 • "Printing a Panel Settings Page" on page 47 •... -
Page 33: Main Components
Main Components This section provides an overview of your DocuPrint CP305 d. This section includes: • "Front View" on page 33 • "Rear View" on page 34 • "Operator Panel" on page 35 • "Securing the Printer" on page 36... -
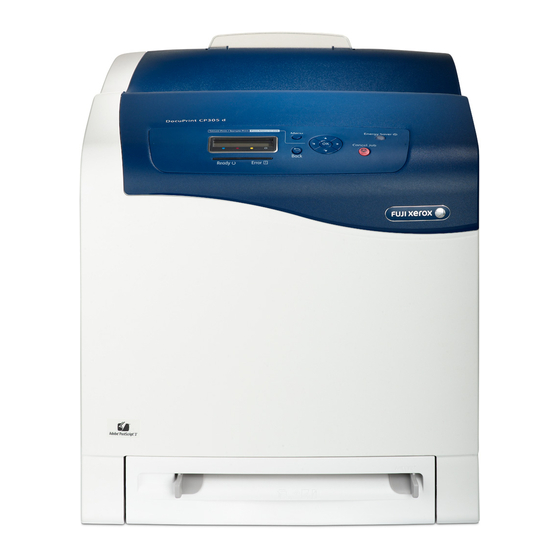
Page 34: Front View
Front View Operator Panel Front Cover Single Sheet Feeder (SSF) Width Guides Standard 250-Sheet Tray Optional 250-Sheet Feeder Side Cover Side Button Output Tray 10 Output Tray Extension 11 Fuser Unit 12 Drum Cartridge 13 Belt Unit 14 Duplexer 15 Toner Cartridge Basic Operation... -
Page 35: Rear View
Rear View USB Port Ethernet Port Power Switch Power Connector Security Slot Control Board Cover Basic Operation... -
Page 36: Operator Panel
Operator Panel The operator panel has a liquid crystal display (LCD) and buttons. Secure Print / Sample Print Menu Energy Saver Cancel Job Back Ready Error LCD Panel • Displays various settings, instructions, and error messages. Menu button • Moves to the top menu. buttons •... -
Page 37: Securing The Printer
Securing the Printer To protect your printer from theft, you can use the optional Kensington lock. Attach the Kensington lock to the security slot on your printer. Security slot For details, see the operating instructions supplied with the Kensington lock. Basic Operation... -
Page 38: Preparing Printer Hardware
Preparing Printer Hardware Open the side cover. Completely pull out the eight yellow ribbons. Close the side cover. Basic Operation... -
Page 39: Installing Optional Accessories
Installing Optional Accessories You can make the printer more functional by installing the optional accessories. This section describes how to install the printer's options such as the optional memory module and optional 250-sheet feeder. This section includes: • "Installing the Optional Memory Module" on page 39 •... -
Page 40: Installing The Optional Memory Module
Installing the Optional Memory Module NOTE: • Your printer supports additional 512 MB memory module. Turn off the printer. Turn the screw on the control board cover counterclockwise, and open the cover. NOTE: • Loosen the screw. You do not need to remove the screw. Align the connector of the memory module with the slot and insert the memory module into the slot. - Page 41 NOTE: • Ensure that the memory module is firmly fixed in the slot and does not move easily. Close the control board cover, and turn the screw clockwise. Turn on the printer. Print the Printer Settings page to confirm that the newly installed memory module is detected by the printer.
- Page 42 PCL 6 driver as an example. ® Click Start → Devices and Printers. Microsoft ® Windows Right-click the printer icon of the DocuPrint CP305 d 7/Windows 7 x64/ and select Printer properties. ® Windows Server Click the Options tab, and then click Get Information 2008 R2 x64 from Printer.
-
Page 43: Installing The Optional 250-Sheet Feeder
Installing the Optional 250-Sheet Feeder Turn off the printer. Disconnect the power cord from the power connector on the rear of the printer. Remove the tape and the bag holding the screws. Place the optional 250-sheet feeder in the location that the printer is located. Pull the standard 250-sheet tray out of the printer about 200 mm. - Page 44 CAUTION: • Be careful not to pinch your fingers when lowering the printer onto the optional 250-sheet feeder. Secure the optional 250-sheet feeder to the printer by tightening the two screws provided with the feeder with a coin or similar object. Insert the standard 250-sheet tray into the printer, and push until it stops.
- Page 45 • The printer will automatically detect the attached tray but will not detect the paper type. Print the Printer Settings page to confirm the optional 250-sheet feeder is installed correctly. Press the Menu button. Select Report/List, and then press the button.
- Page 46 Windows and the PCL 6 driver as an example. Click Start → Devices and Printers. Microsoft Windows Right-click the printer icon of the DocuPrint CP305 d Windows 7 x64/ and select Printer properties. Windows Server Click the Options tab, and then click Get Information 2008 R2 x64 from Printer.
-
Page 47: Turning On The Printer
Turning on the Printer IMPORTANT: • Do not use extension cords or power strips. • The printer should not be connected to an uninterrupted power supply (UPS) system. Connect the power cord to the power connector on the rear of your printer. Connect the other end of the power cord to the power source. -
Page 48: Printing A Panel Settings Page
Printing a Panel Settings Page The Panel Settings page shows current settings for the operator panel menus. Press the Menu button. Select Report/List, and then press the button. Select Panel Settings, and then press the button. The Panel Settings page is printed. Basic Operation... -
Page 49: Power Saver Mode
Power Saver Mode The printer has a power saving feature that reduces power consumption during periods of inactivity. This feature operates in two modes: the Low Power mode and Sleep mode. As delivered, the printer switches to the Low Power mode three minutes after the last print job is printed. The printer then switches to the Sleep mode after another six minutes of inactivity. -
Page 50: Exiting The Power Saver Mode
Exiting the Power Saver Mode The printer automatically exits the Power Saver mode when it receives a print job from a computer. To manually exit the Low Power mode, press any button on the operator panel. To exit the Sleep mode, press the Energy Saver button. - Page 51 Basic Operation...
-
Page 52: Printer Management Software
Printer Management Software Use the CD-ROMs shipped with your printer to install a combination of software programs, depending on your operating system. This chapter includes: • "Print Drivers" on page 52 • "CentreWare Internet Services" on page 53 • "SimpleMonitor (Windows Only)" on page 55 •... -
Page 53: Print Drivers
Print Drivers To access all of your printer's features, install the print drivers from the Driver CD Kit or PostScript Driver Library CD. • The print drivers enable your computer and printer to communicate and provide access to your printer features. Printer Management Software... -
Page 54: Centreware Internet Services
CentreWare Internet Services This section provides information on CentreWare Internet Services, a hyper text transfer protocol (HTTP)-based web page service that installs with your print driver and is accessed through your web browser. These pages give you instant access to printer status, and printer configuration options. Anyone on your network can access the printer using their web browser software. -
Page 55: Creating An Administrative Password
Creating an Administrative Password Launch your web browser. Enter the IP address in the browser’s Address field, and then press the Enter key. Click the Properties tab. In the left navigation panel, scroll down to Security and select Administrator Settings. Select Enabled for Administrator Mode. -
Page 56: Simplemonitor (Windows Only)
® The following procedure uses Microsoft Windows XP as an example. Click start → All Programs → Fuji Xerox → SimpleMonitor for Asia-Pacific → Activate SimpleMonitor. The Select Printer window appears. Click Status Settings. The Status Settings dialog box appears. -
Page 57: Setup Disk Creation Tool (Windows Only)
• Install the DocuPrint CP305 d driver in the computer on which the setup disk is to be created. • The setup disk can only be used on the operating system on which the disk was created or computers running the same operating system. -
Page 58: Network Basics
Network Basics This chapter includes: • "Overview of Network Setup and Configuration" on page 58 • "Connecting Your Printer" on page 59 • "Setting the IP Address" on page 63 • "Installing Print Driver on Computers Running Windows" on page 71 •... -
Page 59: Overview Of Network Setup And Configuration
Print a Printer Settings page to verify the new settings. NOTE: • If the Driver CD Kit or PostScript Driver Library CD is not available, you can download the latest driver from the Fuji Xerox Web Site: http://www.fujixeroxprinters.com/ See also: • "Printing a Printer Settings Page" on page 136... -
Page 60: Connecting Your Printer
Connecting Your Printer Your DocuPrint CP305 d interconnection cables must meet the following requirements: Connection Type Connection Specifications USB 2.0 Ethernet 10 Base-T/100 Base-TX/1000 Base-TX 1 USB port 2 Ethernet port Network Basics... -
Page 61: Connecting Printer To Computer Or Network
Connecting Printer to Computer or Network Connect the printer via Ethernet or USB. A USB connection is a direct connection and is not used for networking. An Ethernet connection is used for networking. Hardware and cabling requirements vary for the different connection methods. Ethernet cable and hardware are generally not included with your printer and must be purchased separately. -
Page 62: Usb Connection
USB Connection A local printer is directly connected to your computer using the USB cable. If your printer is connected to a network instead of your computer, skip this section and go to "Network Connection" on page To connect the printer to a computer: Connect the smaller USB connector into the USB port on the rear of the printer. -
Page 63: Network Connection
Network Connection To connect the printer to a network: Connect an Ethernet cable. To connect the printer to the network, connect one end of the Ethernet cable into the Ethernet port on the rear of the printer, and the other end to a LAN drop or hub. Network Basics... -
Page 64: Setting The Ip Address
Setting the IP Address This section includes: • "TCP/IP and IP Addresses" on page 64 • "Automatically Setting the Printer’s IP Address" on page 65 • "Dynamic Methods of Setting the Printer’s IP Address" on page 66 • "Assigning an IP Address (for IPv4 Mode)" on page 67 •... -
Page 65: Tcp/Ip And Ip Addresses
TCP/IP and IP Addresses If your computer is on a large network, contact your network administrator for the appropriate TCP/IP addresses and additional system settings information. If you are creating your own small Local Area Network or connecting the printer directly to your computer using Ethernet, follow the procedure for automatically setting the printer’s IP address. -
Page 66: Automatically Setting The Printer's Ip Address
Automatically Setting the Printer’s IP Address If the printer is connected to a small established TCP/IP network without a DHCP server, use the installer on the Driver CD Kit or PostScript Driver Library CD to detect or assign an IP address to your printer. -
Page 67: Dynamic Methods Of Setting The Printer's Ip Address
Dynamic Methods of Setting the Printer’s IP Address There are two protocols available for dynamically setting the printer’s IP address: • DHCP (enabled by default) • AutoIP You can turn on/off both protocols using the operator panel, or use CentreWare Internet Services to turn on/off DHCP. -
Page 68: Assigning An Ip Address (For Ipv4 Mode)
Assigning an IP Address (for IPv4 Mode) NOTE: • When you assign an IP address manually in IPv6 mode, use the CentreWare Internet Services. To display the CentreWare Internet Services, use the link local address. To check a link local address, see "Printing and Checking the Printer Settings Page"... - Page 69 Ensure that the message Restart Printer to apply setting appears, and then press any button. Press the button to select Gateway Address, and then press the button. The cursor is located at the first octet of the gateway address. Specify the value of the gateway address using the button.
-
Page 70: Verifying The Ip Settings
Verifying the IP Settings You can confirm the settings by printing the system settings report or using the ping command. The following procedure uses Windows XP as an example. Print the Printer Settings page. Look under the IPv4 heading on the Printer Settings page to ensure that the IP address, subnet mask, and gateway are appropriate. -
Page 71: Printing And Checking The Printer Settings Page
Printing and Checking the Printer Settings Page Print the Printer Settings page and check your printer's IP address by using the operator panel. On the operator panel, press the Menu button. Select Report/List, and then press the button. Select Printer Settings, and then press the button. -
Page 72: Installing Print Driver On Computers Running Windows
Installing Print Driver on Computers Running Windows This section includes: • "Identifying Print Driver Pre-install Status (For Network Connection Setup)" on page 72 • "Inserting the CD-ROM" on page 73 • "USB Connection Setup" on page 74 • "Network Connection Setup" on page 75 •... -
Page 73: Identifying Print Driver Pre-Install Status (For Network Connection Setup)
In the Search box, enter firewall and then press the Enter key. In the list, click Turn Windows Firewall on or off and then follow the instructions on the screen. Enable the firewall after the installation of the Fuji Xerox printer software is complete. Network Basics... -
Page 74: Inserting The Cd-Rom
Inserting the CD-ROM For Installing PCL Print Driver Insert the Driver CD Kit into your computer to start Easy Install Navi. NOTE: → • If the CD does not automatically launch, click Start (start for Windows XP) All Programs (for →... -
Page 75: Usb Connection Setup
USB Connection Setup For Installing PCL Print Driver Click Installing Driver and Software. Click Print Driver. Click Connect via USB. Follow the procedures described in the Help to install the print driver. • USB Printing A personal printer is a printer attached to your computer or a print server using a USB. If your printer is attached to a network and not your computer, see "Network Connection Setup"... -
Page 76: Network Connection Setup
Network Connection Setup NOTE: • To use this printer in a Linux environment, you need to install a Linux driver. For more information on how to install and use these, see also "Installing Print Driver on Computers Running Linux (CUPS)" on page •... -
Page 77: Setting Up For Shared Printing
Setting Up for Shared Printing You can share your new printer on the network using the Driver CD Kit that comes with your printer, or using Microsoft peer-to-peer method. However, if you use the Microsoft method, some features, such as the SimpleMonitor and other printer utilities, installed with the Driver CD Kit, may not be available. If you want to use the printer on a network, share the printer and install its drivers on all the computers on the network. - Page 78 • For Windows Server 2008 and Windows Server 2008 64-bit Edition Click Start → Control Panel → Printers. Right-click the printer icon and select Sharing. Select the Share this printer check box, and then enter a name in Share name. Click Additional Drivers and select the operating systems of all network clients that print to the printer.
- Page 79 • For Windows XP, Windows XP 64-bit Edition, Windows Server 2003, and Windows Server 2003 x64 Edition Click start (Start for Windows Server 2003 / Windows Server 2003 x64 Edition) → Printers and Faxes. Click Add a printer (Add Printer for Windows Server 2003 / Windows Server 2003 x64 Edition) to launch the Add Printer Wizard.
- Page 80 • For Windows Vista and Windows Vista 64-bit Edition Click Start → Control Panel → Hardware and Sound → Printers. Click Add a Printer to launch the Add Printer wizard. Select Add a network, wireless or Bluetooth printer, and then click Next. If the printer is listed, select the printer and click Next, or select The printer that I want isn't listed and enter the path of the printer in Select a shared printer by name and click Next.
- Page 81 • For Windows Server 2008 and Windows Server 2008 64-bit Edition Click Start → Control Panel → Printers. Click Add a Printer to launch the Add Printer wizard. Select Add a network, wireless or Bluetooth printer, and then click Next. If the printer is listed, select the printer and click Next, or select The printer that I want isn't listed and enter the path to the printer in Select a shared printer by name and click Next.
-
Page 82: Installing Print Driver On Computers Running Mac Os X
Installing Print Driver on Computers Running Mac OS X For information on how to install the print driver, refer to the PostScript User Guide. Network Basics... -
Page 83: Installing Print Driver On Computers Running Linux (Cups)
Installing Print Driver on Computers Running Linux (CUPS) This section provides information for installing or setting up the print driver with CUPS (Common UNIX ® ® ® Printing System) on Red Hat Enterprise Linux 4 WS/5 Client or SUSE Linux Enterprise Desktop 10/11. -
Page 84: Installing The Print Driver
Installing the Print Driver This section includes: • "For Red Hat Enterprise Linux 4 WS/5 Client" on page 83 • "For SUSE Linux Enterprise Desktop 10" on page 83 • "For SUSE Linux Enterprise Desktop 11" on page 83 NOTE: •... -
Page 85: Setting Up The Queue
For USB connections with Red Hat Enterprise Linux 5 Client: Select DocuPrint XXX USB #1 or DocuPrint XXX from the Device menu. Select Fuji Xerox from the Make menu, and click Continue. Select DocuPrint XXX from the Model menu, and click Continue. - Page 86 The Description of Printer and Location of Printer do not have to be specified. Select the Do Local Filtering check box, and click Next. Select Fuji Xerox as Select manufacturer. Select XXX as Select Model, and click Next. Confirm the settings in Edit configuration, and click OK.
- Page 87 Select Line Printer Daemon (LPD) Protocol from Access Network Printer or Printserver Box via. Enter the IP address of the printer in IP Address or Host Name:. Select Fuji Xerox in Select the printer manufacturer:. Click OK. The Add New Printer Configuration dialog box appear.
-
Page 88: Setting The Default Queue
Setting the Default Queue • For Red Hat Enterprise Linux 4 WS/5 Client Select Applications → System Tools → Terminal. Enter the following command in the terminal window. (Enter the administrator password) lpadmin -d (Enter the queue name) • For SUSE Linux Enterprise Desktop 10 To activate the Printer setup: Autodetected printers, do the following. -
Page 89: Specifying The Printing Options
Specifying the Printing Options You can specify the printing options such as the color mode or 2-sided printing. • For Red Hat Enterprise Linux 4 WS/5 Client Open the URL "http://localhost:631" using a web browser. Click Manage Printers. Click Configure Printer of the queue for which you want to specify the printing options. Enter root as the user name, and enter the administrator password. - Page 90 • For SUSE Linux Enterprise Desktop 11 Open a web browser. Enter http://localhost:631/admin in Location, and press the Enter key. Enter root as the user name, and enter the administrator password. The CUPS window appears. NOTE: • Set the password for authority as the printer administrator before setting the printer queue. If you have not set it, go to "Setting the Password for Authority as the Printer Administrator"...
-
Page 91: Setting The Password For Authority As The Printer Administrator
Setting the Password for Authority as the Printer Administrator For SUSE Linux Enterprise Desktop 10 and 11, you must set the password for authority as the printer administrator to do operations as the printer administrator. • For SUSE Linux Enterprise Desktop 10 Select Computer →... -
Page 92: Uninstalling The Print Driver
Uninstalling the Print Driver • For Red Hat Enterprise Linux 4 WS/5 Client Select Applications → System Tools → Terminal. Enter the following command in the terminal window to delete the print queue. (Enter the administrator password) /usr/sbin/lpadmin -x (Enter the print queue name) Repeat the command above for all queues for the same model. - Page 93 • For SUSE Linux Enterprise Desktop 11 Select Computer → More Applications... and select GNOME Terminal on the Application Browser. Enter the following command in the terminal window to delete the print queue. (Enter the administrator password) /usr/sbin/lpadmin -x (Enter the print queue name) Repeat the command above for all queues for the same model.
-
Page 94: Printing Basics
Printing Basics This chapter includes: • "About Print Media" on page 94 • "Supported Print Media" on page 98 • "Loading Print Media" on page 103 • "Setting Paper Sizes and Types" on page 114 • "Printing" on page 117 •... -
Page 95: About Print Media
To achieve the best performance from your printer, we recommend you to use only the paper described in this section. When using paper other than that recommended, contact the Fuji Xerox local representative office or an authorised dealer. -
Page 96: Print Media Usage Guidelines
Print Media Usage Guidelines The printer tray accommodates most sizes and types of paper and other specialty media. Follow these guidelines when loading paper and media in the tray: • Envelopes can be printed from the single sheet feeder (SSF) and standard 250-sheet tray. •... -
Page 97: Print Media That Can Damage Your Printer
Print Media That Can Damage Your Printer The following paper types are not recommended for use with the printer: • Chemically treated paper used to make copies without carbon paper, also known as carbonless paper, carbonless copy paper (CCP), or no carbon required (NCR) paper. •... -
Page 98: Print Media Storage Guidelines
Print Media Storage Guidelines For proper print media storage, the following guidelines will help to avoid media feeding problems and uneven print quality. • Store print media in an environment where the temperature is approximately 70 °F/21 °C and the relative humidity is 40%. -
Page 99: Supported Print Media
To use the features of this printer effectively, use the suggested print media that is recommended here. IMPORTANT: • The toner may come off the print media, if it gets wet by water, rain, steam and so on. For details, contact the Fuji Xerox local representative office or an authorised dealer. Printing Basics... -
Page 100: Print Media Dimensions
Print Media Dimensions The maximum dimensions of print media that the standard 250-sheet tray and SSF can handle are: • Width: 76.2 mm (3.00 inches) to 215.9 mm (8.5 inches) • Length: 127 mm (5.00 inches) to 355.6 mm (14.00 inches) The maximum dimensions of print media that the optional 250-sheet feeder can handle are: •... -
Page 101: Usable Print Media
Usable Print Media The types of print media that can be used on this printer are as follows: Single Sheet Feeder (SSF) × Paper Size A4 SEF (210 297 mm) × A5 SEF (148 210 mm) × B5 SEF (182 257 mm) ×... - Page 102 Standard 250-Sheet Tray × Paper Size A4 SEF (210 297 mm) × A5 SEF (148 210 mm) × B5 SEF (182 257 mm) × Letter SEF (8.5 11 inches) × Folio SEF (8.5 13 inches) × Legal SEF (8.5 14 inches) ×...
- Page 103 Optional 250-Sheet Feeder × Paper Size A4 SEF (210 297 mm) × A5 SEF (148 210 mm) × B5 SEF (182 257 mm) × Letter SEF (8.5 11 inches) × Folio SEF (8.5 13 inches) × Legal SEF (8.5 14 inches) ×...
-
Page 104: Loading Print Media
Loading Print Media Loading print media properly helps prevent jams and ensures trouble-free printing. Before loading any print media, identify the recommended print side of the print media. This information is usually indicated on the print media package. Printing Basics... -
Page 105: Capacity
Capacity The standard 250-sheet tray and optional 250-sheet feeder can hold: • 250 sheets of the standard paper. The SSF can hold: • 1 sheet of the standard paper. Printing Basics... -
Page 106: Loading Print Media In The Standard 250-Sheet Tray And The Optional 250-Sheet Feeder
Loading Print Media in the Standard 250-Sheet Tray and the Optional 250-Sheet Feeder NOTE: • To avoid paper jams, do not remove the tray while printing is in progress. • Use only laser print media. Do not use ink jet paper in your printer. Pull the tray out of the printer about 200 mm. - Page 107 Load the print media into the tray with the recommended print side facing up. NOTE: • Do not exceed the maximum fill line in the tray. Overfilling the tray may cause paper jams. • When loading coated paper, load coated paper one sheet at a time. Align the width guides against the edges of the paper.
-
Page 108: Loading Envelope In The Standard 250-Sheet Tray
Loading Envelope in the Standard 250-Sheet Tray Use the following guidelines when loading envelopes in the standard 250-sheet tray: NOTE: • If you do not load envelopes in the standard 250-sheet tray right after they have been removed from the packaging, they may bulge. - Page 109 • Monarch or DL The Monarch or DL envelopes can be loaded in one of the following ways: Load the envelopes short edge feed with the flaps closed and the print side up. Ensure that the flaps come at the right when you face towards the printer. Load the envelopes long edge feed with the flaps open and the print side up.
-
Page 110: Loading Letterhead In The Standard 250-Sheet Tray And The Optional 250-Sheet Feeder
Loading Letterhead in the Standard 250-Sheet Tray and the Optional 250-Sheet Feeder When you use the standard 250-sheet tray and optional 250-sheet feeder, letterhead and hole punched paper enter the printer with the print side facing up. Printing Basics... -
Page 111: Loading Print Media In The Single Sheet Feeder (Ssf)
Loading Print Media in the Single Sheet Feeder (SSF) Adjust the width guides to the print media's width. Hold both sides of the print media face down close to the SSF, and push it 8 cm to 9 cm (4 inches) into the printer until it automatically feeds. -
Page 112: Loading Envelope In The Single Sheet Feeder (Ssf)
Loading Envelope in the Single Sheet Feeder (SSF) • Com-10, Monarch, or DL To load an envelope into the SSF, insert the envelope short edge feed with the flap closed and the print side down. Ensure that the flap comes at the right when you face towards the printer. IMPORTANT: •... - Page 113 • C5 To load an envelope into the SSF, insert the envelope short edge feed with the flap open and the print side down. Ensure that the flap comes at the bottom when you face towards the printer. IMPORTANT: • Never use envelopes with windows, coated linings, or self-stick adhesives.
- Page 114 Using the Single Sheet Feeder (SSF) • Load only one size and type of print media during a single print job. • To achieve the best possible print quality, use only high-quality print media that is designed for use in laser printer. For more guidelines on print media, see "Print Media Usage Guidelines"...
-
Page 115: Setting Paper Sizes And Types
Setting Paper Sizes and Types When loading print media in the standard 250-sheet tray and optional 250-sheet feeder, set the paper size and type on the operator panel before printing. NOTE: • When loading print media in the SSF, use the print driver to set the paper size and type. For more information, refer to the online help of the driver. -
Page 116: Setting Paper Sizes
Setting Paper Sizes On the operator panel, press the Menu button. Select Tray Settings, and then press the button. Select Tray 1 or Tray 2, and then press the button. Select Paper Size, and then press the button. Select the correct paper size for the print media loaded, and then press the button. -
Page 117: Setting Paper Types
Setting Paper Types IMPORTANT: • Paper type settings must match those of the actual print media loaded in the tray or the feeder. Otherwise, print-quality problems can occur. On the operator panel, press the Menu button. Select Tray Settings, and then press the button. -
Page 118: Printing
Printing This section covers how to print certain lists of information from your printer and how to cancel a job. This section includes: • "Sending a Job to Print" on page 118 • "Canceling a Print Job" on page 119 •... -
Page 119: Sending A Job To Print
Sending a Job to Print To support all of the printer features, use the print driver. When you choose Print from a software program, a window representing the print driver opens. Select the appropriate settings for the specific job that you are sending to print. Print settings selected from the driver override the default menu settings selected from the operator panel. -
Page 120: Canceling A Print Job
Canceling a Print Job There are several methods for canceling a job. This section includes: • "Canceling a Job From the Operator Panel" on page 119 • "Canceling a Job From the Computer Running Windows" on page 119 Canceling a Job From the Operator Panel To cancel a job after it has started printing: Press the Stop button. -
Page 121: Using The Stored Print Function
Using the Stored Print Function When you send a job to the printer, you can specify in the driver that you want the printer to store the job in the memory. When you are ready to print the job, go to the printer and use the operator panel menus to identify which job in the memory you want to print. -
Page 122: Printing The Stored Jobs
Printing the Stored Jobs Once jobs are stored, you can use the operator panel to specify printing. Select the job type you are using from Secure Print and Sample Print. Then, select your user ID from a list. Secure Print requires the password you specified in the driver when you sent the job. -
Page 123: Printing Pdf Files Using Pdf Bridge (Windows Only)
Printing PDF Files Using PDF Bridge (Windows Only) The printer has the PDF Bridge feature, which enables you to print PDF files directly without a print driver. Printing PDF files without a print driver is much easier and faster when compared to printing with a print driver. - Page 124 In the command prompt, enter the ftp command as described in the following example: Example: Printing "event.pdf" when the printer's IP address is 192.168.1.100. C:\> ftp 192.168.1.100 Connected to 192.168.1.100. 220 FUJI XEROX DocuPrint XXXX User (192.168.1.100:(none)): 331 Password required Password: 230 Logged in ftp>...
-
Page 125: Duplex Printing
Duplex Printing This section includes: • "Automatic Duplex Printing" on page 124 • "Using Booklet Print" on page 125 Automatic Duplex Printing Automatic duplex printing (or 2-sided printing) allows you to print on both sides of a sheet of paper. A4, Letter, Folio, and Legal paper sizes are acceptable. -
Page 126: Using Booklet Print
Using Booklet Print To use the Booklet Print feature, select Booklet Creation in the Booklet / Poster / Mixed Document / Rotation dialog box displayed by clicking the Booklet / Poster / Mixed Document / Rotation button in the Layout tab of the printer printing preferences dialog box. 2 Sided Print binding position is selected by default. -
Page 127: Selecting Printing Options
A list of available printers appears. Right-click the icon for your printer, and then select Printing Preferences. The FX DocuPrint CP305 d PCL 6 Printing Preferences screen appears. Select the Advanced Settings tab, and then click Defaults. Make selections on the driver tabs, and then click OK to save your selections. -
Page 128: Printing Options For Windows
With the desired document or graphic open in your application, access the Print dialog box. Select the FX DocuPrint CP305 d PCL 6 and click Preferences to open the print driver. Make selections on the driver tabs. See the following table for specific printing options. - Page 129 Operating System Driver Tab Printing Options Windows XP, Windows XP Paper / Output tab • Job Type x 64bit, Windows Server • Saved Settings 2003, Windows Server • 2 Sided Print 2003 x 64bit, Windows • Output Color Vista, Windows Vista x •...
- Page 130 Operating System Driver Tab Printing Options Windows XP, Windows Watermarks / Forms tab • Watermarks Server 2003, Windows – New Watermark Vista, Windows Server – New Watermark (Bitmap) 2008, or Windows 7 – Edit Watermark – Delete Watermark – Apply to First Page Only •...
-
Page 131: Selecting Options For An Individual Job (Mac Os X)
Selecting Options for an Individual Job (Mac OS X) To select print settings for a particular job, change the driver settings before sending the job to the printer. With the document open in your application, click File, and then click Print. Select the desired printing options from the menus and drop-down lists that are displayed. - Page 132 Item Printing Options Image Options • Output Color • Image Quality • Brightness • Basic Features/Advanced Features • Image Type • Image Adjustment • Screen • Color Balance • Defaults Printer Features • Feature Sets • Gray Guaranteed • Feed Orientation •...
-
Page 133: Printing Custom Size Paper
Printing Custom Size Paper This section explains how to print on custom size paper using the print driver. Custom size paper can be loaded in the SSF and standard 250-sheet tray. The way to load custom size paper in the SSF is the same as the one to load standard size paper. The way to load custom size paper in the standard 250-sheet tray is the same as the one to load standard size paper. -
Page 134: Printing On Custom Size Paper
Printing on Custom Size Paper Use the following procedures to print using either the Windows or Mac OS X print drivers. • Using the Windows Print Driver To print on custom size paper using the PCL 6 driver as an example: NOTE: •... -
Page 135: Auditron
Auditron Auditron contains an authentication function that can set limits on what processes can be used, as well as an account management that can be used to control usage based on authentication. The following illustration shows how the printer works with Auditron. Registererd user B Registererd user A Can print up to 10,000... -
Page 136: Checking Status Of Print Data
For more information about SimpleMonitor, see Help: The following procedure uses Windows XP as an example: Click start → All Programs. Select Fuji Xerox. Select SimpleMonitor for Asia-Pacific. Select SimpleMonitor Help. See also: •... -
Page 137: Printing A Report Page
Printing a Report Page You can print a variety of settings for your printer including printer settings, panel settings, job history, error history, print meter, font list, macro list, stored document list, and demo page. This section describes how to print a report page. Printing a Printer Settings Page To verify detailed printer settings, print a printer settings page. -
Page 138: Printer Settings
Printer Settings You can select menu items and corresponding values from the operator panel. When you first browse through the menus from the operator panel, you see some menu items marked with an asterisk (*). These items are the factory default and original system settings. NOTE: •... -
Page 139: Printing With Web Services On Devices (Wsd)
Printing With Web Services on Devices (WSD) This section provides information for network printing with WSD, the new Microsoft protocol for Microsoft Windows Vista, Windows Server 2008, Windows Server 2008 R2, and Windows 7. This section includes: • "Adding Roles of Print Services" on page 139 •... -
Page 140: Adding Roles Of Print Services
Adding Roles of Print Services When you use Windows Server 2008 or Windows Server 2008 R2, you need to add the roles of print services to the Windows Server 2008 or Windows Server 2008 R2 client. • For Windows Server 2008: Click Start→... -
Page 141: Printer Setup
Printer Setup You can install your new printer on the network using the Driver CD Kit that shipped with your printer, or using Microsoft Windows’ Add Printer wizard. The following procedure uses the PCL 6 driver as an example. Installing a Print Driver Using the Add Printer Wizard Click Start→... -
Page 142: Using The Operator Panel Menus
Using the Operator Panel Menus This chapter includes: • "Understanding the Printer Menus" on page 142 • "Panel Lock Function" on page 173 • "Setting the Power Saver Time Option" on page 176 • "Resetting to Factory Defaults" on page 177 Using the Operator Panel Menus... -
Page 143: Understanding The Printer Menus
Understanding the Printer Menus When your printer is connected to a network and available to a number of users, the access to the Admin Menu can be limited. This prevents other users from using the operator panel to inadvertently change a user default that has been set by the administrator. However, you can use your print driver to override user defaults and select settings for individual print jobs. -
Page 144: Report/List
Report/List Use the Report/List menu to print various types of reports and lists. Printer Settings Purpose: To print a list of the current user default values, the installed options, the amount of installed print memory, and the status of printer supplies. Panel Settings Purpose: To print a detailed list of all the settings on the operator panel menus. -
Page 145: Demo Page
Demo Page Purpose: To print a page for testing colors. Stored Documents NOTE: • Stored Documents feature is available only when the 512 MB optional memory module is installed on the printer and RAM Disk under System Settings is enabled. Purpose: To print a list of all files stored for Secure Print and Sample Print in the RAM disk. -
Page 146: Meter Readings
Meter Readings Purpose: To check the total number of printed pages. Values: Meter 1 Displays the total number of color prints. Meter 2 Displays the total number of monochrome prints. Meter 3 Displays the total number of large size color prints. Meter 4 Displays the total number of color and monochrome prints (Meter 1 + Meter 2). -
Page 147: Admin Menu
Admin Menu Use the Admin Menu menu to configure a variety of printer features. PCL Settings Use the PCL Settings menu to change printer settings that only affect jobs using the PCL emulation printer language. NOTE: • Values marked by an asterisk (*) are the factory default menu settings. •... -
Page 148: Output Size
• Output Size Purpose: To specify the default paper size. Values: mm series A4 - 210x297* A5 - 148x210 B5 - 182x257 Letter - 8.5x11 US Folio-8.5x13 Legal - 8.5x14 Executive Monarch Env. DL Env - 110x220 C5 Env - 162x229 #10Env - 4.1x9.5 New Custom Size Portrait (Y) - Page 149 • Orientation Purpose: To specify how text and graphics are oriented on the page. Values: Portrait Prints text and graphics parallel to the short edge of the paper. Landscape Prints text and graphics parallel to the long edge of the paper. •...
-
Page 150: Symbol Set
GaramondAntiqua Times Roman N C Schbk Bd Garamond Krsv Times It N C Schbk BdIt Garamond Hlb Times Bd ITC A G Go Bk GaramondKrsvHlb Times BdIt ITC A G Go BkOb Courier Helvetica ITC A G Go Dm Courier It Helvetica Ob ITC A G Go DmOb Courier Bd... -
Page 151: Font Pitch
• Font Pitch Purpose: To specify the font pitch for scalable mono spaced fonts, within the range of 6.00 to 24.00. The default is 10.00. Font pitch refers to the number of fixed-space characters in a horizontal inch of type. For nonscheduled mono spaced fonts, the pitch is displayed, but cannot be changed. -
Page 152: Draft Mode
• Draft Mode Purpose: To save toner by printing in the draft mode. The print quality is reduced when you print in the draft mode. Values: Disable Does not print in the draft mode. Enable Prints in the draft mode. •... -
Page 153: Sided Print
• 2-Sided Print Purpose: To specify whether to print on both sides of a sheet of paper. Values: 1-Sided Prints on one side of a sheet of paper. Long Edge Flip Prints on both sides of a sheet of paper to be bound by long edge. Short Edge Flip Prints on both sides of a sheet of paper to be bound by short edge. -
Page 154: Ps Error Report
• Layout Purpose: To specify the output layout. Values: Auto % 100% (No Zoom) Booklet 2 Pages Up 4 Pages Up • Output Color Purpose: To specify the output color. Values: Color (Auto) Black and White PS Settings Use the PS Settings menu to change printer settings that only affect jobs using the PostScript emulation printer language. -
Page 155: Paper Select Mode
• Paper Select Mode Purpose: To set the way to select the paper tray for PostScript mode. Values: Auto* Automatically selects the paper tray for PostScript mode. Select FromTray Manually selects the paper tray for PostScript mode. • Output Color Purpose: To set the default color for PostScript. - Page 156 IPv4 Get IP DHCP / Sets the IP address automatically. A random value in the Address Autonet range of 169.254.1.0 to 169.254.254.255 that is not currently in use on the network is set as the IP address. The subnet mask is set as 255.255.0.0. BOOTP Sets the IP address using BOOTP.
-
Page 157: Ip Filter
StatusMessenger Disable Disables the E-Mail Alert feature. Enable Enables the E-Mail Alert feature. InternetServices Disable Disables an access to CentreWare Internet Services embedded in the printer. Enable Enables an access to CentreWare Internet Services embedded in the printer. Bonjour(mDNS) Disable Disables Bonjour (mDNS). -
Page 158: Adobe Protocol
• Adobe Protocol Purpose: To set the PostScript communications protocol. Values: Auto* Sets the PostScript communications protocol automatically. Standard Sets the PostScript communications protocol to Standard. Sets the PostScript communications protocol to BCP. TBCP Sets the PostScript communications protocol to TBCP. Binary Sets the PostScript communications protocol to Binary. -
Page 159: Auto Reset
• Power Saver Time Purpose: To specify the time for transition to power saver mode. Values: Low Power 3min Specifies the time taken by the printer to enter Low Power mode after Timer it finishes a job. 3–60 min. Sleep Timer 6min Specifies the time taken by the printer to enter Sleep mode after it has entered Low Power mode. -
Page 160: Audio Tones
• Job Time-out Purpose: To specify the amount of time the printer waits for data to arrive from the computer. The print job is cancelled if the time-out time is exceeded. Values: Disables the job time-out. 30sec Sets the time the printer waits for data to arrive from the computer. 5–300 sec. -
Page 161: Mm / Inch
Out of Paper Does not emit a tone when the printer runs out of paper. Emits a tone when the printer runs out of paper. Low Toner Alert Does not emit a tone when a toner is low. Emits a tone when a toner is low. AutoClear Alert Does not emit a tone 5 seconds before the printer performs auto clear. -
Page 162: Banner Sheet
• Print ID Purpose: To specify a location where the user ID is printed. Values: Does not print the user ID. Top Left Prints the user ID on the top left of the page. Top Right Prints the user ID on the top right of the page. Bottom Left Prints the user ID on the bottom left of the page. -
Page 163: Ram Disk
• RAM Disk NOTE: • RAM Disk feature is available only when the 512 MB optional memory module is installed on the printer. Purpose: To allocate memory to the RAM disk file system for the Secure Print and Sample Print features. The change becomes effective after the printer is turned off and then on again. -
Page 164: Maintenance Mode
• LetterH Dup Mode Purpose: To specify whether to print on both sides when you use letterhead. Values: Disable Does not print on both sides of letterhead. Enable Prints on both sides of letterhead. • Low Toner Msg Purpose: To specify whether to show the alert message when the toner is low. Values: Does not show the alert message when the toner is low. - Page 165 • Adjust BTR Purpose: To specify the transfer roller voltage adjustment for each paper type. The default settings may not give the best output on all paper types. If you see mottles on the print output, try to increase the voltage. If you see white spots on the print output, try to decrease the voltage.
-
Page 166: Auto Adjust Regi
Labels -6 to +6 LW Gloss Card -6 to +6 HW Gloss Card -6 to +6 • Auto Adjust Regi Purpose: To specify whether to automatically perform color registration adjustment. Values: automatically perform color registration adjustment Does not Automatically performs color registration adjustment •... -
Page 167: Clean Developer
• Clean Developer Purpose: To stir the toner in a new toner cartridge. • Toner Refresh Purpose: To clean the toner in each toner cartridge. Values: Yellow Crtrdg Cleans the toner in the yellow toner cartridge. Magenta Crtrdg Cleans the toner in the magenta toner cartridge. Cyan Crtrdg Cleans the toner in the cyan toner cartridge. -
Page 168: Adjust Altitude
Purpose: To use toner cartridge of another manufacturer. NOTE: • Using a non-Fuji Xerox toner cartridge may severely damage your printer. The warranty does not cover damages caused by using non-Fuji Xerox toner cartridges. Values: Toner Does not use toner cartridge of another manufacturer. -
Page 169: Panel Lock
• Panel Lock Purpose: To set a limited access to Admin Menu with a password, and to set or change the password. See also: • "Panel Lock Function" on page 173. Values: Panel Lock Set Disable Disables password protection for Admin Menu. Enable Enables password protection for Admin Menu. -
Page 170: Tray Settings
Tray Settings Use the Tray Settings menu to define the print media loaded in the standard 250-sheet tray and the optional 250-sheet feeder. NOTE: • Values marked by an asterisk (*) are the factory default menu settings. Using the Operator Panel Menus... - Page 171 Tray 1 Purpose: To specify the paper loaded in the standard 250-sheet tray. Values: Paper Size A4 - 210x297* mm series A5 - 148x210 B5 - 182x257 Letter - 8.5x11 US Folio-8.5x13 Legal - 8.5x14 Executive Monarch Env. Monarch Env. L DL Env- 110x220 DL Env.
- Page 172 Paper Type Plain Light Card Heavy Card Envelope Labels Letterhead LW Gloss Card HW Gloss Card Hole Punched Colored Special Display Screen Does not display a popup menu that prompts to set Paper Type and Paper Size when paper is loaded in the standard 250-sheet tray.
- Page 173 Tray 2 NOTE: • Tray 2 feature is available only when the optional 250-sheet feeder is installed. Purpose: To specify the paper loaded in the optional 250-sheet feeder. Values: Paper Size A4 - 210x297 mm series A5 - 148x210 B5 - 182x257 Letter - 8.5x11 US Folio - 8.5x13 Legal - 8.5x14...
-
Page 174: Panel Lock Function
Panel Lock Function This feature prevents unauthorized users from changing settings made by the administrator. However, you can select settings for individual print jobs using the print driver. This section includes: • "Enabling the Panel Lock" on page 174 • "Disabling the Panel Lock" on page 175 Using the Operator Panel Menus... -
Page 175: Enabling The Panel Lock
Enabling the Panel Lock Press the Menu button. Select Admin Menu, and then press the button. Select Secure Settings, and then press the button. Select Panel Lock, and then press the button. Select Panel Lock Set, and then press the button. -
Page 176: Disabling The Panel Lock
Disabling the Panel Lock Press the Menu button. Select Admin Menu, and then press the button. Enter the password, and then press the button. Select Secure Settings, and then press the button. Select Panel Lock, and then press the button. Select Panel Lock Set, and then press the button. -
Page 177: Setting The Power Saver Time Option
Setting the Power Saver Time Option You can set the power saver time for the printer. The printer switches to the Power Saver mode after the specified time. Press the Menu button. Select Admin Menu, and then press the button. Select System Settings, and then press the button. -
Page 178: Resetting To Factory Defaults
Resetting to Factory Defaults After executing Initialize NVM and rebooting the printer, all the menu parameters or data are reset to their default values. Press the Menu button. Select Admin Menu, and then press the button. Select Maintenance Mode, and then press the button. - Page 179 Using the Operator Panel Menus...
-
Page 180: Troubleshooting
Troubleshooting This chapter includes: • "Clearing Jams" on page 180 • "Basic Printer Problems" on page 199 • "Display Problems" on page 200 • "Printing Problems" on page 201 • "Print Quality Problems" on page 203 • "Adjusting Color Registration" on page 227 •... -
Page 181: Clearing Jams
Clearing Jams This section includes: • "Avoiding Jams" on page 181 • "Identifying the Location of Paper Jams" on page 182 • "Clearing Paper Jams From the SSF" on page 183 • "Clearing Paper Jams From the Standard 250-Sheet Tray" on page 186 •... -
Page 182: Avoiding Jams
Avoiding Jams • Use only recommended print media. • "Loading Print Media in the Standard 250-Sheet Tray and the Optional 250-Sheet Feeder" on page 105 "Loading Print Media in the Single Sheet Feeder (SSF)" on page 110 to load print media properly. •... -
Page 183: Identifying The Location Of Paper Jams
Do not attempt to remove a paper jammed deeply inside the product, particularly a paper wrapped around a Fuser Unit or a heat roller. Otherwise, it may cause injuries or burns. Switch off the product promptly and contact your local Fuji Xerox representative. IMPORTANT: •... -
Page 184: Clearing Paper Jams From The Ssf
Clearing Paper Jams From the SSF IMPORTANT: • Protect the drums of the drum cartridge against bright light. If the front cover remains open for more than 3 minutes, print quality may deteriorate. NOTE: • To resolve the error displayed on the LCD panel, you must clear all print media from the print media path. Pull the jammed paper out of the SSF. - Page 185 Open the belt unit until it stops and remove the jammed paper. Confirm that there are no scraps of paper remaining inside the printer. Close the belt unit, and push at the top of the unit until it clicks. Close the front cover. Troubleshooting...
- Page 186 Insert the standard 250-sheet tray into the printer, and push until it stops. IMPORTANT: • Do not use excessive force on the tray. Doing so could damage the tray or the inside of the printer. Troubleshooting...
-
Page 187: Clearing Paper Jams From The Standard 250-Sheet Tray
Clearing Paper Jams From the Standard 250-Sheet Tray IMPORTANT: • Protect the drums of the drum cartridge against bright light. If the front cover remains open for more than 3 minutes, print quality may deteriorate. NOTE: • To resolve the error displayed on the LCD panel, you must clear all print media from the print media path. Pull the standard 250-sheet tray out of the printer carefully. - Page 188 Open the belt unit until it stops and remove the jammed paper. Confirm that there are no scraps of paper remaining inside the printer. Close the belt unit, and push at the top of the unit until it clicks. Close the front cover. Troubleshooting...
- Page 189 Insert the standard 250-sheet tray into the printer, and push until it stops. IMPORTANT: • Do not use excessive force on the tray. Doing so could damage the tray or the inside of the printer. Troubleshooting...
-
Page 190: Clearing Paper Jams From The Fuser Unit
Clearing Paper Jams From the Fuser Unit IMPORTANT: • Ensure nothing touches or scratches the surface (black-colored film) of the belt unit. Scratches, dirt, or oil from your hands on the film of the belt unit may reduce print quality. •... - Page 191 Open the cover of the fuser unit and remove the jammed paper. Close the cover of the fuser unit and press down the levers at both ends of the fuser unit. Confirm that there are no scraps of paper remaining inside the printer, and then close the belt unit.
-
Page 192: Clearing Paper Jams From The Duplexer
Clearing Paper Jams From the Duplexer NOTE: • To resolve the error displayed on the LCD panel, you must clear all print media from the print media path. Push the side button to open the front cover. Open the cover of the duplexer. Remove the jammed paper from the duplexer. -
Page 193: Clearing Paper Jams From The Optional 250-Sheet Feeder
Clearing Paper Jams From the Optional 250-Sheet Feeder NOTE: • To resolve the error displayed on the LCD panel, you must clear all print media from the print media path. Pull the optional 250-sheet feeder out of the printer carefully. Hold the feeder with both hands, and remove it from the printer. - Page 194 Open the belt unit until it stops and remove the jammed paper. Confirm that there are no scraps of paper remaining inside the printer. Close the belt unit, and push at the top of the unit until it clicks. Close the front cover. Troubleshooting...
- Page 195 NOTE: • If the paper jam message is not cleared after you close the front cover, pull out the standard 250-sheet tray and check if there is a jammed paper in the opening of the tray. Insert the optional 250-sheet feeder into the printer, and push until it stops. IMPORTANT: •...
-
Page 196: Jam Problems
If the problem persists, replace the drum cartridge if you have a spare cartridge. Replace the drum cartridge if you have a spare cartridge. If the problem persists, contact the Fuji Xerox local representative office or an authorised dealer. Troubleshooting... -
Page 197: Ssf Misfeed Jam
If the problem persists, replace the drum cartridge if you have a spare cartridge. Replace the drum cartridge if you have a spare cartridge. If the problem persists, contact the Fuji Xerox local representative office or an authorised dealer. Troubleshooting... -
Page 198: Optional 250-Sheet Feeder Misfeed Jam
Wipe the feed roller in the optional 250-sheet feeder with a cloth moistened with water. If the problem persists, contact the Fuji Xerox local representative office or an authorised dealer. Regi Jam (Exit Sensor On JAM) -
Page 199: Exit Jam (Exit Sensor Off Jam)
Exit jam (Exit Sensor Off JAM) Ensure that the fuser unit is installed correctly. occurs. Replace the fuser unit. If the problem persists, contact the Fuji Xerox local representative office or an authorised dealer. Standard 250-Sheet Tray/Optional 250-Sheet Feeder Multi-feed Jam Problem... -
Page 200: Basic Printer Problems
Basic Printer Problems Some printer problems can be easily resolved. If a problem occurs with your printer, check each of the following: • The power cord is connected to the printer, and to a properly grounded electrical outlet. • The printer is turned on. •... -
Page 201: Display Problems
Display Problems Problem Action After the printer is turned on, the Turn off the printer, wait for 10 seconds, and turn on the printer. Self display on the LCD panel is Test Message appears on the LCD panel. When the test is blank, keeps showing Please completed, Ready is displayed. -
Page 202: Printing Problems
Printing Problems Problem Action Job did not print or incorrect Ensure that the top menu appears on the LCD panel before you send characters printed. a job to print. Press the Menu button to return to the top menu. Ensure that the print media is loaded in the printer. Press the Menu button to return to the top menu. - Page 203 Problem Action Page breaks in unexpected Increase the value for the time-out on the operator panel or places. CentreWare Internet Services. Print media does not stack neatly Turn the print media stack over in the tray. in the output bin. Cannot print from the standard Load the print media into the SSF.
-
Page 204: Print Quality Problems
Print Quality Problems This section includes: • "The Output Is Too Light" on page 204 • "Toner Smears or Print Comes Off" on page 206 • "Random Spots/Blurred Images" on page 207 • "The Entire Output Is Blank" on page 208 •... -
Page 205: The Output Is Too Light
The Output Is Too Light Troubleshooting... - Page 206 Replace the drum cartridge if you have a spare cartridge. See also: • "Replacing the Drum Cartridge" on page 257 • "Installing the Drum Cartridge" on page 260 If the problem persists, contact the Fuji Xerox local representative office or an authorised dealer. Troubleshooting...
-
Page 207: Toner Smears Or Print Comes Off
• "Replacing the Drum Cartridge" on page 257 • "Installing the Drum Cartridge" on page 260 After you replace the drum cartridge, test print your document again. If the problem persists, contact the Fuji Xerox local representative office or an authorised dealer. Troubleshooting... -
Page 208: Random Spots/Blurred Images
Replace the drum cartridge if you have a spare cartridge. See also: • "Replacing the Drum Cartridge" on page 257 • "Installing the Drum Cartridge" on page 260 If the problem persists, contact the Fuji Xerox local representative office or an authorised dealer. Troubleshooting... -
Page 209: The Entire Output Is Blank
The Entire Output Is Blank Troubleshooting... - Page 210 Replace the drum cartridge if you have a spare cartridge. See also: • "Replacing the Drum Cartridge" on page 257 • "Installing the Drum Cartridge" on page 260 If the problem persists, contact the Fuji Xerox local representative office or an authorised dealer. Troubleshooting...
-
Page 211: Streaks Appear On The Output
Replace the drum cartridge if you have a spare cartridge. See also: • "Replacing the Drum Cartridge" on page 257 • "Installing the Drum Cartridge" on page 260 If the problem persists, contact the Fuji Xerox local representative office or an authorised dealer. Troubleshooting... -
Page 212: Part Or The Entire Output Is Black
Replace the drum cartridge if you have a spare cartridge. See also: • "Replacing the Drum Cartridge" on page 257 • "Installing the Drum Cartridge" on page 260 If the problem persists, contact the Fuji Xerox local representative office or an authorised dealer. Troubleshooting... -
Page 213: Pitched Color Dots
Replace the drum cartridge if you have a spare cartridge. color dots. See also: • "Replacing the Drum Cartridge" on page 257 • "Installing the Drum Cartridge" on page 260 If the problem persists, contact the Fuji Xerox local representative office or an authorised dealer. Troubleshooting... -
Page 214: Vertical Blanks
Replace the drum cartridge if you have a spare cartridge. See also: • "Replacing the Drum Cartridge" on page 257 • "Installing the Drum Cartridge" on page 260 If the problem persists, contact the Fuji Xerox local representative office or an authorised dealer. Troubleshooting... -
Page 215: Mottle
Verify that the print media recommended for the printer is being used. appearance. If you use non-recommended print media, use the print media recommended for the printer. If the problem persists, contact the Fuji Xerox local representative office or an authorised dealer. Troubleshooting... -
Page 216: Ghosting
• "Replacing the Drum Cartridge" on page 257 • "Installing the Drum Cartridge" on page 260 If the problem persists, contact the Fuji Xerox local representative office or an authorised dealer. If the type of the ghosting is negative ghost: Verify that the print media recommended for the printer is being used. -
Page 217: Light-Induced Fatigue
Replace the drum cartridge if you have a spare cartridge. light-induced fatigue pattern. See also: • "Replacing the Drum Cartridge" on page 257 • "Installing the Drum Cartridge" on page 260 If the problem persists, contact the Fuji Xerox local representative office or an authorised dealer. Troubleshooting... -
Page 218: Fog
Replace the drum cartridge if you have a spare cartridge. See also: • "Replacing the Drum Cartridge" on page 257 • "Installing the Drum Cartridge" on page 260 If the problem persists, contact the Fuji Xerox local representative office or an authorised dealer. Troubleshooting... -
Page 219: Bead-Carry-Out (Bco)
Replace the drum cartridge if you have a spare cartridge. happening. See also: • "Replacing the Drum Cartridge" on page 257 • "Installing the Drum Cartridge" on page 260 If the problem persists, contact the Fuji Xerox local representative office or an authorised dealer. Troubleshooting... -
Page 220: Jagged Characters
If using a downloaded font, ensure that the font is recommended for the printer, operating system, and the application being used. If the problem persists, contact the Fuji Xerox local representative office or an authorised dealer. Troubleshooting... -
Page 221: Banding
Replace the drum cartridge if you have a spare cartridge. See also: • "Replacing the Drum Cartridge" on page 257 • "Installing the Drum Cartridge" on page 260 If the problem persists, contact the Fuji Xerox local representative office or an authorised dealer. Troubleshooting... -
Page 222: Auger Mark
Replace the drum cartridge if you have a spare cartridge. mark. See also: • "Replacing the Drum Cartridge" on page 257 • "Installing the Drum Cartridge" on page 260 If the problem persists, contact the Fuji Xerox local representative office or an authorised dealer. Troubleshooting... -
Page 223: Wrinkled/Stained Paper
If the problem with printing on a print media other than envelopes persists, contact the Fuji Xerox local representative office or an authorised dealer. Check whether the wrinkle of the four edges of the envelope is within 30 mm. -
Page 224: Damage On The Leading Edge Of Paper
When using the standard 250-sheet tray or optional 250-sheet feeder, change the paper and then try again. If the problem persists, contact the Fuji Xerox local representative office or an authorised dealer. Change the paper with another one and then try again. -
Page 225: The Top And Side Margins Are Incorrect
The Top and Side Margins Are Incorrect Problem Action The top and side margins are Ensure that the margins are set correctly on the application being incorrect. used. If the problem persists, contact the Fuji Xerox local representative office or an authorised dealer. Troubleshooting... -
Page 226: Color Registration Is Out Of Alignment
Check whether or not you have a spare drum cartridge. If you have a spare drum cartridge, replace the drum cartridge. If you do not have a spare drum cartridge, contact the Fuji Xerox local representative office or an authorised dealer. -
Page 227: Protrudent/Bumpy Paper
Load the printed sheet with the side to be printed on facing down, and then print a blank sheet of paper. If the problem persists, contact the Fuji Xerox local representative office or an authorised dealer. Troubleshooting... -
Page 228: Adjusting Color Registration
Adjusting Color Registration This section describes how to adjust the color registration when you first install the printer or after moving it to a new location. This section includes: • "Performing Auto Adjust" on page 228 • "Printing the Color Registration Chart" on page 229 •... -
Page 229: Performing Auto Adjust
Performing Auto Adjust Auto Adjust allows you to correct the color registration automatically. The Operator Panel Press the Menu button. Select Admin Menu, and then press the button. Select Maintenance Mode, and then press the button. Select Adjust ColorRegi, and then press the button. -
Page 230: Printing The Color Registration Chart
Printing the Color Registration Chart Press the Menu button. Select Admin Menu, and then press the button. Select Maintenance Mode, and then press the button. Select Adjust ColorRegi, and then press the button. Select ColorRegi Chart, and then press the button. -
Page 231: Determining Values
Determining Values On the color registration chart, there are two types of charts: Chart 1 (fast scan) and Chart 2 (slow scan). The Chart 1 is used to adjust the color registration for the fast scan direction, which is vertical to paper feed direction. -
Page 232: Entering Values
Entering Values Lattice pattern Using the operator panel, enter the values found in the color registration chart to make adjustments. Press the Menu button. Select Admin Menu, and then press the button. Select Maintenance Mode, and then press the button. Select Adjust ColorRegi, and then press the button. - Page 233 Press the button. Select ColorRegi Chart, and then press the button. Ensure that Are You Sure? appears, and then press the button. The color registration chart is printed with the new values. If the straightest line is not at the value of 0, adjust the values again. Checking the charts before and after the adjustments will help you to determine the values to enter.
-
Page 234: Problems With Installed Optional Accessories
Problems With Installed Optional Accessories Problem Action The optional 250-sheet feeder Ensure that the optional 250-sheet feeder is correctly installed on the does not work correctly. printer. Re-install the optional 250-sheet feeder. See also: • "Removing the Optional 250-Sheet Feeder" on page 288 •... -
Page 235: Other Problems
Other Problems Problem Action Condensation has occurred This usually occurs within several hours after you heat the room in inside the printer. winter. This also occurs when the printer is operating in a location where relative humidity reaches 85% or more. Adjust the humidity or relocate the printer to an appropriate environment. -
Page 236: Understanding Printer Messages
Understanding Printer Messages The printer LCD panel displays messages describing the current state of the printer and indicates possible printer problems you must resolve. This section describes messages, their meanings, and how to clear the messages. IMPORTANT: • When an error code is displayed, the print data remaining on the printer and the information accumulated in the memory of the printer are not secured. - Page 237 024-914 Reload the specified paper on the SSF. 024-923 Open the side cover. Remove the used yellow cartridge, and install a new cartridge. 024-924 Open the side cover. Remove the used magenta cartridge, and install a new cartridge. 024-925 Open the side cover. Remove the used cyan cartridge, and install a new cartridge. 024-946 Insert the standard 250-sheet tray.
- Page 238 093-919 Remove and shake the yellow cartridge. Contact customer support if this failure is repeated. 093-920 Remove and shake the magenta cartridge. Contact customer support if this failure is repeated. 093-921 Remove and shake the cyan cartridge. Contact customer support if this failure is repeated.
-
Page 239: Contacting Service
Contacting Service When you call for printer service, be prepared to describe the problem you are experiencing or the error message on the LCD panel. You need to know the model type and service tag of your printer. See the label located on the rear of your printer. -
Page 240: Getting Help
This section includes: • "LCD Panel Messages" on page 240 • "SimpleMonitor Alerts" on page 241 • "Obtaining the Product Information" on page 242 Fuji Xerox provides several automatic diagnostic tools to help you produce and maintain print quality. Troubleshooting... -
Page 241: Lcd Panel Messages
LCD Panel Messages The LCD panel provides you with information and troubleshooting help. When an error or warning condition occurs, the LCD panel displays a message informing you of the problem. See also: • "Understanding Printer Messages" on page 235 Troubleshooting... -
Page 242: Simplemonitor Alerts
SimpleMonitor Alerts The SimpleMonitor is a tool that is included on the Driver CD Kit. It automatically checks the printer status when you send a print job. If the printer is unable to print your job, the SimpleMonitor automatically displays an alert on your computer screen to let you know that the printer needs attention. -
Page 243: Obtaining The Product Information
• You can browse our web site also on the Driver CD Kit included with the printer. To access the web site, click Fuji Xerox Web Site on the startup window of the CD-ROM. • The URL of the driver download service page is as follows: http://www.fujixeroxprinters.com/... -
Page 244: Non-Genuine Mode
Non-Genuine Mode When toner within a toner cartridge is empty, the Replace XXXX Print Cartridge (XXXX: Yellow, Magenta, Cyan, or Black) message appears. When you want to use the printer in Non-Genuine mode, program the mode and replace the print cartridge. - Page 245 Troubleshooting...
-
Page 246: Maintenance
Maintenance This chapter includes: • "Cleaning the Printer" on page 246 • "Replacing Toner Cartridges" on page 252 • "Replacing the Drum Cartridge" on page 257 • "Replacing the Fuser Unit" on page 263 • "Replacing the Feed Roller Unit" on page 269 •... -
Page 247: Cleaning The Printer
Cleaning the Printer This section describes how to clean the printer in order to maintain it in good condition and print clean printouts all the time. WARNING: • When cleaning this product, use the designated cleaning materials exclusive to it. Other cleaning materials may result in poor performance of the product. -
Page 248: Cleaning Inside The Printer
Cleaning Inside the Printer Clean the feed roller inside the printer if print media does not feed correctly. Turn off the printer and disconnect the power cord. Pull the standard 250-sheet tray out of the printer about 200 mm. Hold the standard 250-sheet tray with both hands, and remove it from the printer. - Page 249 Hold the drum cartridge levers, and then pull out the drum cartridge. NOTE: • Keep the drum cartridge in a dark place. If the front cover remains open for more than 3 minutes, print quality may deteriorate. Clean the feed roller inside the printer with a dry cloth. Insert the drum cartridge until the line on the handle aligns with the white line on the printer.
- Page 250 Close the belt unit, and push at the top of the unit until it clicks. Close the front cover. Insert the standard 250-sheet tray into the printer, and push until it stops. IMPORTANT: • Do not use excessive force on the tray. Doing so could damage the tray or the inside of the printer. Maintenance...
-
Page 251: Cleaning The Color Toner Density (Ctd) Sensor
Cleaning the Color Toner Density (CTD) Sensor Clean the Color Toner Density (CTD) sensor only when an alert for the CTD sensor is shown on the Printer Status window or operator panel. Turn off the printer and disconnect the power cord. Pull the standard 250-sheet tray out of the printer about 200 mm. - Page 252 Close the belt unit, and push at the top of the unit until it clicks. Close the front cover. Insert the standard 250-sheet tray into the printer, and push until it stops. IMPORTANT: • Do not use excessive force on the tray. Doing so could damage the tray or the inside of the printer. Maintenance...
-
Page 253: Replacing Toner Cartridges
Fuji Xerox toner cartridges are available only through Fuji Xerox. It is recommended that you use Fuji Xerox toner cartridges for your printer. Fuji Xerox does not provide warranty coverage for problems caused by using accessories, parts, or components not supplied by Fuji Xerox. -
Page 254: Overview
Overview The printer has toner cartridges of four colors: black (K), yellow (Y), magenta (M), and cyan (C). When a toner cartridge reaches its usable life-span, the following messages appear on the LCD panel. Message Action The toner cartridge has become empty. Replace the old toner Replace XXXX Toner cartridge with a new one. -
Page 255: Removing The Toner Cartridges
Removing the Toner Cartridges Open the side cover. Push the latch(es) backwards to pop open the toner cartridge(s) that you want to replace. Pull the cartridge holder until it clicks, and then pull out the toner cartridge. IMPORTANT: • Always pull the toner cartridge out slowly so you do not spill any toner. Maintenance... -
Page 256: Installing A Toner Cartridge
Installing a Toner Cartridge Unpack a new toner cartridge of the desired color and shake it five to six times to distribute the toner evenly. NOTE: • Ensure that the color of the new toner cartridge matches that on the handle before replacing it. •... - Page 257 Maintenance...
-
Page 258: Replacing The Drum Cartridge
Replacing the Drum Cartridge This section describes how to replace the drum cartridge. IMPORTANT: • Protect the drums of the drum cartridge against bright light. If the front cover remains open for more than 3 minutes, print quality may deteriorate. •... -
Page 259: Removing The Drum Cartridge
Removing the Drum Cartridge Pull the standard 250-sheet tray out of the printer about 200 mm. Hold the standard 250-sheet tray with both hands, and remove it from the printer. Push the side button to open the front cover. Open the belt unit. Turn the four drum cartridge lock levers 90-degrees counterclockwise. - Page 260 Maintenance...
-
Page 261: Installing The Drum Cartridge
Installing the Drum Cartridge Open the drum cartridge packaging. Take out the drum cartridge from the packaging. Completely pull out the eight yellow ribbons from the drum cartridge. Remove the rear protective cover from the drum cartridge. NOTE: • Do not remove the front protective cover at this moment. Maintenance... - Page 262 Insert the drum cartridge until the line on the handle aligns with the white line on the printer. Turn the four drum cartridge lock levers 90-degrees clockwise to lock the drum cartridge. Remove the front protective cover from the drum cartridge. IMPORTANT: •...
- Page 263 Insert the standard 250-sheet tray into the printer, and push until it stops. IMPORTANT: • Do not use excessive force on the tray. Doing so could damage the tray or the inside of the printer. Maintenance...
-
Page 264: Replacing The Fuser Unit
Replacing the Fuser Unit This section describes how to replace the fuser unit. CAUTION: • Before removing the fuser unit, turn off the printer and wait for 40 minutes until the fuser unit cools down. IMPORTANT: • To prevent electric shock, always turn off the printer and disconnect the power cord from the grounded outlet before performing maintenance. -
Page 265: Removing The Fuser Unit
Removing the Fuser Unit Turn off the printer and disconnect the power cord. Remove any paper in the output tray. Push the side button to open the front cover. Open the belt unit. Pinch the gray lever on the right side of the fuser unit and lower the lever toward you. Maintenance... - Page 266 Hold both sides of the fuser unit. Next, slightly raise the right side while holding down the left side, and slide out the fuser unit. Maintenance...
-
Page 267: Installing The Fuser Unit
Installing the Fuser Unit Insert the protrusions of the new fuser unit into the two slots of the printer. NOTE: • Hold both sides of the fuser unit with your hands. • Make sure that the fuser unit is firmly set in the slots and cannot be moved easily. Push the fuser unit forward until the right groove of the snaps into place. - Page 268 Reconnect the power cord to the power connector and turn on the printer. Maintenance...
-
Page 269: Resetting The Counter Of The Fuser Unit
Resetting the Counter of the Fuser Unit After replacing the fuser unit, use the operator panel to reset the counter of the fuser unit. Press the Menu button. Select Admin Menu, and then press the button. Select Maintenance Mode, and then press the button. -
Page 270: Replacing The Feed Roller Unit
"Online Services" on page 293. It is recommended that you use Fuji Xerox feed rollers for your printer. Fuji Xerox does not provide warranty coverage for problems caused by using accessories, parts, or components not supplied by Fuji Xerox. This section includes: •... -
Page 271: Removing The Feed Roller Unit In The Standard 250-Sheet Tray
Removing the Feed Roller Unit in the Standard 250-Sheet Tray Pull the standard 250-sheet tray out of the printer about 200 mm. Hold the standard 250-sheet tray with both hands, and remove it from the printer. NOTE: • Ensure that you remove all the paper from the standard 250-sheet tray before removing the feed roller unit. -
Page 272: Installing The Feed Roller Unit In The Standard 250-Sheet Tray
Installing the Feed Roller Unit in the Standard 250-Sheet Tray Align the new feed roller unit with the groove on the axle. Insert the feed roller unit into the axle until it snaps. The protrusions fit completely into the slots and the roller hook reseats into the groove on the axle. -
Page 273: Ordering Supplies
Ordering Supplies This section includes: • "Consumables" on page 273 • "When to Order Supplies" on page 274 • "Recycling Supplies" on page 275 Certain consumables and routine maintenance items need to be ordered occasionally. Each supply includes installation instructions on the box. Maintenance... -
Page 274: Consumables
Consumables IMPORTANT: • Use of consumables/periodical replacement parts not recommended by Fuji Xerox can impair machine quality and performance. Use only consumables/periodical replacement parts recommended by Fuji Xerox. Product Name Product Code Printable number of pages Toner Cartridge K CT201632 Approx. -
Page 275: When To Order Supplies
It is important to order these supplies when the messages first appear to avoid interruptions to your printing. The LCD panel displays an error message when the supply must be replaced. To order supplies, contact the Fuji Xerox local representative office or an authorised dealer. IMPORTANT: •... -
Page 276: Recycling Supplies
Recycling Supplies • For environmental protection and efficient use of resources, Fuji Xerox reuses returned toner cartridges to make recycle parts, recycle materials or energy recovery. • Proper disposal is required for toner cartridges no longer needed. Do not open toner cartridges containers. -
Page 277: Storing Print Media
Storing Print Media To avoid potential paper feeding problems and uneven print quality, there are several things you can • To achieve the best possible print quality, store print media in an environment where the temperature is approximately 70 °F/21 °C and the relative humidity is 40%. •... -
Page 278: Storing Consumables
Storing Consumables Store consumables in their original packaging until you need to use them. Do not store consumables • Temperatures greater than 104 °F/40 °C. • An environment with extreme changes in humidity or temperature. • Direct sunlight. • Dusty places. •... -
Page 279: Managing The Printer
Managing the Printer This section includes: • "Checking or Managing the Printer with CentreWare Internet Services" on page 279 • "Checking Printer Status with SimpleMonitor (Windows Only)" on page 280 Maintenance... -
Page 280: Checking Or Managing The Printer With Centreware Internet Services
Checking or Managing the Printer with CentreWare Internet Services When the printer is installed in a TCP/IP environment, you can use CentreWare Internet Services to check the printer status, the remaining volume of consumables, and the paper loaded in this printer. You can also use CentreWare Internet Services to configure printer settings. -
Page 281: Checking Printer Status With Simplemonitor (Windows Only)
Checking Printer Status with SimpleMonitor (Windows Only) SimpleMonitor is a tool that is installed with your Fuji Xerox print driver. It automatically checks the printer status when you send a print job. SimpleMonitor can check the paper size loaded into the tray, the status of the output tray, and the remaining amount of consumables, such as toner cartridges. -
Page 282: Conserving Supplies
Conserving Supplies You can change several settings in your print driver to conserve toner cartridge and paper. The following descriptions use the PCL 6 driver as an example. Supply Setting Function Toner cartridge Draft Mode in the This check box allows the users to select a print mode Advanced Settings tab that uses less toner. -
Page 283: Checking Page Counts
Checking Page Counts The total number of printed pages can be checked at the operator panel. Four meters are available: Meter 1, Meter 2, Meter 3, and Meter 4. The Meter Readings counts the number of pages printed properly. Single side color print (including N-up) is counted as one job, and 2-sided print (including N-up) is counted as two. -
Page 284: Moving The Printer
Moving the Printer This section describes how to move the printer. IMPORTANT: • Two people are required to move the printer. • To prevent you from dropping the printer and getting backache or injuries, lift the printer by firmly gripping the recessed areas on both sides of the printer. - Page 285 Insert the standard 250-sheet tray into the printer, and push until it stops. IMPORTANT: • Do not use excessive force on the tray. Doing so could damage the tray or the inside of the printer. Adjust the color registration before using your printer. See also: •...
-
Page 286: Removing Options
Removing Options If the printer location needs to be changed or the printer and print media handling options need to be shipped to a new location, all print media handling options must be removed from the printer. For shipping, pack the printer and print media handling options securely to avoid damage. This section includes: •... -
Page 287: Removing The Optional Memory Module
Removing the Optional Memory Module Turn off the printer. Turn the screw on the control board cover counterclockwise, and open the cover. NOTE: • Loosen the screw. You do not need to remove the screw. Push the clips on both sides of the slot outward. Hold the memory module and pull it straight out. - Page 288 Close the control board cover, and turn the screw clockwise. Turn on the printer. Maintenance...
-
Page 289: Removing The Optional 250-Sheet Feeder
Removing the Optional 250-Sheet Feeder Turn off the printer. Disconnect the power cord from the power connector on the rear of the printer. Pull the standard 250-sheet tray out of the printer about 200 mm. Hold the standard 250-sheet tray with both hands, and remove it from the printer. Remove the two screws joining the printer and the optional 250-sheet feeder by unscrewing them with a coin or similar object. - Page 290 Gently lift the printer off the optional 250-sheet feeder, and place it on a level surface. CAUTION: • Two people are required to lift the printer. Insert the standard 250-sheet tray into the printer, and push until it stops. Reconnect all cables into the rear of the printer and turn on the printer. Maintenance...
- Page 291 Maintenance...
-
Page 292: Contacting Fuji Xerox
Contacting Fuji Xerox This chapter includes: • "Technical Support" on page 292 • "Online Services" on page 293 Contacting Fuji Xerox... -
Page 293: Technical Support
If the Customer’s product contains features that enable Fuji Xerox or its authorised service representative to diagnose and repair problems with the product remotely, Fuji Xerox may request that the Customer allow such remote access to the product. -
Page 294: Online Services
Fuji Xerox Online Support Assistant provides instructions and troubleshooting guides to resolve your printer problems. It is an easy-to-use, searchable online help. To find out more, please visit our online support at http://www.fujixerox.com/support/docuprint/... - Page 295 Contacting Fuji Xerox...
- Page 296 Auditron Mode Connection type Auto Adjust Regi Conserving supplies Auto Job History consumables Auto Reset Contacting Fuji Xerox Automatic Duplex Printing Contacting service Automatically Setting the IP Address ContentsBridge Utility Avoiding jam Control Board Cover Counter of the Fuser Unit...
- Page 297 Entering Values IP Filter Envelope IP Mode Error History Error LED IPv4 Error-Code IPv6 Ethernet Ethernet Port Jam Problems Job History F/W Version Job Time-out Fast Scan Fault Time-out Font Kensington lock Font Pitch Font Size Form Line Labels Front Cover Landscape Lattice pattern Fuser Unit...
- Page 298 LCD panel Portrait SimpleMonitor Power Connector Meter Readings Power Saver Time meter readings Power Switch total printed pages Preparing Printer Hardware meters print deriver (Macintosh) total page counts Installing print driver mm / inch print driver (Linux) Mottle Installing print driver moving print driver (Windows) printer...
- Page 299 StatusMessenger Stored Documents RAM Disk Stored Print RARP Storing consumables Ready LED Storing print media recycling supplies Straightest lines Removing options Subnet Mask Removing Paper Jam Substitute Tray From Duplexer Supplies From Fuser Unit recycling From Optional 250-sheet Feeder when to order From SSF Supported Print Media From Standard 250-sheet Tray...