Advertisement
Advertisement
Table of Contents

Related Manuals for Fitness Quest Edge 386da


Summary of Contents for Fitness Quest Edge 386da
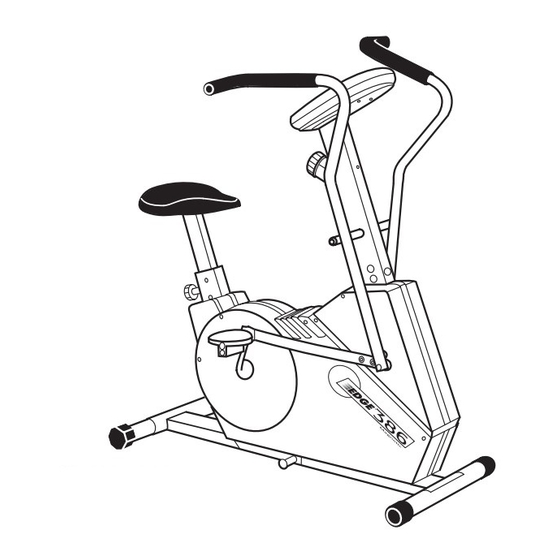
- Page 1 ® Model 386da Dual Action Magnetic Bike...
- Page 2 Congratulations on purchasing your Edge With this product in your home, you have everything you need to start your own workout program to tone and firm the major muscle groups of your upper and lower body. This is vital for all of us, regardless of age, sex, or fitness level, and regardless of whether your primary goal is toning, health maintenance, or more energy for daily activities.
-
Page 3: Important Safety Instructions
IMPORTANT SAFETY INSTRUCTIONS Read all instructions before using this machine CAUTION: Exercise of a strenuous nature, as is customarily done on this equipment, should not be undertaken without first consulting a physician. No specific health claims are made or implied as they relate to the equipment. 1. -
Page 4: Parts Identification
Comments or Questions? Dear Customer, Congratulations on your purchase of the Edge® 386 Dual Action Magnetic Bike. We’re sure that you will be completely satisfied with the product and we invite your comments so that we can hear about your success. Please write or call our Customer Service Specialists at the address or phone number listed below, or contact us on our web site, with any comments or questions you may have. - Page 5 ASSEMBLY Occasionally our products contain components that are pre-lubricated at the factory. We recommend that you protect flooring, or anything else the parts may contact, with newspaper or cloth. PLEASE READ ALL INSTRUCTIONS CAREFULLY BEFORE ASSEMBLING. FIGURE 1 NOTE: There are two FOOT TUBES. The REAR FOOT TUBE has FOOT CAPS (6) on each end and the FRONT FOOT TUBE has WHEELS (7).
- Page 6 ASSEMBLY FIGURE 3 Step 5. Slide PEDAL BUSHING (8) onto SHAFTS of PEDALS (9 RIGHT and 10 LEFT) as shown. Step 6. Thread SHAFTS of PEDALS (9 & 10) into CRANK (11) until tight, then back off 1/2 turn. Step 7. Thread PEDAL LOCK NUT (12) onto end of SHAFT.
- Page 7 ASSEMBLY NOTE: You may need two people to complete the following steps. One to hold CONSOLE TUBE (16) while attachments are made. FIGURE 5 Step 11. Remove the four BUTTON HEAD SCREWS (20) and M8 WASHERS (4) from the FRAME (3). Step 12.
- Page 8 ASSEMBLY FIGURE 6 Step 16. With PIVOT TUBES on REAR side of HANDLEBARS (21 RIGHT and 22 LEFT) and CONNECTING ARMS (23 RIGHT and 24 LEFT) to inside, slide HANDLEBARS onto AXLE. (Remove tape at AXLE TUBE area). Step 17. Slide LARGE WASHER (25) onto end of AXLE and carefully tap PUSH NUT (26) onto end of AXLE with hammer.
- Page 9 ASSEMBLY Step 20 is for SINGLE ACTION MODE. FIGURE 9 Step 20. Lower SLOT in CONNECTING ARMS (23 RIGHT & 24 LEFT) onto LOCKOUT ROD and slide RETAINER (28) back over LOCKOUT ROD to lock CONNECTING ARM in SINGLE ACTION MODE. NOTE: There are three ADJUSTMENT HOLES in each CONNECTING ARM (23 &...
- Page 10 ASSEMBLY FIGURE 11 Step 24. Remove BATTERY DOOR of CONSOLE (32) and insert two "AA" SIZE BATTERIES and replace BATTERY DOOR. NOTE: DO NOT use rechargeable batteries. Using rechargeable batteries will cause a short circuit and destroy CONSOLE (32). IMPORTANT Your monitor includes low grade batteries that will operate the computer for display purposes only.
-
Page 11: Exercise Program
EXERCISE PROGRAM HOW TO BEGIN WARNING: Prior to undertaking any exercise, or program of exercise that requires a major increase in physical activity, consultation with a competent medical authority is strongly recommended. In addition, anyone who has a physical handicap, who suffers from a prolonged illness, or who has increased risk factors such as obesity, hypertension, cardiocirculatory problems, etc., should consult a competent medical authority before undertaking any exercise, or engaging in a continuing program of exercise. -
Page 12: Monitoring Your Heart Rate
PLANNING AN EXERCISE PROGRAM When and how much exercise to do. Probably the most important part of exercising, especially if exercise is new for you, is commitment, commitment, commitment! Maintaining a physically fit body does not require hours and hours of your time. For an average non-exercising person, a safe and generally accepted schedule is to exercise consistently for 20 to 30 minutes, three times per week to maintain cardiovascular fitness. - Page 13 HEART RATE TARGET ZONE FOR CARDIOVASCULAR FITNESS Heart Rate (Beats/Min) Exercise Warm Up Week Period 1 & 2 3 & 4 5 & 6 7 & 8 9 & 10 11 & 12 TABLE 1 AGE (YRS) TABLE 2 THR% Cool Down Minutes Period...
-
Page 14: Working Out
WARMING UP The greatest improvements are achieved when muscles are warm. Stretches should be slow, steady, and held for 15 to 30 seconds, then gradually release back to the starting position. Stretch to a point where tension is felt, not pain. Never bounce or jerk while stretching. The most important feature of balanced fitness is to be consistent. -
Page 15: Computer Instructions
COMPUTER INSTRUCTIONS INTRODUCTION Your monitor will show approximate calories burned, elapsed time, speed and distance traveled to help you track your progress. IMPORTANT: Always consult with your physician before beginning any exercise program. If you are taking medication which may affect your heart rate, a physician's advise is absolutely essential. -
Page 16: Parts List
ITEM QTY. PART NAME M8 x 1.25 x 60mm Carriage Bolt Foot Tube Frame M8 ID x 18.8mm OD Flat Washer M8 x 1.25 Cap Nut Foot Cap Wheel Pedal Bushing Right Pedal Left Pedal Crank Pedal Nut Seat Seat Post Locking Knob Console Tube Extension Wire... - Page 17 FIGURE 13...
- Page 18 Dedication to Quality Fitness Quest warrants this product to be free from all defects in material and workmanship when used according to the manufacturer’s instructions. See Limited Warranty Card for details. If you have any comments or questions contact our Customer Service Department, toll free at 1-800-321-9236, Monday through Friday, 9:00 am to 5:00 pm, Eastern Time.