Chapters
Table of Contents

Subscribe to Our Youtube Channel
Related Manuals for Hoover U5184-900


Summary of Contents for Hoover U5184-900
- Page 1 Owner's Manual Operating and Servicing instructions www.hoover.corn ® Please review this manual before operating your Hoover _ product. ©2008 Healthy Gain Investments, Ltd. All rights reserved. #59t56504. 3/08...
-
Page 2: Table Of Contents
Thermal Protector ............Parts a acceSSorieS mail order form ......... If you need assistance: Visit our website at hoover.com. Follow the service center link to find the service outlet nearest you OR Colt 1-800-944-9200 for an automated referral of authorized... -
Page 3: Important Safeguards
Hoover Sales and Hoover Warranty Service Dealer (Depot). Service Center or Authorized • Do not pull or carry by cord, use cord as a handle, close door on cord or pull cord around sharp edges or comers. -
Page 4: Carton Contents
1. Assembling cleaner Carton contents Empty carton. Find the parts shown below Cleaner assembly before disposing of packing materials. Attach vacuum hose to wand. Slide wand and handle into the slot "¢,£ .j until you hear a click. • A. Handle section Snap hose into B. -
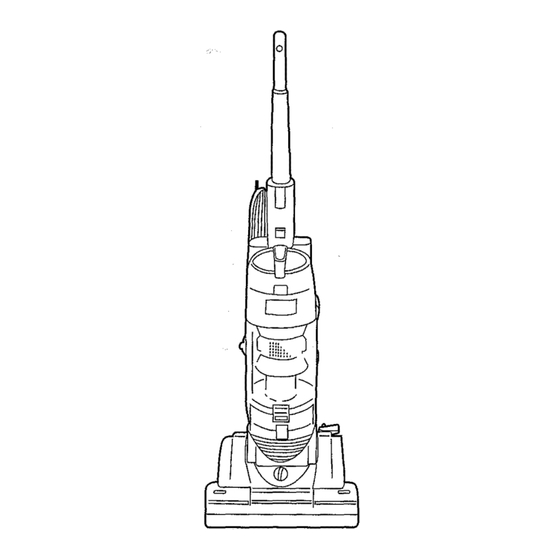
Page 5: Cleaner Descriptions
2. How to use Cleaner description Operate cleaner only at voltage specifiedon data plate on hot-tom of cleaner. The assembled cleaner will look like the drawing. I.Handle grip 2. Extension wand release button 3. Dirt container release button 4.Brushbar onloffbutton 5.On/offbutton 6. -
Page 6: Carpet Height Adjustment
Custom Control rMswitch ON/OFF button Located on the right shoulder (A), as you look the cleaner front on. Turn vacuum on by depressing button after plugging cord into electrical outlet. Brush roll ON/OFF button Press button (B) to turn brush roll on, for cleaning carpets and rugs. (Brush roll w ill automatically stopturning when handle is raised t o upright position.] Turnbrush roll OFF for cleaning hard surface floors. -
Page 7: Cleanin 9 Tools
Cleaning tools When using cleaning tools, put the cleaner in the upright position to stop the brushrolt rotating, or simply pressthe brushrollon/off button. Remove the hose ¢ handle from the slot. Choose any of the handy accessories or use the hose Select propertool alone. -
Page 8: Cleaninff Filter
HEPAFilter What to buy When purchasing a new Hepa Filter, ask for HOOVER part No. 59156501, Unclip and remove Tap side of filter the filter cover until no more dust from the front of... -
Page 9: Replacing Agitator Brush Roll
Remove filter hous- What to buy ing and foam filter When purchasing a new Pre-filter, ask for from the base of HOOVER part No. 59156506. cleaner. When to replace The agitator brush roll When agitator brushes are worn, the agita- tor should be replaced. -
Page 10: Replacing Brush Roll Belt
Belt replacement The belt on your Hoover cleaner causes the brush roll to rotate and is important for the effective operation of"your cleaner. The brush roll belt is designed to last a long time and does not normally need replacement. -
Page 11: If You Have A Problem
4. If you have a problem If a minor problem occurs, it usually can be solved quite easily when the cause is found by using the check list below. POSSIBLECAUSE PROBLEM POSSIBLESOLUTION Cleaner won't turn No voltage in wail plug Check fuse or breaker Thermal protector activated... -
Page 12: Clearing Blockages
PROBLEM SOLUTION !POSSIBLE CAUSE Dirt inside dirt cup stops spinning Too much pressure being Continue using tool applying light Powered hand tool brush roll applied to tool won't turn Broken or worn belt Replace belt Clearing blockages Disconnect cleanerfrom electrical outlet Low suction or pick up may be due to a blockage... -
Page 13: Maintenance Authorized Service
Miiitary Exchanges and Canada. HOW TO MAKE A WARRANTY CLAIM If this product is not as warranted, take or send the product to either a Hoover Sales and Service Center or Hoover Authorized Warranty Service Dealer along with proof of purchase. For an automated referral to authorized service outlets in the U.S.A., phone: t-800-944-9200... -
Page 14: Parts A Accessories Mail Order Form
Signature(req,) Replacement parts andaccessory itemsmaybepurchased fromyourAuthorized H oover D ealer, L eading Retailers, Hoover S aKes & Service C enters, on-line at www, h oover.com, or bycompleting t hisorderform, Mailorders limited to U.S. r esidents only.]n Canada, call 1-800-263-6376 ORon-line at hoover, ca p lease Pleaseallow 3-4 weeks for delivery. - Page 15 Parts and Accessories RETAIN THIS SECTION FORYOUR RECORDS $8.99 $ 7,50 Order Date ReceivedDate...
- Page 16 Manual del Propietario Instruccionesde operaciSn y servicio i iiii iii i iiiii www, hoover.com ® Reviseeste manual antes de hater funcionar su Hoover® pmducto. ilglll i iiii iiiiii ©2008 Healthy Gain Investments, Ltd. Todos los derechos reservados. ##59156504. 3108...
- Page 17 ......Formulario Si neeesita ayuda: Visite nuestro sitio web en hoover.com. Siga el enlaee deI centro de servicio psra encontrsr el centro de servicio m_s eercano o ltame sl 1-800-944+9200 para que Ie informen de manera...
-
Page 18: Medidas De Seguridad Importantes
Centro de ventas y de servicio de Hoover o a un Concesionafio autodzado de servido de garantia de Hoover (Depot), * No tire del cord6n ni tras|ade el aparatojalando del cord6n, ni tampoco 1o use cOreDmanija;... -
Page 19: Ensamblado De La Aspiradora
1. Ensamblado de la aspiradora Contenido de la caja Ensamblado de ia aspiradora Vacie la eaja. Encuentre Ias piezas que se muestran a eontinuaei6n antes de desechar Conecte la el material de embalaje. de la manguera aspiradora al tubo. Deslice el tubo y el mango en la ranura hasta que eseuche un chasquido. -
Page 20: Descfipciones De La Aspiradora
2. Modo de uso Descripci6n de la aspiradora Haga funcionar la aspiradora para alfombras soiamente en el voltaje especificadoen [a placa de datos. I, Mango 2. Bot6n para soltaTd tubo de extensifn 3. Botdn para soltar el contenedoT para polvo 4. -
Page 21: Ajuste De Altura Para Alfombras
Interruptor Custom ControP = Botdn de enoender/apagar Ubicado en el reborde izquierdo (A), si observa ia aspiradora desde la parte delantera. Eneienda la aspiradora presionando el bot6n despu_s de Bot6n para encender/apagar el rodillo de eseobillas enehufar el cord6n en ]a toma de corriente el_ctriea. Presione el bot6n (B) para encender el rodi]lo de escobillas y timpiar alfo- mbras de pared a pared y alfombras de _rea. -
Page 22: Accesorios De Limpieza
Accesorios de limpieza Cuando use los accesorios de limpieza, coloque la aspiradora en posiei6n vertical para que la escobilla deje de girar, o simple- mente presione el botfn para encender/apa- gar la escobilla. Retire ]a manguera y el mango de la raTiuTa. -
Page 23: Limpieza Del Filtro
Limpieza del filtro Filtro HEPA Ou6 compmr A1comprar un nuevo Filtro HEPA, solicite la pieza n. ° 59156501 de HOOVER. Destrahe Ia tapa dd Golpee el costado del filtro basra que filtro y retfrela de no caigan mils... -
Page 24: Reemplazo Del Rodilto De Escobillas Del Agitador
Qu_ comprar tro de espuma de la A1coraprar un nuevo agitador, solicite la pieza base de Ia aspira- n.* 59156506 de HOOVER, dora. Rodillo de eseobillas Cu_ndoreemplazario del agitador Cuando las escobillas del agitador est_n desgastadas, debe reemplazarse el agitador. -
Page 25: Lubricaci6N
Si Ia correa estfi agrietada, mellada o rota, se deberfi reemplazar. Puede instalarse una correa nueva en nuestro Centro de Ventas y Servicio de Hoover m_s cercano. Lubricaci6n La aspiradora tiene cojinetes que cuentan con suficiente lubrieaei6n para la vida Otil de ia aspiradora. -
Page 26: Si Tiene Un Prob|Ema
4. Si tiene un problema Si se pToduce un problema rner_oL pot 1o general, puede resolverse con bastante facilidad cuando se identifica Ia causa a partir de la }ista de verificaei6n que aparece a continuacidn. SOLUCIONPOSIBLE PROBLEMA CAUSA POSIBLE La aspiradora enciende No hayvo]taje en el enchufe... -
Page 27: Eliminaci6N De Obstrucciones
La suciedad dentro del dep6s[to para polvo deja de girar Problema: El Se est_ aplicando demasiada ContinUe usando el accesorio ap|ieando presi6n al accesono menos leUerza. rodillo de eseobil- lax de] aecesorio de mano turboac- cionado no gira Eliminaci6n de obstrucciones Deseoneete la aspiradora de la toma de corriente el_ctrica. -
Page 28: Mantenimiento Servicio Autorizado
Garantla o la disponibilidad de los eentros de servicio de garantia, llame al Centro de respuesta al cliente de Hoover, al 1 800 263 6376, de lunes a viernes, de 8 a,m. a 7 p.m., hora del Este. -
Page 29: Formulario Para Pedido Por Correo De Piezas Y Accesorios
Enviar a: (escriba conletrade imprenta clara) Nombre Calle Ciudad Estado __ C6digopostal M_todo de pago: Cl Cheque u orden de pagoa hombre de: Hoover,Inc. Cl Visa FI Mastercard _I Discover N0mero Fecha de venc. Nombre en la tarjeta Tel6fono particular ( Firma(obligat.)
Need help?
Do you have a question about the U5184-900 and is the answer not in the manual?
Questions and answers