Electrolux E30IC75FSS1 Use & Care Manual
Hide thumbs
Also See for E30IC75FSS1:
- Factory parts catalog (6 pages) ,
- Installation instructions manual (16 pages)
Table of Contents
Advertisement
Quick Links
Advertisement
Table of Contents

Related Manuals for Electrolux E30IC75FSS1


Summary of Contents for Electrolux E30IC75FSS1
-
Page 1: Entirecooktopdoesnotoperate
Care Guide -Induction Cooktop... -
Page 2: Makea Recordfor Futureuse
Serial Number For toll-free telephone support in the U.S. and Canada: l=877-4ELECTROLUX (1-877-435-3287) For online support and internet product information: www.electrolux.com ©2006 Electrolux Home Products, inc. Post Office Box 212378, Augusta, Georgia 30917, USA All rights reserved. Printed in the USA... -
Page 3: Table Of Contents
Finding information TABLEOF CONTENTS ,, ,, ,, • J ,, ,= ,, =, m i u ,, i m m m ,, ,, ,, ,, ,, Jnfor,,,ation .......... 2-3 Ge.eral C_e _Cleaning ....... 19-20 Fi.ding Makea Recordfor Futureuse ......... 2 CeramicGlassCooktopCleaning&... -
Page 4: Safety
Safety IMPORTANT S AFETYINSTRUCTIONS • • • • • • • • • • • • • • • • • Readall instructions beforeusingthis appliance. S avetheseinstructions f or futurer ere e. Thismanualcontains important s afetysymbols and instructions. Pleasepayattention to these !_ii_iiii !iiil iiii_ill i i _ !iii!!i i i i!i_ii i guarantee that interferencewill not occur in a particular installation. - Page 5 Code, Part 1, in Canada, and local code requirements. Install only per installation instructions provided in the literature package for this appliance. Ask your dealer to recommend a qualified technician and an authorized repair service. Know how to disconnect the electrical power to the appliance at the circuit breaker or fuse box in case of an emergency.
- Page 6 Safety iMPORTANT SAFETY iNSTRUCTiONS USING YOUR COOKTOP = Know which touch key pads controls each surface of the Cooking Zones. Clean the appliance regularly to keep all parts free of grease that could catch fire. Exhaust fan ventilation hoods and grease filters should be kept clean. Do not allowgrease to accumulate on hood or filter.
-
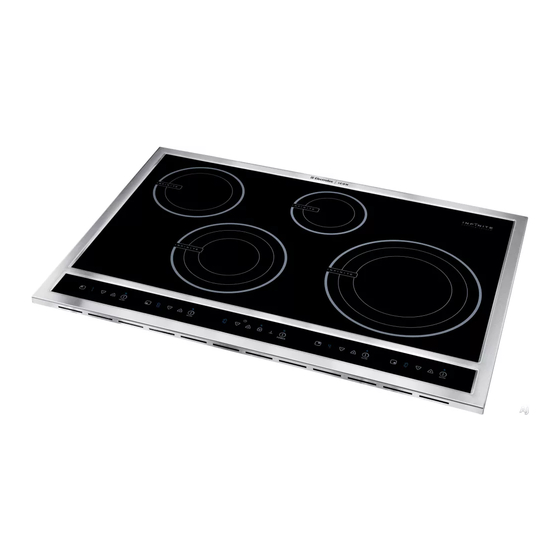
Page 7: Inductioncooktop Features
InductionCooktop Features iiiiiiiiiiiiii INDUCTION C00KTOP FEATURES • • • • • • • • • • • • • READ THESE INSTRUCTIONS CAREFULLY BEFORE USING THE COOKTOP A COOLER COOKTOP - A unique feature of the InductionCooktop is whether turned ON or OFF, the cooktop surface remains cooler than standard ceramic cooktops. - Page 8 induction Cooktop Features INDUCTION COOKTOP FEATURES(CONT'D) [] [] [] [] [] [] [] [] [] [] [] [] [] [] [] [] [] [] [] [] [] [] Fig 2. Fig 3. 5. Left Rear Cooking Zone Control Pads. 6. Left Front Cooking Zone Control Pads. 7.
- Page 9 LED MESSAGES OR UGHT iNDiCATORS D mSPLAYED CONTROL CONTROLS LOCK - This feature allows the cooktop to be locked only when the cooktop is switched to OFF. Touch and hold the LOCK key pad for 5 seconds. A beep will sound and the Lock indicator light will glow (Fig. 5). Once locked, no other displays will glow and no Cooking Zones will activate.
-
Page 10: Induction Cooktop Diepjay#Essages
induction Cooktop Display Messages LED MESSAGESOR UGNT INDICATORS DNSPLAYED BY COOKING ZONECONTROLS (CONT'D) POWER LEVEL SETTINGS - The Cooking Zones have four separate Power Level LEDs. Once active, the Cooking Zones will provide 15 Power Levels to choose from. These include 7 (Fig. -
Page 11: Minimum Pansizerequirements For Eachcookingzones
Before Using the Coo op USETHECORRECT COOKWARE TYPE The magnetic Cooking Zone sensors located below the cooktop surface require the use of cookware made with magnetic material in order to start the heating process on any of the Cooking Zones. When purchasing pans, look for cookware specifically identified by the manufacturer for use with Induction cooktops. -
Page 12: Before Usingthe Cooktop
Before Using the Cooktop COOKWARE RECOMMENDATIONS _CORRECT CORRECT = Cookware not centered on Cook- Cookware centered correctly on ing Zone surface. Cooking Zone surface. • Curved or warped pan bottoms or • Flat pan bottom & straight sides. sides. Min. size _J I÷... -
Page 13: Usequalitycookwarein Goodcondition
Before Using the Coo op US£QUAL(TY COOKWARE (NGOODCOND(T(ON The cookware used with the Induction Cooktop should have flat bottoms that make good contact with the ent(re surface of the Cooking Zone Check for flatness by rotating a ruler across the bottom of the cookware (See Fig 21) Be sure to follow all the recommendations for using cookware as shown in Fig 20 Also remember to"... -
Page 14: Setting Surface Controls
Setting Surface Controls USMNG T HETOUCH CONTROL The recommended way to use the touch pads on the cooktop is shown in Fig. 22. Be sure that your finger is placed in the center of the touch pad as shown. If the finger is not placed on the center of a pad, the cooktop may not respond to the selection made. - Page 15 OPERAT(NG THECOOK(NG ZONES (CONT'D) To Turn ON one or more of the Cooking Zones (cont'd) NOTE: Touch once, or repeatedly touch the _ or _ key pads to adjust or scroll through power levels at any time during the cooking process (To scroll through the power levels quickly touch and hold the _ or _ key pads until the power level desired...
-
Page 16: Preheat R Ecommendations
Setting Surface Controls PREHEAT RECOMMENDATmONS When preheating a pan on the cooktop always watch carefully. Whenever using the cooktop the user should always pay attention to any items cooking and remain attentive until the cooking process is complete. Keep in mind that induction may decrease the amount of time required to preheat a cooking utensil. -
Page 17: Locking Thecontrols
Setting Surface Controls MINUTE TIMER To Cancel the Minute Timer: 1. Touch t heZ_and _ key pads a tthesame t ime ortouch a nd hold either theZ_or key pad and scroll to DO. If cancelling the Minute Timer using the scrolling method, once the Main Control LED reaches OO,release the Arrow key pad. -
Page 18: Powersharing
Setting Surface Controls POWER SHARING Your cooktop is equipped with four induction elements within two heating sections. The right-hand and left-hand Cooking Zones are powered by two independent induction inverters - one inverter for each of the two heating sections. Two Cooking Zones in a heating section share the power of one inverter. -
Page 19: Ceramicglasscooktopcleaning& Maintenance
General Care & Cleaning CERAMIC GLASS COOKTOP CLEANING & MAINTENANCE Prior to using your cooktop for the first time, apply the recommended CookTopO Cleaning Creme to the ceramic surface. Buff with a non-abrasive cloth or no-scratch cleaning pad. This will make cleaning easier when soiled from cooking. -
Page 20: Cleaning Recommendations For
General Care & Cieani CLEANING RECOMMENDATIONS FORTHECERAMIC GLASS COOKTOP (CONTINUED) If SOilSremain, carefully scrape soils with a metal razor blade scraper, holding scraper at a 30 degree angle to the surface. Remove loosened soils with cooktop cleaning cream and buff surface clean. iMPORTANT NOTE: Damage to the ceramic glass cooktop may occur ifyou use an abrasive type scratch pad. -
Page 21: Cooktop Turnsoffwhilecooking
ENT(RECOOKTOPDOESNOT OPERATE • Cooktop controls are locked. Set the cooktop controls to unlock the Cooktop (See p. 17 for further instructions). • Make sure household electrical circuit breaker is ON and that power is properly supplied to the Cooktop. Service wiring not complete. Contact installation agent or dealer. Power outage. -
Page 22: So Utions To Common Problems
Solutions to Common Problems COOING ZONEHEATSFOODTOO HOTOR NOT HOT ENOUGH " Incorrect power level setting. Adjust the power level setting higher or lower and refer to recipe for guidance and adjust accordingly. FOODDOESNOTHEATEVENLY Lightweight or warped pans were used. Be sure to use good quality cookware (Refer to Figs. -
Page 23: Scratches Orabrasionson Ceramic Cooktopglass
Sliding or scraping of metal utensils on cooktop surface. DO NOT slide cookware or cooking utensils across the cooktop surface. Use the recommended ceramic glass cooktop cleaning creme to remove the marks. See "Cooktop Cleaning & Maintenance" in the General Care & Cleaning section (Refer to ps. -
Page 24: Warranty Information
Yourcooktop is protected by this warranty In the U.S.A., your appliance is warranted by Electrolux Home Products North America, a division of White ConsolidatedIndustries, Inc. We authorizeno personto change or add to any of our obligationsunder this warranty.Our obligationsfor service and parts under this warrantymust be performedby us or an authorized Elecfrolux Home Products North America servicer.In Canada, your appliance is warranted by Electrolux...