Table of Contents
Advertisement
MODEL M1014
7" x 12" METAL CUTTINg
BANDSAw
INSTRUCTION MANUAL
Phone: 1-360-734-3482 • On-Line Technical Support: tech-support@shopfox.biz
COPYRIgHT © JANUARY, 2005 BY wOODSTOCK INTERNATIONAL, INC. REVISED NOVEMBER, 2010 (TR)
wARNINg: NO PORTION OF THIS MANUAL MAY BE REPRODUCED IN ANY SHAPE OR FORM wITHOUT
THE wRITTEN APPROVAL OF wOODSTOCK INTERNATIONAL, INC.
Printed in China
#6753CR
Advertisement
Table of Contents

Related Manuals for Shop fox SHOP FOX M1014


Summary of Contents for Shop fox SHOP FOX M1014
- Page 1 MODEL M1014 7" x 12" METAL CUTTINg BANDSAw INSTRUCTION MANUAL Phone: 1-360-734-3482 • On-Line Technical Support: tech-support@shopfox.biz COPYRIgHT © JANUARY, 2005 BY wOODSTOCK INTERNATIONAL, INC. REVISED NOVEMBER, 2010 (TR) wARNINg: NO PORTION OF THIS MANUAL MAY BE REPRODUCED IN ANY SHAPE OR FORM wITHOUT THE wRITTEN APPROVAL OF wOODSTOCK INTERNATIONAL, INC. Printed in China #6753CR...
- Page 2 This manual provides critical safety instructions on the proper setup, operation, maintenance, and service of this machine/tool. Save this document, refer to it often, and use it to instruct other operators. Failure to read, understand and follow the instructions in this manual may result in fire or serious personal injury—including amputation, electrocution, or death.
-
Page 3: Table Of Contents
Contents INTRODUCTION ........2 OPERATIONS........22 Woodstock Technical Support ....2 General .......... 22 Specifications ........2 Operation ........22 Controls and Features ......3 Blade Selection ......... 24 Blade Changes ........25 SAFETY ..........4 Cutting Fluid ........26 Standard Machinery Safety Instructions ..4 Feed Rate ........ -
Page 4: Introduction
Woodstock International, Inc. is committed to customer satisfaction. Our intent with this manual is to include the basic information for safety, setup, operation, maintenance, and service of this product. -
Page 5: Controls And Features
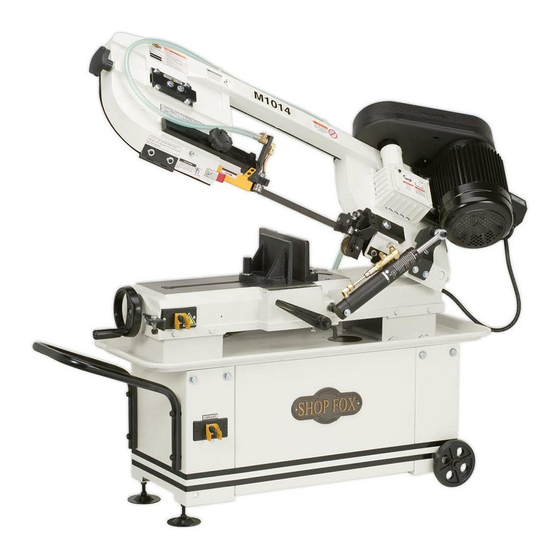
M1014 7" x 12" Metal Cutting Bandsaw Controls and Features Bandsaw controls and features. A. Blade Tension Knob—Allows you to quickly Drain and Chip Pan—Collects chips and tension or de-tentsion the blade. cutting fluid, and directs fluid to the reservoir. B. -
Page 6: Safety
M1014 7" x 12" Metal Cutting Bandsaw SAFETY SAFETY For Your Own Safety, Read Manual Before Operating Machine The purpose of safety symbols is to attract your attention to possible hazardous conditions. This manual uses a series of symbols and signal words intended to convey the level of importance of the safety messages. - Page 7 M1014 7" x 12" Metal Cutting Bandsaw APPROVED OPERATION. Untrained operators STABLE MACHINE. Unexpected movement during can be seriously hurt by machinery. Only operations greatly increases the risk of injury allow trained or properly supervised people and loss of control. Verify machines are to use machine.
-
Page 8: Additional Safety For Metal Cutting Bandsaws
M1014 7" x 12" Metal Cutting Bandsaw Additional Safety for Metal Bandsaws USE this and other machinery with caution READ and understand this and respect. Always consider safety first, entire instruction manual as it applies to your individual working before using this machine. conditions. -
Page 9: Avoiding Potential Injuries
M1014 7" x 12" Metal Cutting Bandsaw Avoiding Potential Injuries Figure 6. Always use the table for freehand Figure 3. Never attempt to freehand cut. cutting and keep fingers clear of blade. Figure 7. Always start the saw with the blade Figure 4. -
Page 10: Electrical
M1014 7" x 12" Metal Cutting Bandsaw ELECTRICAL Circuit Requirements This machine must be connected to the correct size and The machine must be properly set up type of power supply circuit, or fire or electrical damage before it is safe to operate. DO NOT may occur. -
Page 11: Grounding Requirements
M1014 7" x 12" Metal Cutting Bandsaw Grounding Requirements This machine MUST be grounded. In the event of certain The machine must be properly set up types of malfunctions or breakdowns, grounding provides before it is safe to operate. DO NOT a path of least resistance for electric current to travel—in connect this machine to the power order to reduce the risk of electric shock. -
Page 12: Set Up
M1014 7" x 12" Metal Cutting Bandsaw SET UP Unpacking This machine has been carefully packaged for safe transportation. If you notice the machine has been damaged during shipping, please contact your authorized Shop Fox dealer immediately. Items Needed for Set Up The following items are needed, but not included, to set READ and understand this entire instruc- up your machine:... -
Page 13: Inventory
If any parts are missing, find the part num- Box Contents (Figure 11) Qty. ber in the back of this manual and contact A. Pulley Cover ..........2 Woodstock International, Inc. at 360-734- B. Vertical Work Table ........1 3482 or at tech-support@shopfox.biz C. Table Bracket ..........1 D. Handle ............1 E. -
Page 14: Machine Placement
M1014 7" x 12" Metal Cutting Bandsaw Machine Placement Cleaning Machine • Floor Load: This machine distributes a The table and other unpainted parts of your heavy load in a small footprint. Some bandsaw are coated with a waxy grease that residential floors may require additional protects them from corrosion during shipment. -
Page 15: Handle, Wheels, And Feet
M1014 7" x 12" Metal Cutting Bandsaw Handle, Wheels, and Feet GET assistance when lifting this machine. Otherwise, you can severely injure yourself! To install the handle, wheels, and feet, do these Bolt and steps: Washer 1. With the help of an assistant, support the bandsaw on wooden blocks approximately 4"... -
Page 16: Cutting Fluid System
M1014 7" x 12" Metal Cutting Bandsaw Cutting Fluid System This bandsaw has a built-in cutting fluid system that prolongs the life of your bandsaw blades and produces smoother cuts at a lower temperature. Refer to Cutting Fluid on Page 26 for fluid choice and safety precautions. Filter Screen To set up the cutting fluid system, do these steps:... -
Page 17: Pulley Cover
M1014 7" x 12" Metal Cutting Bandsaw Pulley Cover When opened, the pulley cover gives you the ability to change the pulley ratio so the bandsaw can cut at one of four speeds. ENTANGLEMENT HAZARD! MAKE SURE bandsaw unplugged before proceeding! Otherwise, severe injury may occur. -
Page 18: Vertical Cutting Table
M1014 7" x 12" Metal Cutting Bandsaw Shipping Strap and ON/OFF Switch To ensure that your bandsaw arrives to you without damage to the hinge system, a shipping strap was installed. After shipping strap removal, adjust the headstock-stop bolt so the bandsaw ON/OFF switch is not damaged by the headstock. - Page 19 M1014 7" x 12" Metal Cutting Bandsaw 4. Position and install the vertical cutting table with the two stop plate mounting screws as shown in Figure 24). 5. Use a 14 mm wrench to loosen the blade guide lock bolt and install the table support as shown in Figure 6.
-
Page 20: Adjustments
M1014 7" x 12" Metal Cutting Bandsaw ADJUSTMENTS Belt Tension During the life of your bandsaw, you will find it necessary to change the location of the belt so the saw blade can cut at a different speed. To change the belt location you must use the belt adjustment mechanism to move the motor, which loosens or tightens the belt. -
Page 21: Changing Cutting Speed
M1014 7" x 12" Metal Cutting Bandsaw Changing Cutting Speed Along with the correct blade selection and feed rate, Note: These suggested blade speeds the correct pulley ratio must be selected to produce the are an average for both High best cutting speed. -
Page 22: Blade Tension
M1014 7" x 12" Metal Cutting Bandsaw Blade Tension If blade tension is set incorrectly, the blade can fracture and break, become belled, or slip off of the bandsaw. You must make sure the blade tension is set in the correct range to prevent these problems. -
Page 23: Blade Guides
M1014 7" x 12" Metal Cutting Bandsaw Blade Guides The blade guide side bearings support the blade so the Blade Guide Support Bearing blade will enter the workpiece perpendicular to the table Guide Bearing surface (see Figure 32). Adjustment Cap Screw The blade guide support bearings prevent blade twist by stopping the blade from being pushed back during a cut. -
Page 24: Operations
M1014 7" x 12" Metal Cutting Bandsaw OPERATIONS General The Model M1014 will perform many types of operations that are beyond the scope of this manual. Many of these operations can be dangerous or deadly if performed incorrectly. The instructions in this section are written with the understanding that the operator has the necessary knowledge and skills to operate this machine. - Page 25 M1014 7" x 12" Metal Cutting Bandsaw 6. Insert the workpiece into the vise, so the blade will contact the flattest part of the workpiece first, and clamp the workpiece in the vise. 7. Set the cast iron stop for duplicate cuts. 8.
-
Page 26: Blade Selection
M1014 7" x 12" Metal Cutting Bandsaw Blade Selection The chart below is a basic starting point for To select the correct blade TPI do these choosing blade type based on teeth per inch (TPI) steps: for variable tooth pitch blades and for standard 1. -
Page 27: Blade Changes
M1014 7" x 12" Metal Cutting Bandsaw Blade Changes You will find it necessary to change blades depending on the type of material to be cut. Knowing how to correctly select, change, track, and tension the blade will extend the life of your bandsaw and blades. UNPLUG the bandsaw power cord, and NEVER work around the blade or adjust the table while the saw... -
Page 28: Cutting Fluid
M1014 7" x 12" Metal Cutting Bandsaw Cutting Fluid While simple in concept and function, many issues must be taken into account and addressed to find and use the correct cutting fluid. Always follow all product warnings BIOLOGICAL and POISON and contact the fluid manufacturer for unanswered HAZARD! questions. -
Page 29: Feed Rate
M1014 7" x 12" Metal Cutting Bandsaw Feed Rate The speed at which the saw blade will cut through a workpiece is controlled by blade type, feed rate, and feed pressure. Note: If a lubricant is used on the cut, the feed rate can be increased by approximately 15%. -
Page 30: Maintenance
M1014 7" x 12" Metal Cutting Bandsaw MAINTENANCE General SHOP FOX Regular periodic maintenance on your ® Model M1014 will ensure its optimum performance. Make a habit of inspecting your machine each time you use it. Check for the following conditions and repair or replace when necessary: •... -
Page 31: Lubrication
M1014 7" x 12" Metal Cutting Bandsaw Lubrication Since all bearings are sealed and permanently lubri- cated, simply leave them alone until they need to be replaced. Do not lubricate them. However, you must periodically lubricate threaded adjustment locations and check the gear box oil level. -
Page 32: Service
If you require additional machine service not included in this section, please contact Woodstock International Technical Support at (360) 734-3482 or send e-mail to: tech-support@shopfox.biz. Cutting Fluid System... -
Page 33: Blade Tracking
M1014 7" x 12" Metal Cutting Bandsaw Blade Tracking A blade that tracks incorrectly can wear out the wheel flanges or come off of the bandsaw. You must make sure the blade tracks on the wheel so the rear of the blade is supported by the lip on the wheel or wheel flange. - Page 34 M1014 7" x 12" Metal Cutting Bandsaw • If the blade tracking cannot be adjusted with this procedure, the wheel must be re-aligned. Go to Step 6 and complete the procedure. Otherwise, this procedure is complete. 6. With the bandsaw unplugged, loosen the set screw, and back it out as far as it will go without it falling out.
-
Page 35: Wiring Diagram (110V)
M1014 7" x 12" Metal Cutting Bandsaw Wiring Diagram (110V) 110V Power Supply Circuit Breaker Black Black Black Bandsaw Motor Capacitor Cover Green Green Bandsaw ON/OFF Switch Box Toggle Switch Black White White White Yellow Bandsaw Motor Electrical Box Toggle Switch White Black... -
Page 36: Wiring Diagram (220V)
M1014 7" x 12" Metal Cutting Bandsaw Wiring Diagram (220V) 220V Power Supply Circuit Breaker Black Black Black Bandsaw Motor Capacitor Cover Green Green Bandsaw ON/OFF Switch Box Toggle Switch Black White White Yellow White Bandsaw Motor Electrical Box Toggle Switch White Black... -
Page 37: Troubleshooting
M1014 7" x 12" Metal Cutting Bandsaw Troubleshooting This section covers the most common symptoms and corrections with this type of machine. WARNING! DO NOT make any adjustments until power is disconnected and moving parts have come to a complete stop! SYMPTOM POSSIBLE CAUSE CORRECTIVE ACTION... - Page 38 M1014 7" x 12" Metal Cutting Bandsaw Troubleshooting This section covers the most common symptoms and corrections with this type of machine. WARNING! DO NOT make any adjustments until power is disconnected and moving parts have come to a complete stop! SYMPTOM POSSIBLE CAUSE CORRECTIVE ACTION...
- Page 39 M1014 7" x 12" Metal Cutting Bandsaw -37-...
-
Page 40: Parts List
M1014 7" x 12" Metal Cutting Bandsaw Parts List PART # DESCRIPTION PART # DESCRIPTION XM1014001 GEAR BOX XM1014032 STRAIN RELIEF 1/2" XM1014002 BEARING COVER XM1014033 ELECTRICAL BOX XPK07M KEY 6 X 6 X 20MM XM1014034 STAND COMPLETE ASSEMBLY XM1014004 SHAFT XM1014035 FILTER... - Page 41 M1014 7" x 12" Metal Cutting Bandsaw -39-...
-
Page 42: Parts List
M1014 7" x 12" Metal Cutting Bandsaw Parts List PART # DESCRIPTION PART # DESCRIPTION XM1014100 BODY FRAME XPSS03 SET SCREW 1/4"-20 X 3/8" XM1014101 KNOB BOLT XM1014142 COMPRESSION SPRING XPW02 FLAT WASHER 3/8" XM1014143 BLADE TENSION SLIDING BLOCK XPLW04 LOCK WASHER 3/8"... - Page 43 M1014 7" x 12" Metal Cutting Bandsaw -41-...
-
Page 44: Parts List
M1014 7" x 12" Metal Cutting Bandsaw Parts List PART # DESCRIPTION PART # DESCRIPTION XM1014200 BASE XM1014237 SPECIAL BOLT 3/8"-18 X 1-1/2" XM1014201 WHEEL XPW02 FLAT WASHER 3/8" 201-1 XM1014201-1 WHEEL HANDLE XM1014239 VISE JAW BRACKET (FRONT) 201-2 XPSS17 SET SCREW 5/16"-18 X 5/16"... - Page 45 M1014 7" x 12" Metal Cutting Bandsaw -43-...
-
Page 46: Parts List
M1014 7" x 12" Metal Cutting Bandsaw Parts List PART # DESCRIPTION PART # DESCRIPTION XM1014300 RETAINER XM1014321 ROLL PIN 10 X 42MM XM1014301 ROLL PIN 4 X 22MM XM1014322 ECCENTRIC SET XM1014302 HOUSING XM1014323 ECCENTRIC ONLY XM1014303 AXLE XPR39M EXTERNAL RETAINING RING 8MM XM1014304 AXLE ASSEMBLY... -
Page 47: Notes
M1014 7" x 12" Metal Cutting Bandsaw Notes -45-... -
Page 48: Notes
M1014 7" x 12" Metal Cutting Bandsaw Notes -46-... - Page 49 M1014 7" x 12" Metal Cutting Bandsaw...
- Page 50 Fold along dotted lIne place stamp Here Woodstock international inc. p.o. box 2309 bellingham, Wa 98227-2309 Fold along dotted lIne tape along edges--please do not staple...
-
Page 51: Warranty
Woodstock International, Inc. will repair or replace, at its expense and at its option, the Shop Fox machine or machine part, which in normal use has proven to be defective, provided that the original owner returns the product prepaid to a Shop Fox factory service center with proof of their purchase of the product within two years, and provides Woodstock International, Inc. - Page 52 High Quality Machines and Tools Woodstock International, Inc. carries thousands of products designed to meet the needs of today's woodworkers and metalworkers. Ask your dealer about these fine products:...