Table of Contents
Advertisement
Quick Links
MODEL W1816
3 HP LOW-PROFILE CYCLONE
DUST COLLECTOR
OWNER'S MANUAL
(FOR MODELS MANUFACTURED SINCE 10/09)
Phone: (360) 734-3482 • Online Technical Support: tech-support@shopfox.biz
COPYRIGHT © FEBRUARY, 2010 BY WOODSTOCK INTERNATIONAL, INC., REVISED MARCH, 2010 (TS)
WARNING: NO PORTION OF THIS MANUAL MAY BE REPRODUCED IN ANY SHAPE OR FORM WITHOUT
THE WRITTEN APPROVAL OF WOODSTOCK INTERNATIONAL, INC.
Printed in Taiwan
#12272TS
Advertisement
Table of Contents

Subscribe to Our Youtube Channel
Related Manuals for Shop fox SHOP FOX W1816


Summary of Contents for Shop fox SHOP FOX W1816
- Page 1 (FOR MODELS MANUFACTURED SINCE 10/09) Phone: (360) 734-3482 • Online Technical Support: tech-support@shopfox.biz COPYRIGHT © FEBRUARY, 2010 BY WOODSTOCK INTERNATIONAL, INC., REVISED MARCH, 2010 (TS) WARNING: NO PORTION OF THIS MANUAL MAY BE REPRODUCED IN ANY SHAPE OR FORM WITHOUT THE WRITTEN APPROVAL OF WOODSTOCK INTERNATIONAL, INC.
- Page 2 This manual provides critical safety instructions on the proper setup, operation, maintenance and service of this machine/equipment. Failure to read, understand and follow the instructions given in this manual may result in serious personal injury, including amputation, electrocution or death. The owner of this machine/equipment is solely responsible for its safe use.
-
Page 3: Table Of Contents
Contents INTRODUCTION ........2 ACCESSORIES ........35 Woodstock Technical Support ....2 MAINTENANCE ........37 Additional Safety for Dust Collectors ..8 General .......... 37 ELECTRICAL .........9 Emptying Drum ......... 37 220V Operation ........9 Lubrication ........37 Extension Cords ........9 Removing Canister Filter ...... -
Page 4: Introduction
Woodstock International, Inc. is committed to customer satisfaction. Our intent with this manual is to include the basic information for safety, setup, operation, maintenance, and service of this product. -
Page 5: Specifications
W1816 Owner's Manual (Mfg. Since 10/09) MACHINE SPECIFICATIONS Phone #: (360) 734-3482 • Online Tech Support: tech-support@shopfox.biz • Web: www.shopfox.biz MOdEl W1816 3HP lOW-PROFIlE CYClONE dUST COllECTOR Motor Type ..................TEFC Capacitor Start Induction Class ........................Class "F" Horsepower ......................... 3 HP Voltage ........................ - Page 6 Performance Curve 2000 " 1750 1489 1407 1500 1319 1246 1250 1090 1000 44" Ø8" Static Pressure (Inch/H 3 HP Woodstock Dust Colletor Performance Results Max CFM Max SP Volts Inlet Impeller " " 1489 10.2 8" ⁄ " " 9"...
-
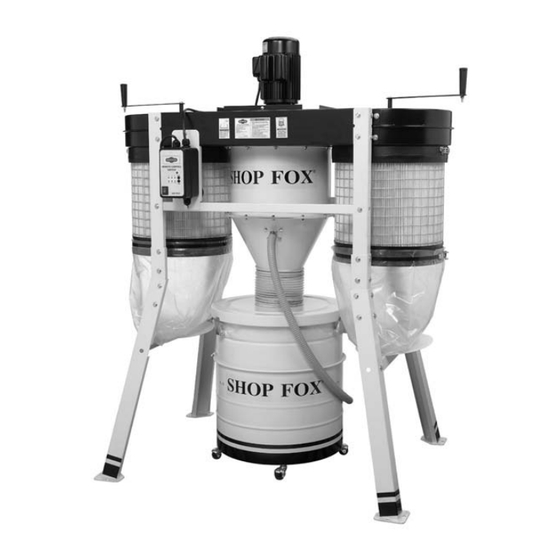
Page 7: Controls And Features
W1816 Owner's Manual (Mfg. Since 10/09) Controls and Features Canister Filter Motor Cleaning Handle Blower Housing Canister Filter Magnetic Switch w/Remote Control Canister Filter Collection Bag Vacuum Hose Collection Drum w/Casters Inlet Cyclone Funnel Rear View... -
Page 8: Standard Safety Instructions
W1816 Owner's Manual (Mfg. Since 10/09) SAFETY READ MANUAL BEFORE OPERATING MACHINE. FAILURE TO FOLLOW INSTRUCTIONS BELOW WILL RESULT IN PERSONAL INJURY. Indicates an imminently hazardous situation which, if not avoided, WILL result in death or serious injury. Indicates a potentially hazardous situation which, if not avoided, COULD result in death or serious injury. - Page 9 W1816 Owner's Manual (Mfg. Since 10/09) 10. NEVER LEAVE WHEN MACHINE IS RUNNING. Turn power OFF and allow all moving parts to come to a complete stop before leaving machine unattended. 11. DO NOT USE IN DANGEROUS ENVIRONMENTS. DO NOT use machinery in damp, wet locations, or where any flammable or noxious fumes may exist.
-
Page 10: Additional Safety For Dust Collectors
W1816 Owner's Manual (Mfg. Since 10/09) Additional Safety for Dust Collectors READ and understand this USE this and other machinery with caution entire manual before using and respect. Always consider safety first, this machine. Serious per- as it applies to your individual working sonal injury may occur conditions. -
Page 11: Electrical
W1816 Owner's Manual (Mfg. Since 10/09) ELECTRICAL The machine must be properly set up before it is safe to operate. DO NOT connect this machine to the power source until instructed to do so in the "Test Run" portion of this manual. 220V Operation L6-30 P L6-30 R... -
Page 12: Setup
W1816 Owner's Manual (Mfg. Since 10/09) SETUP Unpacking This machine has been carefully packaged for safe transportation. If you notice the machine has been damaged during shipping, please contact your authorized Shop Fox dealer immediately. Inventory Keep machine disconnected from The following is a description of the components shipped power until instructed otherwise. - Page 13 W1816 Owner's Manual (Mfg. Since 10/09) Inventory (Figure 4) H. Cyclone Funnel ..........1 Clear Flexible Hose 9" Dia.......1 Intake Barrel ..........1 K. Flexible Vacuum Hose 1 ⁄ " Dia......1 L. Cyclone Funnel Vacuum Pipe ......1 M. Canister Cleaning Handle Assemblies ....2 N.
-
Page 14: Machine Placement
W1816 Owner's Manual (Mfg. Since 10/09) Machine Placement Mounting to Shop Floor • Floor Load: This machine distributes a heavy load in a small footprint. Some Although not required, we recommend residential floors may require additional that you mount your new machine to the bracing to support both machine and floor. -
Page 15: Assembly
W1816 Owner's Manual (Mfg. Since 10/09) Assembly NOTICE Using air tools to tighten the fasteners in the assembly of your dust collector may crack or chip the paint because of their high torque. We recommend that you use hand tools or an electric tool with a low clutch setting. - Page 16 W1816 Owner's Manual (Mfg. Since 10/09) Note: In Steps 4–5 below, tighten the fasteners in an alternating star pattern to obtain an even sealing pressure on the foam tape. x 12 4. Orient the intake barrel on the blower housing as Intake shown in Figure 10, then secure it in place with (12) Port...
- Page 17 W1816 Owner's Manual (Mfg. Since 10/09) 8. Connect the two upper stand braces to the upper stand legs with (4) ⁄ "-16 x ⁄ " hex bolts and (4) ⁄ " Upper Stand Brace flat washers, as shown in Figure 13. Note: Orient the braces so that the off-center third hole is aligned with the two mounting holes in the blower housing bracket, as shown in Figure 13.
- Page 18 W1816 Owner's Manual (Mfg. Since 10/09) 11. Slide the four lower stand legs onto the leg Lower connectors, then connect them with (16) ⁄ "-16 x Stand Leg ⁄ " hex bolts and (16) ⁄ " flat washers, as shown in Figure 16.
- Page 19 W1816 Owner's Manual (Mfg. Since 10/09) 15. Attach the two bag platforms to the side stand braces with (4) ⁄ "-16 x ⁄ " hex bolts and (4) ⁄ " flat washers, as shown in Figure 19. Bag Platform Figure 19. Bag platform connected to the side stand brace.
- Page 20 W1816 Owner's Manual (Mfg. Since 10/09) 18. Place the top collection drum on top of the bottom collection drum, then secure them together with the drum clamp assembly, as shown in Figure 22. Figure 22. Clamping the top and bottom collection drums together.
- Page 21 W1816 Owner's Manual (Mfg. Since 10/09) 20. Install the three drum lid latch assemblies with (6) #10-24 x ⁄ " Phillips head screws and (6) #10-24 hex nuts, as shown in Figure 24. Note: To avoid snagging the plastic collection bag in the future, insert the screw from inside the drum.
- Page 22 W1816 Owner's Manual (Mfg. Since 10/09) 23. Insert the plastic drum collection bag into the collection drum, as shown in Figure 27. Figure 27. Inserting the plastic collection bag. 24. Place the collection drum lid on the drum assembly, then pull all three latches up and onto the hooks of the lid, as shown in Figure 28.
- Page 23 W1816 Owner's Manual (Mfg. Since 10/09) 26. Roll the collection drum underneath the cyclone funnel, then connect the 9" clear flexible collection hose between the funnel and the drum lid with the Collection two 9" hose clamps, as shown in Figure 29. Hose 27.
-
Page 24: Test Run
W1816 Owner's Manual (Mfg. Since 10/09) Test Run Once the assembly is complete and before you connect to any duct lines, test run your machine to make sure it runs ON/OFF Remote properly. Button Control If, during the test run, you cannot easily locate the source of an unusual noise or vibration, stop using the machine immediately, then review the Troubleshooting guide on Page 39. -
Page 25: Operations
W1816 Owner's Manual (Mfg. Since 10/09) OPERATIONS General The instructions in this section are written with the understanding that the operator has the necessary knowledge and skills to operate this machine. If at any time you are experiencing difficulties performing any operation, stop using the machine! If you are an inexperienced operator, we strongly recommend that you read books or trade articles, or... -
Page 26: Basic Controls
W1816 Owner's Manual (Mfg. Since 10/09) Basic Controls Magnetic Switch Refer to Figure 32 and the descriptions below to become familiar with the operation of the magnetic switch. A. Timer Indicator Lights: Turns ON when that timer setting is selected. B. -
Page 27: Ducting Materials
W1816 Owner's Manual (Mfg. Since 10/09) Ducting Materials You have many choices regarding main line and branch line duct material. For best results, use metal duct for the main line and branch lines, then use a short length of flexible hose to connect each machine to the branch lines. -
Page 28: Flexible Duct
W1816 Owner's Manual (Mfg. Since 10/09) Flexible Duct Flexible hose is generally used for short runs, small shops and at rigid duct-to-tool connections. There are many different types of flex hose on the market today. These are manufactured from materials such as polyethylene, PVC, cloth hose dipped in rubber and even metal, including steel and aluminum. -
Page 29: System Design
W1816 Owner's Manual (Mfg. Since 10/09) System Design Step 1: Decide Who Will Design For most small-to-medium sized shops, you can design and build the dust collection system yourself without hiring engineers or consultants. We have included some information here to get you started on a basic design. If you have a large shop or end up designing a Dust Collector complicated system, then we recommend that you do... - Page 30 W1816 Owner's Manual (Mfg. Since 10/09) 3. Directional changes should be kept to a minimum. The more directional change fittings you use directly increases the overall resistance to airflow. 4. Gradual directional changes are more efficient than sudden directional changes (i.e. use the largest corner radius possible when changing hose or pipe direction).
- Page 31 W1816 Owner's Manual (Mfg. Since 10/09) If your machine doesn't have a built in dust port, use Machine ..Average Dust Port Size Figure 41 as a guide to determine which size of dust port to install on your machine. Table Saw ........4"...
- Page 32 W1816 Owner's Manual (Mfg. Since 10/09) Determining Main Line Duct Diameter The general rule of thumb for a main line duct is that the velocity of the airflow must not fall below 3500 FPM. Use the inlet size of the dust collector as a starting point for the main line.
-
Page 33: Multiple Dust Ports
W1816 Owner's Manual (Mfg. Since 10/09) Multiple Dust Ports Total CFM Branch Line Size If your machine has multiple dust ports, add the total CFM 5" given for each dust port size from Figure 40. Refer to 5" the chart in Figure 45 and find the CFM that is closest to 6"... - Page 34 W1816 Owner's Manual (Mfg. Since 10/09) In most small/medium shops it is only necessary to calculate the line with the longest duct length or the most fittings (operating under the assumption that if the line with the highest resistance works, the others will be fine).
- Page 35 Congratulations! You've just designed your own dust system. Figure 49. Example of CFM for static 3 HP Woodstock Dust Colletor Performance Results pressure loss for the duct line connected — If the CFM for your static pressure loss is below...
-
Page 36: System Grounding
W1816 Owner's Manual (Mfg. Since 10/09) System Grounding Since plastic hose is abundant, relatively inexpensive, easily assembled and air tight, it is a very popular material for conveying dust from woodworking machines to the dust collector. However, plastic flex-hose and plastic duct are an insulator, and dust particles moving against the walls of the plastic duct create a static electrical build up. -
Page 37: Accessories
Dealer. If you do not have a dealer in your area, these products are also available through online dealers. Please call or e-mail Woodstock International Inc. Customer Service to get a current listing of dealers at: 1-800-840-8420 or at sales@woodstockint.com. - Page 38 W1816 Owner's Manual (Mfg. Since 10/09) The Shop Fox Blast Gates are used in every dust collection system to control air flow from one machine to another, which maximizes system efficiency. We offer blast gates in both black ABS plastic and aluminum.
-
Page 39: Maintenance
W1816 Owner's Manual (Mfg. Since 10/09) MAINTENANCE General Regular maintenance on your machine will ensure its optimum performance. Make a habit of inspecting your machine each time you use it. Check for the following conditions and repair or replace when necessary: •... -
Page 40: Removing Canister Filter
W1816 Owner's Manual (Mfg. Since 10/09) Removing Canister Filter The canister filter assemblies can be easily removed for replacing or cleaning. Tools Needed Wrench or Socket 12mm ........1 To remove a canister filter, do these steps: 1. DISCONNECT MACHINE FROM POWER! 2. -
Page 41: Service
This section covers the most common problems and corrections with this type of machine. If you require additional machine service not included in this section, please contact Woodstock International Technical Support at (360) 734-3482 or send e-mail to: tech-support@shopfox.biz. WARNING! DO NOT make any... -
Page 42: Electrical Safety Instructions
These pages are current at the time of printing. However, in the spirit of improvement, we may make changes to the electrical systems of future machines. Study this diagram carefully. If you notice differences between your machine and these wiring diagrams, call Woodstock International Technical Support at (360) 734-3482. -
Page 43: Wiring Diagram
W1816 Owner's Manual (Mfg. Since 10/09) electrical diagram Wiring Diagram Read Page 40 STOP MOTOR Before Wiring Ground Start 220VAC Capacitor Capacitor NEMA L6-30 PLUG 50MFD 600MFD 250VAC 125VAC (As Recommended) 13NO NHD C-120D 220V 14NO OL_NO NHD NTH-25 CIRCUIT BOARD RESET START SWITCH... -
Page 44: Wiring Components
W1816 Owner's Manual (Mfg. Since 10/09) Wiring Components Contactor Circuit Board Overload Relay Start Switch Figure 54. Magnetic switch wiring. Motor Junction Box Capacitors Figure 55. Motor wiring. -42-... -
Page 45: Parts
W1816 Owner's Manual (Mfg. Since 10/09) PARTS Main -43-... -
Page 46: Main Parts List
W1816 Owner's Manual (Mfg. Since 10/09) Main Parts List REF PART # DESCRIPTION REF PART # DESCRIPTION X1816001 MOTOR 3HP 220V 1PH 60HZ X1816034 COLLECTION DRUM VACUUM PIPE 1-1 X1816001-1 MOTOR FAN COVER X1816035 COLLECTION DRUM CASTER 2" 1-2 X1816001-2 MOTOR FAN X1816036 LOWER COLLECTION DRUM 1-3 X1816001-3 CAPACITOR COVER... -
Page 47: Machine Labels - Front
7. Never collect glass, water, or metal with dust collector. a power source. copyrighted and must only be used on Shop Fox™ brand machines. Never use Woodstock’s label Weight: 375 lbs. Only collect wood fiber dust and chips. -
Page 48: Machine Labels - Rear
FOR SHOP FOX MACHINES ONLY! All labels created by Woodstock International, Inc. are copyrighted and must only be used on Shop Fox™ brand machines. Never use Woodstock’s label copyrighted and must only be used on Shop Fox™ brand machines. Never use Woodstock’s label artwork on other brands of machines. - Page 49 W1816 Owner's Manual (Mfg. Since 10/09)
- Page 50 Fold along dotted lIne place stamp Here Woodstock international inc. p.o. box 2309 bellingham, Wa 98227-2309 Fold along dotted lIne tape along edges--please do not staple...
-
Page 51: Warranty
Woodstock International, Inc. will repair or replace, at its expense and at its option, the Shop Fox machine or machine part, which in normal use has proven to be defective, provided that the original owner returns the product prepaid to a Shop Fox factory service center with proof of their purchase of the product within two years, and provides Woodstock International, Inc. - Page 52 High Quality Machines and Tools Woodstock International, Inc. carries thousands of products designed to meet the needs of today's woodworkers and metalworkers. Ask your dealer about these fine products:...
Need help?
Do you have a question about the SHOP FOX W1816 and is the answer not in the manual?
Questions and answers