Table of Contents
Advertisement
Available languages
Available languages
Advertisement
Table of Contents

Related Manuals for Sears Craftsman 536.884561


Summary of Contents for Sears Craftsman 536.884561
- Page 1 CRRFrSMRN ® 3 Horsepower 21 Inch Single Stage Auger Propelled SNOW THROWER Optional Electric Start MODEL NO. 536.884561 Caution: Read and follow all Safety Rules and Operating Instructionsbefore first use of this product. SEARS, ROEBUCK AND CO., Hoffman Estates 60179 U.S.A. 340847 05/07/96...
- Page 2 WARRANTY ON CRAFTSMAN SNOW THROWER For one year from the date of purchase, when this Craftsman Snow Thrower is main- tained, lubricated, and tuned up according to the operating and maintenance instruc- tions in the owner's manual, Sears will repair, free of charge, any defect in material or workmanship.
- Page 3 your footing, and keep a firm hold on the opening at all times. handles. Walk; never run. Exercise extreme caution to avoid slipping , This snow thrower is for use on side- or falling, especially when operating walks, driveways, and other ground level reverse or backing up.
- Page 4 Run the snow thrower a few minutes after throwing snow to prevent freeze-up of the auger/impeller, •_ ,..'_k% b_-_t_%¢ " _ . .z,S_:_2.:_i.#x_....Contents of Parts Bag I - Owner's Manual (not shown) 1 - Parts Bag (not shown) t - 3.2 ounce container Craftsman 2-cycle oil...
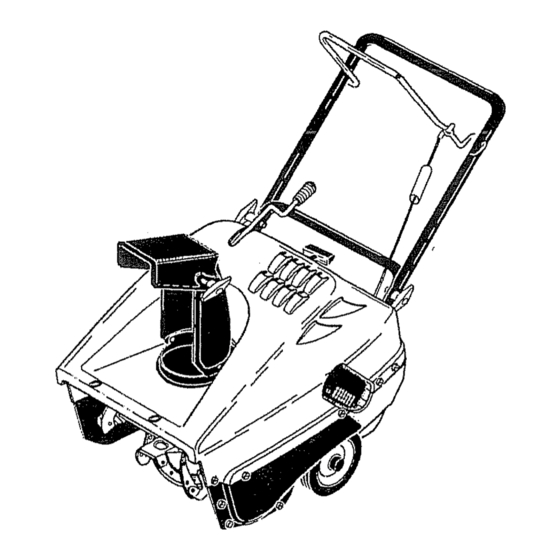
- Page 5 Z._CAUTION: Always wear safety Auger Control glasses or eye shields while assembling snow thrower. Chute Control TOOLS REQUIRED FOR ASSEMBLY 1 - Knife to cut carton Chute Deflector The figure to the right shows the snow thrower completely assembled_ References to the right or left hand side of the snow thrower are from the viewpoint...
- Page 6 KNOW YOUR SNOW THROWER READ THIS OWNER'S MANUAL AND SAFETY RULES BEFORE OPERATING YOUR SNOW THROWER. Compare the illustrations with your SNOW THROWER to familiarize yourself with the locationof various controlsand adjustments,Save this manual for future reference. 40:1 Oil/Fuel Mixture Primer Button tgnition Off Ignition On...
-
Page 7: How To Use
Mix gasoline and oil as follows: • Pour 1 U.S. quart of fresh, clean, unleaded automotive gasoline to a gallon gasoline container. o Add 3.2 oz of clean, high quality, Craftsman two-cycle oil into the gasotine container (One 3.2 ounces of oil pro- vided). - Page 8 DO NOT FILL THE FUEL TANK WITH GASOLINE THAT DOES NOT HAVE OIL MIXED IN IT. SHAKE THE GASOLINE CONTAINER BEFORE EACH FILLING OF THE FUEL TANK. (I/2 cup or 3,2 oz.) Shake Can Gasoline (1 u.s. 1 UoS,gallon container IMPORTANT: Do not use outboard motor place.
- Page 9 Do notprimea warmengine,tfthe en- • In windy conditions, lower the chute ginefailsto start,followtheColdEn- deflector to direct discharged snow close gineStartinstructions o n page8. to the ground where it is less likely to blow into unwanted areas. Recoil Starter .l_," Primer Button , Keep the area to be cleared free of I Vent Ho|e Handte ..
- Page 10 CUSTOMER RESPONSIBILITIES _ _11,1,,11,,i,, ,... SERVICE SCHEDULE SERVICE DATES RECORDS segi. Fill In dates as Before After Before Each Each flint 12 Needed Storage you complete Season Hours regular service v" Tighten All Screws & Nuts Check Spark Piug Check Drive Belts LubricateChute ControlFlange Check Fuel •...
- Page 11 ENGINE securely into the engine and the spark plug wire is attached to the spark plugo SPARK PLUG If a torque wrench is available, torque - Clean the spark plug and reset the gap plug to 18 to 23 foot pounds. periodically.
- Page 12 • Remove the two screws holding the belt cover to the top cover. Use a large flat Cable---_.._i Cable AdJust- / head screwdriver, NOTE: If the top cover is already removed, omit this step. • Remove the one screw holding the belt meo, To,ii cover to the bottom cover.
- Page 13 • Reinstall the belt cover_ NOTE: Make sure the belt is in proper position, See To Replace the Drive Belt If the drive belt is damaged or worn paragraph on this page, excessively, replace it with a new belt. • Tie the control bail to the upper handle TO REPLACE THE DRIVE BELT...
- Page 14 • Slide the auger assembly out of the bearing assembly on the right side of the snow thrower. • Tip the auger assembly enough to allow it to slide out of the auger housing. Install the new auger assembly in reverse Guide 'order of removal.
- Page 15 10. o If you do not want to remove gasoline, a • Be sure that all nuts, bolts and screws are fuel stabilizer (such as Craftsman fuel securely fastened. Inspect all visible stabilizer No. 33500) may be added to...
- Page 16 Cover the snow thrower with a suitable NOTE: A yearly checkup or tune-up at a SEARS Service Center is a good way of protective cover that does not retain ensuring that your snow thrower wilt moisture. Do not use plastic or vinyl, provide maximum performance for the next season,,...
- Page 17 CRAFTSMAN 2'1" - 3HOP. SNOW THROWER 536.884561 ENGINE/DRIVE AS£EMBLY 33431OB Note: Always use original equipment A|i unnumbered items are parts. Use o! service/replacement parts other than originat paris may void your interchangeable with opposite side warranty, 'REF: REF. NO,, PART NAME PART NO.
- Page 18 CRAFTSMAN 21"- 3H.P, SNOW THROWER 536.884561 FRAME ASSEMBLY REF. PART NO. PART NAME 333769-853 333767 Frame, Side LH 333987 Channel, Frame Support 160044 Screw, 1/4-20x2.00 t502 Nut, t14-20 Reghexctrlk Bracket, Fuel Tank 1.5 Qt 333749-853 18OO2O Screw, 1/4-20xo75 1502 Nut, 1/4-20 Reghexotrlk 180020 Screw, 1/4-20x.75...
- Page 19 CRAFTSMAN 21" - 3H.P. SNOW THROWER 536.884561 BELT COVER ASSEMBLY 3343_ 1 i REF.I REF.! PART NAME PART NAM E NO, PARTNO. NO. IPART NO, i 170 340087 Cover, Top 150 340089 Belt Cover 171 274707 Screw, 10-24x 5Wahhma 'Screw 10-24x5...
- Page 20 CRAFTSMAN 21" -,3H.P. SNOW THROWER 536.884561 BELT COVER ASSEMBLY REFo i PART NO. PART NAME 340091 ..Auger Housing Assy. 180020 Screw, 114-20x75 F{atwasher,.28 tx 63x.065 120392 I502 Nut, 1/4-20 Reghexctrlk 55323 Scraper Blade 577707 _,91 Rivet, Ovset _,92 180020...
- Page 21 CRAETSMAN 21" - 3H.P. SNOW THROWER 536°884561 WHEEL ASSEMBLY REF. 4NO. PART NO. PARTNAME "65o Axle, Shaft 996416 Flatwasher 391xl.00x.125 577036 Tire & Rim 6x1. 996416 FlatwashP.r .39tx I O0x,125 577598 Ring, Retaining 335418B HANDLE ASSEMBLY PART NO. PART NAME PART NO.
- Page 22 CRAFTSMAN 21" - 3H.P. SNOW THROWER 536.884561 DECALS ;REF' IPARTNO., PARTNAME !822 402635 Decal, Dash 402896 Decal, 3/21" 69880 Decal, Warn Hot Muffler 318494 Decal, Choke 308768 Decal, Dang Stripe 313892 Danger Chute Decal 70141 Decal, Danger Auger 337524 Decal, Auger Control Bar...
- Page 23 CRAFTSMAN 2,,CYCLE ENGINE MODEL NUMBER: 143.973091 Starter No. 590712 REF, PART PART NAME 590712 Rewind Starter 590599A :_aring P in (lnct, 4) sher 590600 Retainer 590696 Washer 390601 590697 Brake Spring 590698 Starter t_og 590699 Dog Spring 59o709 Pul)ey & Rewind Sprg Assy...
- Page 24 CRAFTSMAN 2-CYCLE ENGINE MODEL NUMBER: 143.973091 370A...
- Page 25 CRAFTSMAN 2-CYCLE ENGINE MODEL NUMBER: 143.973091 REF.# PART NO. DESCRIPTION QTY. Cylinder (Order SiB if replacement is needed) 490291A Air Vane 570707 Extension Spring 530110 Bal! Bearing 530150 Needle Bearing & Line (Set (37 Needles) 530104A Cartridge Bearing 290607 Crankshaft...
- Page 26 CRAFTSMAN 2-CYCLE ENGINE MODEL NUMBER: 143.973091 Carburetor Noo6327 t4 4D"'l_ REF: PART ..PART NAME 632714 Carburetor 632166 Throttle Shaft & Lever Ass'y 632169 Throttle Return Spring 631184 Dust Seal Washer 631183 Dust Seal (Throttle) 631621 Throttle Shutter 650506 Shutter Screw 631300 Choke Shaft &...
- Page 27 SEARS reparar&, sin recargo alguno, cuafquier defecto en materiales y mane de obra. Siesta Removedora de nieve Craftsman se usa para prop6sitos comerciales o de arrendamiento, esta garantfa es v_lida durante 90 dies a partir de la fecha de compra_ Esta garamt[a no cubre .lo siguiente:...
- Page 28 aloperarla removedora d e nieveen marcha (excepto cuando el fabricante retroceSOo recomiende as[ especificamente). PREPARACiON Permita que el moto¢ y _a removedora de nieve se ajusten a las temperaturas _nspeccione completamente e l_rea exteriores antes de comenzar a retirar ia dondese usar&la removedora d e nieve nievey retiretodaslasesteras, t rineos,...
- Page 29 adecuadamente para asegurarse No ponga en marcha el motor en que la removedora de nieve est& en ambientes interiores, excepto al condiciones seguras de trabajo. arrancar el motor y para transportar removedora de nieve hacia adentro o 2° Nunca almacene la removedora hacia afuera del edificio.
- Page 30 Contenido de la bolsa con las partes (no se muestran del tamafio real) 1 - Boise con ias partes (no muestra) 1 - Manuel del Duefio (no mueslra) 1 - Envase de acelte SAE30 .upefior Manitja de PRECAUCION: Siempre de1 Barreno anteojos de seguridad o proteccion para Patanca de Descar...
- Page 31 CONOZCA SU REMOVEDORA DE NIEVE LEA ESTE MANUAL DEL PROPIETARIO Y LAS REGLAS DE SEGURtDAD ANTES DE OPERAR LA REMOVEDORA DE NIEVE° Compare las iiustraciones con su removedora nieve para familiarizarse con la posici6n de los diferentes controles y ajustes. Guarde este manual para una referencia futura.
- Page 32 PREOAUCION: Lea el manual del propietario antes de operar la maquina. Posicion de Nuncas dirija la descarga hacia los ropulsion del peatones. Suelle la palanca del conmutador rreno de control y apague el motor antes de desatascar el canal de descarga o el alojamiento del barreno y antes de dejar la maquina.
- Page 33 • Agregue 100cc (3,2 oz) de aceite de dos no utilice gasoltna para ningun otto fin. tiempos, limpio y de la alta calidad Dado que el olor de ta gasoline resulta Craftsman (se tncluye una late de aceite agradable pare muchos nibos, evite que de 100cc).
- Page 34 Boton Cebo Manivela de NOTA: Deje que et motor se caliente per arran( algunos minutes antes de user la )iradero removedora de nJeve, pues el motor no brindar& toda su potencia mientras no alcence temperature de operaci6no ARRANQUEEN CALIENTE ° Asegerese de que el control de estrangulaci6n "APAGADO"...
- Page 35 Puedeajustarla distancia dedescarga . Planes que la descarga de la nieve se de la nievemoviendo el desviador d e la haga en la direcci6n del viento. bocadedescarga° SI Iomuevehacia NIEVE HUMEDA Y COMPACTA arriba,obtendr& mayor d istanciade • Mu_vase despac{o en {a nieve en estas lanzamiento;...
- Page 36 ESPACIFICAClONES DEL de nieve o fango para evitar la PRODUCTO congelaciSn del barreno y los controles. LUBRICACION - DE ACUERDO A LO CABALLOS DE FUERZA: NEOESARIO TABLA DE LUBRICACION DESPLAZAMIENTO: 6°0 PULG. c0bicas CAPACIDAD DE GASOLINA: 1 cuartos (Sin plomo) PORPORCtON DE LA MEZCLA DE GASOLIN4JACEITE:...
- Page 37 fabricaparabrindartavelocidad de ajuste de? cable e {ns6rteto en ta necesaria° E l exceso de velocidad del manija de control (Vea la figura tres). motorpuedeaumentar e l peligrode Vuelva a colocar ?amanga protectora lesiones personales ademas de anularla sobre la abrazadera de ajuste del cable°...
- Page 38 izquierdo de la cubierla superior Use un Pernos que se Cubierta Tornillos que se deben deben remover de destornillador de cabeza ptana grande de ]a cubierta cubierta superior • Remueva el perno delantero del lade izquierdo. Use una llave de 5/16" y 3/8" •...
- Page 39 • Ajuste el cojin det freno hada arriba o hacia abaj0 para tener una abertura de 1/8" entre la parte inferior del cojln del freno y la correa. • Apriete el tornillo y la tuerca. AVISO: Revise el ajuste de la correa de impulsi6n antes de volver a instalar la cubierta de la correa (Vea et p&rrafo "Ajuste De La Correa De tmpulsi6n"...
- Page 40 del barreno uia de ta polea Zapata del treno Armaion izquierda imiento _olea del barreno REEMPLAZO DE LA BUJIA La bujia se encuentra en el compartimiento C,orreE _'de [racciorl del motor debajo de la tape superior (Vea la figure bajo) y no puede verse en condiciones normales Polea tensora...
- Page 41 niever Llevesu removedora d e nievea un la f&bricao No trate de cambiarla ya que Oentro de Servicios SEARS autorizado puede ocasionarse lesiones personates paralas reparaciones y ajustes que plensa que el motor est& funcionando necesite demasiado r&pida o lentamente, lleve su removedora de nieve a un Centro de...
- Page 42 o Cubra ta removedora de nieve con una OTROS cubierta protectora apropiada que no Si fuese posible, alacene su removedora retenga humedad. No use pl,=5.stico ni de nieve en ambientes interiores y vini!o. ct'Jbrala para protegerla contra el potvo y IMPORTANTE: Nunca cubra la la sucidad,...
- Page 44 For the repair or replacement parts you need delivered directly to your home Call 7 am-7 pro, 7 days a week 1-800-366-PART (1-800-366-7278) Para ordenar piezas con entrega a domicilio -1-800-659-7084 For in-house major brand repair service Call 24 hours a day, 7 days a week 1-800-4-REPAIR (1-800-473-7247) Para pedir servicio de reparaci6n a...