Table of Contents
Advertisement
Advertisement
Table of Contents

Related Manuals for Hitachi HDC-881E


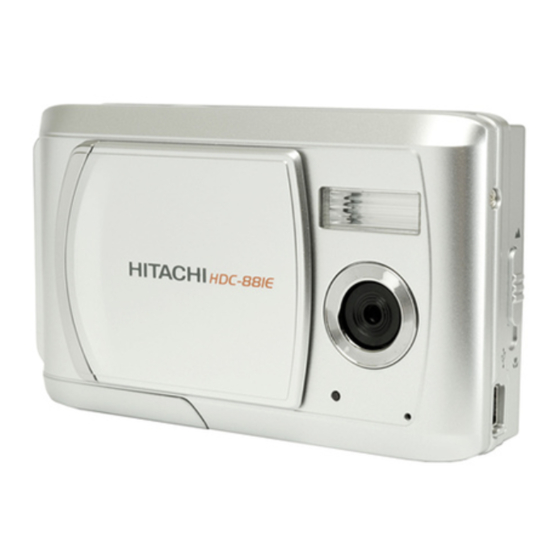
Summary of Contents for Hitachi HDC-881E
-
Page 2: Fcc Statement
FCC STATEMENT This device complies with Part 15 of the FCC Rules. Operation is subject to the following two conditions: (1) This device may not cause harmful interference, and (2) This device must accept any interference received, including interference that may cause undesired operation. -
Page 3: Read This First
READ THIS FIRST Trademark Information ® ® Microsoft and Windows are U.S. registered trademarks of Microsoft Corporation. ® Pentium is a registered trademark of Intel Corporation. Macintosh is a trademark of Apple Inc. SD™ is a trademark. Other names and products may be trademarks or registered trademarks of their respective owners. -
Page 4: Safety Instructions
SAFETY INSTRUCTIONS Read and understand all Warnings and Cautions before using this product. Warnings If foreign objects or water have entered the camera, turn the power off and remove the battery. Continued use might cause fire or electric shock. Consult the store of purchase. - Page 5 Cautions Insert the battery paying careful attention to the polarity (+ or –) of the terminals. Inserting the battery with its polarities inverted might cause fire and injury, or damage to the surrounding areas due to the battery rupturing or leaking. Do not fire the flash close to anyone’s eyes.
-
Page 6: Notes On Battery Usage
Notes on Battery Usage When you use the battery, carefully read and strictly observe the Safety Instructions and the notes described below: Use only the specified battery (3.7V). Avoid extremely cold environments as low temperatures can shorten the battery life and reduce camera performance. When you are using a new rechargeable battery or a rechargeable battery that has not been used for an extended period of time (the battery that passed the expiry date is an exception), it may affect the number of images that can be captured. -
Page 7: Table Of Contents
CONTENTS INTRODUCTION 27 Capture Menu Overview 29 Video Menu Package Contents 30 Playback Menu 31 Setup Menu GETTING TO KNOW YOUR CAMERA 33 TRANSFERRING FILES TO Front View YOUR COMPUTER Rear View 33 Downloading Your Files 10 LCD Monitor Display 34 EDITING SOFTWARE 12 GETTING STARTED INSTALLATION... -
Page 8: Introduction
INTRODUCTION Overview Congratulations on your purchase of the new digital camera. Capturing high-quality digital images is fast and easy with this state-of-the-art smart camera. Equipped with a 8.0-megapixel sensor, this camera is capable of capturing images with a resolution of up to 3264 x 2448 pixels. Package Contents Carefully unpack your camera and ensure that you have the following items: Common Product Components:... -
Page 9: Getting To Know Your Camera
GETTING TO KNOW YOUR CAMERA Front View 1. Strap holder 2. Lens cover 3. Shutter button 4. Flash 5. Lens 6. Microphone 7. Self-timer LED EN-8... -
Page 10: Rear View
Rear View 1. Focus switch Right button Normal mode Flash button Macro mode Left button 2. USB connector Self-timer button 3. Tripod socket Up button 4. Battery / memory card cover MENU Menu button 5. OK OK button 10. LCD monitor Digital Zoom button 11. -
Page 11: Lcd Monitor Display
LCD Monitor Display Capture mode 1. Mode indication ] Auto Mode ] Sport Mode ] Night Mode ] Portrait Mode ] Landscape Mode ] Backlight Mode +0.3 +0.3 +0.3 2. Flash mode 00154 00154 00154 2008/01/01 19:58 2008/01/01 19:58 2008/01/01 19:58 ] Auto Flash ] Forced Flash ] Red-eye reduction... - Page 12 Video mode [S] 1. Mode icon 2. Available recording time 3. Main focus area 59:59 59:59 59:59 4. Battery condition 5. Storage media 6. Video resolution 7. Exposure compensation 8. Focus setting +0.3 +0.3 +0.3 Playback mode [x] - Still image playback 1.
-
Page 13: Getting Started
GETTING STARTED Preparation 1. Attach the camera strap. 2. Open the battery/memory card cover. 3. Load the batteries with correct orientation as shown. 4. Insert an SD/SDHC memory card (Optional). The camera has 16MB internal memory (14MB available for image storage), but you can load an SD/SDHC memory card (SDHC memory card up to 4GB) to expand the... -
Page 14: Turning The Power On/Off
Turning the Power On/Off Load the batteries and insert an SD/SDHC memory card before starting. To turn the camera on, slide the lens cover open until it clicks, uncovering the lens. To turn the camera off, slide the lens cover closed until it clicks, covering the lens. -
Page 15: Choosing The Language
Choosing the Language Specify in which language menus and messages are to be displayed on the LCD monitor. 1. Press the / MENU button. Setup 2. Select [Setup] menu with the button. 3. Select [Language] with the buttons, and Next Menu Format Beep press the OK button. -
Page 16: Setting The Date And Time
Setting the Date and Time Follow the steps below to set the date display style, current date and time. 1. Slide the lens cover open until it clicks to turn on Setup the camera. The camera mode is displayed. 2. Press the / MENU button to enter [Setup] in any mode. -
Page 17: Capture Mode
CAPTURE MODE Capturing Images Your camera is equipped with a 2.8" LTPS LCD monitor to help you compose images, playback recorded images/video clips or adjust menu settings. 1. Slide the lens cover open until it clicks to turn on the camera. 2. -
Page 18: Setting Focus
Setting Focus Images can be captured by sliding the focus switch to set the focus modes: [ macro or [ ] normal mode. 1. Slide the lens cover open until it clicks to turn on the camera. 2. Slide the focus switch to your desired focus mode. -
Page 19: Setting The Scene Mode
Setting the Scene Mode You can select the scene mode according to the shooting scene. There are 6 available modes in this scene mode. ] Auto: Select this mode to adjust point-and-shoot action. ] Sport: Select this mode when you want to photograph fast-moving subjects. -
Page 20: Adjusting The Exposure (Ev Compensation)
Adjusting the Exposure (EV Compensation) You can manually adjust the exposure determined by the digital camera. Use this mode when the proper exposure cannot be obtained, for example, when the contrast (different between light and dark) between the subject and the background is extremely large. The EV compensation value can be set in the range from -2.0EV to +2.0EV. -
Page 21: Video Mode
VIDEO MODE Recording Video Clips This mode allows you to record video clips at a resolution of VGA (640 x 480) / QVGA (320 x 240) pixels. 1. Press the / MODE button to set the camera 59:59 59:59 59:59 mode to [ 2. -
Page 22: Playing Back Video Clips
Playing Back Video Clips You can play back recorded video clips on the camera. 1. Press the / MODE button twice to enter 00:11 00:11 00:11 ] Playback mode. The last image appears on the screen. 2. Select the desired video clip with the buttons. -
Page 23: Playback Mode
PLAYBACK MODE Playing Back Still Images You can play back the still images on the LCD monitor. 1. Slide the lens cover open until it clicks to turn on 2.0X 2.0X 2.0X the camera. 2. Press the / MODE button twice to enter [ Playback mode. -
Page 24: Thumbnail Display
Thumbnail Display This function allows you to view 9 thumbnail images on the LCD monitor simultaneously so you may search for a particular image. 1. Slide the lens cover open until it clicks to turn on the camera. 2. Press the / MODE button twice to enter [ Playback mode. -
Page 25: Protecting Images
Protecting Images Set the data to read-only to prevent images from being erased by mistake. 1. Press the / MODE button twice to enter [ Play Playback mode. 2. Select the image that you want to protect with the Next Menu Fix Red Eyes buttons. -
Page 26: Dpof Settings
DPOF Settings DPOF is the abbreviation for Digital Print Order Format, which allows you to embed printing information on your memory card. You can select the images to be printed and how many prints to make with the DPOF menu in the camera and insert the memory card to the card compatible printer. -
Page 27: Erasing Images
Erasing Images Erasing single image / Erasing all images 1. Press the / MODE button twice to enter [ Play Playback mode. The last image will be displayed on the screen. Next Menu Fix Red Eyes 2. Select the image you want to erase with the Delete Next Menu buttons. -
Page 28: Menu Options
MENU OPTIONS Capture Menu This menu is for the basic settings to be used when capturing still images. Capture Capture Color Size Normal Saturation High Quality Fine Scene Mode Sharpness Hard Auto Preview Metering Average Date Print W. Balance Auto 1. - Page 29 Metering This sets the metering method for calculating the exposure. * [ o ] Average: The entire area of the screen is measured, and the exposure is calculated. * [ q ] Spot: A very small portion of the center of the screen is measured, and the exposure is calculated.
-
Page 30: Video Menu
Video Menu This menu is for the basic settings to be used when recording video clips. Video Size / MODE button to set the camera mode to [ w ]. 1. Press the 2. Press the / MENU button. 3. Select the desired option item with the buttons, and press the OK button to enter its respective menu. -
Page 31: Playback Menu
Playback Menu In the [ ] mode, choose which settings are to be used for playback. Play Play Fix Red Eyes Next Menu Thumbnail Next Menu Delete Next Menu Copy to Card Next Menu Slide Show 3 sec. DPOF Next Menu Protect Next Menu 1. -
Page 32: Setup Menu
Setup Menu Set your camera’s operating environment. Setup Setup Next Menu Format Beep Language English 3 Min. Auto Off Sys. Reset Next Menu Light Freq. 50Hz 1. Press the / MENU button. 2. Select the [Setup menu with the button. 3. - Page 33 Sys. Reset This returns all basic settings to the camera’s default settings. * Cancel / Execute Light Freq. The function allows to change the light frequency of environment to 60Hz or 50Hz. * [60Hz]: The light frequency of environment is 60Hz. * [50Hz]: The light frequency of environment is 50Hz.
-
Page 34: Transferring Files To Your Computer
TRANSFERRING FILES TO YOUR COMPUTER System Requirement Windows Macintosh Pentium III 800 or equivalent PowerPC G3/G4/G5 Windows 2000/XP/Vista OS 9.0 or later 256MB RAM 512MB recommended 256MB RAM 512MB recommended 150MB available hard disk space 128MB available hard disk space CD-ROM drive CD-ROM drive Available USB port... -
Page 35: Editing Software Installation
EDITING SOFTWARE INSTALLATION MediaOne Gallery SE - makes it the easiest way to manage and share your digital life with family & friends. The intuitive thumbnail library automatically organizes, updates and sorts files for the most natural way to browse your multimedia collection. To install software: 1. -
Page 36: Using The Camera As A Pc Camera
USING THE CAMERA AS A PC CAMERA Your camera can act as a PC camera, which allows you to videoconference with busi- ness associates, or have a real-time conversation with friends or family. To use the cam- era for videoconferencing, your computer system must include the items as below: Microphone Sound card Speakers or headphones... -
Page 37: Specifications
SPECIFICATIONS Item Description Image sensor 1/2.5” CMOS sensor Effective pixels 8.0 Mega pixels Image resolution <Still image> 8M: 3264 x 2448, 5M: 2560 x 1920, 2M: 1600 x 1200, VGA: 640 x 480 <Video clip> VGA: 640 x 480 (24 fps), QVGA: 320 x 240 (30 fps) Recording media 16MB internal memory (14MB available for image storage) Supports SD/SDHC memory card (up to 4GB) (optional) -
Page 38: Appendix
APPENDIX Possible Number of Shots Possible number of shots (still image) The table shows the approximate shots that you can capture at each setting based on the capacity of the internal memory and the SD/SDHC memory card. SD/SDHC memory card capacity Internal Size Quality... -
Page 39: Troubleshooting
Troubleshooting Refer to the symptoms and solutions listed below before sending the camera for repairs. If the problem persists, contact your local reseller or service center. Solutions / Corrective Symptom Cause Actions The power does not The batteries are not loaded. Load the batteries correctly. -
Page 40: Connecting To A Pictbridge Compliant Printer
Connecting to a PictBridge Compliant Printer Read this section if the model you purchased is included with the PictBridge functions. If a printer that supports PictBridge is available, images can be printed by connecting the digital still camera directly to the PictBridge-compatible printer without using a computer. Connecting the camera to the printer 1. - Page 41 3. If you select [Select] in the previous step, the Select figure shown on the right hand side will appear. Print Num Select the image that you want to print with buttons. Select the [Print Num] (up to 99) with the buttons.
- Page 42 Language WEEE explanation English "The mark is in compliance with the Waste Electrical and Electronic Equipment Directive 2002/96/EC (WEEE)." "The mark indicates the requirement NOT to dispose the equipment including any spent or discarded batteries as unsorted municipal waste, but use the return and collection systems available"...
Need help?
Do you have a question about the HDC-881E and is the answer not in the manual?
Questions and answers