Table of Contents
Advertisement
Quick Links
Advertisement
Table of Contents

Related Manuals for Meridian Meridian 568


Summary of Contents for Meridian Meridian 568
- Page 1 Meridian 568 Digital Surround Processor...
- Page 2 Meridian 568 Digital Surround Processor User Guide...
- Page 3 Dolby, Pro Logic, AC-3, and the double-D symbol Lossless Packing, and MLP are registered This guide was produced by Human-Computer are trademarks of Dolby Laboratories Licensing trademarks of Meridian Audio Ltd. Interface Ltd, http://www.interface.co.uk Corporation. Lucasfilm, THX, and THX Cinema are...
-
Page 4: Table Of Contents
Contents Introduction Introduces the digital surround processor, Using the digital and gives guidelines and suggested surround processor layouts to help you plan your surround system. Provides step-by-step instructions for Defining your own The 568 Digital Surround Processor ..2 operating the digital surround processor, presets Sample configurations ...... - Page 5 DSP presets Gives technical information about each of Setting up the digital the DSP presets, with details of the special surround processor parameters available for each one. Configuring the digital Logic DSP presets ......... 38 Describes how to unpack and install the surround processor Music DSP presets ........
- Page 6 Configuring the digital surround processor using a computer Describes how to configure the digital surround processor using the Meridian Troubleshooting Configuration program. The Meridian Configuration program ..78 Provides suggested solutions to typical Installing the Meridian Configuration problems. Glossary program ..........79 Creating a new settings file ....
-
Page 8: Introduction
Introduction he Meridian 568 Digital Surround Processor combines a completely digital surround-sound processor with a high-performance digital preamplifier in a single integrated unit. It takes advantage of the latest techniques in high- precision analogue electronics and digital signal processing, and the result is an impressively realistic and exciting reproduction of music and cinema sound. -
Page 9: The 568 Digital Surround Processor
The 568 Digital Surround Processor The 568 Digital Surround Processor incorporates the result of To resample the signal to take advantage of the highest rate several years of research and development into several available (upsampling). innovative technologies. To perform filtering or adjustment of the frequency response; eg treble or bass. - Page 10 Meridian High Resolution (MHR) 500 Series communications The 568 Digital Surround Processor supports Meridian High The 568 Digital Surround Processor is part of the Meridian 500 Resolution (MHR), to allow you to connect to other MHR- Series of advanced digital, analogue, and video components, compliant Meridian products to take advantage of high-rate and these incorporate a sophisticated communications link, to audio sources, and provide the additional benefits of lower jitter...
-
Page 11: Sample Configurations
Sample configurations Meridian Compact Theatre™ M33 rear M33 rear M1500 Meridian DVD Player The Meridian 568 Digital Surround Processor is ideal for use with The 568 Digital Surround Processor can connect directly to up the M33 Active Analogue Loudspeaker and M1500 Active to eight Meridian active loudspeakers, allowing you to create a Subwoofer. - Page 12 Meridian Digital Theatre™ DSP6000 DSP6000 DSP5000C D33 side D33 side D33 rear D33 rear Meridian DVD Player The 568 Digital Surround Processor can be used with two multi-channel reproduction from music and film sources. The Meridian DSP6000 Digital Loudspeakers, and a DSP5000C Meridian DVD Player is an ideal source for use with the 568.
-
Page 13: Specification And Accessories
Specification and accessories Specification Analogue outputs 4 x stereo 24-bit Delta-Sigma DAC. 8 x unbalanced outputs for centre, sub, Digital inputs 4 x cable, 75 , IEC958 and data rears, mains, and sides or subs. compatible, up to 24 bits. 3 x balanced outputs for mains and 1 x optical, Toslink (EIAJ), IEC958 and centre. -
Page 14: Available Accessories
5kg (10lb). interconnect the S leads between up to eight Meridian DSP digital loudspeakers. It is required if your 568 system includes Meridian Audio reserves the right to amend product more than two DSP loudspeakers. specifications at any time. Meridian 519 Demodulator... - Page 15 Fan kit A Fan kit is available for the 568 to provide additional ventilation if the unit is installed in an enclosed space. The fan can be programmed using the Meridian Configuration program so that it either runs when the 568 is out of standby, or when the temperature rises above the recommended level.
-
Page 16: Dsp Presets
DSP presets Multi-channel digital sources The digital surround processor provides an extremely comprehensive range of digital signal processing options for decoding both analogue and digital audio signals and Several alternative multi-channel digital formats are currently processing them for multi-channel reproduction. These are available which encode up to eight different channels onto a referred to as DSP presets, and are designed to provide the best digital signal. - Page 17 Multi-channel sources encoded onto In addition, a high data-rate version of DTS can be used to two channels compress five channels of CD-quality audio into the same space as two channels of unencoded sound, allowing a DTS music CD to provide over an hour of five-channel music, at a quality Several systems have been developed for encoding multi- indistinguishable from conventional CD.
- Page 18 Conventional stereo sources TV Logic TV Logic provides user-adjustable steering, and is The digital surround processor can also accept a conventional recommended for use with TV broadcasts that are not surround two-channel source, such as music on compact disc or a video encoded, where Pro Logic may give reduced intelligibility.
- Page 19 Special DSP presets Trifield Trifield uses a different processing technique to give a stable, The digital surround processor also includes the following three-dimensional image, with the ability to adjust the width of special DSP presets, for specific applications: the image. Because of its precision we recommend this option for solo, chamber, or vocal music.
-
Page 20: Provides Step-By-Step Instructions For
Using the digital surround processor his chapter provides a summary of the functions of the digital surround processor to identify the controls which you use to operate the unit. It also provides step-by-step instructions for operating the digital surround processor, using either the front panel or the Meridian System Remote. -
Page 21: Front Panel
Front panel 1 Source Selects the source. 2 Store Changes the DSP preset Display assigned to a source. 3 Preset Changes the preset. 4 Mute BOOTHROYD STUART Digital Source Store Preset Mute Display 5 Display Digital Surround Processor Changes the information displayed on the front panel. -
Page 22: Meridian System Remote
Meridian System Remote Source keys Select a source. Control keys Control the source functions. Switches to standby. RADIO TAPE 1 TAPE 2 CABLE VCR 1 VCR 2 Function Acesses additional functions. Repeat Number keys Angle Audio Record Phase Subtitle Store For entering track numbers and radio presets. -
Page 23: Quick Guide To Operating The 568 With The Remote
Quick guide to operating the 568 with the remote Action 568 as controller DSP speaker as controller Source selection CD, RADIO etc. CD, RADIO etc. Go to standby Volume A V Volume A V Volume Mute Mute Mute Change display Display Not available Change DSP preset... -
Page 24: Selecting A Source
Selecting a source To select a source When not playing, the digital surround processor should be left in the standby state. This uses a negligible amount of electricity, but ensures that the components of the digital surround Press Source (front panel) until the display shows the source processor operate at maximum efficiency from the moment you you require. - Page 25 To switch to standby Press Off on the front panel or the remote. The display will show: If you have other Meridian 500 Series equipment or Meridian DSP loudspeakers connected to the digital surround processor these units will also switch to standby.
-
Page 26: Adjusting The Volume
Adjusting the volume To mute the sound The digital surround processor adjusts the volume in precise steps of 1dB, where 9dB is equivalent to doubling the loudness. The current volume setting is displayed in dB on the front panel Press Mute. display, and can be varied in the range 1 to 99dB. -
Page 27: Changing The Dsp Preset
Changing the DSP preset Each source has a set of DSP presets associated with it, one for The following table gives the sequence of DSP presets for each each of the alternative audio formats: two-channel (PCM), Dolby audio format, followed where appropriate by the abbreviated Digital, DTS, MPEG, and MLP. -
Page 28: Changing The Display
Changing the display The digital surround processor displays information about the Display option Example current settings on the 12-character front panel display. In DSP preset and volume M u s i c addition, it can display the same information superimposed on a video image. -
Page 30: Defining Your Own
Defining your own presets n addition to being able to change the source, volume, and DSP preset, the digital surround processor provides a sophisticated range of more advanced adjustments for each DSP preset, to allow you to change the characteristics of the sound to the settings you want. This chapter explains how to change these advanced parameters, and how to store them permanently so they are available whenever you want to use them. -
Page 31: Locking And Unlocking The Menus
Locking and unlocking the menus To simplify the normal operation of the digital surround processor, and to protect the settings from accidental changes, you can lock the menus so that the parameters cannot be accessed. To display or change the DSP presets, or to define your own presets, you first need to unlock the digital surround processor menus. -
Page 32: Changing The Dsp Parameters
Changing the DSP parameters To change a DSP parameter Each DSP preset provides a series of parameters that you can vary to customise its behaviour to your specific requirements. For example, most presets provide Balance and Depth Make sure the menus are unlocked; see To unlock the menus parameters which alter the characteristics of the sound. -
Page 33: Standard Parameters
Standard parameters Parameter Range Default What it changes Treble * † -10dB to +10dB +0dB The slope of the frequency response. Bass * † -5dB to +5dB +0dB The bass response. Phase * † + or - The phase of all loudspeakers. Balance <10 to 10>... -
Page 34: Changing Treble, Bass, Or Phase
Changing treble, bass, or phase The digital surround processor provides sophisticated treble and The treble control tilts the frequency of the response over the bass controls, to allow you to adjust the broad balance of the entire frequency range to make the sound brighter or dimmer. It system to correct for the acoustics of your listening room, or for can be adjusted between 10dB in 0.5dB steps. -
Page 35: Changing The Listening Position
Changing the listening position To move the listening position to the A conventional stereo system provides a single balance control, left or right which changes the relative loudness of the two speakers. The 568 Digital Surround Processor provides a more sophisticated Press >... - Page 36 To change the relative level of the rear or side loudspeakers Press > or < (remote) until the display shows the speaker(s) you want to adjust. R e a r For example: Press A or V (remote) to change the relative level of the speakers, in dB.
-
Page 37: Changing The Integration Of The Centre
Changing the integration of the centre To change the relative delay of the If you have a centre loudspeaker you can adjust its relative centre speaker loudness, to provide the best integration of the centre with the main left and right speakers. Press >... -
Page 38: Changing The Spaciousness Of The Sound
Changing the spaciousness of the sound You can adjust the spaciousness of the sound by altering the If you have side speakers an additional S Delay option allows delay on the rear and side channels. you to adjust the delay on the side speakers between 15ms and 30ms. -
Page 39: Changing The Lip Sync And On-Screen Display
Changing the lip sync and on-screen display To adjust the lip sync To change the position of the on-screen display The LipSync parameter is a unique feature of the digital surround processor which allows you to adjust the delay For each DSP preset you can specify the position of the between the sound and the video image by up to one video on-screen display (OSD), or blank the on-screen display frame. -
Page 40: Changing The Dsp Preset For A Source
Changing the DSP preset for a source Each source has an appropriate DSP preset associated with it Press Preset (front panel or remote) to select the DSP preset for each music format. For example, for a standard stereo (PCM) you want to associate with the source. signal the CD source uses Trifield and the TV source uses TV Logic. -
Page 41: Defining Your Own Presets
Defining your own presets The 568 Digital Surround Processor allows you to modify one of Hold down Store (front panel), or press Store (remote) until the built-in presets, and save it for future use. the display shows the next available user-defined preset. You can either save the changes to the built-in preset, or you S t o . - Page 42 If you are defining a user preset you can now edit the name of If you are using a Meridian DSP loudspeaker you select a blank the preset if you wish. by pressing Function Clear. A flashing cursor shows the letter you For example, you could change the S t o .
- Page 43 To clear a user-defined preset Make sure the menus are unlocked; see To unlock the menus, page 24. Press Preset (front panel or remote) to select the DSP preset you want to clear. U s e r 2 For example: Press and hold down Clear (remote) for several seconds.
-
Page 44: Dsp Presets
DSP presets his chapter gives technical information about each of the DSP presets built in to the digital surround processor. It explains the processing performed by each DSP preset, and gives details of the types of material you should use with each preset. It also gives details of the special DSP parameters available for each preset. -
Page 45: Logic Dsp Presets
Logic DSP presets Pro Logic The digital surround processor provides four DSP presets specifically designed for reproducing stereo film soundtracks. Three of these presets, Pro Logic, THX Cinema, and TV Logic, Dolby Surround is an encoding system based on a phase- are designed for Dolby Surround encoded material. - Page 46 THX Cinema THX can also be used with the 5.1 Movie DSP presets; see Dolby Digital THX, DTS THX, and MPEG THX, page 46. The THX Cinema DSP preset provides Pro Logic decoding, Pro Logic and THX Cinema DSP followed by additional signal processing refinements developed preset parameters by Lucasfilm Ltd.
- Page 47 TV Logic DSP preset parameters If Party? is set to No, the combined or selected signal is played only through the centre speaker, or the left and right speakers if Parameter Options What it changes there is no centre, to centrally localise high-frequency hiss and clicks.
-
Page 48: Music Dsp Presets
Music DSP presets Music The digital surround processor provides seven alternative music DSP presets designed for the reproduction of well-recorded material, originally intended for replay over a traditional stereo The Music DSP preset extracts the mono and surround pair of loudspeakers. components of the original recording. - Page 49 Music and Trifield DSP preset This gives a significant improvement over traditional stereo, parameters which converts the differences between the microphone signals into amplitude differences in the speaker signals. This version of the Trifield algorithm is virtually impossible to implement without Parameter Options What it changes...
- Page 50 Ambisonic recording space whether you are at the exact central seat or well off to one side. The Ambisonic DSP preset is designed for replaying material encoded in UHJ format, the two-channel stereo-compatible Of all the signal-processing options, Ambisonic is the one that encoding found on Ambisonically recorded discs and requires the greatest attention to speaker choice and positioning.
- Page 51 Ambisonic and Super Stereo DSP Music Logic preset parameters Music Logic is a music DSP preset with user-adjustable Parameter Options What it changes steering, designed to provide an exciting experience with many types of studio-produced music. Width * 0 to 1 The width of the image.
- Page 52 DTS Music Stereo and Direct DTS Music is a special version of the DTS preset designed with The Stereo preset passes the left and right input signals directly a lower LFE level of -10dB to match the bass levels applied to to the left and right main speakers.
-
Page 53: 5.1 Movie Dsp Presets
5.1 Movie DSP presets MPEG The discrete digital formats can encode up to eight separate channels, which can be decoded to provide separate signals to the eight speakers in a surround configuration. MPEG surround is the preferred audio format for DVD in PAL territories. - Page 54 5.1 Movie DSP preset parameters Using dynamic range control Parameter Options What it changes Because Dolby Digital is a digital format it allows dynamic range control without the distortion involved in analogue methods. The Surr. Rear Surr. Rear, Surr. Side, Switches the surround Compress parameter can be set to one of the following options: Surr.
- Page 55 Using peak-level limiting The Max SPL or Limit parameters allow you to set up peak-level limiting for bass signals, and the setting applies to all the discrete digital DSP presets. If your loudspeaker layout includes one or more subwoofers the parameter is named Max SPL, and it sets the peak-level limit for the LFE channel.
-
Page 56: Connections
Setting up the digital surround processor his chapter explains how to install the digital surround processor. It describes what you should find when you unpack the unit, how you should connect it to your other audio equipment and speakers, and the siting constraints. -
Page 57: Unpacking
Unpacking Radio interference The digital surround processor comes in a box containing the following components: FCC Warning: This equipment generates and can radiate radio Meridian 568 Digital Surround Processor. frequency energy and if not installed and used correctly in Meridian System Remote. accordance with our instructions may cause interference to Power cord. -
Page 58: Positioning The Digital Surround Processor
Positioning the digital surround processor Safety warnings To avoid interference Do not expose the unit to dripping or splashing. Do not position the digital surround processor: Do not place any object filled with liquid, such as a vase, on the unit. Near strong magnetic radiation, such as near a power Do not place naked flame sources, such as lighted candles, amplifier. -
Page 59: Connecting The Digital Surround Processor
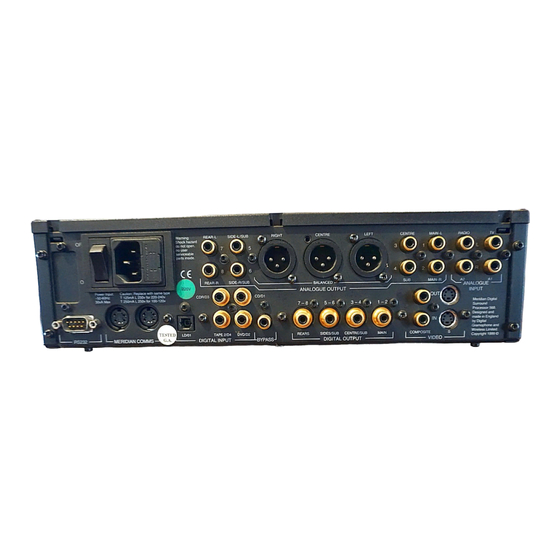
Connecting the digital surround processor Rear panel Expansion Power input Analogue Balanced analogue Analogue Analogue connector and fuse speakers outputs speakers inputs REAR-L SIDE-L/SUB CENTRE MAIN-L RADIO REAR-R SIDE-R/SUB CENTRE LEFT MAIN-R RIGHT ANALOGUE BALANCED OUTPUT INPUT CDR/D3 CD/D1 7–8 5–6 3–4 1–2... -
Page 60: Digital Audio Inputs
Digital audio inputs Analogue audio inputs The following table gives details of the digital audio inputs: The following table gives details of the analogue audio inputs: Use this input To connect to this Use this input To connect to this CD/D1, DVD/D2, A digital source, such as a CD player, TV/A1, RADIO/A2... -
Page 61: Audio Outputs
Audio outputs Communications connections The following table gives details of the analogue and digital The following table gives details of the communications outputs: connections: Use this output To connect to this Use this connection To connect to this MAIN 1-2 Main left and right speakers. -
Page 62: Connecting Video
Connecting video On-screen display The on-screen display automatically locks to an NTSC, PAL, or SECAM signal, and requires an input signal to operate. The Television/Monitor video circuits in the 568 are of broadcast quality, and passing the video signal through the digital surround processor will not MONITOR affect its quality. -
Page 63: Connecting Speakers
Connecting speakers To connect to Meridian DSP If your system includes more than two Meridian DSP loudspeakers loudspeakers you will need a 511 S-patch box (available separately) to link together the S5 leads from each speaker. DSP5000C Connect the COMMS output from the master digital speaker Centre (master) to one socket on the 511 using an S5 lead. - Page 64 To connect to active loudspeakers To connect to a stereo power (eg Meridian M33s) amplifier (eg Meridian 556 or 557) M33 Active M33 Active 568 Digital Surround Processor 556 Stereo Power Amplifier Loudspeaker Loudspeaker MAIN–L INPUT INPUT 568 Digital Surround Processor MAIN–R MAIN–L INPUT...
- Page 65 To connect an active subwoofer (eg Meridian M1500 or M2500) 568 Digital Surround Processor Subwoofer DIRECT CROSSOVER INPUT INPUT Audio lead Connect the SUB analogue output socket from the 568 Digital Surround Processor to the subwoofer’s line level input. The digital surround processor provides very high-quality crossovers for the subwoofer, and for best results you should use these instead of the subwoofer’s crossover.
-
Page 66: Connecting Sources
Connecting sources To connect to a digital source To connect to an analogue source (eg Meridian 508.24 24-Bit CD Player) (eg Meridian 504 FM Tuner) 508.24 24-Bit CD Player 568 Digital Surround Processor 504 FM Tuner 568 Digital Surround Processor DIGITAL DIGITAL INPUT OUTPUT... - Page 67 To connect to a DVD player To connect to a LaserDisc player (eg Meridian DVD Player) LaserDisc player 568 Digital Surround Processor Meridian DVD Player 568 Digital Surround Processor OPTICAL VIDEO VIDEO DIGITAL INPUTS OUTPUT OUTPUT IN S LD/O1 DIGITAL S-video DIGITAL INPUT VIDEO IN...
- Page 68 To connect to a 562 or 562V Connect up to eight analogue, five digital, and two optical Multimedia Controller sources to the appropriate inputs of the 562 or 562V. Configure the 562 to Type 1. 562V Multimedia Controller 568 Digital Surround Processor Configure each 562 or 562V source as required;...
-
Page 69: Connecting To Other Meridian Equipment
Connecting to other Meridian equipment To connect to other Meridian 500 One unit will then be designated C o n t r o l l e r Series equipment as the controller, and display: Connect one of the COMMS sockets on the back panel of the This is the unit that will respond to the remote. -
Page 70: Configuring The Digital Surround Processor Without A Computer
Configuring the digital surround processor without a computer he 568 Digital Surround Processor can be set up for most standard configurations of loudspeakers and sources using just the front-panel controls and Meridian System Remote. This chapter explains how to configure the digital surround processor without using a computer, and then how to calibrate the loudspeakers and sources for your particular system. -
Page 71: Choosing A Standard Setting
Choosing a standard setting The digital surround processor provides several alternative The following diagram shows the meaning of the standard Type standard settings, called Types, which configure all aspects of codes: the 568 into the most commonly needed configurations. In addition, any User Types you create using the Meridian Type 5.S DAA Configuration program are also available. - Page 72 To select a Type To set up the 568 for use with a 562 or 562V Multimedia Controller Put the digital surround processor into standby by pressing Off (front panel or remote). Select 562 Mode as follows: Hold down the A key on the front T y p e i n .
-
Page 73: Standard Source Settings
Standard source settings The digital surround processor provides 12 sources When the digital surround processor is reset to one of the corresponding to the 12 source selection keys on the Meridian standard Types the sources are set up with the labels, inputs, System Remote. -
Page 74: Calibrating The System
Calibrating the system To help you to set up your installation to give the best possible If your digital surround processor is connected to a television or sound with any particular combination of associated equipment, monitor, the on-screen display also provides additional text the 568 Digital Surround Processor includes a built-in calibration explaining what to do. - Page 75 To choose the distance units To start the calibration procedure You can choose to display and enter distances in either feet and Put the digital surround processor into standby by pressing inches, or metres. Off (front panel or remote). Press and hold the Off key on the front panel for at least five To change the distance units: seconds.
- Page 76 To move between the calibration tests Press > (remote) or Source (front panel) to move to the next test. Press < (remote) to move back to an earlier test. Press Store (front panel or remote) to jump to the next set of tests.
-
Page 77: Calibration Tests
Calibration tests Use the > and < keys to move between each of the speakers Levels in the layout in the sequence: Left, Centre, Right, Side R, Rear These tests allow you to adjust the output level to each speaker R, Rear L, Side L, and subwoofers. - Page 78 Distance Measure from the ear height at the listening position to the tweeter on each speaker (where applicable), in the distance units These tests allow you to adjust the delay of each of the speakers you have chosen; see To choose the distance units, page 68. in the layout to time-align the system so that sounds are Use the >...
- Page 79 Fine tuning The next display shows the distance (or delay) for the same speaker. These tests allow you to fine-tune the phase and delay of each L e f t 1 8 ' 0 speaker when used in conjunction with other speakers on the For example: layout.
- Page 80 Pay particular attention to the centre channel, as this can have a dramatic effect on the overall sound. As you increase the delay the speaker will appear to move away from you. You have now completed the calibration of your system. Press Off (front panel or remote) to exit from the calibration procedure.
-
Page 81: Setting Up Subwoofers
Setting up subwoofers To adjust the subwoofer crossover This section explains how to use Sine/Sub mode to adjust the frequency subwoofer crossover frequency to suit the subwoofers in your system, and use a sinewave test signal to check for room resonances. - Page 82 To use the sinewave sweep test To change the sweep rate Press < or > (remote) until the Sine/Sub mode includes a sinewave signal test, to help you set P a u s e 8 0 H z the subwoofer crossover frequencies, or check for room display shows: resonances.
- Page 83 To change the volume To select other test signals Press < or > (remote) until the display shows the current Use the volume keys in the usual way. signal. Warning: Very loud low-frequency signals may damage S i g n a l S i n e speakers.
-
Page 84: Using A Computer
Configuring the digital surround processor using a computer he 568 Digital Surround Processor provides a flexible range of customisation options which you can change to suit your own preferences and the other equipment in your system. To configure the 568 you use the Meridian Configuration program, an intelligent Windows-based application that is supplied with the 568. -
Page 85: The Meridian Configuration Program
The Meridian Configuration program Sources The Meridian Configuration program is a stand-alone Windows- based application that lets you design your own configuration of Lets you customise the operation of each of the the 568 Digital Surround Processor to suit your own personal sources, including the presets used by each source preferences and the particular configuration of equipment in for each of the audio formats, the digital, analogue,... -
Page 86: Installing The Meridian Configuration Program
Installing the Meridian Configuration program Requirements Planning the configuration To use the Meridian Configuration program you need: Before creating a configuration for your 568 Digital Surround Processor it is a good idea to plan the following aspects of your A computer running Windows 95 or Windows NT 4.00. setup: A 100MHz or faster Pentium-class processor. - Page 87 To run the Meridian Configuration Button Option Function program Creates a new settings file. Click Start, point at Programs, then click Meridian Open Opens an existing settings file. Configuration. Save Saves the current settings file to disk. The Meridian window will be displayed: Fetch Fetches the current configuration of the attached product(s).
- Page 88 To connect the serial cable The serial cable is symmetrical, and can be connected either way round. Connect one end to the RS232 connector on the back panel of the 568 Digital Surround Processor. Connect the other end to one of the serial ports on the PC or PC notebook computer.
-
Page 89: Creating A New Settings File
Creating a new settings file The section explains how to create a new settings file, using the A new settings file will be created for you, with the initial name Meridian Configuration program, and how to enter personal MSF1, and the Meridian window will show a Surround information to identify the settings in your product. - Page 90 To display the settings To enter your personal details Double-click the Surround processor icon, to open it and Click the Owner icon in the left-hand panel. display the settings it contains. Enter any text you like in the Dealer, Owner, and Description fields.
- Page 91 The options on the Advanced tab are for use by dealers in setting up multi-room systems, and to upload a new version of the software to the product, and it is recommended that you do not change these settings. To display or edit the settings Double-click the Settings icon.
-
Page 92: Setting Up Speakers
Setting up speakers To specify the speaker layout This section describes how to use the Meridian Configuration program to configure the 568 Digital Surround Processor for the configuration of loudspeakers in your system, and specify Click Speakers in the left-hand panel of the Meridian information about the type of each speaker, for optimum window. - Page 93 As you change the options the layout illustration will change to Choose Large if your main left and right speakers are large, show the resulting layout. with good bass performance, and you want to use them for full range reproduction. If you select a combination of options that is not supported, the Choose Small if your main left and right speakers do not have other options will be adjusted accordingly to ensure that the...
- Page 94 Centre Use the Sides and Rears drop-down menus to specify the type of the rear and side speakers. Use the Centre drop-down menus to specify which presets use the centre speaker, and its size and type. Subwoofers From the first drop-down menu choose one of the following Use the Subwoofers drop-down menus to specify the options: number of subwoofers, and the DSP presets that use them.
- Page 95 To specify the speaker sizes Speaker protection Because of the high bass levels that 5.1 materials are capable of Once you have specified the speaker layout for you system, reproducing, the digital surround processor allows you to set up click the Sizes tab to display the Sizes page of speaker automatic protection of each full-range speaker or subwoofer.
- Page 96 Peak-level limiting The size value is displayed in the SizeCalc display. The Max SPL or Bass limit parameter allows you to set up Type the size into the appropriate field. peak-level limiting for bass signals, and the setting applies to all the discrete digital DSP presets.
-
Page 97: Setting Up Sources
Setting up sources To configure the source options This section describes how to use the Meridian Configuration program to configure the sources provided by the digital surround processor. Select the source in the list of sources. Click the Options tab. To set up sources Click the Sources icon in the left-hand panel of the Meridian window. - Page 98 Disabling this options prevents the source from appearing when The Audio input option can be set to Last valid to leave the you press the Source key, or the corresponding source key on input unchanged when you select the source. This allows you to the Meridian System Remote.
- Page 99 To set the advanced source options If you have two Meridian source units of the same type you can configure them to have different Comms addresses. You Click the Advanced tab to show the Advanced page of can then select the appropriate source by specifying its settings.
-
Page 100: Configuring Presets
Configuring presets To modify a built-in preset The 568 Digital Surround Processor provides 20 built-in presets and the Meridian Configuration program lets you configure the DSP parameters of any of the built-in presets to suit your own Select the preset in the list of presets. preferences. - Page 101 Note that the treble and bass settings will not be available if your The new preset is created in the first available space after the system includes DSP loudspeakers, because in this case the built-in presets. DSP speakers handle the treble and bass adjustments. Select the new preset you have created.
- Page 102 To delete a user-defined preset Select the preset in the list of presets. Click the Delete this preset button. To copy a preset to a specific position in the list of user-defined presets Highlight the preset you want to copy. Choose Copy from the Edit menu, or click the Copy button in the toolbar: Highlight the user-defined preset or empty position you want...
-
Page 103: Changing The Setup Options
Changing the setup options The final stage in editing the settings is to configure the general The options are described in the following table: Setup options. Option What it means To change the setup options Lock settings on Locks the DSP preset parameters. product Click the Setup icon in the left-hand panel of the Meridian window. - Page 104 Option What it means Meridian 800 present If selected, the menu keys on the Meridian System Remote operate the DVD/CD Player menus rather than the Digital Surround Controller menus. Meridian High Specifies whether the digital output Resolution uses Meridian High Resolution for all sources, or only when necessary.
-
Page 105: Calibrating The Settings With Your System
Calibrating the settings with your system To store the settings to the digital Once you have edited the settings to suit the configuration of surround processor your system, the next step is to store the settings to the 568 and use the calibration listening tests built into the 568 to calibrate it for correct performance. - Page 106 To fetch the calibrated settings When the download is complete the 568 will automatically reset itself to use the new settings, and show the owner name you defined: Finally fetch the calibrated settings back from the digital surround processor as follows: Z a c h a r y F o r d For example: Make sure your settings file is loaded into the Meridian...
-
Page 107: Creating A User Type
Creating a User Type To name the User Type Once you have fetched the calibrated settings from the digital surround processor, the final step is to store them permanently to the 568 as a User Type, so that you can reset the unit to them Click the Settings icon in the left-hand panel of the Meridian whenever you need to. - Page 108 To create additional User Types Initially the new type will be created with the same settings as the type you based it on, and with the name New type: If you wish you can create several User Types, and store them all to the digital surround processor.
- Page 109 To copy settings between User Types Highlight the User Type you want to copy the settings from. Choose Copy from the Edit menu, or click the Copy button in the toolbar: Highlight the User Type you want to copy the settings to. Choose Paste from the Edit menu, or click the Paste button in the toolbar: You can also copy and paste source and preset settings from...
-
Page 110: Completing The Configuration
Completing the configuration The final stage in creating a settings file is to save it, and then If the download was successful the 568 will briefly display the store it to the digital surround processor. owner name you have defined. To save the current settings Z a c h a r y F o r d For example:... -
Page 112: Troubleshooting
If you are still not able to resolve a difficulty with the help of this guide and the suggestions in the following pages, please contact your Meridian dealer or Meridian Audio Ltd. -
Page 113: General Operating Problems
General operating problems Standby point not lit Remote not working Check the following: Check the following: There is AC power connected to the socket on the rear of the The battery in the Meridian System Remote. 568. Remove the 500 Comms connections from the 568, does it The power switch on the rear panel of the 568 is turned on. - Page 114 When playing a Dolby Digital DVD, the 568 selects the Pro Logic preset DVDs include a two-channel Dolby Digital soundtrack, which will use the default two-channel preset. Select a six-channel soundtrack, if it is available. Unit is overheating If there is not adequate ventilation around the unit, or you are operating it in an enclosed space, you will need to fit the optional Fan kit.
-
Page 115: Audio Problems
Audio problems Hum on analogue input There is radio interference There is no reason for the 568 to produce hum on the analogue The 568 is a digital audio and computing device which has been input. designed to very high standards of electromagnetic compatibility. - Page 116 Audible hiss at high volume settings The 568 has a 24-bit capability on its internal analogue-to-digital converter, which is used for analogue sources. When the volume The input dynamic range of most current recordings is at is turned up high you may hear its dither as a hiss when the maximum 16 bit.
- Page 117 Sound not clear Centre not working If speech sounds muffled in a system with a centre speaker, There may be a connection problem. check that sound is coming from the centre as there may be a connection problem. In a digital or Meridian feed to the centre In a digital or Meridian feed to the centre, you may have set it you may have set it up to be right instead of left so that it is up to be right instead of left, and therefore it may be playing a...
-
Page 118: Video Problems
Video problems Poor picture quality Picture quality may suffer if you do not attend to the following: Are you using suitable quality cables with good connectors? Is there a ground loop created between any of the components connected to the 568? Remember that reception of broadcast or cable signals can be significantly deteriorated by cross-modulation in the RF domain. -
Page 119: Meridian Configuration Program Problems
Meridian Configuration program problems Preset options do not appear or are Meridian Configuration program not available repeatedly fails to talk to the product The options available when you are editing the DSP preset Check that you have selected a COM port. parameters depend on the speaker layout you have defined in Check that no other program currently running is using the Speakers. -
Page 120: Service And Guarantee
Meridian Audio Limited. Note that connecting anything other than the correct network lead to the COMMS In case of difficulty within the UK or USA please contact the sockets may cause damage to the 568 Digital Surround appropriate sales and service address shown on page ii. -
Page 122: Glossary
Glossary Absolute phase Controller Dolby Surround A control which changes the phase of the The product in a Meridian system that The encoding system used for the majority signals to all the speakers. uses the infra-red signals from the remote of movies on video and many TV to control the system. - Page 123 LFE sub Digital Video Disc or Digital Versatile Disc, A subwoofer which plays the full 120Hz Meridian High Resolution is a proprietary a CD-sized disc with nearly 30 times the bandwidth LFE signal in Dolby Digital, secure encoding format using encryption storage capacity of CD.
- Page 124 Mono surrounds Source Surrounds which have a common signal On-Screen Display, which the 568 can An input to the system, such as CD or TV. steered to them. This may then be superimpose on a composite video signal The Meridian 500 and 800 Series provide decorrelated by the THX process to give to give information about the state of the 12 named sources, corresponding to the...
- Page 125 Surround Type A sound reproducing system with more A standard configuration of the digital than two loudspeakers, and usually with surround processor. Selecting a Type speakers behind or to the side of the resets any configuration and calibration listener. changes. Additional processing that follows Dolby Pro Logic Surround decoding to give a more faithful reproduction of cinema...
-
Page 126: Index
Index AC-3 encoding 9 Audio stream display 21 Clearing a DSP preset 36 Academy (DSP parameter) 12, 40 Automatic setup 62 Communications connections 54 Accessories 7 Components 50 Balance (DSP Fan kit 8, 51 Compress (DSP parameter) 47 parameter) 25, 26, 28 Meridian 511 S-patch Box 7 Compression 47 Balanced outputs 54... - Page 127 DSP presets (continued) Distance calibration test 71 DSP parameters (continued) Dolby Digital 9, 46 Distance units, changing 68 Party? 40 Dolby Digital THX 10, 46 Dolby Digital DSP preset 9, 46 Phase 26, 27 DTS 9, 46 dynamic range control 47 Position 44 DTS Music 10, 45 Dolby Digital encoding 9...
- Page 128 DTS THX DSP preset 10, 46 Integration of the centre, Meridian 500 Series (continued) DVD player, connecting 60 changing 30 DSP6000 Digital Loudspeakers 5 Dynamic range control 47 Introduction 1 M1500 Active Subwoofer 4 M33 Active Analogue Fan kit 8, 51 LaserDisc player, connecting 60 Loudspeaker 4 Fetching calibrated settings 99...
- Page 129 Meridian DSP loudspeakers Music Logic DSP preset 12, 44 R Delay (DSP parameter) 26 connecting 54, 56 Muting the sound 19 R Filter (DSP parameter) 42, 44 using with remote Rack mount kit 8 On-screen display (OSD) 21 control 16, 25, 35 Radio interference 50, 108 changing position 32 Meridian DVD Player,...
- Page 130 Save As (File menu) 82 Sources (continued) Subwoofers Selecting a source 17 setting up 74 crossover 58 Serial cable, connecting 81 setting up using a PC 90 setting crossover frequency 74, 75 Serial port, specifying 81 standard settings 66 Super Stereo DSP preset 12, 43 Settings file, creating 82 Sources icon 78, 90 Super Stereo encoding 12...
- Page 131 UHJ format 43 Unlocking the menus 24 Unpacking 50 User Types copying settings between 102 creating 100 naming 100 User-defined presets clearing 36 creating 94 deleting 95 editing name 35 Ventilation 51 Video connecting 55 connections 52 problems 111 Volume adjusting 19 muting 19 Width (DSP parameter) 42, 44...