Table of Contents
Advertisement
Available languages
Available languages
Advertisement
Chapters
Table of Contents

Related Manuals for ToneWorks Toneworks AX3G


Summary of Contents for ToneWorks Toneworks AX3G
-
Page 2: Table Of Contents
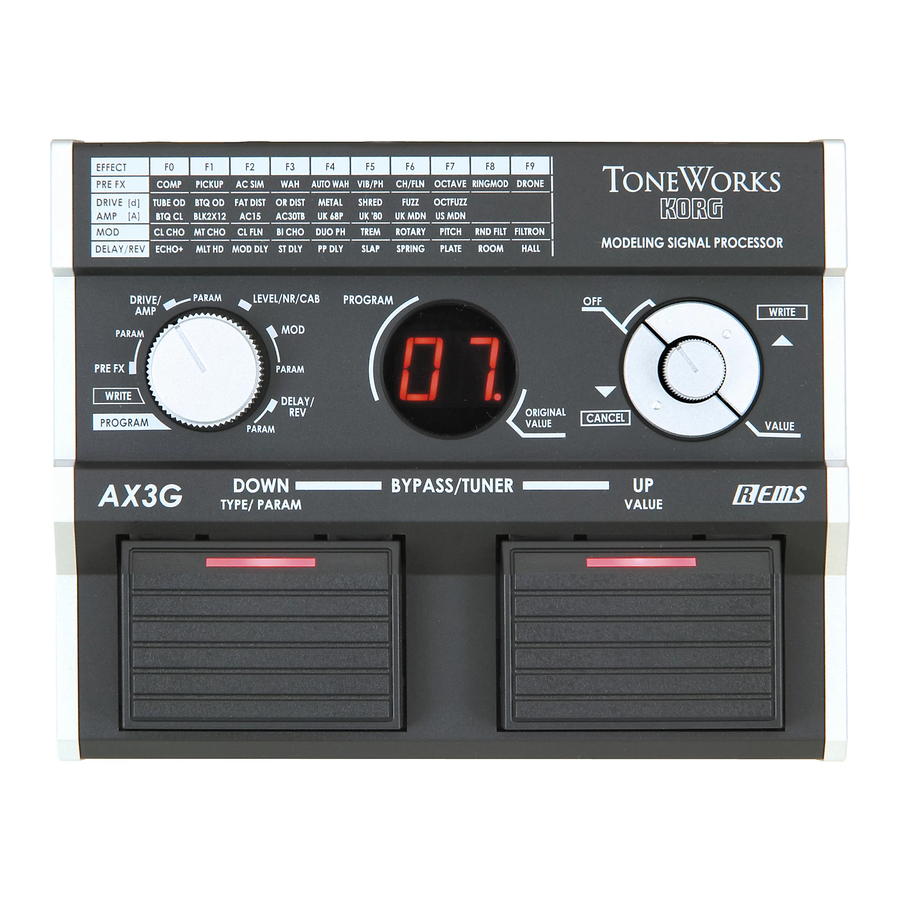
Table of Contents Precautions ..............3 Introduction ............... 4 Welcome! ................. 4 Main features ..............4 Front and rear panel ..........4 Front panel ............... 4 Rear panel ............... 5 Setup ................. 5 Installing batteries ............. 5 Basic connections .............. 6 Example of a connection to a guitar amp ...... -
Page 3: Precautions
AC adapter from the wall outlet. Then contact your distributor’s warranty. nearest Korg dealer or the store where the equipment was purchased. Please also retain your receipt as proof of purchase otherwise your product THE FCC REGULATION WARNING (for U.S.A.) may be disqualified from the manufacturer’s or distributor’s warranty. -
Page 4: Introduction
[PROGRAM] position, Write mode when at the [WRITE] Connect an optional Korg EXP-2 foot controller or XVP-10 expres- position, and Edit mode when at the [PRE FX]–[DELAY/REV-PARAM] sion/volume pedal, and use it as a wah pedal or volume pedal. -
Page 5: Rear Panel
3. Pedal jack 4. Value knob You can connect an optional Korg EXP-2 foot controller or XVP-10 ex- In Edit mode, use this knob to adjust the value of a parameter. In Write pression/volume pedal to this jack. -
Page 6: Basic Connections
Example of a connection to a guitar amp 1. Slide the cover of the battery case in the direction of the arrow, and open the cover. Insert four separately sold AA-size alkaline batteries, being sure to observe the correct polarity (“+” and “-” markings), and close the Guitar battery case. -
Page 7: Selecting A Program
AX3G Owner’s manual Down switch or Program Up switch, letting you change instantly between Edit mode is when the function selector is in one of the [PRE FX]–[DE- sounds. LAY/REV PARAM] positions. To enter Program mode, set the function selector to [PROGRAM]. (The You can change the effect type for each category ([PRE FX], [DRIVE/ LEDs in the upper part of the Program Up/Down switches will light.) AMP], [LEVEL/NR/CAB], [MOD], [DELAY/REV]), and edit the param-... -
Page 8: Selecting And Adjusting Sub-Parameters
By adjusting the main parameters, you can tweak your sound to what or [ ] buttons to cycle the display through LE (program level), nr (NR you have in mind. sensitivity), and Cb (cabinet). Use the value knob to adjust each param- eter. -
Page 9: Checking The Values Saved In A Program (Original Value)
AX3G Owner’s manual Bypassing the AX3G 1. Set the function selector to [WRITE]. Simultaneously press the Program Up and Program Down switches; all 2. Press the [ (WRITE)] button. The program number will blink. effects will be bypassed. At this time, the program/value display will indi- 3. -
Page 10: Adjusting The Tuner Calibration
2. If you decide to cancel the reload operation at this point, press the Note name [CANCEL] button. Display 3. If you wish to reload the factory settings press the [ (WRITE)] but- ton. The program/value display will indicate “ ”... -
Page 11: Specifications
AX3G Owner’s manual Are the DRIVE/AMP or PROGRAM LEVEL (LEVEL/NR/CAB) pa- Specifications rameters be turned to a low value? Is the volume turned down for another effect? Number of effects: Pre-effect types: 10 If an expression pedal is connected, is it turned down? Drive/Amp Model types: 16 Is the Mute function activated? Refer to “Bypass and Mute”... - Page 12 Sommaire Précautions .............. 13 Introduction ............. 14 Bienvenue! ..............14 Caractéristiques principales ..........14 Panneau Avant et Arrière ......... 14 Panneau Avant ............... 14 Panneau Arrière ............. 15 Configuration ............16 Installation des piles ............16 Raccordements ............... 16 Exemple de branchement à un ampli guitare ....16 Exemple de branchement à...
-
Page 13: Précautions
électrocution. Veillez à ne pas laisser tomber d’objets métalliques dans le boîtier. Si cela se produisait, débranchez l’adaptateur secteur de la prise de courant et contactez votre revendeur Korg le plus proche ou le magasin où vous avez acheté l’instrument. -
Page 14: Introduction
40 programmes prédéfinis. La fonction de ce potentiomètre dépendra du mode sélectionné par le Si vous raccordez la pédale optionnelle Korg EXP-2 ou XVP-10, vous pouvez sélecteur. Vous êtes en mode Programme lorsque le sélecteur est sur la utiliser celle-ci comme pédale wah-wah ou comme pédale de volume. -
Page 15: Panneau Arrière
En mode mander le volume ou le Wah-Wah, vous pouvez connecter une pédale Programme, ce potentiomètre a la fonction de master volume. Korg optionnelle EXP-2 ou XVP-10 sur cette prise. 5. Program Up switch 4. Prise d’alimentation secteur Dans le mode Program, utilisez ce commutateur pour sélectionner un... -
Page 16: Configuration
2. Raccordez votre guitare à la prise INPUT. Configuration Si l’appareil est allimenté sur piles, il se mettra sous tension. 3. Si vous utilisez l’adaptateur secteur (KA181) vendu séparément, Installation des piles branchez l’adaptateur secteur sur une prise secteur. L’appareil se mettra sous tension. -
Page 17: Jouer (Mode Programme)
AX3G Manuel d’utilisation Jouer (Mode Programme) Créez votre son (Mode Edit) Les réglages de chaque effet est communément appelés programme. Flux du Signal L’ AX3G possède 80 programmes. Les programmes 01–40 sont réinscriptibles. Les programmes 41–80 contiennent des programmes PRE FX DRIVE/AMP CABINET présélectionnés pour une utilisation immédiate. -
Page 18: Selectionner Et Adjuster Les Sous-Paramètres
Pour désactiver l’effet sélectionné, pressez simultanément les boutons Guide rapide [ ] et [ ] . Quand l’effet est actif, le type d’effet est indiqué et quand il Pour sélectionner un effet et l’éditer, à votre gout, vous devez avant tout ajuster est inactif, l’écran affiche“... -
Page 19: Sauvegarde D'un Programme(Write Mode)
AX3G Manuel d’utilisation Dans le mode programme, cette Led s’éclairera quand les valeurs de Types de paramètres d’effets et écran de valeur tous les paramètres atteindront celles sauvées dans le programme. Quand vous pressez le bouton Program Down dans le mode edit, l’écran indiquera le type d’effets ou le type de paramètres.(F0–F9, d0–d7, A0–... -
Page 20: Ajustez Le Calibrage De L'accord
2. Jouez une note avec votre guitare. L’écran program/value indiquera 1. Appuyes simultanément sur les boutons Program Up et Down et le nom de la note la plus proche. [ (CANCEL)] button (3 boutons au total), Allumez l’appareil. L’écran Le nom des notes est indiqué comme suit: program/value display indiquera “... -
Page 21: Caractéristiques
AX3G Manuel d’utilisation Est ce que l’adaptateur secteur est compatible? Est ce que le réglage de volume DRIVE/AMP [VOLUME] du PRO- Est ce qu’il est bien connecté à la prise alimentation? GRAM LEVEL (LEVEL/NR/CAB) [LEVEL] n’est pas dosé de Peut-il être en panne? manière excessive? 2 Pas de son Vérifiez le volume de sortie de votre guitare. - Page 22 Inhalt Vorsichtsmaßregeln ..........23 Einleitung ..............24 Willkommen! ..............24 Funktionen ..............24 Bedienoberfläche und Rückseite ........ 24 Bedienfeld ..............24 Rückseite ................ 25 Vorbereitung ............26 Einlegen der Batterien ............. 26 Grundlegende Verbindungen ........... 26 Anschlussbeispiel — Gitarrenverstärker ......26 Anschlussbeispiel —...
-
Page 23: Vorsichtsmaßregeln
Achten Sie darauf, keine Metallobjekte in das Gerät kommen zu lassen. Falls ein Gegenstand in das Gerät eindringt, ziehen Sie das Netzteil von der Steckdose ab. Dann wenden Sie sich an Ihren Korg-Fachhändler oder an des Geschäft, in dem das Gerät gekauft wurde. -
Page 24: Einleitung
Mit einem optionalen Korg-Schweller (EXP-2 oder XVP-10) kannst Einleitung du wahlweise den Wah-Effekt bedienen oder die Lautstärke einstellen. Willkommen! Beim Wechseln zwischen Programmen, die den gleichen Delay-Typ Vielen Dank für deine Entscheidung zu einem AX3G Modeling- und TIME-Parameter ([P1]-Einstellung) verwenden, reißt das Delay Signalprozessor der TONEWORKS-Serie. -
Page 25: Rückseite
Stimmfunktion dienen sie zum Einstellen der Kammertonfrequenz. 3. PEDAL-Anschluss 4. Eingaberad Hier kannst du ein optionales Korg-Schwellpedal (EXP-2 oder XVP-10) Im Edit-Modus kannst du mit diesem Rad die Parameterwerte einstellen. anschließen. Im Write-Modus wählst du damit den Zielspeicher. Im Program-Modus Wenn du es als Wah-Pedal nutzen möchtest, musst du unter [PRE FX]... -
Page 26: Vorbereitung
Wenn du mit einem Kopfhörer arbeiten möchtest, musst du ihn an Vorbereitung die OUTPUT-Buchse anschließen. 2. Verbinde die Gitarre mit der INPUT-Buchse auf der Rückseite. Einlegen der Batterien Damit schaltest du im Batteriebetrieb das Gerät ein. 3. Ein (optionales) AC-Netzteil musst du zuerst mit der DC9V-Buchse auf der Rückseite und danach mit einer Steckdose verbinden. -
Page 27: Spielen (Program-Modus)
AX3G Bedienungsanleitung Spielen (Program-Modus) Programmieren eigener Sounds (Edit-Modus) Die Einstellungen eines gespeicherten Sounds nennen wir „Program“. Signalfluss Das AX3G bietet 80 solcher Speicher. In den Speichern 01~40 kannst du eigene Einstellungen sichern. Die Speicher 41~80 enthalten „Pre- sets“, die dir auf die Sprünge helfen sollen. PRE FX DRIVE/AMP CABINET... -
Page 28: Anwahl Und Einstellen Der Zusatzparameter
Um den gewählten Effekt auszuschalten, musst du die Taster [ ] und [LEVEL/NR/CAB] [ ] simultan drücken. Wenn der Effekt aktiv ist, wird der Typ angezeigt. Stelle den Funktionswahlschalter auf diesen Eintrag, um den Ist er hingegen aus, so wird „ “... -
Page 29: Speichern Eines Sounds (Write-Modus)
AX3G Bedienungsanleitung Speichern eines Sounds (Write-Modus) Umgehen des AX3G Wenn du mit einem Sound zufrieden bist, kannst du ihn wie folgt speichern. Betätige Program Up und Program Down gleichzeitig: Alle Effekte werden umgangen. Im Speicher-/Werte-Display erscheint „ “. Wenn du allerdings vorher einen anderen Speicher wählst bzw. das Gerät ausschaltest, werden deine Einstellungen wieder gelöscht! Stummschalten des AX3G 1. -
Page 30: Einstellen Der Kammertonfrequenz
3. Wenn deine Gitarre zu hoch gestimmt ist, blinkt die Diode des Pro- 3. Drücke den [ (WRITE)]-Taster. Im Speicher-/Werte-Display erscheint gram Up-Schalters. Ist sie zu tief gestimmt, so blinkt die Diode des „ “ und die Werksdaten werden geladen. Wenn alle Daten Program Down-Schalters. -
Page 31: Technische Daten
AX3G Bedienungsanleitung Hast du einen zu hohen DRIVE/AMP [VOLUME]- oder PRO- 2. Nix zu hören GRAM LEVEL-Wert (LEVEL/NR/CAB) gewählt? Hast du die Lautstärke deiner Gitarre ganz zurückgenommen? Ist das Gitarrenkabel richtig angeschlossen? Ist das Gitarrenkabel eventuell defekt? Technische Daten Hast du unter DRIVE/AMP oder PROGRAM LEVEL (PROGRAM LEVEL) zu niedrige Parameterwerte eingestellt? Hast du die Lautstärke eines externen Effekts heruntergedreht? Anzahl der Effekte:... - Page 32 Appendices PRE FX Main Parameter F0 COMP SENS 1...10 LEVEL 0...10 F1 PICKUP TYPE HS, SH LEVEL 0...10 PHASE 1...10 PHASEMIX -10...10 SENS 0...10 F2 AC SIM 1...10 BODY 1...10 TYPE 1,2,3,4 0...10 F3 WAH PEDAL 1...10 TYPE 47 / 48 ORDER Pr/Po CLOSE...
- Page 33 About the AMP/LINE setting Use this setting to specify the type of device to which you've connected the AX3G; such as a guitar amp, mixer or recorder. This setting compensates the output from the guitar amp model so that it will be suitable for connection to the input jack of your guitar amp. A1: Use this setting if you've connected the AX3G to a clean-sounding amp, such as a typical of US-made open-backed combo.
- Page 34 LEVEL/NR/CAB PROGRAM LEVEL 0...10 NR SENS 0...10 CABINET MODEL C0...C9 Main Parameter CL CHO SPEED 1...10 DEPTH 0...10 MANUAL 1...10 MODE 1,2,3 MT CHO SPEED 1...10 DEPTH 0...10 TIME 0...10 0...10 CL FLN SPEED 1...10 RESO 0...10 DEPTH 0...10 MANUAL 1...10 0...10 BI CHO...
- Page 35 Preset program chart Program No. Program name Type Program No. Program name Type AC15 Crunch FILTRON PEACH ROTARY UK MODRN Lead UK '80S Lead *ICE* VULGAR D Lead GIBBY AC Acoustic CLEAN Clean TUBE OD CRUNCH Crunch AUTO WAH DIRT Lead RESO AC Acoustic...
- Page 36 4015-2 Yanokuchi, Inagi-city, Tokyo 206-0812 Japan C 2005 KORG INC. 1709 C0TH Printed in Japan...