Table of Contents
Advertisement
Contents
Before Starting ................................................................................................................. 1
Using the Menu............................................................................................................. 1
Using Keys....................................................................................................................... 1
What's in the Box?........................................................................................................... 2
Important Phone Numbers.......................................................................................... 2
Getting Started................................................................................................................. 3
Setting the Language ................................................................................................. 5
Installing the Memory Backup Batteries .............................................................. 5
Installing the Paper Roll ............................................................................................. 6
Setting the Date And Time ....................................................................................... 7
Programming the Sales Tax...................................................................................... 7
PC-Based Software.......................................................................................................... 8
About the Displays........................................................................................................10
Lifting and Lowering the Customer Display.....................................................11
Adjusting the Clerk Display ....................................................................................11
About the Menus on the Clerk Display..................................................................11
Using the Keyboard......................................................................................................13
Advertisement
Table of Contents

Related Manuals for Royal Alpha 710ML


Summary of Contents for Royal Alpha 710ML
-
Page 1: Table Of Contents
Contents 1 Welcome Before Starting ......................... 1 Using the Menu......................1 Using Keys........................1 What’s in the Box?......................2 Important Phone Numbers..................2 2 Getting Started Getting Started......................... 3 Setting the Language ....................5 Installing the Memory Backup Batteries .............. 5 Installing the Paper Roll ..................... - Page 2 Contents Turning the Register Off and On ................16 Using the Cash Drawer ....................16 Using the Accessory Drawer..................18 4 Setting Up Your Cash Register - the Basics Using the Displays......................19 The Clerk Screen......................20 Navigating the Clerk Screen ...................20 Adjusting the Contrast on the Clerk Screen............21 Using Power Saving Mode ..................21 Setting Alphanumeric Descriptions................22 Using Double Wide Characters................24...
- Page 3 Contents Programming PLUs with the Optional Barcode Reader.......43 Printing the Program Confirmation Report ............44 Before Going to Register Mode................44 Error Codes ........................45 Clearing an Error ......................47 5 Setting Up Your Cash Register Parameters Print Options........................48 1. Header........................49 2. Footer.........................49 3. Date..........................49 4.
- Page 4 Contents 11. Decimal........................54 To Default ........................54 Others Set Up ........................55 [+%] Rate........................55 [-%] Rate.........................56 [-] HALO ..........................56 Credit-1 Name......................56 Credit-2 Name......................56 FC Set Up........................56 AGE-1 Set Up ........................57 AGE-2 Set Up ........................57 Currency Symbol......................57 Z-Report #........................57 Zero Skip ........................58 Z-Report .........................58 Compressed........................58 Machine Number ......................58 Daily Z Counter......................58...
- Page 5 Contents Ringing up Sales with the Optional Barcode Reader ........64 Verifying the PLU Information for an Item ............65 Printing Receipts......................66 Receipt on Demand....................66 Using Training Mode....................67 Setting the Training Passcode ................67 Entering and Exiting Training Mode..............68 7 Programming Complex Tax Rates Selecting the Tax System....................70 Programming Straight Add-on Tax in the United States........71 Programming Table Tax in the United States .............72...
- Page 6 Contents 10 Troubleshooting Paper End or Printer Errors..................93 No Receipt Printing.......................94 No Printing on the Receipt..................94 The Cash Register Turns Itself Off ................94 Electronic Journal Memory Errors................94 The Cash Register Does Not Work at All..............95 The Cash Register Does Not Work at All..............96 Opening the Drawer When There is no Power ...........96 Half System Clear......................96 Partial Reset ........................97...
- Page 7 Contents Temporarily Overriding a PLU Price ..............108 Paid-Out Sale ....................... 109 PLU Sale ......................... 109 Plus Percentage Sale ....................109 Received-On-Account Sale ..................110 Registering A Department Unit Price..............110 Registering A Reference Number................. 111 Return Sale........................111 Split Tendering Sale....................112 Use the Error-Correct /Void Key ................
-
Page 8: Welcome
C HAPTER Welcome Congratulations on purchasing your new Royal cash register! This register is designed to be easy to use, helping you to focus on running your business. Before Starting Before you start using this manual to set up and customize your cash register, you should know the following. -
Page 9: What's In The Box
What’s in the Box? Look for and unwrap the following: • Cash Register • 1 starter roll of standard thermal paper, Royal Reorder Number 013127 (2¼ inch or 57.5 mm wide). • Journal Spindle, installed in the printer compartment • RegisterLink software and 6 foot serial cable •... -
Page 10: Getting Started
C HAPTER Getting Started Setting up your cash register consists of the following steps: 1 Unpacking the cash register 2 Plugging the cash register into a power source 3 Turning on the cash register by pressing the Main menu (on) key. 4 Setting the Language 5 Installing the Memory Backup Batteries 6 Installing the Paper Roll... - Page 11 Getting Started If you make a mistake or enter a wrong setting during initial setup, just continue with the rest of the initial setup. During initial setup, you cannot change settings after you press the Amount Tend Total <Enter> key. When you complete the initial setup, you can correct any setting by following the instructions listed in this manual.
-
Page 12: Setting The Language
Chapter 2 Getting Started Setting the Language At the prompt, you can select English, Spanish, or French. Changing the language changes the factory programmed words you and the customer see on the displays. However, changing the language does not translate any words you program in the cash register, such as PLU descriptions, header information, and so on. -
Page 13: Installing The Paper Roll
Getting Started • Replace the battery cover. Slide the bottom tabs into the long slit in the bottom position and snap the cover into place. Do not put the tabs in the 2 holes in the bottom of the compartment. The cover will not close and you will break the tabs. -
Page 14: Setting The Date And Time
Chapter 2 Getting Started Setting the Date And Time The date changes every day and prints in the month-day-year format. You can prevent the date from printing on the transaction receipts. The date format can also be changed to print day-month-year. For more information, see Date Format on page 60. -
Page 15: Pc-Based Software
PC-Based Software Straight tax is the easiest and most commonly used tax rate. Most states and areas use straight tax. To find out which sales tax type and percentage rate you should use, contact your local government office. This section explains setting simple sales tax in the United States. See Selecting the Tax System on page 70 for other sales tax systems. - Page 16 Connecting the Cash Register to a PC on page 92. The RegisterLink software is on a CD. Please install the software from this CD. Then check for updates on the Royal web site (www.royal.com). If a later version of the RegisterLink software is available on the web site, download it from the web site and install it on your PC.
-
Page 17: Getting To Know The Cash Register
C HAPTER Getting To Know the Cash Register This chapter shows you the basics of using your cash register after you set it up. If you have not yet set up your cash register, see the Quick Start sheet that came in the box with your cash register or Getting Started on page 3. -
Page 18: Lifting And Lowering The Customer Display
Chapter 3 Getting To Know the Cash Register Lifting and Lowering the Customer Display You can lift and lower the customer display so that customers can easily see what is happening. Adjusting the Clerk Display Your cash register has a 5 line display for the operator. All lines shows letters and numbers (alphanumeric). - Page 19 About the Menus on the Clerk Display You may see a scroll bar on the right side of the screen. This means that there are more options to see if you use the Arrow Up and Arrow Down keys. Scroll bar Help text When you are programming, you also see text that moves across the bottom of the screen.
-
Page 20: Using The Keyboard
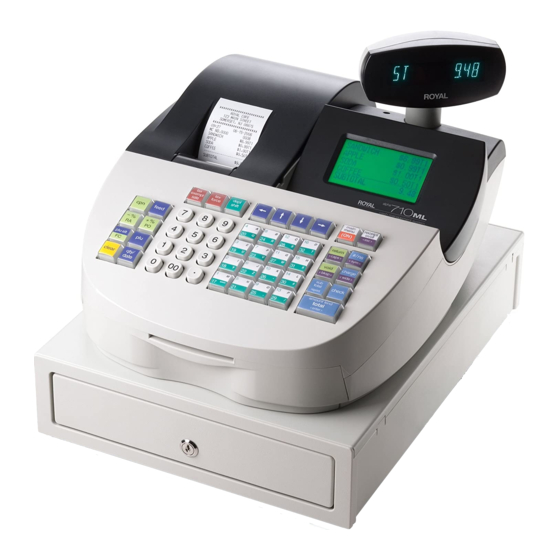
Chapter 3 Getting To Know the Cash Register Using the Keyboard The keyboard on your cash register looks like the following: Department keys and Amount Tend Total key Rounded number keys opens cash drawer letters for programming To use the keyboard, do the following: •... - Page 21 Using the Keyboard The following identifies some of the keys on the keyboard and what you can use them for Table 1 Navigating keyboard Use this key... To do this... • enter single entry coupon discounts • feed paper through the printer •...
- Page 22 Chapter 3 Getting To Know the Cash Register Table 1 Navigating keyboard Use this key... To do this... • select items from the menus in the clerk display • move the cursor on the screen • go directly back to the Main menu from any point in the cash register menus •...
-
Page 23: Turning The Register Off And On
Turning the Register Off and On Table 1 Navigating keyboard Use this key... To do this... • end a sale paid for with cash • enter the dollar amount the customer gave you for a cash sale and the register calculates change •... - Page 24 If it is, the drawer is locked with the 515 key. You need the key to unlock the cash drawer. If the key is lost or locked in the cash drawer, contact Royal. When you are using the cash drawer, make sure you lower the bill arms before you close the cash drawer.
-
Page 25: Using The Accessory Drawer
Using the Accessory Drawer To open the cash drawer using the emergency lever 1 With your hands on the cash drawer, carefully tip the front of the register up. Underneath the cash register, toward the back of the register, you see a small lever. -
Page 26: Setting Up Your Cash Register - The Basics
C HAPTER Setting Up Your Cash Register - the Basics This chapter includes explanations for: • Specifying messages on the display and on receipts • Setting clerk names and numbers • Setting machine numbers • Setting clerk and manager passcodes •... -
Page 27: The Clerk Screen
Using the Displays The Clerk Screen The clerk screen prompts you through setting up the cash register and using it to ring up sales. The main screen on the display looks like this: When ringing up sales, you see the department number or PLU number on the clerk screen. -
Page 28: Adjusting The Contrast On The Clerk Screen
Chapter 4 Setting Up Your Cash Register - the Basics Adjusting the Contrast on the Clerk Screen You can adjust the contrast on the clerk screen to make it brighter or darker. This makes it easier for you to see the display in different lighting. To adjust the contrast Programming More Options Config Contrast 1 Press the Main menu (on) key. -
Page 29: Setting Alphanumeric Descriptions
Setting Alphanumeric Descriptions To change the power saving time Programming More Options Config Power Saving 1 Press the Main menu (on) key. 2 Press the Arrow Down key to select Programming. Press the Amount Tend Total <Enter> key. 3 If you are prompted for a Manager Passcode, type the passcode number and then press the Check key. - Page 30 Chapter 4 Setting Up Your Cash Register - the Basics To use the letters and characters in the lower green area of the keys, press the Dept Shift key and then press the key with the letter you want. Use the round number keys to enter any numbers you want.
-
Page 31: Using Double Wide Characters
Setting Header Messages and Footer Messages Using Double Wide Characters For extra emphasis, you can program double wide characters for a specific character or a line of characters. Normal Size Double Wide If you use double wide characters, the maximum number of characters you can use is reduced by half. - Page 32 Chapter 4 Setting Up Your Cash Register - the Basics Header Message or Footer Message Worksheet Use this worksheet to make your header message or footer message. Make a copy of the blank worksheet before you start, in case you make a mistake or change your mind.
- Page 33 Setting Header Messages and Footer Messages Remember, you can make the characters double width but you can only use half the total number of characters if you do this. For example, if you want Coffee to be double wide, you need 12 spaces. For more information about double wide characters, see Using Double Wide Characters on page 24.
-
Page 34: Printing Options On Receipts
Chapter 4 Setting Up Your Cash Register - the Basics Printing Options on Receipts You can specify if the following prints on receipts: • Headers and footers • Date and time • Clerk name and number • Tax total, amount and location •... - Page 35 Setting Clerk Numbers and Names Note When clerks enter passcodes, passcodes appear as asterisks *** on the displays for extra security. After you are done programming clerk numbers, you can check your results. See Running the Options Dump Report on page 79. Important If you enter the wrong character, press the Void <bksp>...
-
Page 36: Using The Clerk System
Chapter 4 Setting Up Your Cash Register - the Basics 6 Select On. Press the Amount Tend Total <Enter> key. Now when the clerk enters Sales Registration mode, s/he is prompted for the clerk number. To turn on Clerk Passcodes Programming Security Set Up Clerk Passcode 1 Press the press the Main menu (on) key. -
Page 37: Setting X And Manager Passcodes
Setting X and Manager Passcodes Setting X and Manager Passcodes Manager passcodes are available for added security: • to go to the PRG and Z modes • to go to the X mode. Important The Manager passcode cannot be 0000 (zeros). The cash register will not accept this passcode. -
Page 38: Setting The Machine Number
Chapter 4 Setting Up Your Cash Register - the Basics 4 Press the Arrow Down key to select X Mode Passcode. Press the Amount Tend Total <Enter> key. 5 Follow the instructions on the display. To use the X mode passcode Example 2: Go to the X mode, using the X Passcode 1212 1 Press the press the Main menu (on) key. -
Page 39: Programming Department Keys
Programming Department Keys 2 Press the Arrow Down key to select Programming. Press the Amount Tend Total <Enter> key. 3 If you are prompted for a Manager Passcode, type the passcode number and then press the Check key. If you did not program a Manager Passcode, go to the next step. -
Page 40: Setting Department Number Keys
Chapter 4 Setting Up Your Cash Register - the Basics After you are done, you can check your results. See Running the Department Confirmation Report on page 80. To program department keys Programming Department Set Up 1 Press the Main menu (on) key. 2 Press the Arrow Down key to select Programming. - Page 41 Programming Department Keys When you are programming the alpha descriptions for Departments and PLUs use the Alpha Keyboard. Note Only capital letters of the alphabet are on the Alpha Keyboard. To use lower case letters, press the Return <caps> key. The department keys are clearly labeled with all the letters needed to program these descriptions.
-
Page 42: Programming Department Preset Price
Chapter 4 Setting Up Your Cash Register - the Basics Programming Department Preset Price Department Preset Price programs a preset price in a department to save time when ringing up an entry. Even if a price has been pre-programmed, you can override the price at the time of sale. The price automatically rings up each time that department key is pressed. -
Page 43: Setting Department Type
Programming Department Keys Setting Department Type Normal Item Entry allows you to ring up two or more items into a department. For example, if you want to ring up 5 of the same items, you can tell the cash register to multiply the one price by the number of items. Single Item Entry allows you to ring up only one item in a department and ends the sale as a cash sale as soon as the Department key is pressed. -
Page 44: Scrolling Messages
Chapter 4 Setting Up Your Cash Register - the Basics inappropriate customers; it simply provides a reminder to the clerk that this is an age-controlled item. You have 3 default options: • No age No age validation (the default setting for each department.) •... -
Page 45: Types Of Scrolling Messages
Scrolling Messages Types of Scrolling Messages You can program the following types of scrolling messages Table 4 Scrolling messages Message Type This message shows:. OFF message When the register is in the OFF position Prg X Z Mode During the idle state when the register is in Programming, X Report, or Z Report modes SALES message After the sales transaction... -
Page 46: Programming Scrolling Messages
Chapter 4 Setting Up Your Cash Register - the Basics Programming Scrolling Messages Use the steps below to program your scrolling message. To program a scrolling message Programming More Options Text Messages Scroll Messages 1 Press the Main menu (on) key. 2 Press the Arrow Down key to select Programming. -
Page 47: Programming The Credit Keys
Programming the Credit Keys 3 If you are prompted for a Manager Passcode, type the passcode number and then press the Check key. If you did not program a Manager Passcode, go to the next step. 4 Press the Arrow Down key to select More Options. Press the Amount Tend Total <Enter>... - Page 48 Chapter 4 Setting Up Your Cash Register - the Basics 5 Press the Arrow Down key to select Others Setup. Press the Amount Tend Total <Enter> key. 6 Press the Arrow Down key to select the Credit Name you want to change.
-
Page 49: Programming Plu Descriptions
Programming PLU Descriptions Programming PLU Descriptions The Price-Look Up system allows for fast, accurate entry of an item and automatically records the number of items sold. If you want to use the optional barcode reader, you can scan UPC codes to ring up items. To scan barcodes, they must be numeric only, 13 digits or less, and must be one of the following barcode types and standards: •... -
Page 50: Programming Plus With The Optional Barcode Reader
9 When you are done programming, press the Main menu (on) key. Programming PLUs with the Optional Barcode Reader You can use the optional Royal model PS700 barcode reader to scan items and automatically ring them up. Using the barcode reader saves time and reduces errors caused by people ringing up items incorrectly. -
Page 51: Printing The Program Confirmation Report
Printing the Program Confirmation Report 3 If you are prompted for a Manager Passcode, type the passcode number and then press the Check key. If you did not program a Manager Passcode, go to the next step. 4 Press the Arrow Down key to select PLU Set Up. Press the Amount Tend Total <Enter>... -
Page 52: Error Codes
Chapter 4 Setting Up Your Cash Register - the Basics Error Codes Your cash register makes beeps and shows you messages in the display. Some beeps and messages let you know everything is working and others let you know you need to do something. Table 5 Common errors This error... - Page 53 Error Codes Table 6 Common errors This error... Means this... ENTER AMT. TEND The cash register is set to require the amount tendered to be entered. INVALID PASSCODE An invalid passcode was entered. MAX. $ REACHED The maximum dollar amount is reached. NO ZERO-PRICES The cash register is set in System Options to not accept zero price entries for departments...
-
Page 54: Clearing An Error
Chapter 4 Setting Up Your Cash Register - the Basics Clearing an Error The Clear key stops an alarm beep that happened because a key was pressed that was not correct for that operation. The Clear key does not erase a transaction that was registered by an operating key and printed on the register tape. -
Page 55: Setting Up Your Cash Register Parameters
C HAPTER Setting Up Your Cash Register Parameters This chapter shows you more advanced programming for your cash register. This chapter is organized to show you the menu options shown in the clerk display. Use this chapter to quickly find a menu option you want. Some of the menu options in this chapter are already discussed elsewhere in this manual. -
Page 56: Header
Chapter 5 Setting Up Your Cash Register Parameters 5 Press the Arrow Down key to select Print Options. Press the Amount Tend Total <Enter> key. The rest of this section explains each menu option. 1. Header Specifies if the Header prints on the customer receipt. For more information about header messages, see Setting Header Messages and Footer Messages on page 24. -
Page 57: Multiple Receipts
Print Options you can program the first two lines and then make the remaining 3-lines blank. Then you can either set this option to print those blank lines for extra spacing or to skip those 3 blank lines to save on paper. 9. -
Page 58: Machine
Chapter 5 Setting Up Your Cash Register Parameters Because the receipt paper is not wide enough to print both pieces of information on one line, it is split over 2 lines. Each PLU prints on 2 lines of the receipt with the second option. The PLU number and name option is more descriptive and helps in a retail setting when a customer might return a product or where there are warranty claims. -
Page 59: Key Lay-Out
System Options 4 Press the Arrow Down key to select More Options. Press the Amount Tend Total <Enter> key. 5 Press the Arrow Down key to select System Options. Press the Amount Tend Total <Enter> key. The rest of this section explains each menu option. 1. -
Page 60: In Dept
Chapter 5 Setting Up Your Cash Register Parameters 5. % In Dept. Specifies if -% is subtracted and +% is added to individual department totals on the X & Z Reports. Or if these % amounts are not included in the individual department totals and only listed at the bottom of the report in the Discount and Add-On totals. -
Page 61: Decimal
System Options Select from the following options to set the rounding. Table 7 Rounding This... Rounds to this... Down Numbers from .1 - .9 to 0 Numbers from .5 - .9 to 1 (U.S. Standard) Numbers from .1 - .9 to 1 After you are done, you can check your results. -
Page 62: Others Set Up
Chapter 5 Setting Up Your Cash Register Parameters Others Set Up The Others Set Up menu includes the options listed in this section. To open the Others Set Up menu Programming More Options Others Set Up 1 Press the Main menu (on) key. 2 Press the Arrow Down key to select Programming. -
Page 63: [-%] Rate
Others Set Up [-%] Rate You may want to deduct a default Minus Percentage rate from an individual item or from a total, such as an employee discount or standard sale discount. The - % RA key subtracts a discount percentage amount from an individual item if you press it immediately after you ring up an item or from the sub-total amount of an entire sale if you press it after you press the Sub-total reprint key. -
Page 64: Set Up
Chapter 5 Setting Up Your Cash Register Parameters foreign currency the customer gives you and press the Amount Tend Total <Enter> key. Note You can only program one foreign currency. Follow the instructions on the screen, providing the following information. •... -
Page 65: Zero Skip
Others Set Up Zero Skip Specifies to print items with a zero total on all reports or to skip items that have a zero total. Z-Report Specifies to allow reprinting a second copy of the Z report. If you set this option to “single”, then you cannot recover or print another copy of the Z-Report after it is generated. -
Page 66: Grand Total Amount
Chapter 5 Setting Up Your Cash Register Parameters Grand Total Amount You can program the starting Grand Total Sales Amount. If you were using a different cash register before this one and want to carry the Grand Total Sales amount over from all the sales rung on the previous cash register and to continue adding to that amount with this register, set that starting Grand Total Sales amount here. -
Page 67: Date Format
Config Options Date Format Select from MM-DD-YY or DD-MM-YY. Time Adjust the time: hours and minutes. Time Format Specify between 12-Hour format with AM and PM designations or 24-hour format (Military time). Note Regardless of this setting, when you are programming the cash register, the Hour must always be entered in 24-hour mode. -
Page 68: Options Dump
Chapter 5 Setting Up Your Cash Register Parameters Options Dump This report contains all the parameter option settings for the cash register and in the following order: • Print Options • System Options • Header text • Footer text • Scrolling Messages text •... -
Page 69: Ringing Up Sales And Using Training Mode
C HAPTER Ringing up Sales and Using Training Mode After you set up your cash register, ringing up sales is easy. For information about ringing up complicated sales, see Examples on page 98. If you want to learn about using the cash register without affecting the daily total, you can use the Training mode. -
Page 70: Ringing Up Sales Without A Plu Number
Chapter 6 Ringing up Sales and Using Training Mode Ringing up Sales without a PLU Number You can ring up a sale for an item that does not have a PLU number. To ring up a straight cash sale without a PLU number 1 Make sure Sales Registration is highlighted on the main menu and press the Amount Tend Total <enter>... -
Page 71: Ringing Up Sales With A Plu Number
Ringing up Sales Ringing up Sales with a PLU Number You can ring up a sale for an item that has a PLU number. To ring up a straight cash sale with a PLU number and not using the barcode reader 1 Make sure Sales Registration is highlighted and press the Amount Tend Total <enter>... -
Page 72: Verifying The Plu Information For An Item
Chapter 6 Ringing up Sales and Using Training Mode • Using the round Number keys, press the three digit passcode and then press the Check key. 3 Put the barcode reader light over the barcode, about ½ inch or closer above the UPC symbol on the product to read the barcode properly. -
Page 73: Printing Receipts
Printing Receipts Printing Receipts You can turn the customer receipt printer on or off in the Sales Registration mode. The receipt printer is on by default and prints the customer receipt for all transactions. All features of the cash register are activated as programmed. A customer receipt is printed for every transaction. -
Page 74: Using Training Mode
Chapter 6 Ringing up Sales and Using Training Mode Using Training Mode We provide examples to help learn how to use this cash register. For information about the examples, see Examples on page 98. Using the examples can help you learn to use the cash register and the available features. -
Page 75: Entering And Exiting Training Mode
Using Training Mode Entering and Exiting Training Mode After a training passcode is programmed, you can enter and exit Training mode. When the cash register is in Training mode, a symbol appears in the lower left of the clerk screen. Some transactions may also print DEMO or asterisks **** on the receipt. -
Page 76: Programming Complex Tax Rates
C HAPTER Programming Complex Tax Rates Your cash register can manage complex tax rates and assignments. This chapter explains how to set these up. Many people do not need the information in this chapter. If this information does not relate to your business needs, you can skip it. If some information is related to your specific needs, then skip any sections which you do not need to set up your cash register. -
Page 77: Selecting The Tax System
Selecting the Tax System Selecting the Tax System Within the tax system you select, you can program up to 4 different tax rates on your cash register. Each tax rate can be linked directly to a department key (see Programming Tax Status on page 35), or by pressing the Tax Force key before ringing up a sales entry. -
Page 78: Programming Straight Add-On Tax In The United States
Chapter 7 Programming Complex Tax Rates To select a tax system Programming More Options Config Tax System 1 Press the Main menu (on) key. 2 Press the Arrow Down key to select Programming. Press the Amount Tend Total <Enter> key. 3 If you are prompted for a Manager Passcode, type the passcode number and then press the Check key. -
Page 79: Programming Table Tax In The United States
Programming Table Tax in the United States 3 If you are prompted for a Manager Passcode, type the passcode number and then press the Check key. If you did not program a Manager Passcode, go to the next step. 4 Press the Arrow Down key to select Tax Setup. Press the Amount Tend Total <Enter>... -
Page 80: Calculating Your Tax
Chapter 7 Programming Complex Tax Rates 6 Press the Arrow Down key to select Table. Press the Amount Tend Total <Enter> key. 7 Do the following: • Enter the price ranges and the amount of tax for each range. At the start of the regular repeating breakpoint, after you enter the first value of the first regular breakpoint, press the #/NS <sym>... - Page 81 Programming Table Tax in the United States In our Example Tax Chart, a sale from .00 to .08 is not taxed. The next tax bracket a sale from .09 to .24 is taxed one cent. The next tax bracket a sale from .25 to .41 is taxed two cents.
-
Page 82: Example Tax Chart
Chapter 7 Programming Complex Tax Rates Example Tax Chart The following is an example of how a tax chart can look. Note A total of 63 breakpoints can be programmed on this cash register. Enter these values when you set the table tax Irregular breakpoints... -
Page 83: The Worksheet
Using Canadian Tax Rates The Worksheet Write down your results as you go. Using Canadian Tax Rates If you are in Canada, this cash register can be set for Canadian tax rates. If you are using Canadian tax rates, you see the following 4 tax rate options: •... - Page 84 Chapter 7 Programming Complex Tax Rates dollar amount when setting the tax percentage amount. Just follow the instructions on the screen. You can also set Tax-On-Tax or Piggy Back Tax. To set Canadian tax rates Programming Tax Set Up 1 Press the Main menu (on) key. 2 Press the Arrow Down key to select Programming.
-
Page 85: Using Vat Tax Rates
Using VAT Tax Rates Using VAT Tax Rates The Value Added Tax is commonly used in Mexico and Europe but other locations use it as well. To set a VAT tax Programming Tax Set Up 1 Press the Main menu (on) key. 2 Press the Arrow Down key to select Programming. -
Page 86: Running Reports
C HAPTER Running Reports Your cash register includes many reports. In this chapter, we explain: • Programming confirmation reports • Assigned Department keys reports • Assigned PLUs reports • Financial reports, such as sales totals and End-of-day Z reports • Other management reports •... -
Page 87: Running The Department Confirmation Report
Running the Department Confirmation Report • System options • Others setup • Config options • Header, footer, and scrolling messages • Tax settings and rates To run a program confirmation report Programming More Options Options Dump 1 Press the Main menu (on) key. 2 Press the Arrow Down key to select Programming. -
Page 88: Running The Plu Confirmation Report
Chapter 8 Running Reports 3 If you are prompted for a Manager Passcode, type the passcode number and then press the Check key. If you did not program a Manager Passcode, go to the next step. 4 Press the Arrow Down key to select Department Set up. Press the Amount Tend Total <Enter>... -
Page 89: Running Management Reports
Running Management Reports Running Management Reports The cash register maintains totals of all transaction information. This information is saved in the memory of the cash register as long as the register is plugged in to an electrical outlet or, if the cash register is unplugged, the batteries are charged. -
Page 90: About Management Reports
Chapter 8 Running Reports You can also print a duplicate Z1 Report. This is useful if the register runs out of paper or if there is a power outage while the Z1 Report is printing. However, you must set the parameter in Others Setup to allow a second report to be printed. -
Page 91: Financial Report Example
Running Reports Note Make sure you have a lot of cash register paper installed before you start printing any report. To run reports 1 Press the Main menu (on) key. 2 Press the Arrow Down key to select Reports. Press the Amount Tend Total <Enter>... -
Page 92: Additional Information In Electronic Journal (Ej) Reports
Chapter 8 Running Reports The Financial report looks like the following. Your specific report looks different, because of your unique cash register activity. (Actual report may vary slightly) Additional Information in Electronic Journal (EJ) Reports The Electronic Journal can hold 4,000-lines of transactions in memory. When the cash register memory is full, no more transactions or information can be stored in EJ memory. - Page 93 Running Reports the printer off and no receipt printed. This includes all sales transactions, any Z reports run during the day and even using the #/NS <sym> key for no-sale rings to open the cash drawer. The cash register warns you when the Electronic Journal memory is nearly full to let you finish the current transaction.
- Page 94 Chapter 8 Running Reports 6 Follow the instructions on the screen. You can review the report on the clerk screen and then print it. Use the arrow keys to move through the report. The Electronic Journal record prints and the Electronic Journal memory is not reset.
-
Page 95: Maintenance And Options
• If you need electronic service, take the cash register to a Royal authorized service center. For more information, see Manufacturer’s Limited Warranty on page 121. -
Page 96: Installing A New Paper Roll
Chapter 9 Maintenance and Options Installing a New Paper Roll As you use the cash register, you will need to replace the paper roll. Your cash register has a thermal printer that prints receipts for the customer or a journal tape. Use 2¼ inch (57.5 mm) wide standard thermal register paper. -
Page 97: Using The Battery System
Using the Battery System 5 Do one of the following: • If you do not need to print receipts: Place the black plastic Journal Takeup spindle on its grooves above the Battery compartment. The spindle sits above the paper roll. Press the Feed key to move the paper through the printer about 10-12 inches. -
Page 98: About The Serial Port
Chapter 9 Maintenance and Options To install or replace the batteries 1 Before you start, make sure you have 3 new AA batteries. 1 Open the Journal Compartment Cover. Remove the Journal Compartment Cover and set aside. 2 Move the paper roller bar up and out of the way. Grab the small handle on the right of the print roller bar. -
Page 99: Connecting The Cash Register To A Pc
Connecting the Cash Register to a PC The pin description for the serial port on the cash register is shown below. Pin numbers Pin No. Signal Name Abbreviation Receive Data Transmit Data Signal Grand (Request to send) (Clear to send) OUT(+5V) Power supply for BCR Connecting the Cash Register to a PC Using the RegisterLink software, you can connect your cash register to a... -
Page 100: Troubleshooting
C HAPTER Troubleshooting Most errors are described on the clerk screen and you are prompted with the corrective action to take. For a list of common error messages and what they mean, see Error Codes on page 45. This section generally describes other possible issues and what to do. -
Page 101: No Receipt Printing
If the cash register is not printing on the receipt, make sure you are using thermal paper. Bond paper will not work in this cash register. If needed, contact the Royal Customer Support hotline at 1-800-272-6229 for additional help. The Cash Register Turns Itself Off This is normal. -
Page 102: The Cash Register Does Not Work At All
Chapter 10 Troubleshooting 1 Press the Main menu (on) key. 2 Press the Arrow Down key to select Reports. Press the Amount Tend Total <Enter> key. 3 Press the Arrow Down key to select Z Report. Press the Amount Tend Total <Enter>... -
Page 103: The Cash Register Does Not Work At All
Partial Reset. • As a last resort, perform a Full System Clear procedure. See Full System Clear. 2 If needed, contact the Royal Customer Support hotline at 1-800-272-6229 for additional help. Opening the Drawer When There is no Power If there is no power and you need to open the drawer, follow these instructions. -
Page 104: Partial Reset
Chapter 10 Troubleshooting Partial Reset If the cash register did not respond to the Half System Clear, try a Partial Reset. This procedure requires both your hands or a friend to help. To do a partial reset 1 Unplug the cash register from the power source. 2 Using the round Number keys, press and hold the 3 key and the 7 key at the same time. -
Page 105: Examples
C HAPTER Examples The examples in this section show how to ring up different types of transactions. You can enter a maximum of 7 digits to enter a price, including dollars and cents. To ring up a sale At the main menu screen, select Sales Registration. Press the Amount Tend Total <Enter>... - Page 106 Chapter 11 Examples • Credit Sale • Credit Return • Dept Shift Key • Exempting Tax On An Item • Exempting Tax on the Entire Sale • Gallonage Sales Transaction • Minus Percentage Discount Sale • Multiplication of a Department Unit Price •...
-
Page 107: Transaction Codes
Transaction Codes Transaction Codes The following codes appear on transaction receipts: Table 8 Transaction Codes The code... Means this... Reference Number Amount Being Multiplied ADD ON Plus Percent CASH Cash Transaction Total CHANGE Change CHARGE Charge Transaction Total CHECK Check Transaction Total Clerk #1 to Clerk number 1 to number n where n= the maximum Clerk #n... -
Page 108: Sample Receipt
Chapter 11 Examples Sample Receipt The example below shows the general transaction information you see printed on a receipt. Your actual receipt may vary. The rest of this chapter shows you example transactions. Adding Tax to a Non-Taxable Department Example 4: Assume the Department 2 key is programmed for no tax and the TAX 1 rate is programmed for 6%. -
Page 109: Cash Sale With Tendering Change
Cash Sale With Tendering Change Cash Sale With Tendering Change Example 5: Ring up a $1.00 item in Department 1 and compute change from $5.00 cash tendered. To ring up a sale with tendering change 1 In the Number keys area, press 100, and then press the key. -
Page 110: Charge Return
Chapter 11 Examples Charge Return Example 8: Refund $1.00 in Department 1 and credit the return to charge. To ring a charge return 1 Press the key. 2 In the Number keys area, press 100, and then press the 3 Press the key. -
Page 111: Credit Return
Credit Return To ring a credit sale 1 In the Number keys area, press 100, and then press the key. 2 In the Number keys area, press 200, and then press the key. 3 Press the or the key. Note You do not have to enter an amount before pressing either of the credit keys. -
Page 112: Exempting Tax On An Item
Chapter 11 Examples 4 Press the key. 5 In the Number keys area, press 1000, and then press the key. Note The register returns to the Non-Shift Mode after each department entry. Exempting Tax On An Item Example 14: Assume the Department 1 key is programmed as a taxable department. -
Page 113: Gallonage Sales Transaction
Gallonage Sales Transaction Gallonage Sales Transaction Example 16: In this example, Department 4 is programmed for Gallonage Mode and is non-taxable. Ring 10.759 gallons at $2.749 per gallon. Note Department 4 must be programmed as gallonage for this to work. To ring a gallonage sales transaction 1 In the Number keys area, press 10.759, and then press the key. -
Page 114: Multiplication Of A Department Unit Price
Chapter 11 Examples Note If the Minus Percentage Discount Rate is NOT programmed, type in the 10% discount rate by pressing 10 before pressing the key. 3 Press the key. Multiplication of a Department Unit Price Example 18: Assume the Department 1 key is pre-programmed for $1.00. Ring up this price three times. -
Page 115: Multiplying By A Fraction
Multiplying By A Fraction Multiplying By A Fraction Example 20: Multiply the quantity of 1.25, as in 1¼ yards of fabric at $1.00 per yard in Department 1. Caution When multiplying by a fraction, you must use the decimal point in the fraction but not in the dollar amount. -
Page 116: Paid-Out Sale
Chapter 11 Examples Paid-Out Sale Example 23: Indicates money taken out of the cash drawer. Ring up $10.00 to show money paid out of the cash drawer. To record monies paid out In the Number keys area, press 1000, then press the key. -
Page 117: Received-On-Account Sale
Received-On-Account Sale Version 2 Note When ringing a taxable item with a Plus Percentage the tax will automatically be charged on the amount after the PLUs percentage is added. To ring a PLUs percentage sale 1 In the Number keys area, press 100, and then press the key. -
Page 118: Registering A Reference Number
Chapter 11 Examples Registering A Reference Number Example 28: Used to print a number, up to 10 digits, to identify an invoice number or any other number on receipts. Ring up the number 1234567 in a standard sale. Note Using the reference number is not recorded in any activity counter or sales totals on the Management Reports. -
Page 119: Split Tendering Sale
Split Tendering Sale Split Tendering Sale Example 30: Ring up a $15.00 item in Department 1 with 6% sales tax, split the total of the sale between $5.00 in cash payment and $10.90 in charge payment. To ring up a Split Tendering sale 1 In the Number keys area, press 1500, and then press the key. -
Page 120: Voiding A Department Preset Price
Chapter 11 Examples Voiding a Department Preset Price Example 33: Department 1 is programmed for the price of $1.00 and Department 2 is programmed for the price of $2.00. Ring up Department 1 and Department 2 prices, then void the Department 1 entry. To void a department preset price 1 Press the key. -
Page 121: Voiding A Minus Percentage Discount Sale
Voiding A Minus Percentage Discount Sale Voiding A Minus Percentage Discount Sale Example 35: Void a $1.00 item in Department 1 and void a pre-programmed Minus Percentage Discount Rate of 10%. To void a minus percentage discount sale 1 In the Number keys area, press 100, press the key, and then press key. -
Page 122: Voiding A Department Multiplication Sale
Chapter 11 Examples Voiding A Department Multiplication Sale Example 37: Void a $1.00 item in Department 1 three times. To void a department multiplication sale 1 In the Number keys area, press 3 and then press the key. key, in the Number keys area, press 100, and then press 2 Press the key. -
Page 123: Voiding A Plu Sale With A Minus Percentage Discount
Voiding a PLU Sale with a Minus Percentage Discount Voiding a PLU Sale with a Minus Percentage Discount Example 40: Assume PLU #1 is preset for the price of $1.00 in Department 1 and the -%/RA key is preprogrammed for 10%. Void a sale with PLU #1 and a 10% discount. -
Page 124: Voiding A Plus Percentage Sale
Chapter 11 Examples Voiding a Plus Percentage Sale Example 42: Void a $1.00 item in Department 1 and void a pre-programmed Plus Percentage Rate of 10%. To void a plus percentage sale key, in the Number keys area, press 100, and then press 1 Press the key. -
Page 125: A Product Information
57mm alphanumeric thermal printer. Ink Source Thermal printer - no ribbon or ink needed Paper Supply 2¼ inch or 57.5 mm wide standard thermal paper (Royal Reorder # 013127) Memory Battery Roughly 28 days after power interruption Protection Technology CMOS RAM Electrical 115V~ 60Hz, 0.40A... -
Page 126: Safety And Legal Notices
Appendix A Safety and Legal Notices • The power outlet for this cash register must be located near the unit and be easily accessible. • Do not use this cash register outdoors in the rain or near any source of liquid, such as a pool. -
Page 127: Software Licensing Agreement
Royal or the owner of the Software. Nothing in this license constitutes a waiver of any rights Royal or the owners of the Software may have under any applicable copyright law or any other United States federal or state law. -
Page 128: Manufacturer's Limited Warranty
Somerset, NJ 08875 USA warrants that your NEW Royal Electronic Cash Register or Time Clock (“Product”) is free of defects of workmanship and materials. If there is a defect or malfunction of this Product, Royal will repair the Product free of charge as follows: PARTS:New or comparable rebuilt parts in exchange for defective parts for ONE YEAR from the date of purchase. - Page 129 Manufacturer’s Limited Warranty Service Center. Royal and/or the Service Center cannot be held responsible for any loss or damage that occurs while in transit. For Authorized Service Centers within your local area, call 1-888-261-3888 or 1-800-272-6229. In Canada call 1-888-266-9380. Or you can call the Royal Corporate Service Center directly at 1-630-315-2603 for shipping instructions and additional information.
-
Page 130: Ordering Supplies And Accessories
RegisterLink PC-based software, replacement RLNC RegisterLink serial cable, replacement RLCC RegisterLink software and serial cable RLKIT For Prices and Availability Call 1-888-261-4555 or visit our web site at www.royal.com. Prices and Availability Subject to Change Without Notice Alpha 710ML User’s Guide... -
Page 131: Index
102 adding tax to a non taxable connecting to a PC 92 cash sale without tendering change, department, example 101 contacting Royal 2 example 102 adjust the contrast on the clerk contrast, adjust on clerk screen 21 change computer 52... - Page 132 Index keys, programming 32 multiplication of a department unit price 107 names, programming 33 FCC warning 119 multiplication sale 107 number keys, using 33 footer message multiplying by a fraction 108 preset price, programming 35 double wide 24 no-sale function 108 dept shift key, example 104 programming 24 overriding a PLU sale 108...
- Page 133 16 PLU description 42 sales 62 ordering PLUs with the barcode scanner sales, barcode reader 64 accessories 123 Royal, contacting 2 more register tape 123 tax rates 70 supplies 2 running tax status 35 an Electronic Journal reports 85...
- Page 134 Index connectors 91 tax-on-tax, setting 77 department preset with a minus percentage discount example technical information, serial port setting alphanumeric descriptions 22 minus percentage discount sale amount of time messages total number allowed, PLUs 42 example 114 appear on the display 39 training mode, setting passcode 67 multiplication of a department clerk names 27...