Table of Contents
Advertisement
IMPORTANT SAFETY INSTRUCTIONS
When using an electrical machine, basic safety
precautions should always be followed, including the
following.
Read all instructions before using this sewing machine.
When the machine is not in use, it should be disconnected
from the electricity supply by removing the plug from the
outlet.
DANGER
To reduce the risk of electric shock:
1. A machine should never be left unattended when
plugged in.
2. Always unplug this machine from the electric outlet
immediately after using and before cleaning.
WARNING
To reduce the risk of burns, fire, electric shock or injury to
persons:
1. Do not allow to be used as a toy. Close attention
is necessary when this machine is used by or near
children and infirm persons.
2. Use machine only for its intended use as described
in this manual. Use only attachments recommended
by the manufacturer as contained in this manual.
3. Never operate this machine if
· it has a damaged cord or plug
· it is not working properly
· it has been dropped or damaged
· it has fallen into water
Return the machine to the nearest authorized
BERNINA dealer or service center for examination,
repair, electrical or mechanical adjustment.
4. Never operate the machine with any air openings
blocked. Keep ventilation openings of the sewing
machine and foot control free from accumulation
of lint, dust and loose cloth.
5. Keep fingers away from all moving parts. Special care
is required around the sewing needle.
6. Always use the BERNINA original stitch plate. The
wrong plate can cause the needle to break.
7. Do not use bent needles.
8. Do not pull or push fabric while stitching. It may
deflect the needle, causing it to break.
9. Turn power switch to "0" when making any adjust-
ments in the needle area, such as threading or
changing the needle, threading the bobbin or
changing the presser foot.
10. Always unplug the sewing machine from the electri-
cal outlet when removing covers, lubricating or when
making any other user servicing adjustments men-
tioned in this instruction manual.
11. Never drop or insert any object into any opening.
12. Do not use outdoors.
13. Do not operate where aerosol (spray) products are
being used or where oxygen is being administered.
14. Before disconnecting, turn all controls to the off ("0")
position then remove the plug from the outlet.
15. Do not unplug by pulling on the cord but grasp the
plug before pulling.
16. No responsibility will be taken for any possible
damage as the result of misuse of the machine.
17. This machine is provided with double insulation.
Use only identical replacement parts. See instructions
for Servicing of double-insulated machines.
SERVICING DOUBLE-
INSULATED PRODUCTS
In a double-insulated product, two systems of insulation
are provided instead of grounding. No grounding means
is provided on a double-insulated product nor should a
means for grounding be added to the product. Servicing
a double-insulated product requires extreme care and
knowledge of the system and should only be done by
qualified service personnel. Replacement parts for a
double-insulated product must be identical to those
parts in the product. A double insulated product is mar-
ked with the words "DOUBLE INSULATION" or "DOUBLE
INSULATED".
The symbol
SAVE THESE
INSTRUCTIONS!
This sewing machine is intended for household use only.
030866.51.04_0401_a185_EN
Safety Instructions
may also be marked on the product.
1
Advertisement
Table of Contents

Related Manuals for Bernina Artista 185


Summary of Contents for Bernina Artista 185
-
Page 1: Important Safety Instructions
The symbol may also be marked on the product. 6. Always use the BERNINA original stitch plate. The wrong plate can cause the needle to break. SAVE THESE 7. Do not use bent needles. - Page 2 In addition, a wide range of sewing accessories, together with sewing publications full of practical and creative ideas, add to the joy of sewing the BERNINA way. It gives me great pleasure to welcome you into the BERNINA family.
-
Page 3: Table Of Contents
Contents Safety Instructions Forward 4–5 Details of the machine 6–13 Setting up the machine 14–16 Stitch Summary Presser feet 18 –19 Practical stitches/buttonholes 20–25 General instructions 25–31 Functions Messages 32–39 Buttonholes 40–41 Alphabets/numbers 42–47 Memory 48–50 Quilt stitches/16-directional sewing/4-directional sewing 50–51 Sideways motion stitches –... - Page 4 Details of the machine Details of the machine 14 15 Front view Back view 030866.51.04_0401_a185_EN...
-
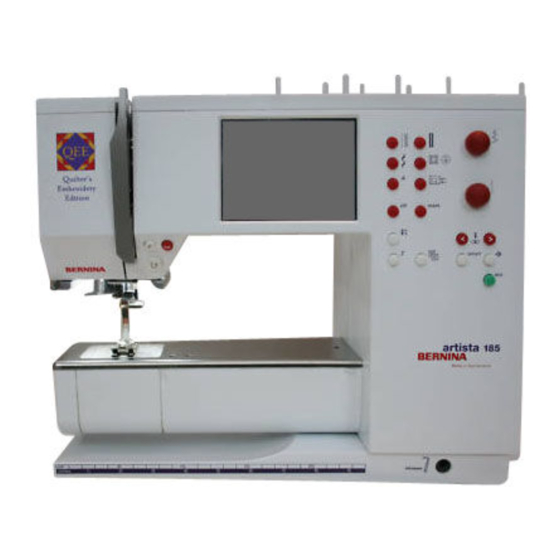
Page 5: Details Of The Machine
Details of the machine Bobbin cover Stitch plate Attachment base for special accessories Darning ring connection Presser foot Needle clamp Thread guide Needle threader Thread take-up cover Thread path Thread take-up Bobbin pre-tension Quick reverse button F (Favorite Function) button Automatic thread cutter Screen Bobbin winder with on/off switch and... -
Page 6: Carrying Case
Setting up the machine Carrying case Carrying case · protects from dust and dirt · compartment for accessories Accessories · foot control · instruction manual · power cable · warranty card · FHS presser foot lifter (Free Hand System) · seam guide for sewing table ·... -
Page 7: Setting Up The Machine
Setting up the machine Power cable Power cable Important! (USA/Canada only) · the power cable is stored in the case This sewing machine has a polarized plug · plug A into machine (one blade wider than the other). To · plug B into electrical outlet reduce the risk of electric shock, this plug is intended to fit only one way into a Foot control cable... -
Page 8: Winding The Bobbin
Setting up the machine Winding the bobbin Thread cutter Winding the bobbin Threading the bobbin · cut the thread on the · turn power switch on · following the direction of the arrow take thread through thread cutter · place empty bobbin on the rear guide and round the pre-tension stud spindle ·... -
Page 9: Changing The Needle
Setting up the machine Changing the needle Removing the needle · raise the needle · turn power switch to “0” · lower the presser foot · loosen the needle clamp · pull the needle down to remove Inserting the needle ·... -
Page 10: Threading The Upper Thread
Setting up the machine Threading the upper thread Attaching the thread spool · raise the needle and presser foot · turn the power switch to «0» (off) · attach the foam pad · place spool on pin (spool turns clockwise) ·... - Page 11 Setting up the machine Threading the double needle Threading the first thread · place thread spool on horizontal spool pin · thread by guiding the thread to the front in the slit and past the tension disc A on the right side ·...
-
Page 12: Thread Cutter
Setting up the machine Thread cutter Thread cutter on head frame · pull both threads from front to back over the cutter. · the threads release as soon as the first stitch is sewn Stitch Plate 9 mm Stitch plate 5,5 mm Stitch plate Straight stitch plate (special accessory) -
Page 13: Presser Foot Pressure
Setting up the machine Presser foot pressure Dial on head frame Standard pressure Reduced pressure Increased pressure · the presser foot pressure · for all normal sewing · for jerseys and loose · for sheer, slippery dial is on the left of the knits, quilting lightweight fabrics, head frame... - Page 14 Stitch Summary Practical stitches Buttonholes 9 mm/40 mm decorative stitches 030866.51.04_0401_a185_EN...
-
Page 15: Stitch Summary
Stitch Summary Quilt stitches 16-directional sewing 4-directional sewing Alphabets 030866.51.04_0401_a185_EN... - Page 16 Stitch Summary 030866.51.04_0401_a185_EN...
-
Page 17: Presser Feet
BERNINA Specialty Presser Feet The standard selection of presser feet covers most normal sewing requirements but we recommend the use of BERNINA specialty presser feet for specific sewing tasks such as quilting, heirloom sewing, home decorating, tailoring, etc. They are available from your BERNINA dealer. -
Page 18: Practical Stitches/Buttonholes
Practical stitches Practical stitches 1 Straight stitch 11 Super stretch All non-stretch fabrics. All straight Open seam in all super-stretch fabrics, stitch work. such as Lycra. 2 Zig-zag 12 Gathering stitch Most fabric types. All simple zig-zag Most types of fabric. Gathering with applications such as oversewing fine shirring elastic. - Page 19 Practical stitches 21 Basting 24 Bar tack program Basting seams, hems, etc. Reinforcing pocket edges, belt loops etc. 22 Simple darning program 25 Bar tack program Automatic darning in fine and medium Reinforcing pocket edges, belt loops weight fabrics. etc. 23 Reinforced darning program 26 Fly stitch large Automatic darning in heavy weight...
- Page 20 General instructions Screen The artista is operated with a combination of external buttons and knobs and a touch screen. Switch machine on · power switch to “1” Welcome screen · welcome · appears for approximately 3 seconds · can be disabled in the Setup program Practical stitch screen ·...
-
Page 21: General Instructions
General instructions On-screen stitch selection/stitch display/functions Stitch Selection · touch the stitch of your choice · the stitch is highlighted · every stitch is displayed with its number Altering the stitch width Altering the stitch width · turn the upper knob ·... -
Page 22: Stitch Selection
General instructions Presser foot indicator · the recommended presser foot is displayed by number Return to basic settings · press the external clr button · the stitch will revert to its basic set- tings Needle stop adjustment · press needle stop button again – ·... - Page 23 General instructions Confirm and go to next screen Back to previous screen · touch OK to confirm · touch esc · the screen displays the selected · the previous screen appears stitch · if the selection was not confirmed · the selected stitch is active by touching OK, the stitch selected (highlighted) by number will be ignored...
- Page 24 General instructions Alphabet button · the alphabet menu appears · touch to select the alphabet of your choice Quilt stitches/Directional sewing quilt stitches button · the menu of the 3 categories appears: · quilt stitches 16 directions · 16-directional sewing ·...
- Page 25 General instructions / Functions Needle stop eco (ecology) button · press the eco button · the default setting of the needle stop is the “up” position · energy use by the machine is cut by · press the needle stop button ·...
-
Page 26: General Functions
Functions General functions The following functions are found on various screens and programs of the artista sewing machine. They are consistently used in the same manner for specific tasks when accessing and moving between different programs. Scroll up Closing special applications ·... - Page 27 Functions Long stitch Pattern repeat 1–9 x · touch symbol · touch symbol one or more times to · machine sews every second stitch select number required (max. stitch length 10 mm) · 1 = machine stops at the end of an ·...
-
Page 28: Forward
Functions Double needle limitation Balance · touch one or more times to select · touch symbol to open balance screen number from 2 to 8 · correct forwards and reverse stitches · the numbers represent the distance · correct sideways motion stitches between the needles in mm ·... - Page 29 Functions Functions in Memory Select memory The following functions become available along the · the opened memory bank is lower portion of the screen when the external memory displayed with its number button is pressed to access the memory feature. ·...
- Page 30 Functions Memory sub-divider Long stitch · touch symbol · touch symbol · the memory has up to 255 sections · machine sews every second stitch or banks (max. stitch length 10 mm) · each bank can be subdivided as desired ·...
-
Page 31: Messages
Functions/Messages Alphabet program functions One of the following functions will appear in the lower number of normal functions shown on the toolbar by left corner of the screen when a letter/number of an one, causing it to be hidden. alphabet or monogram is selected. It will reduce the Monogram size Letter size ·... -
Page 32: Buttonholes
Buttonholes Buttonholes Buttonholes are practical closures All buttonholes can be sewn and which can also be used for a programmed in a variety of ways. decorative effect. The artista 185 provides a very versatile selection. Buttonholes/Button sewing on Select buttonhole/button sew-on program/eyelets program/eyelet ·... - Page 33 Buttonholes Automatic buttonholes (round, keyhole and hand-look) Both beads of the buttonhole are sewn in the same direction. Buttonhole length = buttonhole opening in mm Sewing the first straight stitches · the sewn section will be displayed on the screen (to the right of the presser foot indicator) ·...
- Page 34 Buttonholes On-screen display · ”auto” below the buttonhole symbol indicates that the buttonhole is programmed Deleting saved buttonholes · press the external «clr»-button · «auto» will disappear · a new buttonhole length can be programmed Automatic buttonhole (all types) Length calculated from button The buttonhole size can be determined by holding a button on the screen.
- Page 35 Buttonholes Stitch counter buttonholes (all types) The first bead of the buttonhole is sewn forward and the second, backwards Stitch using Buttonhole Foot 3C or Automatic Buttonhole Foot 3A; sew at a consistent speed. The appearance of a stitch counter buttonhole can vary on different types of fabric so it must be reprogrammed for different fabrics.
-
Page 36: Buttonhole In Long Term Memory
Buttonholes Buttonhole corrections (all types) The following adjustments can be made to a buttonhole Permanent adjustments can be made using the Setup and will remain in effect until the machine is turned off. program (see pages 59–72). Open balance screen Buttonhole too wide ·... - Page 37 Buttonholes Recalling the Saved Buttonhole · select the desired buttonhole style · touch mem · touch the buttonhole length or button measurement function to recall the saved buttonhole · the length of the buttonhole will appear on the screen Changing the Saved Buttonhole ·...
- Page 38 Buttonholes Sewing a Six-step Buttonhole Note: The graphics shown on the screen (see below) are the same when stitching the standard, narrow, and stretch buttonholes. Sewing a 6-step buttonhole · touch “1” on the screen · symbol shows section of button to be sewn ·...
-
Page 39: Eyelet Program
Buttonholes Cutting buttonholes open Seam ripper · use the seam ripper to cut the buttonhole open, starting at each end and working towards the middle Buttonhole cutter and block · place the fabric on a piece of wood · position the cutter in the center of the buttonhole ·... -
Page 40: Alphabets/Numbers
Alphabets/Numbers Alphabets/Numbers There is a choice of five different Large monograms can be sewn in alphabet styles. three sizes. Each alphabet can be sewn in two sizes. Alphabets · Monograms 30/20/15 mm (side- · press the external Alphabet button ways motion) ·... -
Page 41: Programming Letters/Numbers
Alphabets/Numbers Programming letters/numbers Programming · open memory · touch to select letter · the letter appears in memory · the cursor moves to the right in front of the letter Continue programming · touch to select the next letter · the letter appears in memory ·... -
Page 42: Memory
Memory Memory Stitches, letters and numbers can be Any alterations to stitch length, programmed, saved and corrected in stitch width, and needle position memory. should be made before entering the stitch into memory. The memory has a capacity of 1023 stitches that can be divided into 255 In contrast to the stitch menu, memory segments or banks. -
Page 43: Programming Stitches By Number
Memory Continue programming must be selected to start the · select the next desired stitch stitching at the beginning of the · the stitch appears in the mem field combination. · continue in this manner · use Pattern repeat to stop auto- ·... -
Page 44: Memory Functions
Memory Editing memory contents Stitches with functions · stitches can be modified after being programmed into memory · program the first two stitches normally · touch edit · all available functions appear in the top right section of the screen ·... -
Page 45: View Memory Contents
Memory View memory contents View memory contents · the cursor is in exactly the same · touch check place as it was in the view window · the memory contents appear in a window · the cursor is visible · the cursor can be moved into position with the arrows for editing applications ·... -
Page 46: Open Individual Memory
Memory Saving memory contents/leave memory Save and leave memory · touch store · the contents are saved · the memory can be opened and viewed at any time · touch external mem button Turning off machine without saving · memory contents will be lost if the machine is turned off without touching store Open individual memory... -
Page 47: Deleting Memory
Memory Memory sub-divider Memory sub-divider the right of the first letter in that · the contents of a memory can be memory bank. Stitching will start sub-divided as desired, e.g. name, with the letter to the left of the cur- street, town, etc. -
Page 48: Quilt Stitches/16-Directional Sewing/4-Directional Sewing
Quilt stitches/directional sewing Quilt stitches/16 directions/4 directions Quilt stitches/ quilt stitches Directional sewing button · the menu of the 3 categories appears: · quilt stitches · 16-directional sewing · 4-directional sewing 16 directions · touch to select the category of your choice ·... - Page 49 Directional sewing 16 directional sewing – straight stitch with long stitch function Straight stitch with long stitch · the long stitch function is now function highlighted on the toolbar at the · press the external quilt/directional lower edge of the screen button ·...
-
Page 50: Sideways Motion Stitches - Outline Designs
Directional sewing/sideways motion stitches 4 directional sewing Sewing in 4 directions without turn- Sewing direction · the machine sews the selected ing the fabric is particularly useful for mending worn areas in tubular items stitch in the direction chosen (sleeves, trousers, etc.) and can also Sewing be used in some decorative tech- niques. -
Page 51: Sideways Motion Stitches
Sideways motion stitches Sideways motion stitches Sideways motion stitches · others are designed for continuous · after selecting the desired motif, sewing, to be used for borders, the stitch is activated edgings, and decorative stitching · all normal information appears on ·... -
Page 52: Balance
Balance Balance All stitches are checked and fully These effects can be corrected with adjusted before the machine leaves the electronic balance so that the the factory. stitch formation can be adjusted where necessary to suit the fabric. Different fabrics, threads, stabilizers, and interfacings can affect There are 50 vertical steps and 20 programmed stitches so that... - Page 53 Balance Balance for sideways motion stitches Fabric, thread stabilizers, and inter- Horizontal corrections facings can affect sideways motion · the horizontal balance is shown in stitches so correcting with balance the right half of the screen will sometimes be necessary. ·...
-
Page 54: Help
Help Program Help The Help program provides on- quicker and easier to find electroni- screen explanations about individual cally. stitches and all functions, elimina- No matter which screen is displayed, ting the need to refer regularly to the help feature for stitches and the instruction manual. -
Page 55: Thread Tension
Thread tension/Tutorial/Creative Consultant Thread tension Basic tension settings apply Changes can be made to the tension automatically when a stitch or of any stitch without affecting any program is selected. The tension is other stitches. To do this, the tension factory set for best possible sewing function is accessed with the results using a 100 weight, 2 ply... -
Page 56: Creative Consultant
The suggested presser feet are not necessarily standard with the machine but may be special accessories which can be obtained from your BERNINA dealer. External TTC button · press the external TTC button 030866.51.04_0401_a185_EN... - Page 57 Thread tension/Tutorial/Creative Consultant Menu · the following menu appears: · Thread tension · Tutorial · Creative Consultant · touch Creative Consultant Fabric menu · use the arrows to scroll up and · 3 columns of fabric types are down for all choices displayed ·...
-
Page 58: Smart Function
Smart Function Smart Function Sometimes you have to interrupt a The screen in which you are working task at hand to complete another with all the settings you made can be piece of sewing which must be done saved and easily re-opened. before you can carry on any further. -
Page 59: Setup Program
Setup Program Setup Program The Setup program allows you to All changes made in the Setup pro- personalize the screen to suit your gram will be saved, even when the own requirements and preferences. machine is turned off. You can change basic settings The machine can be reset and permanently and program the F returned to the factory settings at... -
Page 60: Personal Program
Setup Program Personal Program Use the Personal program to design a When inserting stitches into the Per- screen with the stitches you use most sonal program, variations (different often. Whether it is made up of stitch widths, stitch lengths, and stitches for a certain type of sewing, needle positions) of all stitches may such as heirloom or garment, or just... - Page 61 Setup Program Inserting the second stitch · press the external buttonhole button · touch the round buttonhole (stitch 54) Personal screen · screen changes to personal program · the round buttonhole appears on the screen · touch store to save the buttonhole in your personal program ·...
- Page 62 Setup Program Deleting stitches from the Personal Program Setup menu · press the external Setup button, menu appears · select personal program Personal screen Delete the stitch · personal screen appears · press the external clr · select stitch to be deleted (will be button highlighted) Stitch deleted...
- Page 63 Setup Program Removing functions · the function is highlighted in the · select Motor Speed in the lower upper rows and has been deactivat- two rows ed (removed) from the lower ones · touch the up arrow · move and deactivate other ·...
- Page 64 Setup Program Return all functions to basic settings Removing of functions · touch reset · press button · all functions will be returned to their · delete function original positions except the Favorite function button on the head frame · to reprogram the Favorite function but- ton, follow the same steps Adding of functions ·...
- Page 65 Setup Program Audio signals · bobbin winder motor · audio signals can be applied to the · embroidery end following: · audio signals can be turned on and · stitches · functions · the number of repeats can be · feed-dog raised/lowered selected (for embroidery) ·...
- Page 66 Setup Program Save and close Back to basic settings · touch OK to confirm the change · follow the directions above to enter · touch esc to return to the Setup the motor speed menu menu · touch reset to revert to factory ·...
-
Page 67: Return To Basic Settings
Setup Program Back to factory settings · touch reset to return tensions to the factory settings Save and close · touch OK to confirm the change · touch esc to return to the Setup menu · touch esc to return to the last selected stitch menu Start screen on and off Setup menu... -
Page 68: Sewing Light
Setup Program · a message will appear asking you · touch no; the Setup screen to confirm that you want to return reappears the machine to the basic settings · all existing changes to Setup · touch yes; the Setup screen remain in effect reappears ·... -
Page 69: Version Information
Setup Program Service The service function of the Setup program gives information about the version of software in the artista and lets you make calibration adjustments to the screen and hoop of the embroidery module (special accessory). Version Information The version screen shows information information is helpful if you are about the version of software loaded asking questions of the dealer or if... -
Page 70: Screen Calibration
Setup Program Screen Calibration Calibrating the screen is important Note: The screen is calibrated at the for making on-screen selections by factory, but shipping and transport- touch. If the screen is not calibrated, ing may affect it. you may touch one selection and the The screen only needs to be cali- machine will read one next to it. -
Page 71: Automatic Thread Cutter
Setup Program Hoop adjustment · if it is not, adjust with the arrows · hoop adjustment screen appears · it is only necessary to adjust the hoop once – the same setting · attach the large hoop to the embroidery module changes will apply to all the hoops ·... -
Page 72: Screen Contrast
Setup Program Screen contrast The contrast of the screen can be adjusted for easier viewing. Setup menu · press the external Setup button, menu appears · touch contrast (lower right of screen) · contrast screen appears Adjust contrast · the original screen is visible on the ·... -
Page 73: Eco (Ecological) Function
These accessories Ask your Bernina dealer for more will add to the capabilities and details! CPS Program CPS Program (Customized Pattern Selection) -
Page 74: Embroidery Cards
Special Accessories Embroidery module Embroidery module screen and can be sewn immediately. (special accessory) You can position, mirror image, The embroidery module is a wonder- enlarge and reduce the motifs. ful addition to your sewing machine, offering you unlimited possibilities Additional embroidery motifs, cover- to use your imagination and creativi- ing a wide range of subjects, are... - Page 75 · select and embroider the same as for design motifs programmed on the embroidery module. PC Embroidery Software (optional accessory) BERNINA artista Embroidery Software The finished creations are transferred allows you to combine, mirror image, directly via a connecting cable (9-pin rescale and embellish existing motifs.
- Page 76 Needle, thread, fabric feed Important facts about sewing machine needles Sewing machine, needle and thread Needle/ Your Bernina uses needle system 130/705H. thread table 110–120 Needle and thread The most commonly sold needles are nos. 70–120. The Darning thread finer the needle, the lower the number. The table shows you which needle is suitable for which threads.
-
Page 77: Needles, Thread, Fabric Feed
130/705 H-ZWI Needle distance: 1.0 / 1.6 / 2.0 / 2.5 / 3.0 / 4.0 / 6.0 / 8.0 Decorative sewing Triple needle 130/705 H-DRI Needle distance 3.0 Special needles are available at your BERNINA dealer. 030866.51.04_0401_a185_EN... - Page 78 Needle, thread, fabric feed Feed-dog and fabric feed Feed-dog and stitch length are short. The fabric moves under the foot quite slowly, With each stitch the feed-dog moves forward by one step. even at full sewing speed. Buttonholes, satin stitch and The length of this step is determined by the stitch length some decorative stitches are sewn with a very short stitch selected.
-
Page 79: Cleaning And Maintenance
Caution: Please note that a defective CFL sewing light must ONLY be replaced by an authorized technician. The sewing computer must be brought to an authorized BERNINA dealer! Please refer to the safety instructions! 030866.51.04_0401_a185_EN... -
Page 80: Troubleshooting
· use the correct spool disc · machine has been standing in a cold room · stitch plate or hook tip damaged – take your machine · bobbin winder engaged to your BERNINA ® dealer · remnants of thread block the hook system... -
Page 81: Glossary Of Terms
Glossary of terms Glossary of terms check · to preview the contents of a memory bank clr (clear) · remove or restore settings, back to basic settings cursor · on-screen positioning marker (vertical line) · used in memory for marking deletions, insertions, etc. customized ·... - Page 82 Glossary of terms smart · program which saves the stitch and all settings in use during interruptions. Toggle between two stitches. software · computer programs store · save in memory for recall at any time toolbar · a term used for on-screen groups, e.g. functions touch screen ·...
-
Page 83: Index
Index Index · securing end of stitch · sub-division Accessory box · tension Alphabets/numbers 40–41 Embroidery cards 74–75 · alter size Embroidery module · monogram sizes External stitch buttons 23–24 · programming · alphabet button Alphabet programming functions · buttonhole button ·... - Page 84 Index · F (Favorite function) button · Functions, programming 62–63 Maintenance, cleaning · Functions in Setup Memory 42–47 · Motor speed 65–66 · Corrections in memory · Needle position · Deleting memory · Personal program 60–61 · Functions · Return to basic settings 67–68 ·...
- Page 85 Sewing Manual artista 185 030866.51.04_0401_a185_EN...
- Page 86 030866.51.04_0401_a185_EN...
- Page 87 Contents 2–5 Straight stitch, Zig-zag Altered memory 7–11 Practical stitch seams 12, 13 Sewing knits Zippers Long stitch function Basting stitch Blind hem 18, 19 Elastic, cord Bartack program 21–28 Buttonholes Button sew-on program Eyelets 31–34 Mending/darning Decorative stitches 36–38 Quilt stitches Decorative stitches combined with functions 40–42...
-
Page 88: Straight Stitch
Straight stitch Straight stitch Stitch: Straight Stitch No. 1 Needle: size and type suitable for the fabric selected Thread: cotton or polyester Feed-dog: up (sewing position) Presser foot: Reverse pattern foot No. 1C Straight stitch · the machine is ready to sew as soon as it is turned on ·... - Page 89 Straight stitch Securing stitch Stitch: Securing stitch No. 5 Needle: size and type suitable for the fabric selected Thread: cotton or polyester Feed-dog: up (sewing position) Presser foot: Reverse pattern foot No. 1C Securing stitch · for all fabrics · secures beginning and end of seam ·...
- Page 90 Straight stitch Edge stitching Stitch: Straight Stitch No. 1 Needle: size and type suitable for the fabric selected Thread: cotton, polyester, or cordonnet (topstitching) Feed-dog: up (sewing position) Presser foot: Reverse pattern foot No. 1C or Blindstitch Foot No. 5 or Edgestitch Foot No.10/10C (optional accessory) Narrow edge stitching Needle position...
- Page 91 Zig-zag Zig-zag stitch Stitch: Zig-zag No. 2 Needle: size and type suitable for the fabric selected Thread: cotton or polyester Feed-dog: up (sewing position) Presser foot: Reverse pattern foot No. 1C Zig-zag applications · for all fabric types · for finishing raw edges ·...
- Page 92 Personal (altered) Memory Temporary Altered Memory Stitch: Any selected stitch Needle: size and type suitable for the fabric selected Thread: cotton or polyester Feed-dog: up (sewing position) Presser foot: Reverse pattern foot No. 1C Temporary Altered Memory · for all stitches and fabrics ·...
- Page 93 Practical stitch seams Practical stitch seams Open seams Seams which are pressed open · seam allowance width as wide as desired · seam lies flat · seam does not stretch Suggested stitches: · straight, narrow zigzag, super stretch, and triple straight stitch Application: ·...
- Page 94 Practical stitch seams Triple Straight Stitch seam Stitch: Triple Straight Stitch No. 6 Needle: 80–90 universal or jeans Thread: polyester Feed-dog: up (sewing position) Presser foot: Reverse pattern foot No. 1C Open seam · durable seam for firm and densely woven fabrics such as denim and corduroy ·...
- Page 95 Practical stitch seams Vari-overlock seam Stitch: Vari-overlock No. 3 Needle: size and type suitable for the fabric selected Thread: cotton or polyester Feed-dog: up (sewing position) Presser foot: Overlock foot No. 2A Closed seam · stretchy seam in fine, soft knits such as silk jersey and interlock Sewing ·...
-
Page 96: Flat Joining Seam
Practical stitch seams Stretch overlock seam/Reinforced overlock seam Stitch: Stretch Overlock No. 13 or Reinforced Overlock No. 19 Needle: universal, ballpoint, or stretch as needed Thread: cotton or polyester Feed-dog: up (sewing position) Presser foot: Reverse pattern foot No. 1C Closed seam ·... - Page 97 Practical stitch hems Hems with practical stitches Preparation · fold and press hem; baste if desired Sewing · sew hem at desired depth (right side) · trim excess fabric (wrong side) Visible hem with Jersey stitch Stitch: Jersey stitch No. 14 Needle: universal, ballpoint, or stretch as needed Thread:...
-
Page 98: Sewing Knits
Sewing knits Sewing knits Important tips for sewing knit fabrics Start with a new needle · blunt needles can damage knits Use a stretch needle (130/705 H-S) if necessary · the needle point slides easily between the fibers Use a fine sewing thread ·... - Page 99 Sewing knits Ribbing with overlock seam Stitch: Vari-overlock No. 3 Needle: size and type suitable for the fabric selected Thread: cotton or polyester Feed-dog: up (sewing position) Presser foot: Overlock foot No. 2A Ribbing with overlock seam · for all fine cotton, synthetic and mixed fiber knits Preparation ·...
- Page 100 Zippers Zippers Stitch: Straight stitch No. 1 Needle: size and type suitable for the type of fabric selected Thread: cotton or polyester Feed-dog: up (sewing position) Presser foot: Zipper foot No. 4 Needle position: far right or far left Preparation: ·...
- Page 101 Long stitch Long stitch function This function works with the straight stitch to produce a longer than usual stitch. The machine sews every second stitch when the Long stitch function is activated. The longest stitch possible is 10 mm when the stitch length is set at 5mm. For decorative top stitching, the Long stitch function can be combined with Triple Straight stitch.
-
Page 102: Basting Stitch
Basting stitch Basting stitch This feature is a stitch rather than a function (such as the long stitch). When this stitch (No. 21) is selected, the machine stitches a straight stitch, sewing every fourth one. The longest stitch possible is 20 mm when the stitch length is set at 5mm. -
Page 103: Blind Hem
Blind hem Blind hem Stitch: Blindstitch No. 9 Needle: size and type suitable for the fabric selected Thread: cotton, polyester, or silk Feed-dog: up (sewing position) Presser foot: Blindstitch foot No. 5 Blind hem · for invisible hems in medium to heavy cotton, wool and mixed fiber fabrics Preparation ·... - Page 104 Elastic, cord Sewing on narrow elastic with Universal stitch Stitch: Universal stitch No. 15 Stitch width: depends on width of elastic Needle: type and size to suit the fabric selected Thread: cotton or polyester Feed-dog: up (sewing position) Presser foot: Reverse pattern foot No.
- Page 105 Elastic, cord Sewing on wide elastic Stitch: Running stitch No. 4 or Sewn-out Zig-zag No. 16 or Lycra stitch No. 17 Stitch length: adjust to suit elastic Needle: size and type to suit the fabric selected Thread: cotton or polyester Feed-dog: up (sewing position) Presser foot:...
- Page 106 Bar tack program Bartack program Stitch: Bartack program No. 24 or Buttonhole bartack No. 25 Needle: size and type to suit the fabric selected Thread: cotton, polyester, or rayon Feed-dog: up (sewing position) Presser foot: Reverse pattern foot No. 1C Bartack program ·...
- Page 107 Buttonholes Important information on buttonholes Thread tension · the tension is set automatically when a buttonhole is selected · the upper tension is slightly looser than normal · this gives a slightly rounded appearance to the beads, making the buttonhole more attractive Manual buttonholes ·...
- Page 108 Buttonholes Balance for keyhole and round buttonholes · any balance alterations affect both beads differently (see picture for stitch counter buttonhole) · the keyhole or eye is balanced as follows: if keyhole is distorted to the right (picture A): · use the "up” arrow to correct it if keyhole is distorted to the left (picture B): ·...
- Page 109 Buttonholes Hooking the cord in the automatic buttonhole foot No. 3A · insert the needle at the beginning of the buttonhole · raise the presser foot · guide the cord under the foot to the right · hook the cord over the pin at the back of the foot ·...
- Page 110 Buttonholes Straight stitch buttonholes Straight stitch buttonholes are useful as a foundation for satin stitched buttonholes on soft and loosely woven fabrics that fray easily. The buttonhole beads and bartacks of the second (satin stitched) buttonhole will cover the straight stitching. They are also good for stitching bound buttonholes and reinforcing buttonhole openings on leather, vinyl, and felt.
- Page 111 Buttonholes Automatic buttonholes (all types) Both beads are sewn in the same direction. Buttonhole length = buttonhole opening in mm Stretch buttonholes are particularly effective on all knit fabrics because the double overlock stitch used for the beads stretch with the fabric while keeping its shape. Note: The automatic buttonhole foot 3A must lie perfectly flat on the fabric.
- Page 112 Buttonholes Automatic round, keyhole and hand-look buttonholes Both beads are sewn in the same direction. Buttonhole length = buttonhole opening in mm Stitch: Round buttonholes 54+55, and keyhole buttonholes 56–58 and Handlook buttonhole #63 Needle: size and type suitable for the fabric selected Thread: cotton or polyester Feed-dog:...
- Page 113 Buttonholes Stitch counter buttonholes for all buttonhole types (can not be saved in memory) The first (left) bead is sewn forwards, the second (right) bead is sewn in reverse. Stitch: Buttonholes (all types) Needle: size and type suitable for the fabric selected Thread: cotton or polyester Feed-dog:...
- Page 114 Buttonholes Manual 4/6-step buttonholes (all types) Sewing buttonholes manually is ideal if you only need to sew one; also for repairing existing buttonholes. The number of steps depends on the type of buttonhole. A manually sewn buttonhole cannot be saved. Stitch: any buttonhole Needle:...
- Page 115 Button sewing-on program Button sewing-on program Stitch: Button sew-on program No. 60 Stitch width: depends on the distance between the holes Needle: size and type suitable for the fabric selected Thread: cotton or polyester Feed-dog: down (darning position) Presser foot: Button sew-on foot No.
- Page 116 Eyelets Zigzag Eyelets Stitch: Zig-zag Eyelet No. 61 Needle: size and type suitable for the fabric selected Thread: cotton, polyester, or rayon Feed-dog: up (sewing position) Presser foot: Reverse pattern foot No. 1C Zig-zag Eyelet · ideal opening for cords and narrow ribbons ·...
- Page 117 Darning, mending Elastic Edges Stitch: Zig-zag stitch No. 2 Stitch width: approximately 5mm Stitch length: 1mm – 1.5mm Needle: size and type suitable for the fabric selected Thread: cotton or polyester Feed-dog: up (sewing position) Presser foot: Reverse pattern foot No. 1C Elastic edges ·...
- Page 118 Darning, mending Reinforced edges on woven fabrics Stitch: Honeycomb stitch No. 8 or Running stitch No. 4 Needle: size and type suitable for the fabric selected Thread: lightweight darning thread Feed-dog: up (sewing position) Presser foot: Reverse pattern foot No. 1C Reinforcing edges ·...
-
Page 119: Automatic Darning
Darning Automatic darning Quick darning of holes or worn areas Stitch: Simple Darning Program No. 22 or Reinforced Darning Program No. 23 Needle: size and type suitable for the fabric selected Thread: lightweight darning thread Feed-dog: up (sewing position) Presser foot: Automatic buttonhole foot No. -
Page 120: Manual Darning
Darning Manual darning Stitch: Straight stitch No. 1 Needle: size and type suitable for the fabric selected Thread: lightweight darning thread Feed-dog: down (darning position) Presser foot: Darning foot No. 9 (optional accessory) Darning holes or worn areas · replaces threads with the lengthwise and the crosswise grains in all fabrics Preparation ·... -
Page 121: Decorative Stitches
Decorative stitches Decorative stitches Stitch: 9 mm wide decorative stitches Needle: embroidery needle in a size suitable for the fabric selected Thread: cotton or rayon embroidery Feed-dog: up (sewing position) Presser foot: Reverse Pattern foot No. 1C or Open Embroidery Foot No. 20C Embroidery foot No. - Page 122 Quilt stitches Hand-look quilt stitch Stitch: Quilt stitches No. 328, 346–350 Needle: size and type suitable for the fabric selected Upper thread: monofilament Bobbin thread: 30 weight, 2 ply cotton Feed-dog: up (sewing position) Presser foot: Reverse pattern foot No. 1C or Walking foot No.
-
Page 123: Decorative Quilt Stitches
Quilt stitches Decorative quilt stitches Stitch: Quilt stitches Nos. 326–338, 351–353 Needle: size and type suitable for the fabric selected Thread: cotton or rayon embroidery Feed-dog: up (sewing position) Presser foot: Reverse pattern foot No. 1C Straight stitch No. 326 ·... - Page 124 Quilt stitches Freehand quilting Stitch: Straight stitch No. 1 or No. 325 Quilting straight sitch or No. 326 Piecing stitch/Straight stitch Needle: size and type suitable for the fabric selected Thread: cotton or monofilament Feed-dog: down (darning position) Presser foot: Darning foot No.
- Page 125 Combining decorative stitches with functions Using decorative stitches with functions Stitch: 9 mm decorative stitches Needle: size and type suitable for the fabric selected Thread: cotton or rayon embroidery Feed-dog: up (sewing position) Presser foot: Reverse pattern foot No. 1C or Open Embroidery foot No.
- Page 126 Practical and decorative stitches in memory Practical and decorative stitches in memory · the memory capacity is 1023 individual stitch patterns · the memory has 255 banks · each bank can be sub-divided as desired · most practical and decorative stitches as well as letters and numbers can be combined, programmed, and saved in memory ·...
- Page 127 Practical and decorative stitches in memory Stitch combination as single repeat · select a memory bank following the directions on the previous page · touch stitch 409 one time · touch stitch 616 two times · on the toolbar, activate Pattern repeat 2 x ·...
- Page 128 · select a memory bank following the directions above · press the external alphabet button · touch the block letter alphabet · touch the appropriate letters to spell “BERNINA” · on the toolbar, activate Pattern repeat 1 x · begin stitching; the letters will continuously stitch, automatically stopping after the “A”...
- Page 129 16 directions 16 direction sewing Stitch: Straight stitch No.39 or Zig-zag No. 40 Needle: size and type suitable for the fabric selected Thread: cotton or polyester Feed-dog: up (sewing position) Presser foot: Sideways motion foot No. 40C 16 directional sewing ·...
- Page 130 16 directions Connecting stitch patterns Stitch: Straight stitch No. 39 Function: Long stitch Needle: size and type suitable for the fabric selected Thread: cotton, polyester, or rayon Feed-dog: up (sewing position) Presser foot: Sideways motion foot No. 40C 16 direction straight stitch as connecting threads ·...
- Page 131 4 directions 4 directional sewing Stitch: Stitches No. 41–48 Needle: size and type suitable for the fabric selected Thread: cotton or polyester Feed-dog: up (sewing position) Presser foot: Sideways motion foot no. 40C Automatic sewing in 4 directions · sew in 4 directions without turning the fabric ·...
- Page 132 Sideways motion stitches Sideways motion stitches – Outline Designs Stitch: Sideways motion stitches/monograms Needle: size and type suitable for the fabric selected Thread: cotton or rayon embroidery Feed-dog: up (sewing position) Presser foot: Sideways motion foot No. 40C Sideways motion stitches ·...
- Page 133 Sideways motion stitches External button · press the external Decorative stitch button · press the external Alphabet button for monograms Screen · select any of the motifs marked with crossed arrows · or select monograms Sewing · using the template mark the beginning of the stitch on the fabric ·...
- Page 134 Sideways motion stitches Sideways motion stitches in memory Sideways motion stitches in memory · all sideways motion stitches and monograms can be programmed and saved in memory; however, they cannot be sewn in sequence like decorative stitches · the beginning and ending points of sideways motion stitches vary considerably and are sometimes within the stitch itself Combining sideways motion stitches and monograms...
- Page 135 Balance Balance All stitches are tested and adjusted before the machine leaves the factory; however, shipping and transporting can affect the setting of the balance function. Different fabrics, threads and stabilizers can distort the stitch patterns so that they are too long (do not close properly) or too short (have a condensed appearance).
- Page 136 Balance Balance for sideways motion stitches Fabric, thread stabilizers, and interfacings can affect sideways motion stitches so correcting with balance will sometimes be necessary. Balance · select sideways motion stitch or motif · touch b to activate balance · balance screen appears ·...
- Page 137 Index Index 16 directional sewing 43–44 4 directional sewing Honeycomb stitch edges Securing stitch (straight stitch) Sewing in 16 directions 43–44 Sewing in 4 directions Sewing knits Auto buttonholes Sideways motion stitches Auto round and keyhole Jersey overlock seam in memory buttonholes Sideways motion stitches 46–47...
- Page 138 030866.51.04_0401_a185_EN...