Table of Contents
Advertisement
Quick Links
- 1 Safety Precautions
- 2 Connecting the Cables and Getting Started
- 3 Simple Connection
- 4 Installing the Usb Driver on the Windows os
- 5 Setting the Network-Access Parameters
- 6 Changing the Administrator Password Used for Logging in to the Web
- 7 Indicators
- 8 Technical Specifications
- Download this manual
Advertisement
Table of Contents

Related Manuals for Huawei SmartAX MT882a


Summary of Contents for Huawei SmartAX MT882a
- Page 1 SmartAX MT882a ADSL CPE User Guide HUAWEI TECHNOLOGIES CO., LTD.
- Page 2 SmartAX MT882a ADSL CPE V100R001 User Guide Issue Date 2008-12-24 Part Number 103130...
- Page 3 Copyright © Huawei Technologies Co., Ltd. 2008. All rights reserved. No part of this document may be reproduced or transmitted in any form or by any means without prior written consent of Huawei Technologies Co., Ltd. Trademarks and Permissions and other Huawei trademarks are trademarks of Huawei Technologies Co., Ltd.
-
Page 4: Table Of Contents
MT882a ......................15 4.2 Accessing the Network Through the PPP Dial-Up Software on the Computer ...........................16 5 Configuring the MT882a ................ 17 5.1 Changing the Administrator Password Used for Logging In to the Web Configuration Page ....................17 5.2 Changing the IP Address................18... - Page 5 6 FAQs......................18 7 Appendix....................22 7.1 Indicators....................22 7.2 Interfaces and Buttons................22 7.3 Default Settings..................23 7.4 Technical Specifications................23...
-
Page 6: Safety Precautions
1 Safety Precautions Thank you for purchasing SmartAX MT882a ADSL CPE (hereinafter referred to as the MT882a). For safety purposes, carefully read through these safety precautions and observe them during operation. Basic Requirements Keep the device dry during storage, transportation, and operation of the device. -
Page 7: Operation Requirements
Operation Requirements Do not allow children to play with the device or accessories. Swallowing the accessories may be fatal. Use the accessories such as the power adaptor provided or authorized only by the manufacturer. Make sure that the device does not get wet. If water gets into the device, disconnect the power supply immediately and unplug all the cables connected to the device. - Page 8 After the MT882a is used for a certain period of time, the cover will be heated, which will not affect the function of the MT882a.
-
Page 9: Connecting The Cables And Getting Started
2 Connecting the Cables and Getting Started 2.1 Simple Connection If your telephone line is used for the broadband network access only and you do not need to use a telephone, take the following figure as a reference for connecting the cables. -
Page 10: Connecting One Telephone
2.2 Connecting One Telephone If your telephone line is used for both the broadband network access and a telephone connection, take the following figure as a reference for connecting the cables. POWER RESET ADSL 1 Telephone jack on the wall 2 Splitter 3 Telephone 4 Computer... -
Page 11: Connecting Multiple Telephones
8 Power adapter 2.4 Getting Started Press the power button on the top of the MT882a to power on the MT882a. After you power on the MT882a, the ADSL indicator blinks (for less than three minutes), indicating that the MT882a is being activated. Later, the ADSL indicator... -
Page 12: Installing The Usb Driver
MT882a, both PCs can access the Internet. If you hope to connect your PC through the USB port to the MT882a, you need to install the USB driver on the PC. The USB driver of the MT882a supports the following... - Page 13 The usb_driver_for_linux directory stores the source code file of the Linux OS driver. Step 5 Add the following two configuration command lines at the end of the rc.local file in the /etc/rc.d directory. insmod /usr/local/lib/trendchip/trendchip.o &>/dev/null & ifconfig eth1 192.168.1.2 up &>/dev/null & After you add the two configuration command lines, the system automatically loads the USB driver during start.
-
Page 14: Installing The Usb Driver On The Mac Os
YPE=Ethernet Step 9 Restart the PC. Step 10 Connect the MT882a through a USB cable to the PC, and then power on the MT882a. 3.2 Installing the USB Driver on the MAC OS To install the USB driver on the MAC OS, perform the following steps:... - Page 15 Step 3 Click Next. The Authenticate dialog box is displayed. Step 4 Enter the OS administrator account and the password, and then click OK. Step 5 Click Accept to start the installation procedure.
-
Page 16: Installing The Usb Driver On The Windows Os
Step 7 Select Restart now and click Finish to restart the PC. Step 8 Connect the MT882a through a USB cable to the PC, and then power on the MT882a. 3.3 Installing the USB Driver on the Windows To install the USB driver on the Windows OS, perform the following steps:... - Page 17 Step 3 In the Choose Setup Language dialog box, select a language such as English, and then click Next. Step 4 Click Next.
- Page 18 Step 5 Select Typical, and then click Next. Step 6 Click Next to start the installation procedure. Wait for the installer to complete the installation. A dialog box is displayed, asking you to connect the terminal.
- Page 19 Step 7 Connect the MT882a through a USB cable to the PC, and then power on the MT882a. Wait for the MT882a to start. The Hardware Installation dialog box is displayed. Step 8 Click Continue Anyway to continue with the installation.
-
Page 20: Setting The Network-Access Parameters
4.1 Accessing the Network Through the Embedded PPP Dial-Up Software of the MT882a If you select this method for accessing the network, the MT882a starts to set up dial-up connection automatically after the startup. You can access the network after you power on the computer. -
Page 21: Accessing The Network Through The Ppp Dial-Up Software On The Computer
For details, refer to the procedure for enabling the embedded dial-up function described in Step 2 in section 4.1 "Accessing the Network Through the Embedded PPP Dial-Up Software of the MT882a." Select Bridge from the Mode drop-down combo box. Step 2 Install and configure the PPP dial-up software on the computer. -
Page 22: Configuring The Mt882A
After the network connection is created, to access the network, double-click the icon for the dial-up connection, and then click Connect in the displayed dialog box. 5 Configuring the MT882a 5.1 Changing the Administrator Password Used for Logging In to the Web Configuration Page For safety reasons or to make the password easy to remember, you can change the log-in administrator password after logging in to the Web configuration page. -
Page 23: Changing The Ip Address
Internet Explorer and enter the new IP address in the address bar Ensure that the IP address of the computer is in the same network segment as that of the IP address of the MT882a so that the computer can access the Web configuration page. 5.3 Restoring Default Settings... - Page 24 1. Ensure that the power switch of the terminal is turned on. 2. Ensure that electricity comes from the socket and that the input power of the socket meets the requirements described on the label of the terminal power adapter. If the voltage is unsteady, for example, if the voltage is too high or too low, do not use the terminal.
- Page 25 The user name and the user password are provided by your network operator. Step 6 Check whether you can use the PPP dialing software to dial successfully. If you cannot use the PPP dialing software to dial successfully, perform further checks as follows: 1.
- Page 26 If the problem persists, contact your service provider. After a broadband terminal is installed, does Internet access degrade call quality or do telephone calls lower the Internet access rate? No. The terminal uses the frequency division multiplexing (FDM) and splitter technologies to separate voice signals from data signals.
-
Page 27: Appendix
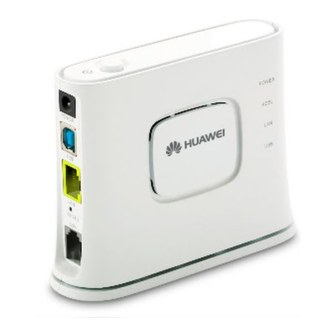
7 Appendix 7.1 Indicators Indicator Status Description POWER The MT882a is powered on. The MT882a is powered off. ADSL Blinking The MT882a is being activated. The MT882a is activated. The MT882a is powered off. Data is being transmitted through the Ethernet Blinking interface. -
Page 28: Default Settings
Interface/Button Description It is the power button on top of the MT882a and is used to power on or power off the MT882a. 7.3 Default Settings Parameter Setting IP address of the LAN interface 192.168.1.1 Subnet mask of the LAN 255.255.255.0... - Page 29 Item Specification Dimensions (W × D × H) 118.4 mm × 90.3 mm × 40.4 mm Weight < 210 g...
- Page 30 HUAWEI TECHNOLOGIES CO., LTD. Huawei Industrial Base Bantian, Longgang Shenzhen 518129 People's Republic of China www.huawei.com Part Number: 103130...