Table of Contents
Advertisement
Advertisement
Table of Contents

Related Manuals for Optoma DC300


Summary of Contents for Optoma DC300
-
Page 1: User Manual
DC300 Document Camera USER MANUAL... - Page 2 Please read this manual carefully before operating the document camera and keep it for reference. PRECAUTIONS NOTICE: PLEASE READ CAREFULLY BEFORE USE Use the document camera under the rated electric conditions. Do not place the document camera on an unstable surface as it may fall, causing injury or damage.
-
Page 3: Table Of Contents
USER MANUAL ................1 1. PARTS IDENTIFICATION ............4 2. CONTROL PANEL ..............5 3. INPUTS AND OUTPUTS............5 4. REMOTE CONTROL..............6 5. CONNECTIONS ................. 7 5.1. COMPUTER CONNECTION .................8 5.2. VGA OUTPUT CONNECTION................8 6. COMMUNICATE WITH COMPUTER ......... 9 6.1 COMPUTER REQUIREMENTS ................9 6.2 USB CAMERA ......................9 7. -
Page 4: Parts Identification
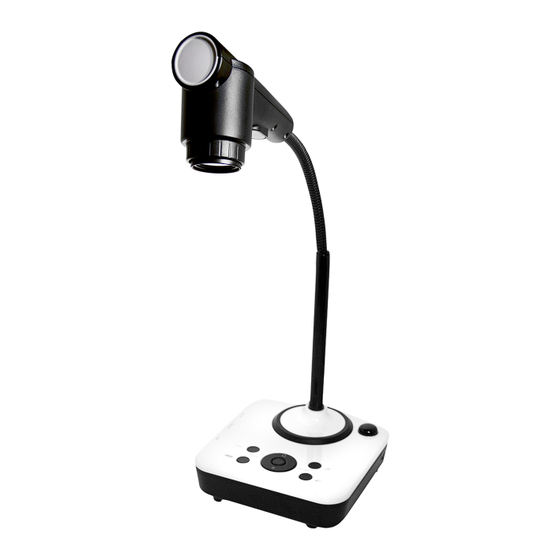
PARTS IDENTIFICATION 1. Camera 2. LED Light 3. Flexible Camera Arm 4. IR Receiver for Remote Control 5. Interface Panel (VGA Port, Power Input and USB) 6. Control Panel 7. Kensington Lock... -
Page 5: Control Panel
CONTROL PANEL 1. POWER: Turn on/off the power. 2. LAMP: Turn on/off the LED light. 3. AUTO: Perform auto focus, color adjustment and white balance. 4. FOCUS+/-: Adjust focus manually. 5. BRIGHT+/-: Image brightness control. 6. ZOOM+/-: Control image zoom in and zoom out. 3. -
Page 6: Remote Control
REMOTE CONTROL 1. Power: Power document camera on and off 2. Video: Video mode 3. Home/Directional Key: Home button 4. Lamp: Turn LED light On/Off 5. Save: Capture the image in display 6. Recall: Image recall mode enabled, display the saved images 7. - Page 7 10. Rotate: Rotate image 11. Sharp+/-: Image sharpness control 12. Computer: Computer mode 13. SXGA/XGA: Switch the output signal between XGA and SXGA 14. Mirror: Output right-and-left, up-and-down mirror image 15. Page +/-: Saved image page up and down when image recall mode is enabled 16.
-
Page 8: Connections
5. CONNECTIONS 5.1. COMPUTER CONNECTION 5.2. VGA OUTPUT CONNECTION... -
Page 9: Communicate With Computer
6. COMMUNICATING WITH COMPUTER 6.1 COMPUTER REQUIREMENTS Minimum PC and software requirements: Operating system: Windows XP CPU: Pentium 4 1.8GHz Physical memory: 512M Video memory: 64M 6.2 USB FUNCTION SOFTWARE INSTALLATION Click “Next” when dialogue box appears to run the software installation package:... - Page 10 Read the terms, select "I accept the terms in the license agreement" and click "Next" as shown below: When the following dialogue box appears, click "Next":...
- Page 11 The default installation directory is Program Files, C: \ Program Files \. Click “Next” to proceed with default installation directory or click “Change” to select a different installation directory: After selecting destination folder, click “OK”.
- Page 12 Then click "Next". Click "Install" to complete installation.
- Page 13 Click "Finish” to complete the installation. Then you will see the following dialogue box, which is an installation package for 2005 C++ environment. If your PC already has this installed, click "No" to exit. Otherwise, click "Yes" to install it.
- Page 14 STARTING SOFTWARE Double click the short cut icon on the desktop to launch the software. IMAGE CAPTURE AND VIDEO RECORDING Left click to capture images. The captured images will be automatically saved into the default destination folder. The path and file name are displayed in software status bar on the bottom of the window as shown below:...
- Page 15 Left click to start recording. While recording, the settings button will be inactive. Detailed information is displayed on the software status bar at the bottom of the window. The video is automatically saved in the default folder or pre-set folder. SETTINGS The captured images and recorded videos will be saved automatically into the Images and Videos folders.
- Page 16 the options of recording video with or without sound as shown below: “The length of video that can be recorded” box displays the longest recording time for videos to be saved in the preset path as shown below: Click “save” to complete setting. IMAGE MODIFICATIONS To begin image modifications, click icon.
- Page 17 Line Clicking icon allows you to create lines within the image. icon allows you to change the setting of the chosen line.
- Page 18 Line Width: Change the width of the line. X, Y: Change the position of the line. Color: Change the color of the line. Width, Height: Change the angle of the line. Rectangles icon allows you to place a rectangle in the image as shown below. icon allows you to change the setting of the chosen rectangle.
- Page 19 Line Width: Change the line width of the rectangle. X, Y: Change the position of the rectangle. Color: Change the line color of the rectangle. Fill Color: Check box to fill color in the rectangle. Width, Height: Change the shape of the rectangle by changing the angle of two adjacent lines of the rectangle.
- Page 20 Line Width: Change the line width of the circle. X, Y: Change the position of the circle. Color: Change the line color of the circle. Fill Color: Check box to fill color in the circle. Width, Height: Change the size of the circle. Freeform icon allows you to place scribbles in the image as shown below.
- Page 21 Line Width: Change the line width of the curve. X, Y: Change the position of the curve. Color: Change the line color of the curve. Graphic Default Setting icon allows you to change the default graphic setting. Deleting Graphic Click to delete the chosen graphic.
-
Page 22: Features
ZOOM IN AND ZOOM OUT DC300 enables you to view items in immense detail with 9x optical zoom combined with 12x seamless digital zoom. The advanced optical system of DC300 features high-speed auto focus capability that ensures quick auto focus when you zoom in and out of any object. -
Page 23: Image Mirror
IMAGE SAVE The DC300 can store up to 12 images in its internal memory. You can recall stored images by pressing one of the numerical buttons on the front panel or remote control. IMAGE RECALL By pressing the “Recall”... -
Page 24: Specification
8. SPECIFICATION Model DC300 Sensor 1/3" CMOS Pixels 2 Megapixels Zoom 9x Optical, 12x Digital Frame Rate Shooting Area Max: 16.5"x11.7", Min: 0.1"x0.1" Focus Auto/Manual Output Resolution XGA, SXGA Resolution (Horizontal) ≥750 TV Lines White Balance Auto/Manual Color Adjustment Brightness Adjustment... -
Page 25: Trouble-Shooting
9. TROUBLE-SHOOTING Symptoms Possible causes/counter-measures No image 1. Power cord is not properly connected. 2. Cables are not properly connected. 3. Power switch is not turned on. 4. The built-in fuse is broken: Change fuse. 5. Change the output resolution. Image bending 1. -
Page 26: Packing List
Contact: Optoma Technology, Inc., 3178 Laurelview Ct., Fremont, CA, Tel: 510-897-8600, For customer service please call: 1-888-887-5001 All Specifications are subject to change without notice. ©2011 Optoma Technology, Inc. All other names mentioned herein are property of their respective owners.
Need help?
Do you have a question about the DC300 and is the answer not in the manual?
Questions and answers