Advertisement
PRE-ASSEMBLY
 Before you start
ALWAYS USE EXTREME CAUTION maintaining this product!
PERFORMANCE USING SUPPLIED HOSES
(1/4IN. HOSE ON INLET) (3FT. GARDEN HOSE ON DISCHARGE)
| Rate of Flow at 3,500 RPM | 48 GPH |
| Rate of Flow at 800 RPM | 42 GPH |
PERFORMANCE USING A HEAVY DUTY GARDEN HOSE ON INLET
(NOT SUPPLIED) AND SUPPLIED 3FT GARDEN HOSE ON DISCHARGE)
| Rate of Flow at 3,500 RPM | 260 GPH |
| Rate of Flow at 800 RPM | 60 GPH |
PRODUCT SPECIFICATIONS
| Maximum Head at 3,500 RPM | 100 ft. |
| Maximum Head at 800 RPM | 32 ft. |
| Priming | Self-Priming up to 3 ft. vertically |
| Lubrication | Factory lubricated for first time use. Lubricate with vegetable oil before each subsequent use |
PLANNING OPERATION
Carefully unpack and inspect each part. Pull oil tube completely out of garden hose. Compare parts with the package contents list. If any part appears missing or damaged, do not operate this product. Contact the customer support team.
TOOLS REQUIRED

NOTE:
If using a garden hose on the suction side of pump, then the hose must be walled and be kept as short as possible. If not, then there is a risk of the hose collapsing and blocking suction. There can be no leaks in the suction line or the pump will not prime.
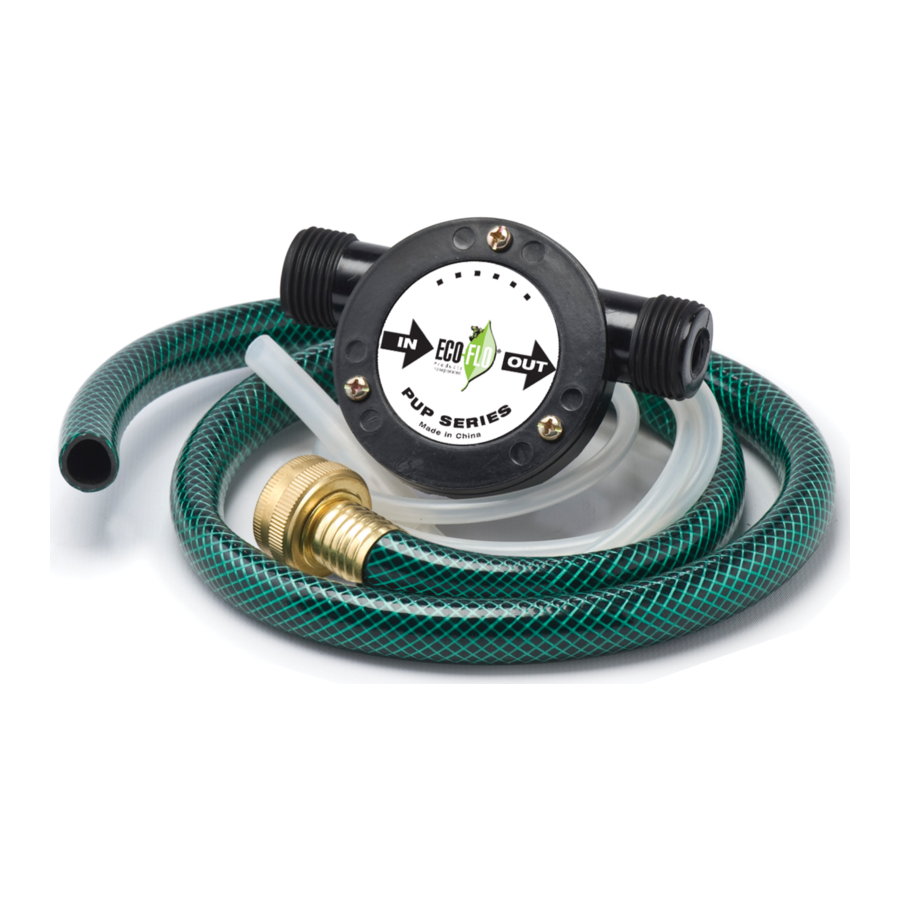
PACKAGE CONTENTS

| PART | DESCRIPTION | REPLACEMENT PART NUMBER | QUANTITY |
| A | Oil tube, 35 in. x 1/4 in. O.D. W/Adapter 3 in. Adapter (3/8 in. O.D., and 1/4 in, I.D.) | 60DRLL005A | 1 |
| B | Pump | 60DRLL001 | 1 |
| C | 3ft. x 1/2in. Discharge garden hose with brass female fitting | 60DRLL006 | 1 |
ASSEMBLY
Preparing to pump motor oil using adapter and tube

Ensure drill is not connected to electrical service as you begin this process.

- Remove the dipstick from the engine/motor from which you plan to remove motor oil.
- Cut at a 60 degree angle one end of tube (A).
- Lubricate the pump impeller by placing several drops of mineral or vegetable oil on the impeller at inlet port (1).
- Place the adapter tube (B) into the inlet port (1) of the pump (C) as far as it will go in.
- Insert the end of the tube (A) with the 60 degree cut into the motor dipstick hole.
- Attach the garden hose (D) to port (2).
- Attach drill pump with tubes and hose to drill.
- Connect drill motor power cord to a 3-wire grounded plug.
To minimize the pump rotating on the drill, firmly grip the drill pump and hold it as you Start the drill.
Ensure motor oil is drawn into the drill pump within 15-20 seconds to avoid damaging the pump. If it does not, check to ensure the tube (A) is firmly inserted in the adapter (B) and that the adapter (B) is firmly installed in pump (C), ensure the tube is not crimped and that the tube is fully inserted in the dipstick hole.

Do not pump oil if debris / metal shavings are present
NOTE: Motor oil should be removed when at room temperature.
Preparing to pump clean water using garden hose connected to pump
Ensure drill is not connected to electrical service as you begin this process.

- Inspect the washer in the inlet hose to make sure it is in good condition and installed in the hose.
- Lubricate the pump impeller by placing several drops of mineral or vegetable oil on the impeller at inlet port (1).
- Connect hose (D) to the port and suction hose to inlet port on pump (C) outlet.
Keep the inlet hose as short as possible
The combined height of the inlet and outlet hose should be no higher than 3 ft. above the water source and/or not more than 25 ft. horizontally from the water source.
- Attach the drill pump with hoses to the drill.
- Connect the drill motor power cord to a 3-wire grounded plug.
To minimize the pump rotating on the drill, firmly grip the drill pump and hold it as you start the drill.
Ensure water is drawn into the drill pump within 15-20 seconds to avoid damaging the pump. If it does not, check to ensure the hose connections are firmly installed to the pump (C) and that the adapter (B) is firmly installed in pump (C), ensure none of the hoses are crimped and that the suction hose is fully inserted in the water source.
NOTE: Water should be removed when it is at room temperature.
If water has suspended solids, a strainer should be installed on hose (D )that is in the water. A piece of door screen tied to end of hose that is in the water would help keep any solids out of the hose.
OPERATION
Preparing for operation
Risk of electrical shock, personal injury or death. Never touch or handle driven pump with wet hands or when standing on a wet surface or in water.
Be sure the drill is always electrically grounded to an acceptable electrical ground.
NOTE: Keep the suction line as short as possible and filled with water.
NOTE: Any air leaks in the suction line will prevent the pump from priming.

- Use the unit within the liquid temperature range of 40°F to 120°F.
- Inspect hoses thoroughly before each use, making sure that all connections are tight and that the hoses are all in good condition.
- Be sure that the inlet line (1) is airtight and submerged in fluid. The inlet (1) and discharge (2) lines should be free of kinks and other flow restrictions.
NOTE: Hoses of shorter lengths, larger diameters, and stiffer walls will result in better performance.
Priming the pump
NOTE: Never operate the impeller dry. Operating it dry for as little as 30 seconds can ruin the pump. The impeller must be oiled to reduce friction or wear.
NOTE: Never operate the pump dry for prolonged periods of time, as this will damage the pump.
NOTE: Use a strainer on the end of the inlet hose, when pumping liquids with small solids to extend pump life.
NOTE: Oil becomes thick in cold weather. Oil must be kept thin for the pump to work properly.

- Wet the impeller located inside the pump with pumped fluid and/or cooking mineral oil before starting the pump. This improves the priming process.
- Start the drill pump. Self-priming should occur within 30 seconds. The pump will selfprime up to an 8 ft. vertical lift. Be sure that the liquid enters the pump within 15 to 20 seconds. If not, refer to the assembly instructions and also the Troubleshooting section.
NOTE: Electric drills are not intended to be operated unattended or continuously. Doing either of these can cause the pump and drill to fail.
- If pump fails to prime, ensure that there are no air leaks or obstructions in suction line.
- If front cover is removed for impeller maintenance, be sure to clean and lubricate the shaft seal, impeller and O-ring before reassembly
NOTE: Do not overtighten screws or pump housing damage can occur!
MAINTENANCE
Normal use of the pump causes it to wear. To extend pump life:
- Lubricate the impeller with vegetable oil before each use by placing a few drops in pump inlet (port 1)
- Always flush with clear water after using
- Keep the suction hose/tubing as short as possible and prime the hose/tubing
- (fill with liquid) when possible before starting the pump
- Do not use a suction hose that can collapse due to vacuum pressure
- If front cover is removed for impeller maintenance, be sure to clean and lubricate the shaft seal, impeller and O-ring before reassembly.
SERVICE PARTS

| NUMBER | DESCRIPTION | PART NUMBER | QUANTITY |
| 1 | Impeller | EFPUP6301 | 1 |
| 2 | O-ring | EFPUP6302 | 1 |
TROUBLESHOOTING
| Problem | Probable Cause | Corrective Action |
| The pump will not prime | Air is leaking into the inlet hose or connection | Replace the washer in the hose fitting or replace the hose |
| The inlet hose is clogged | Clean or replace the hose | |
| The hose collapsed due to inlet line suction on a flat surface | Use quality, heavy duty, thick-walled hose on suction side of pump Notch the end of the inlet line where it meets the flat surface, use suction rated hose | |
| The impeller, body, and end cover are worn from pumping abrasives | Replace the pump | |
| The impeller blades are missing or charred from dry running | Replace the pump | |
| Air is leaking in at the seal or O-ring | Incrementally snug the screws on the front cover plate to seal the O-ring. Disassemble, clean and lubricate all components and seals. If O-ring or Shaft seal is damaged, replace the pump | |
| The shaft turns but the impeller does not turn | Replace the pump | |
| Drill speed is too slow | Increase drill speed | |
| There is a low flow rate | The drill is running too slowly | Increase the drill speed. Minimum drill speed for acceptable operation is 800 RPM. Optimal drill speed is 3500 RPM |
| There is a restriction in the inlet or discharge hoses | Clean or replace the hoses. Check hoses to eliminate any sharp bends or kinks in the lines | |
| The suction hose is too long, the diameter is too small and/or the pump is too high above the liquid surface | Use appropriate hose and pumping setup to maximize performance | |
| Liquid is leaking where the shaft enters the pump body | The lip seal is damaged | Replace the pump |
WARRANTY
Contact the Customer Service Team at 1-877-326-3561
GENERAL SAFETY
Important Safety Instructions
Carefully read and follow all safety instructions in this manual and on pump.
SAVE THESE INSTRUCTIONS – This manual contains important instructions that should be followed during installation, operation, and maintenance of the product.
Save this manual for future reference.
Safety Labels
This is the safety alert symbol. When you see this symbol on your pump or in this manual, look for one of the following signal words and be alert to the potential for personal injury!

Indicates a hazard which, if not avoided, will result in death or serious injury.
Indicates a hazard which, if not avoided, could result in death or serious injury.
Indicates a hazard which, if not avoided, could result in minor or moderate injury.
NOTICE
indicates practices not related to personal injury. Keep safety labels in good condition. Replace missing or damaged safety labels.
General Safety
Risk of burns. Do not touch an operating motor. Motors are designed to operate at high temperatures. To avoid burns when servicing pump, allow it to cool for 20 minutes after shut-down before handling.
Do not allow pump or any system component to freeze. To do so will void warranty.
Pump water only with this pump.
Periodically inspect pump and system components.
Wear safety glasses at all times when working on pumps.
Risk of explosion. Pump body may explode if used as a booster pump.
NOTE: Not recommended to use for drinking water.
Documents / Resources
References
Download manual
Here you can download full pdf version of manual, it may contain additional safety instructions, warranty information, FCC rules, etc.
Advertisement


Need help?
Do you have a question about the PUP62 and is the answer not in the manual?
Questions and answers