Advertisement
PARTS AND INSTALLATION DRAWINGS

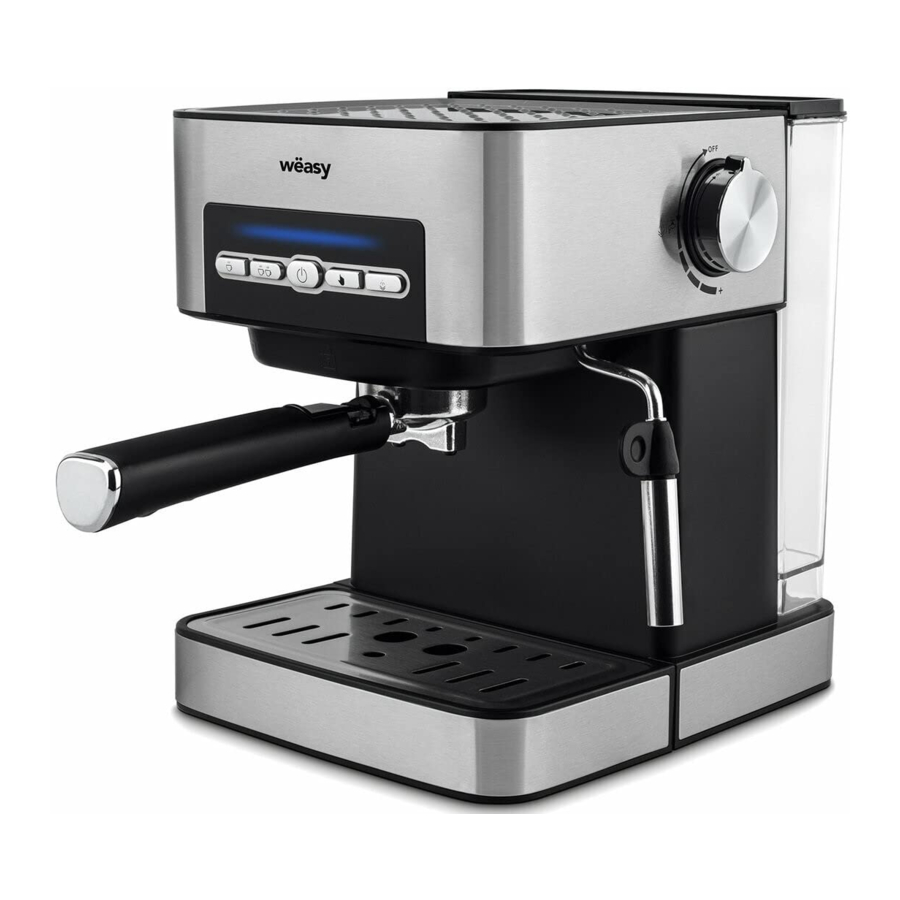
- button for one cup
- Button for two cups
- On/off button
- Manual control button
- steam on/off
- Cup plate
- drip tray
- tank cover
- tank
- steam knob
- main body
- steam pipe component
- steam jacket
- spoon
- Funnel handle
- hook(buckle when pour wasted coffee powder residue)
- funnel
- Filter for 2 cups
Preparation for first use / cold machine state
- pour water into the water tank, and the water level should not exceed the "Max" mark in the water tank.
- plug in the power supply, and then press the 'on/off button', the upper indicator light turns blue flicker at this time. Then you press the 'manual control button' and the water pump will start to work, it will pump the water from water tank into the machine for heating.
- The machine starts to warm up. At this time, the coffee switch indicator lights will fliker. To wait untill the light turns to continuous illuminates from fliker, the pre-heat is finished, it will take about 2 minutes.
- Then press "one cup button",the machine will flow hot waters out, you can use the water to wash the filter or cups.
Start to make coffee
- Place the filter into the funnel.
- When the machine is preheating, you can fill the coffee powder into the filter and then flat and tight the powder by the tail of spoon at the mean time. (the coffee powder can not be too coarse or too thin)You can also clean the edge of filter with a brush or your hand
![]()
- Insert and lock the funnel as indicated, then place the coffee cup under the funne
- Press the 'one cup button',the machine begins to flow out one cup of coffee (or press '2 cups button', ,the machine begins to flow out two cups of coffee. or press 'manual control button',then the machine begins to flow out the coffee, when it reach to the capacity which you want, press the 'manual control button' again, the machine will stop flowing out the coffee.)

Steam and frothing function
- Press the 'steam on/off button', the upper indicator light turns red flicker. To wait untill the light turns to continuous illuminates from fliker, the pre-heat is finish.
- Pour the 'whole milk' into the 1/3 of the frothing cup and insert the steam nozzle into 1CM from surface, then turn the steam knob slowly until steam starts to blow out. (Note: the degree of steam can be adjusted according to the proficiency of the individual. We suggest to release a little bit moisture before you froth the milk.)
- When the temperature of milk reaches to about 75 degrees(and the milk bubble begins to expand), you can stop the steam by turnning the steam knob to "OFF" position and press the 'steam button'. The indicator light will turn to blue color.(Or you can also press 'on/off button' to turn off the machine)
Remark: after you frothed the milk, to clean the milk on the surface of the steam nozzle with a damp cloth duly, and then spray steam to prevent the hole inside the nozzel will be blocked after the milk was dried.
Hot water function
- Press the 'on/off button', the upper indicator light turns to flicker with blue color, it means the machine is pre-heating. To wait untill the light turns to continuous illuminates from fliker, the pre-heat is finish. Turn the knob to 'on' position untill there's water is flow out from the steam nozzle. The water can use for drinking, cleaning or warming the cups.
- After that, you can turn the knob to 'off' position, then press'on/off button'again to turn off the machine.
CLEAN AND MAINTENANCE
- Cut off power source and let the coffee maker cool down completely before cleaning.
- Clean housing of coffee maker with moisture-proof sponge often and clean water tank, drip tray and removable shelf regularly then dry them. Note: Do not clean with alcohol or solvent cleanser. Never immerse the housing in water for cleaning.
- Detach the metal funnel through turn it anticlockwise, get rid of coffee residue inside, then you can clean it with cleanser, but at last you must rinse with clear water.
- Clean all the attachments in the water and dry thoroughly.
CLEANING MINERAL DEPOSITS
- To make sure your coffee maker operating efficiently, internal piping is cleanly and the peak flavor of coffee, you should clean away the mineral deposits left every 2-3 months.
- Fill the tank with water and descaler to the MAX level (the scale of water and descaler is 4:1; the detail refers to the instruction of descaler. Please use "household descaler", you can use the citric acid (obtainable from chemist's or drug stores) instead of the descaler (the one hundred parts of water and three parts of citric acid).
- According to the program of pre-heating, put the metal funnel (no coffee powder in it) and carafe (jug) in place. Brewing water per "PRE-HEATING".
- Press the 'on/off button', the upper indicator light turns to flicker with blue color, it means the machine is pre-heating. To wait untill the light turns to continuous illuminates from fliker, the pre-heat is finish. Turn the knob to 'on' position untill there's water is flow out from the steam nozzle.
- press the 'on/off button', the upper indicator light turns blue flicker at this time. Then you press the 'manual control button' and the water pump will start to work, it will pump the water from water tank into the machine for heating.
- The machine starts to warm up. At this time, the coffee switch indicator lights will fliker. To wait untill the light turns to continuous illuminates from fliker, the pre-heat is finished, it will take about 2 minutes
- Then press "one cup button",the machine will flow hot waters out, you can use the water to wash the filter or cups.
TROUBLE SHOOTING
| Symptom | Cause | Corrections |
| No water/no steam |
| Will be adding water into the water tank, Switch on the power switch and coffee switch |
| No lipa | Coffee powder is too thick/not flatten | Change the coffee powder, with pressure pressed powder coffee powder |
| No steam | The steam hole was blocked | Use a small wire to poke the steam holes |
| Coffee maker can not work any more, hot water & steam lamp are on light, another two lamps not on | Not closed steam knob | closed steam knob |
| Coffee more or less | Coffee powder loading is too much or less | 1 cup 1 spoon with flatten according to the standard amount of filling, coffee powder can't be too thick or too thin, too thick coffee powder can not be complete extraction, too fine affect the quantity of coffee |
| The steam cannot froth. | Is it whole milk? | Use whole milk. |
| The steam ready indicator is not illuminated, then begins to frothing milk. | Only after the steam ready indicator is illuminated, the steam can be used to froth. |
WARRANTY
The warranty period for our products is 2 years, unless otherwise stated, starting from the date of initial purchase or the date of delivery.
If you have any problems or questions, you can easily access our help pages, troubleshooting tips, FAQ, and user manuals on our service site: https://sav.hkoenig.com.
The accessories supplied with the device are also excluded from the warranty. They cannot be exchanged or refunded. However, some accessories can be purchased directly through our website: https://sav.hkoenig.com/.
IMPORTANT SAFEGUARDS
Before using the electrical appliance, the following basic precautions should always be followed including the following:
- Before using checks that the voltage of wall outlet corresponds to coffee maker rating plate.
- The appliance must be earthed.
- Close supervision is necessary when your appliance is being used near children.
- Do not place the coffee maker on hot surface or beside fire, avoid to be damaged.
- Remove plug from wall outlet before cleaning and when not in use. Allow appliance to cool down completely before taking off, attaching components or before cleaning.
- Do not operate any appliance with a damaged cord or plug or after the appliance malfunctions, or is dropped or damaged in any manner. Return appliance to the nearest authorized service facility for examination, repair or electrical or mechanical adjustment.
- The use of accessory which is not recommended by manufacturer may cause injury to persons or damage to appliance.
- Place appliance on flat surface or table, do not hang its power cord over the edge of table or counter.
- Ensure that the power cord does not touch hot surface of appliance.
- Some parts of appliance are hot when operated, so do not touch with hand directly.
- Do not immerse appliance or power cord into water or any other liquids.
- Do not use outdoors.
- Save these instructions booklet for future reference.
- Cleaning and maintenance should not be carried out by children unless they are at least 8 years of age and are supervised by an adult.
- Keep the appliance and its power cord out of reach of children under 8 years of age.
- When using electrical equipment, safety precautions must always be taken to prevent the risk of fire, electric shock and/or injury in the event of misuse.
- Make sure that the voltage rating on the typeplate corresponds to your main voltage of your installation. If this is not the case, contact the dealer and do not connect the unit.
- Never leave the unit unattended while in operation.
- The device must not be used if it has been dropped, it obvious signs of damage are visible or if it has leaks.
- Please keep this document at hand and give it to the future owner in case of transfer of your device.
- Do not operate this appliance if it has a damaged cord or plug, if it is not working properly or if it has been damaged or dropped. If the supply cord is damaged, it must be replaced by the manufacturer or its service agent or a similarly qualified person in order to avoid a hazard.
- This device is not intended for use by persons with reduced capacity on the physical, mental or sensory or lack of experience and knowledge unless he has them was asked to monitor or if they have had instructions on the use of the appliance by a person responsible for their safety. Children should be supervised to ensure they do not play with the device.
- The device is not intended to be operated by external timer means or a remote control system.
- Before cleaning the machine, make sure the machine is unplugged.
- The machine is only used for household and indoor.
- This appliance is intended for use in domestic and similar applications such as
- kitchen areas in shops, offices and other working environments
- farmhouses
- in hotels, motels and other residential environments
- guest rooms.
HOUSEHOLD USE ONLY
Adeva SAS / H.Koenig Europe - 8 rue Marc Seguin - 77290 Mitry Mory - France www.hkoenig.com - sav@hkoenig.com - contact@hkoenig.com - Tél: +33 1 64 67 00 05
Documents / Resources
References
Download manual
Here you can download full pdf version of manual, it may contain additional safety instructions, warranty information, FCC rules, etc.
Advertisement


Need help?
Do you have a question about the kfx32 and is the answer not in the manual?
Questions and answers